background image

A-5

nVIDIA SATA RAID

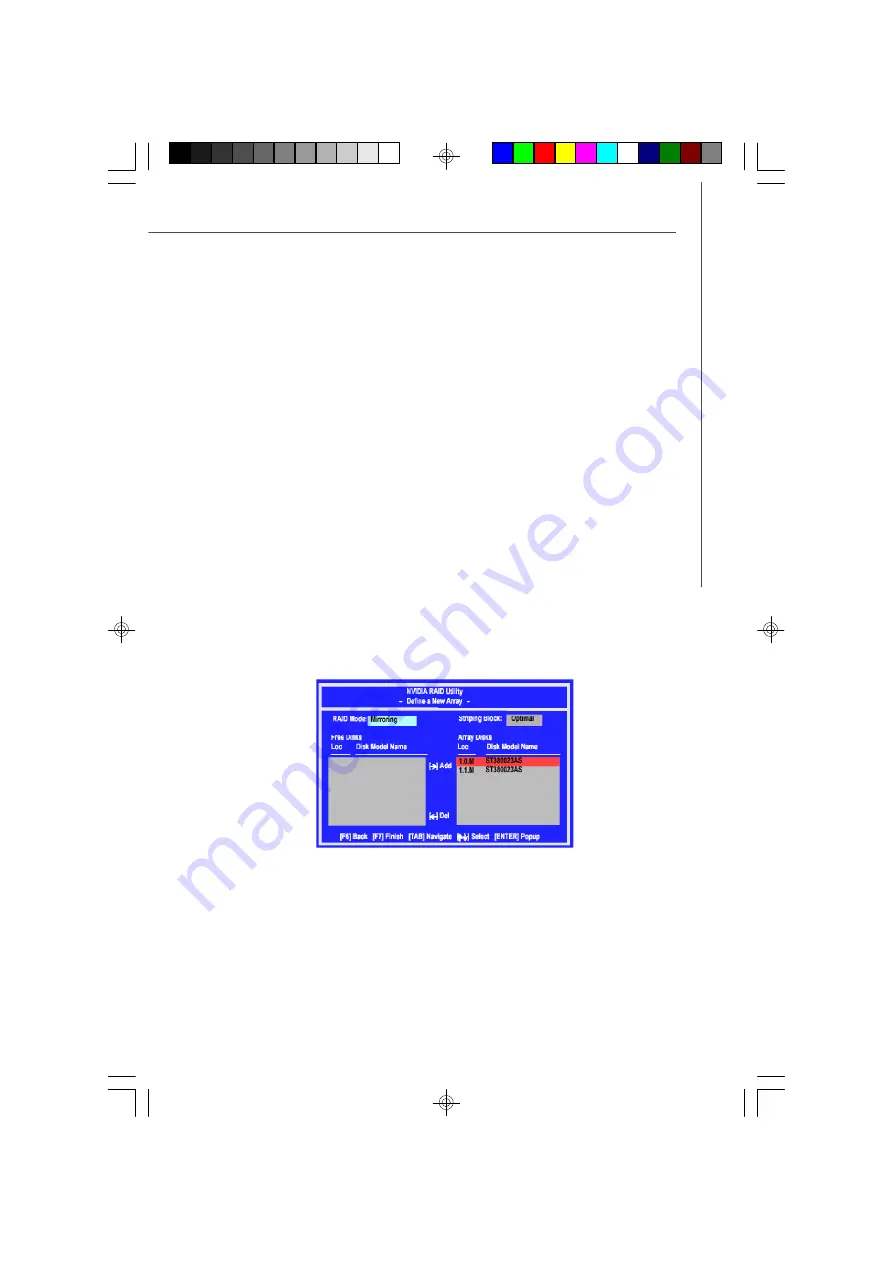
Using  the Define  a  New  Array  Window

If necessary, press the tab key to move from field to field until the appropriate field is
highlighted.

  Selecting the  RAID  Mode

By default, this is set  to [Mirroring]. To  change to a different RAID mode, press the
down arrow key until the mode that you want appears in the RAID Mode box

either

[Mirroring], [Striping].

  Selecting the Striping Block  Size

Striping Block

 size is given in kilobytes, and affects how data is arranged on the

disk. It is recommended to leave this value at the default [Optimal], which is 32KB, but
the values can be between [4 KB] and [128 KB].

  Assigning  the  Disks

The disks that you enabled from the RAID Config BIOS setup page appear in the 

Free

Disks

 block. These are the drives that are available for use as RAID  array disks.

To designate a free disk to be used as a RAID array disk,

1. 

 Tab to the 

Free Disks

 section. The first disk in the list is selected.

2.  

Move it from the Free Disks block to the Array Disks block by pressing the right

arrow key (-->). The first disk in the list is moved, and the next disk in the list is
selected and ready to be moved.

3.  

Continue pressing the right-arrow key (<-- ) until all the disks that you want to use
as RAID array disks appear in the 

Array Disks

 block.

It shows  that  two  disks  have  been  assigned  as  RAID1  array  disks  in  the  figure
above.

9661v1.0-Appendix A(nVIDIA SATA RAID).p65

 2007/11/1, 

下午

 02:56

5

Содержание K9ND Speedster2 Series

Страница 1: ...i K9ND Speedster2 Series MS 9661 V1 X Server Board G52 96611X3 9661v1 2 Preface p65 2008 11 14 10 46 1 PDF created with pdfFactory Pro trial version www pdffactory com...

Страница 2: ...rademarks of International Business Machines Corporation Windows 98 2000 NT XP Vista are registered trademarks of Microsoft Corporation Netware is a registered trademark of Novell Inc Award is a regis...

Страница 3: ...ep on it Do not place anything over the power cord 8 Always Unplug the Power Cord before inserting any add on card or module 9 All cautions and warnings on the equipment should be noted 10 Never pour...

Страница 4: ...elow Reorient or relocate the receiving antenna Increase the separation between the equipment and receiver Connect the equipment into an outlet on a circuit different from that to which the receiver i...

Страница 5: ...v WEEE Waste Electrical and Electronic Equipment Statement 9661v1 2 Preface p65 2008 11 14 10 46 5 PDF created with pdfFactory Pro trial version www pdffactory com...

Страница 6: ...vi 9661v1 2 Preface p65 2008 11 14 10 46 6 PDF created with pdfFactory Pro trial version www pdffactory com...

Страница 7: ...vii 9661v1 2 Preface p65 2008 11 14 10 46 7 PDF created with pdfFactory Pro trial version www pdffactory com...

Страница 8: ...ng Unit 2 3 Memory 2 8 Power Supply 2 10 Back Panel 2 11 Connector 2 13 Jumper 2 19 Slot 2 20 Chapter 3 BIOS Setup 3 1 Entering Setup 3 2 The Menu Bar 3 4 Main 3 5 Advanced 3 7 Power 3 21 Boot 3 23 Ex...

Страница 9: ...p to two 45nm Quad Core AMD Opteron pro cessors under 115W TDP in Socket 1207 and sup ports up to 8 Registered ECC DDR2 533 667 800 DIMM slots to provide the maximum of 32GB memory capacity In the ent...

Страница 10: ...DDR2 533 667 800 DIMMs 8 DDR2 DIMM slots up to 32GB memory IDE 1 channel bus master IDE port Supports ATA133 100 66 SATA 6 SATA II ports support 6 SATA II devices Storage and data transfers at up to 3...

Страница 11: ...ctors 2 x 1394 connectors optional 1 x serial port connector 1 x proprietary front audio connector Slots 1 PCI Express x16 slot PCI_E3 supports x8 SLI or x16 signal 1 PCI Express x16 slot PCI_E1 suppo...

Страница 12: ...SYS_FAN4 J1394_1 Optional JUSB2 JUSB1 J2 J1 SATA_1 SATA_2 SATA_ 3 SATA_4 SATA_5 SATA_6 CPU0_FAN1 C HA_FAN1 I DE 1 JBAT1 COM2 JFP2 JFP1 FLOPPY1 Top LAN Jack Bottom USB Ports Top LAN Jack Bottom USB Por...

Страница 13: ...dures While doing the installation be careful in holding the components and follow the installation procedures For some components if you install in the wrong orientation the components will not work...

Страница 14: ...8 P C I C l a s s Slots p 2 20 CPU p 2 3 CPU1_FAN1 p 2 15 IDE1 p 2 13 J1 p 2 17 DIMM Slots p 2 8 CHA_FAN1 p 2 15 JBAT1 p 2 19 J4 p 2 18 SYS_FAN4 p 2 15 JPWR2 p 2 10 Back Panel I O p 2 11 SYS_FAN2 p 2...

Страница 15: ...properly to protect the CPU from overheating 2 Make sure that you apply an even layer of heat sink paste or thermal tape between the CPU and the heatsink to enhance heat dissipation 3 While replacing...

Страница 16: ...move the plastic cap from the load plate The pins of the socket reveal 5 After confirming the CPU direction indicated below with red circles for correct mating put down the CPU in the socket housing f...

Страница 17: ...under the retention tab 9 Place the cooler set on top of the reten tion mechanism Secure the metal clips on the cooler set to the hooks on the retention mechanism 10 Connect the cooler power cord to t...

Страница 18: ...ually eliminate thermal issues users are advised to take proper precautions 1 Users are recommended to use AVC Z7UB408 series cooler when installing 120W AMD Opteron CPU 2 Users are recommended to use...

Страница 19: ...P0_DIMM3 P1_DIMM3 P0_DIMM2 P1_DIMM4 P0_DIMM1 PCI_E2 ALC888 VIA VT6308P Optional PCI_E1 PCI2 PCI1 SYS_FAN2 SYS_FAN3 CPU1_FAN1 SYS_FAN1 JPWR1 JPWR2 SYS_FAN4 J1394_1 Optional JUSB2 JUSB1 J2 J1 S ATA_1 S...

Страница 20: ...l mode can enhance the system performance Please refer to the following tables for population rules under Dual Channel mode CPU0 DIMM1 DIMM2 DIMM3 DIMM4 Rule 1 Single Channel V V Rule 2 Dual Channel V...

Страница 21: ...inger on the memory module is deeply inserted in the DIMM slot 3 The plastic clip at each side of the DIMM slot will automatically close v NOTE You can barely see the golden finger if the memory modul...

Страница 22: ...owe r supply of 600 watts and above is highly recommended for system stability 24 Pin System Power Connector JPWR1 This connector allows you to connect to an SSI power supply To connect to the power s...

Страница 23: ...USB devices such as keyboard mouse or other USB compatible devices LAN Port The standard RJ 45 jack is for connection to single Local Area Network LAN You can connect a network cable to it Keyboard U...

Страница 24: ...nal CD player tapeplayer or other audio devices Line Out Green Line Out is a connector for speakers or headphones Mic Pink Mic is a connector for microphones RS Out Black Rear Surround Out in 4 5 1 7...

Страница 25: ...sk drive IDE Connector IDE1 This connector supports IDE hard disk drives optical disk drives and other IDE devices Important If you install two IDE devices on the same cable you must configure the dri...

Страница 26: ...ry cable into 90 degree angle Otherwise data loss may occur during transmission SATA_1 SATA_2 SATA_3 SATA_4 SATA_5 SATA_6 Serial ATA Connector SATA_1 SATA_6 These connectors are high speed Serial ATA...

Страница 27: ...gned fan with speed sensor to take advantage of the CPU fan control Important Please refer to the recommended CPU fans at AMD official website or consult the vendors for proper CPU cooling fan SYS_FAN...

Страница 28: ...nal Ready 5 GND Ground 6 DSR DataSetReady 7 RTS Request T o Send 8 CTS ClearTo Send 9 RI Ring Indicate Pin Definition 1 2 9 10 JUSB1 2 COM2 1 9 2 Front USB Connector JUSB1 JUSB2 This connector complia...

Страница 29: ...SIGNAL DESCRIPTION 1 GND Ground 2 SPK Speaker 3 SLED SuspendLED 4 BUZ Buzzer 5 PLED PowerLED 6 BUZ Buzzer 7 NC Noconnection 8 SPK Speaker JFP2 Pin Definition Front Panel Connector JFP1 JFP2 These conn...

Страница 30: ...his connector allows you to connect the front panel audio and is compliant with Intel Front Panel I O Connectivity Design Guide PIN SIGNAL 6 LINE NEXTR 7 HPON 8 KEY 9 FLINE OUTL 10 LINE NEXTL PIN SIGN...

Страница 31: ...RAM the system can automatically boot OS every time it is turned on If you want to clear the system configuration set the JBAT1 Clear CMOS Jumper to clear data JBAT1 1 Keep Data Clear Data 3 1 3 1 Im...

Страница 32: ...signals to the microprocessor The PCI IRQ pins are typically connected to the PCI bus pins as follows Order 1 Order 2 Order 3 Order 4 PCI Slot 1 INTA INT B INTC INTD PCI Slot 2 INT B INTC INTD INTA P...

Страница 33: ...and allows you to configure the system for optimum use You may need to run the Setup program when An error message appears on the screen during the system booting up and requests you to run SETUP You...

Страница 34: ...gory described in this chapter are under continuous update for better system performance Therefore the descrip tion may be slightly different from the latest BIOS and should be held for reference only...

Страница 35: ...values and move from field to field within a sub menu If you want to return to the main menu just press the Esc General Help F1 The BIOS setup program provides a General Help screen You can call up th...

Страница 36: ...s to the settings Main Use this menu for basic system configurations such as time date etc Advanced Use this menu to set up the items of special enhanced features available on your system s chipset Po...

Страница 37: ...cal Bus IDE Adapter This setting controls the onboard IDE adapter Primary Master Primary Slave Type Press PgUp or PgDn to select Manual None or Auto type Note that the specifications of your drive mus...

Страница 38: ...led allows the system to boot within 5 seconds since it will skip some check items Boot time Diagnostic Screen Select Enabled if you want to view the system diagnostic screen during boot time Summary...

Страница 39: ...p Utility to change this setting BIOS Write Protect This function protects the BIOS from accidental corruption by unauthorized users or computer viruses When enabled the BIOS data cannot be changed wh...

Страница 40: ...led the memory controller maps the local memory of each pro cessor to a single contiguous range of physical addresses This allows the operating system to map user data to local memory whenever possibl...

Страница 41: ...d memory to be grouped in an optimal manner ECC Options ECC Mode If all memory in the system supports ECC enabling this will initial scrub DRAM and enable system requests to DRAM to be checked and or...

Страница 42: ...ed for the L1 memory cache to be corrected when in an idle state L2 ECC Scrub Control The L2 ECC Scrub option controls the time allotted for the L2 memory cache to be corrected when in an idle state O...

Страница 43: ...ems display the current status of all of the monitored hardware devices components such as CPU voltages temperatures and all fans speeds CPU and System Voltage This field shows the CPU and system volt...

Страница 44: ...e which will adjust the CPU system fan speed automatically depending on the current CPU system temperature avoiding system damage caused by overheating CPU0_FAN1 CPU1_FAN1 Speed SYS_FAN1 SYS_FAN2 SYS_...

Страница 45: ...ntegrated in the Southbridge SATA0 Controller SATA1 Controller SATA2 Controller These settings allow you to enable disable the onchip Serial ATA controllers Interrupt Mode This BIOS feature is used to...

Страница 46: ...3 14 MS 9661 Server BoardB NV RAID Configuration NV RAID Configuration This setting enables disables the nVIDIA software RAID configuration 9661v1 0 3 p65 2007 11 1 02 56 14...

Страница 47: ...language for your FirstWare applications FirstWare Authentication Level This setting allows you to select the authentication level for your FirstWare applications FirstWare Video Mode This setting all...

Страница 48: ...IOS will activate the selected device as a PCI bus master Latency Timer This item controls how long each PCI device can hold the bus before another takes over When set to higher values every PCI devic...

Страница 49: ...ting allows you to set the type of floppy drives installed Floppy Check This setting causes the BIOS to search for floppy disk drives at boot time When enabled the BIOS will activate the floppy disk d...

Страница 50: ...board Serial Port A B Base I O Address These settings specify the base I O port addresses of the onboard Serial Port A B Interrupt These settings specify IRQs for the Serial Port A B Floppy Disk Contr...

Страница 51: ...d of Console Redirection Console Type This setting specifies the console type Flow Control This feature allows you to enable flow control Console Connection This feature indicates whether the console...

Страница 52: ...set to Yes the DMI event log will be cleared at next POST stage Then the BIOS will automatically set this option to No Event Logging This setting disables enables the BIOS to log DMI Desktop Managemen...

Страница 53: ...State Restores the system to the previous status before power failure or interrupt occurred C State Configuration C state performance indicates the ability to run the processor in lower power states w...

Страница 54: ...ormat is HH MM SS Resume Date The date format is MM DD YYYY ACPI Suspend Support This item specifies the power saving modes for ACPI function If your operating system supports ACPI you can choose to e...

Страница 55: ...the Operating System Boot Priority Order This setting allows users to set the boot priority of the specified devices Refer to the Item Specific Help on the right pane for instructions Excluded from Bo...

Страница 56: ...o the Optimal Defaults The Setup Defaults are the default values set by the mainboard manufacturer specifically for the optimized performance of the mainboard Discard Changes The option allows users t...

Страница 57: ...ing businesses to the common PC desktop This tech nology uses multiple drives to either increase total disk space or to offer data protection For all levels RAID techniques optimize storage solutions...

Страница 58: ...ancy Requires 2 drives for the storage space of 1 drive 2 Yes System Requirement Operating System Support NVRAID supports the following operating systems Windows XP Windows 2003 x64 Windows 2003 Windo...

Страница 59: ...ows CD use the floppy disk that has the RAID driver to copy and install the nForce RAID software 4 Initialize the NVRAID Array Disks Setting Up the NVRAID BIOS Be sure to enable the nVidia RAID Functi...

Страница 60: ...ists In the example above 1 0 M means the hard drive is attached to Channel 1 Controller 0 and the drive is set to Master The following is a list of all possible combinations Parallel ATA 0 0 M Channe...

Страница 61: ...B and 128 KB Assigning the Disks The disks that you enabled from the RAID Config BIOS setup page appear in the Free Disks block These are the drives that are available for use as RAID array disks To d...

Страница 62: ...ys to select the array that you want to set up then press Enter The Array Detail window appears 4 If you want to mark this disk as empty and wipe out all its contents then press C 5 At the prompt pres...

Страница 63: ...ress S again at the Specify Devices screen then press Enter 4 Select NVIDIA NForce Storage Controller and then press Enter The follow ing Windows Setup screen appears listing both drivers Important Pl...

Страница 64: ...the floppy 5 Follow the instructions on how to install Windows XP After Windows XP is com pletely installed it is recommended that you install the the RAID management tool Important Each time you add...

Страница 65: ...upgrade the Windows IDE driver and install the RAID software 1 Start the NVIDIA C19 System Drivers installation program to open the NVIDIA Windows nForce Drivers page 2 Select the modules that you wan...

Страница 66: ...e Administrative Tools folder and double click on Computer Management 2 Click Disk Management under the Storage section The Initialize and Convert Disk Wizards appears 3 Click Next The Select Disks to...

Страница 67: ...w appears The actual disks listed will depend on your system and the unallocated partition is the total combined storage of two hard disks You must format the unallocated disk space in order to use it...

Страница 68: ...mirrored array Watch the progress of rebuilding an array Only applies to RAID 1 arrays Synchronizing a RAID Array Rebuild the redundancy in RAID 1 arrays copy the data to the redundant disk the same o...

Страница 69: ...instead of the failed disk Dedicated Disk A dedicated free disk is a disk that is assigned to a RAID 1 array and that disk is used by that array only when needed for example during a system crash whe...

Страница 70: ...to Windows and run the NVRAIDMAN program If the disk is not part of any RAID array then it will appear under the Free Disk section of the RAID GUI Step 2 Dedicate the Free Disk to an Array While runni...

Страница 71: ...array 5 Click Next The Completing the NVIDIA Spare Disk Allocation page appears 6 Click Finish As shown in figure below the ST380011A drive is now a dedicated free disk in the mirrored array If a syst...

Страница 72: ...array it can be removed at any time To remove the disk right click on the dedicated disk and select Remove Disk to remove it In the previous example simply right click on the ST380011A drive and selec...

Страница 73: ...ensive support for morphing a process of converting from one RAID mode to another RAID mode General Requirements and Limitations The new array capacity must be equal to or greater than the previous ar...

Страница 74: ...to the system As soon as the drive is added the user can then finish running the RAID wizard and the drive becomes usable by the system Hot Plug Array allows the user to add or remove an entire array...

Страница 75: ...nsure consistency and reliable performance on any supported fault tolerant array such as RAID 0 Use this feature only if you are absolutely sure that you want to wipe out all the data on that array In...

Страница 76: ...o its default value of 64K then click Next 5 At the Free Disk Selection page select the two drives that you want to Mirror and click Next 6 Click Next again and the following screen shot will appear 7...

Страница 77: ...own below The Initialization Process As you can see from the screen shot above the initialization process has started and it will be completed in a short period of time As soon as the Initialization p...

Страница 78: ...eed the lost data on the newly added drive Rebuilding Instructions After creating a mirrored array you can rebuild the array using the following steps 1 Go to Windows and run the NVIDIA RAID Managemen...

Страница 79: ...ting the NVIDIA Rebuild Array page appears 6 Click Finish The array rebuilding starts after a few seconds and a small pop up message appears towards the bottom right corner of the screen as shown in t...

Страница 80: ...g an array works only when using RAID 1 Rebuilding does not apply to RAID 0 Rebuilding applies to a degraded fault tolerant array You can rebuild a degraded mirrored array using any available Free Dis...

Страница 81: ...ated a fault tolerant array such as RAID 1 1 Right click on Mirroring and select Synchronize Array as shown in Figure below 2 The Synchronize Array Wizard Welcome screen appears 3 Click on Next and th...

Страница 82: ...ows the hard drive connector ports and provides a visual indication of the location and status of the drives as follows Red rectangle A red rectangle will flash around the port connector that is attac...

Страница 83: ...ek ALC888 provides 10 channel DAC that si multaneously supports 7 1 sound playback and 2 chan nels of independent stereo sound output multiple streaming through the Front Out Left and Front Out Right...

Страница 84: ...fore installing the driver The following illustrations are based on Windows XP environment and could look slightly different if you install the drivers in different operating systems 1 Insert the appl...

Страница 85: ...ALC888 Audio 3 Click Next to install the Realtek High Definition Audio Driver Click here Select this option 4 Click Finish to restart the system Click here 9661v1 0 Appendix B Realtek ALC888 p65 2007...

Страница 86: ...ick the audio icon from the system tray at the lower right corner of the screen to activate the HD Audio Configuration It is also available to enable the audio driver by clicking the Realtek HD Audio...

Страница 87: ...ed sound effects and the equalizer will adjust automatically If you like you may also load an equalizer setting or make an new equalizer setting to save as an new one by using the Load EQ Setting and...

Страница 88: ...gs Load Whenever you would like to use preload settings simply click this the whole list will be shown for your selection Delete To delete the pre saved settings which are created from previous steps...

Страница 89: ...he page to pull down the arrow in Others you will find more optimized settings available to you Karaoke Mode Karaoke mode brings Karaoke fun back home Simply using the music you usually play Karaoke m...

Страница 90: ...icated real panel or front panel This feature is very helpful when 2 people are using the same computer together for different purposes Click the button and the Mixer ToolBox menu will appear Then che...

Страница 91: ...s the default setting Then you must to select the Realtek HD Audio front output from the scroll list first and use a different program to play the second audio source for example use Winamp to play MP...

Страница 92: ...controls or to completely mute sound output Tool Show the following volume controls This is to let you freely decide which volume control items to be displayed Advanced controls Enable playback multi...

Страница 93: ...ool Show the following volume controls This is to let you freely decide which volume control items to be displayed Enable recording multi streaming Tool Mute Important ALC888 allows you to record the...

Страница 94: ...utput e 8CH Speaker for 7 1 Speaker Output Speaker Configuration 1 Plug the speakers in the corresponding jack 2 Dialogue connected device will pop up for your selection Please select the device you h...

Страница 95: ...cks on your system are so called AC 97 jacks If so please check this item to disable front panel jack detection Mute rear panel output when front headphone plugged in Enable auto popup dialogue when d...

Страница 96: ...when it is converted to analog Output Sampling Rate 44 1KHz This is recommend while playing CD 48KHz This is recommended while playing DVD or Dolby 96KHz This is recommended while playing DVD Audio 19...

Страница 97: ...any speaker fails to make sound then check whether the cable is inserted firmly to the connector or replace the bad speakers with good ones Or you may click the auto test button to test the sounds of...

Страница 98: ...ophone together with your sound For example you might have chance to use VOIP function through Internet with your friends The voice of your friend will come out from speakers playback However the voic...

Страница 99: ...is tab you may adjust your 3D positional audio before playing 3D audio applica tions like gaming You may also select different environment to choose the most suitable environment you like 9661v1 0 App...

Страница 100: ...ec You may also select the language of this utility by choosing from the Language list Also there is a selection Show icon in system tray Switch it on and an icon will show in the system tray Right cl...

Страница 101: ...s in accordance with the setting in software utility n 2 Channel Mode for Stereo Speaker Output 1 Line In 2 Line Out Front channels 3 MIC 4 Line Out Rear channels but not functioning in this mode 5 Li...

Страница 102: ...or and two speakers to the real chan nel Line Out connector 4 Channel Analog Audio Output 1 Line In 2 Line Out Front channels 3 MIC 4 Line Out Rear channels 5 Line Out Center and Subwoofer channel but...

Страница 103: ...the rear channel Line out connector and two s peaker s to the c enter subwoofer channel Line Out connector 6 Channel Analog Audio Output 1 Line In 2 Line Out Front channels 3 MIC 4 Line Out Rear chan...

Страница 104: ...side chan nel Line Out connector 8 Channel Analog Audio Output 1 Side Surround Out Side channels 2 Line Out Front channels 3 MIC 4 Line Out Rear channels 5 Line Out Center and Subwoofer channel 6 S PD...

Отзывы: