6
INSTALLATION INSTRUCTIONS
M S D
•
W W W . M S D P E R F O R M A N C E . C O M
• ( 9 1 5 ) 8 5 5 - 7 1 2 3 • F A X ( 9 1 5 ) 8 5 7 - 3 3 4 4
REV LIMITS
The Controller allows you to program two rev limits; one for an over-rev safety and another that
provides a low limit for use as a hole-shot, or two step limit.
RevLaunch This is the low rpm limit that is designed to be used while staged at the starting
line. It is activated when the Blue wire is connected to 12 volts. When voltage is
removed from this wire, the High Rev Limit is active. It is adjustable in 100 rpm
increments from 2,000 - 12,500 rpm.
RevMax
This is the high, or over-rev rpm limit. It is active whenever the Blue wire (Launch
Rev Limit) is
not connected to 12 volts. It is adjustable in 100 rpm increments
from 2,000 - 12,500 rpm.
STEP RETARD
A step retard will provide an adjustable amount of retard at a specific moment. This is ideal when
using nitrous oxide. The amount of retard is adjustable from 0° - 15° in 1° increments. The retard is
activated when the Pink wire is switched to 12 volts. Default is 10°.
IDLE TIMING CONTROL
This is defaulted at Control DISABLE. When switched to ENABLE, the controller will alter the ignition
timing constantly to search for the best idle qualities.
Note: This is a function of an ECU controlled system and should be enabled when used with an
OEM EFI application.
COIL SELECT
There are several coils that can be used on these engines. The 6LS-2 lets you program which coil
is being used for the best performance.
LS 2 Select when using factory LS 2 coils or MSD PN 82478. This is the default.
LS 1 Select when using factory style LS 1 or MSD PN 82468.
TIMING CURVE MODULES
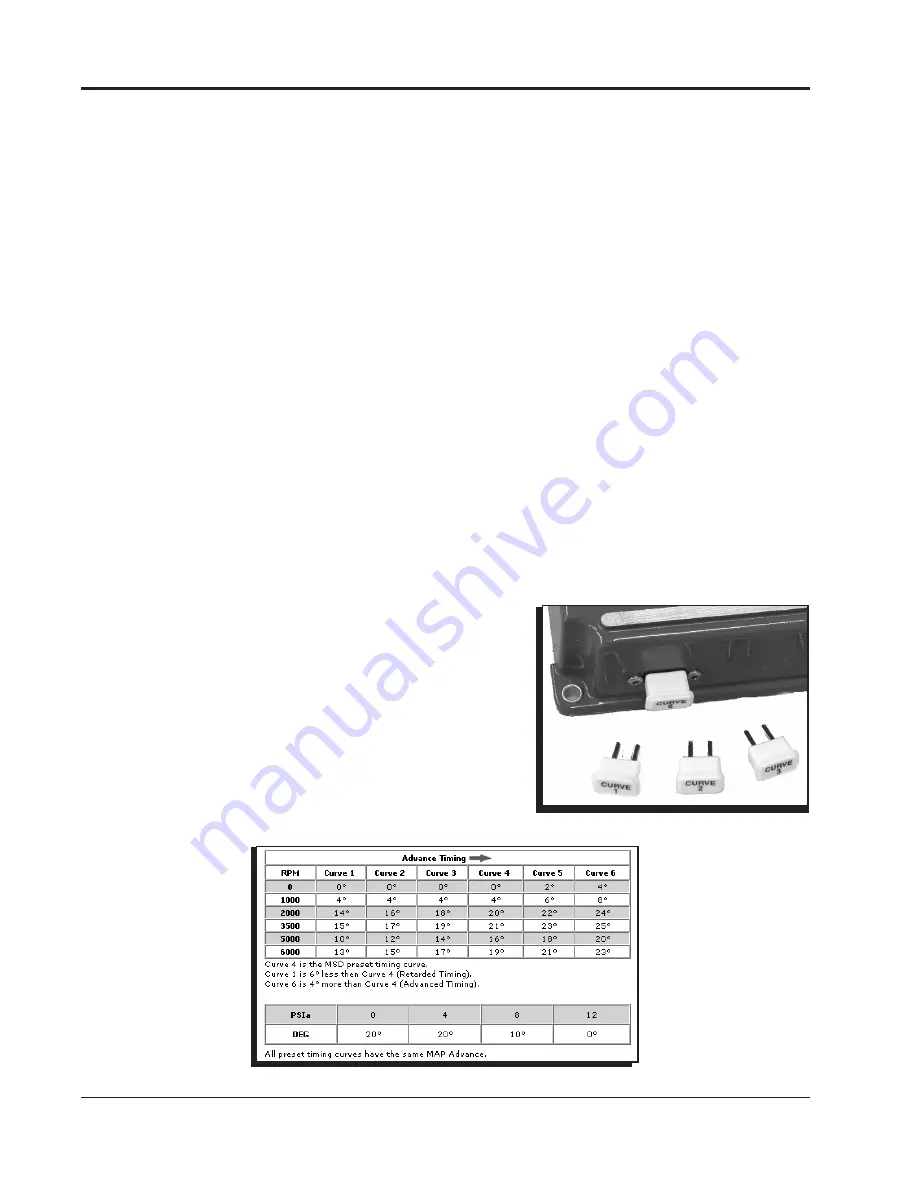
The PN 6012 Controller is supplied with six modules that
plug into the side of the housing (Figure 3). The modules
are labeled Curve 1, Curve 2, etc. By plugging in one of the
modules, the timing curve will be set with a pre-programmed
curve upon power-up of the Controller. (Removing the module
while the engine is running will not affect the timing curve.)
Figure 4 shows each of the timing curves.
Note: Any updates that are made using the PC software will
be overridden if a module is left plugged in during
power-up of the Controller.
Figure 3 Timing Curve Modules.
Figure 4 Timing Curves from the Modules.


