background image

ASSEMBLY INSTRUCTIONS. 
Removing Heater from Package: 

1.  Remove heater, reflector from carton. 
2.  Remove all shipping packaging from heater 

components. 

3.  Retain all packaging material and carton, until 

heater warranty has expired.  Any warranty returns 
require original packaging and carton. 

4.  Check heater for any shipping damage.  If any is 

found, immediately contact and return heater to 
dealer / distributor where purchased. 


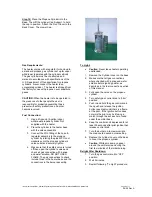
Step 1:

 Remove all components from package and 

inspect parts. 


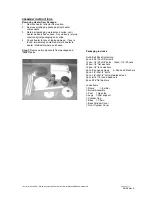
Packaging includes

 
Nut & Bolt Pack Containing: 
4pcs--3/16”-24x3/8” screws 
12pcs--1/4”-20x3/4” bolts   12pcs--1/4”-20 nuts 
24pcs--1/4” flat washers 
12pcs--1/4” lock washers   
4pcs--Pan head screws 

4--Pan head Washers 

3pcs--1/4”-20x1/2” bolts 
3pcs--1/4”-20x1/2” bolts (stainless steel) 
3pcs--5/16”-18 round head nuts 
6pcs-5/16” flat washers 
 
Loose Items: 
1-Dome          1-Emitter 


1-Burner Assembly 
1-Post     1-Gas Line 
3-Legs   1-Post support 
1-Cylinder Cap 
1-Base    1-Chain 
1-Back Cylinder Cover 
1-Front Cylinder Cover 


\\Commserv\Users\EGI_Shared\Engineering\Labels & Manuals WIP\MH40PH\MH40PH Manual.doc 

Page 4 of 11 

06/08 Rev A

Содержание MH40PH

Страница 1: ...S HEATER GENERAL HAZARD WARNING IMPROPER INSTALLATION ADJUSTMENT ALTERATION SERVICE OR MAINTENANCE CAN CAUSE INJURY OR PROPERTY DAMAGE READ THE INSTALLATION OPERATING AND MAINTENANCE INSTRUCTIONS THOR...

Страница 2: ...at there is ample fresh air ventilation DO NOT use in buildings garages or other enclosed spaces If at any time gas odor is detected IMMEDIATELY DISCONTINUE operation until the source of gas has been...

Страница 3: ...efore you return Properly trained service people must repair the leak check for further leakages and them relight the appliance for you ODOR FADING NO ODOR DETECTED Some people cannot smell well Some...

Страница 4: ...e all components from package and inspect parts Packaging includes Nut Bolt Pack Containing 4pcs 3 16 24x3 8 screws 12pcs 1 4 20x3 4 bolts 12pcs 1 4 20 nuts 24pcs 1 4 flat washers 12pcs 1 4 lock washe...

Страница 5: ...has Wheels please assemble the wheels as Attachment 2 before Step 5 Attach 3 Legs Post Support Assembly to Base 6 bolts 1 4 20 3 4 12 flat washers 6 lock washers 6 nuts Step 6 Install Post onto Post...

Страница 6: ...OFF Open the Propane Cylinder Valve If bubbles appear at the connection there is a leak and it must be tightened until no bubbles appear MAKE SURE THERE IS NO LEAKS Close the Propane Cylinder Valve t...

Страница 7: ...several drops of the Leak Check Solution Step 10 to the hose gas line connection Make sure the Heater Control Knob is OFF Open the Propane Cylinder Valve If bubbles appear at the connection there is...

Страница 8: ...en the cylinder s valve and check all gas connection with a soap and water solution DO NOT USE A FLAME The gas connections to check include those in the heater base and the connections in the burner a...

Страница 9: ...ed in accordance with chapter 5 of the standard for Storage and Handling of Liquefied Petroleum Gases ANSI NFPA 58 Only recoat those portions of the heater post base assembly with high temperature 120...

Страница 10: ...must show heater model number item number part number and description We recommend that only parts supplied by the manufacture be used on this unit A locally purchased part may appear to be identical...

Страница 11: ...Commserv Users EGI_Shared Engineering Labels Manuals WIP MH40PH MH40PH Manual doc Page 11 of 11 06 08 Rev A...

Страница 12: ...06 08 Rev A...

Отзывы: