background image


CONNECTING DEVICES 


Connections 


Connecting the System 

It is recommended that you turn off all components (or unplug AC power) while you are connecting the 

system. 


1 – Connect TV 

Composite Video 

Connect the video cable from the Video Out jack on the back panel of the DVD system to your 
television’s Video In jack. 

S-Video 

For better video quality, you can connect the system to your TV with a S-Video cable (not 
included). 
Connect the S-Video cable from the S-Video Out jack on the back panel of the system to your 
television’s S-Video In jack. 

SCART Video 

You can connect the system to your TV with a scart cable. Set the [Video Type] to [TV-RGB].


Y/Pb/Pr 

Use the COMPONENT Cable (not supplied) to connect DVD system to your TV. Set the [Video 
Type] to [YUV]. If the TV set supports P-Scan function, you can set [Video Type] to [Y, Pb, Pr]. 


2 – Place Speakers 

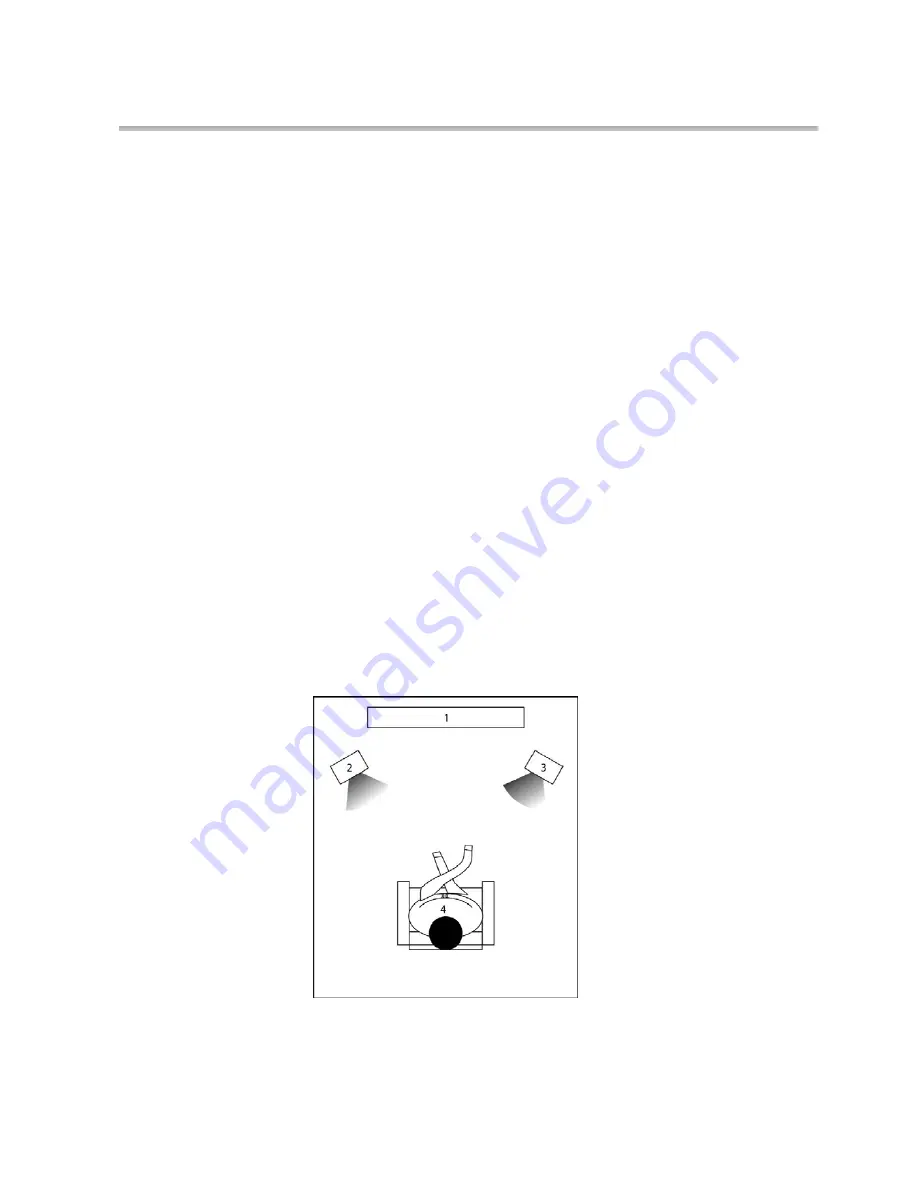
For the best result, arrange the 2 speakers as shown in your listening area: 

Front Speakers (L, R) 

Align the front speakers at ear level and at a horizontal angle of 45 degrees to the primary 
listening area. 


1. TV set or screen 

2. Front or main left speaker 

3. Front or main right speaker 

4. Viewer’s location 


EN-8 

Содержание XR-DV30

Страница 1: ...USER S MANUAL DVD MICRO SYSTEM XR DV30 Please read this User Manual carefully before using this product and keep this manual for future reference...

Страница 2: ...overturn Symbol provided by RETAC 10 Ventilation Slots and openings in the cabinet are provided for ventilation and to ensure reliable operation of the product and to protect it from overheating and t...

Страница 3: ...roduct through openings as they may touch dangerous voltage points or short out parts that could result in a fire or electric shock Never spill liquid of any kind on the product 19 Servicing Do not at...

Страница 4: ...WIDE BLADE PLUG WITH WIDE SLOT AND FULLY INSERT THE APPARATUS SHALL NOT BE EXPOSED TO WATER AND NO OBJECTS FILLED WITH LIQUID SUCH AS VASES SHALL BE PLACED ON THE APPARATUS CAUTION THE UNIT EMPLOYS A...

Страница 5: ...ng the remote control 7 Connections 8 9 10 11 Connecting power supply 12 Basic DVD operation 13 14 15 Playing the radio 16 MPEG4 MP3 PLAYBACK 17 FUNCTION OF USB 18 CD RIPPING FUNCTION 18 SYSTEM Setup...

Страница 6: ...al property rights owned by Macrovision Corporation and other rights owners Use of this copyright protection technology must be authorized by Macrovision Corporation and is intendedfor home and other...

Страница 7: ...play function while in DVD mode Use this button to pause play function while in DVD mode 5 PREV While in the DVD status you may press this button for previous track 6 NEXT While in the DVD status you...

Страница 8: ...urce 3 LINE OUT 4 COAXIAL DIGITAL AUDIO OUTPUT 5 COMPONENT VIDEOS OUTPUT Y Cr Pr Cb Pb 6 VIDEO OUTPUT 7 S VIDEO OUTPUT 8 SCART IN OUT 9 ANTENNA Use to connect the provided indoor FM and AM loop antenn...

Страница 9: ...13 FWD 14 REV BUTTON 15 A B 16 SLOW 17 DISPLAY 18 MENU PBC 19 ANGLE 20 LANGUAGE 21 VIDEO 22 R L 23 RDS 24 OPEN CLOSE 25 DVD 26 TUNER 27 FM MODE 28 SCROLL LEFT 29 ENTER 30 SCROLL DOWN 31 MEMO 32 PAUSE...

Страница 10: ...or reference only Notes z Point the remote control directly at the player s remote sensor z Do not leave the remote control in an extremely hot or humid place z Do not spill water or put anything wet...

Страница 11: ...n the back panel of the system to your television s S Video In jack SCART Video You can connect the system to your TV with a scart cable Set the Video Type to TV RGB Y Pb Pr Use the COMPONENT Cable no...

Страница 12: ...tip of the wire into its connector and then release the thumb levers to lock the wire in place CAUTION To prevent damage to circuits do not short circuit the positive and negative speaker output jacks...

Страница 13: ...thumb levers to lock the wires in place To prevent noise pickup keep the AM loop antenna away from the system and other components 5 Connect FM Wire Antenna 1 Connect the supplied FM wire antenna to...

Страница 14: ...ohm Outdoor FM antenna 6 Connect External Audio The back panel of the DVD system provides 1 AUX IN Connect to an external stereo audio input 2 Line Out Connect to the inputs of external Audio System...

Страница 15: ...they have been carefully plug power cord into outlet Press the POWER button on the front panel to power the unit The display panel will light When the unit is initially powered a brief surge of elect...

Страница 16: ...n pressed Also play and pause can be switched with the Pause button on the remote Moreover such as menu play title play sequence play etc these different play modes are offered a Menu Play compatible...

Страница 17: ...VCD or VCD disc is loaded and MENU PBC is on once MENU PBC button pressed MENU PBC button switches off Then the player can play in sequence playback mode when MENU PBC button pressed twice MENU PBC sw...

Страница 18: ...on the screen and the Program Playback will be stopped Also you can press Stop and Play to resume normal playback z Notes To clear the programmed order use Arrow buttons to highlight the CLEAR item t...

Страница 19: ...ll store up to total 50 AM or FM radio stations in its memory 1 Press the AUTO SCAN button The automatic tuning mode is activated 2 Stations will be stored in ascending order until 50 stations of that...

Страница 20: ...name should have a JPEG extension Current directory name File Switch Region Displays the file type of the playing and the switching The playing file is a MP3 audio file The playing file is a JPEG pict...

Страница 21: ...ice may need to be formatted in advance 2 Select and playback desired CD track you want to encode and then press SUBTITLE button in remote controller to start CD RIPPING function Information will be s...

Страница 22: ...the choices of that option appear on the right For example press the Down arrow button to highlight the BRIGHTNESS option then press Enter to select the brightness choices appear on the right d Press...

Страница 23: ...SETUP The system setup options are illustrated below SOURCE There are 2 kinds of sources illustrated below USB can be selectable when the USB device is connected TV SYSTEM According to the Color Syst...

Страница 24: ...put jack of TV set you can choose S VIDEO YUV RGB P SCAN YPbPr Notes Only choose P SCAN if your DVD player is connected to a Progressive Scan TV with Y Cb Cr cables TV TYPE According to the TV type yo...

Страница 25: ...rd mode must be turned on If you want to set the ratings limit you will need to enter the default password which is 6666 then press Enter to confirm To change the password you will be prompted for the...

Страница 26: ...ating limit system like movie ratings It works with DVD discs that have been assigned a rating This helps you control the types of DVDs that your family watches DEFAULT Choose this option to resume al...

Страница 27: ...E Highlight the AUDIO LANG option and press the Arrow buttons to choose the audio language you prefer Press Enter to confirm If the disc you are playing has that language available it will output audi...

Страница 28: ...he Arrow buttons to choose the menu language you prefer Press Enter to confirm If the disc you are playing has that language available it will display menu in that language Notes If your preferred lan...

Страница 29: ...IF RAW and SPDIF PCM z SPDIF RAW Choose this setting if your DVD player is connected to a power amplifier with a coaxial cable or an optical cable z SPDIF PCM Choose this setting if your DVD player is...

Страница 30: ...frozen for more than 60 sec the screen aver will be displayed This feature can protect the screen from damage z ON Choose this setting to activate the screen saver z OFF Choose this setting to cancel...

Страница 31: ...nd Down arrow button to move the scroll and adjust the contrast HUE Use the Up and Down arrow button to move the scroll and adjust the hue SATURATION Use the Up and Down arrow button to move the scrol...

Страница 32: ...und like in a movie theatre if the original movie the disc was recorded from was encoded in the Pro Logic Dolby Digital format z STEREO Choose this setting when 5 1 channel sound playing two channels...

Страница 33: ...REO MONO L MONO R and MIX MONO REFERENCE z To protect your DVD player the interval between two consecutive Power button operations must be above 30 seconds z If not using a period of time please pull...

Страница 34: ...y 1 Check to make sure the disc is loaded correctly label side facing up on disc tray 2 Check that disc is clean from dirt dust fingerprints and smudges 3 Check to ensure disc is with in the guides on...

Страница 35: ...Output FM Tuner Tuning Range 87 5 108MHz S N Ratio 46dB Monophonic 46dB Stereo 50dB DIN Selectance 50dB THD Monophonic 2 Stereo 3 Frequency Response 30Hz 10kHz 1dB Stereo Resolution 35dB 1kHz 30dB 10...

Страница 36: ...www mpmaneurope com...

Отзывы: