


16
GB
pan is empty, the “E5” error will be reported. Once the appliance cools down, the cooking
process will resume.
7. The hob features an undervoltage and overvoltage protection system. If the voltage changes
too much, the appliance will report an error (see the error table).
BEFORE FIRST USE
1. Remove the appliance from the box. Remove all plastic sheets, bags and styrofoam inserts.
2. During unpacking check appliance if there are not damaged.
3. Clean the appliance (see CLEANING & MAINTENANCE).
4. Make sure that your mains power supply corresponds to the voltage stated on the rating
plate.
USAGE INSTRUCTIONS
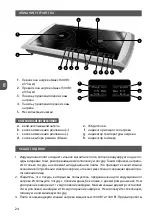
1. Place the appliance on a firm, level and dry surface.
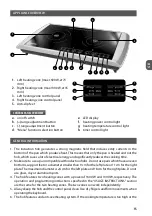
2. Plug the power cord to the mains. A short sound signal will be played, and the display (e) will
show the “OFF” status. Keyboard operation will always produce a sound signal.
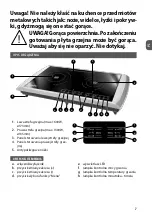
3. Place a compatible pan on the heating zone (1) and/or (2). Any attempt to start the heating
process without a pan on the corresponding heating plate or with an incompatible pan will
result in the “EO” error code on the display (e).
4. Turn on the appliance using the on switch (a) and press the “Menu” button (d) to go to heating
parameter selection. If you take no action after turning on the hob, it will automatically turn
off after 5 seconds.
HEATING POWER
– use the function selection button (d) to select the heating power; the
control light (f) will turn on, indicating that the heating process has started. Next, use the
range adjustment buttons (b) and (c) to set the power. The left heating zone supports the
following power settings: 200, 350, 500, 650, 800, 1000, 1100, 1200, 1400, 1600 W, and the right
heating zone supports the following settings: 200, 350, 500, 650, 800, 900, 1000, 1100, 1200,
1300 W. The higher the power, the faster the hob heats up, which reduces the cooking time.
You can modify the power settings at any moment during cooking.
HEATING TEMPERATURE
– if the temperature is your priority, use the function selection
button (d) to select the temperature; the control light (g) will turn on, indicating that the
heating process has started. Next, use the range adjustment buttons (b) and (c) to set the
temperature. The following temperature settings are available: 60, 80,100,120,140,160,180,200
,220,240 °C. You can modify the temperature at any moment during cooking.
CAUTION! If you do not declare the heating time, the appliance will automatically switch off after 120 minutes.
HEATING TIME
– you can set it between 0 and 180 minutes. Use the function selection button
(d) to select the timer; the control light (h) and (f) will turn on. Set the heating time using the
(b) and (c) buttons, and wait for a moment; the value you selected will light up continuously,
which means that the countdown has started. The hob will then alternate between displaying
the time and the power. Modify the latter if necessary, as the maximum power available for the
heating zone is selected by default. The same applies to the heating time and temperature.
Содержание MKE-11
Страница 2: ...INSTRUKCJA OBS UGI 3 USER MANUAL 11 19 BEDIENUNGSANLEITUNG 28 GB RU DE PL...
Страница 19: ...19 R U...
Страница 20: ...20 R U...
Страница 21: ...21 R U...
Страница 22: ...22 R U 8 8...
Страница 23: ...23 R U...
Страница 26: ...26 R U 60 80 100 120 140 160 180 200 220 240 C 120 0 180 d h f b c 5 EO 40 6 7 8 E0 E1 E2 E3 E4...
Страница 27: ...27 R U E5 E6 1 50 LWA 50 Uwaga Firma MPM agd S A zastrzega sobie mo liwo zmian technicznych O...