– 4 –
– 5 –
– 6 –
www.moxa.com/support
The Americas: +1-714-528-6777 (toll-free: 1-888-669-2872)
Europe: +49-89-3 70 03 99-0
Asia-Pacific: +886-2-8919-1230
China: +86-21-5258-9955 (toll-free: 800-820-5036)
2012 Moxa Inc., All Rights Reserved
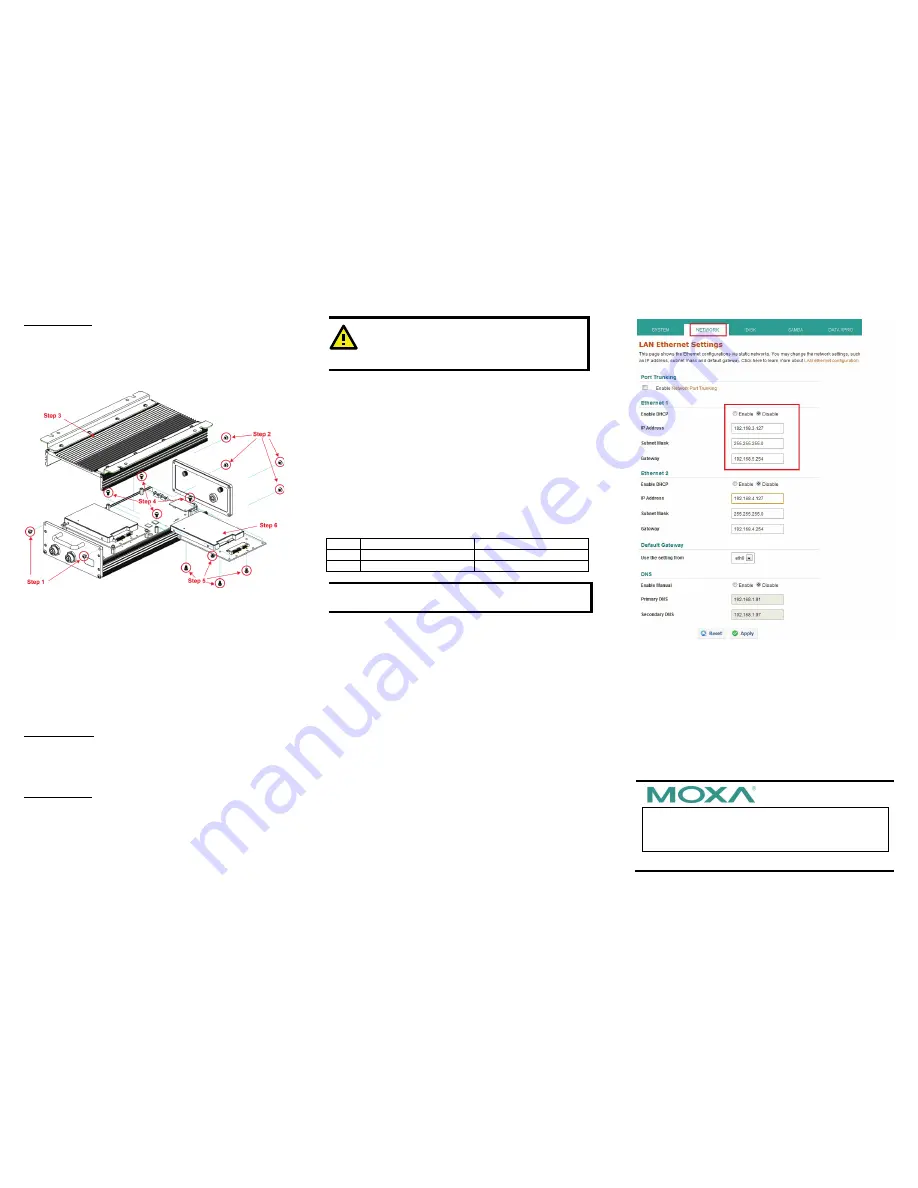
Hard Disk Drive
The RNAS-1201 model comes with 2 SATA connectors that can
install 2 SATA disks, and RNAS-1211-T model has been
pre-installed with 2 100 GB hard disks. Users may manually install
or replace these disks. Refer to the following figure and
descriptions on how to install or replace the hard disks.
Step 1:
Remove the two screws on the front panel.
Step 2:
Remove the four screws on the rear panel.
Step 3:
Remove the top cover of the RNAS-1200.
Step 4:
Remove the four screws on the drive tray.
Step 5:
If a drive has already been installed, remove the four
screws on the back of the drive tray to free it.
Install the new drive and secure the enclosure by reversing this
procedure.
The same procedure is used to install or replace the 2
nd
drive.
Reset to Default
To depress the
Reset to Default
button on the rear panel, use a
screwdriver to depress the button and hold it for five seconds. The
system will then reset all software settings to the factory defaults.
Real-time Clock
The RNAS-1200’s real-time clock is powered by a lithium battery.
We strongly recommend that you do not replace the lithium
battery without help from a qualified Moxa support engineer. If you
need to change the battery, contact the Moxa RMA service team.
WARNING
There is a risk of explosion if the battery is replaced with a
new battery of incorrect specifications.
Powering the RNAS-1200
To power on the RNAS-1200, simply connect it to any Ethernet
switch that supports PoE or PoE+. Once the system is fully
powered and initialized, the
Ready
LED will light up.
Configuring the Ethernet Interface
Power up the RNAS-1200 computer and verify that the power
source is ready. Once the operating system boots up, the first step
is to configure the Ethernet interface. The factory default IP
settings are show below:
Default IP Address
Netmask
LAN1
192.168.3.127
255.255.255.0
LAN2
192.168.4.127
255.255.255.0
NOTE Refer to the User’s Manual for additional
configuration information.
You may use a web browser to access the RNAS-1200’s
configuration wizard. Simply connect to the RNAS-1200 over a LAN
port using the default IP address, open a browser, and enter the
following information when prompted:
Login: Admin
Password: Admin
To go directly to the RNAS-1200’s IP configuration, click on the
Network
tab on the main toolbar. There, you may set the Ethernet
interfaces for static or DHCP addressing. To set up a static IP
address, simply disable DHCP and enter the IP address, subnet
mask and gateway information in the specified fields. If two
different gateways are configured, it will be necessary to select
which LAN port will serve as the default gateway. Finally, enter
DNS information in the bottom section of the page. When finished,
click
Apply
to complete.
The networking configuration interface is shown on the following
page of this installation guide, with the main IP addressing
parameters highlighted.


