background image


- 9 -

Grounding the EtherDevice Switch


Grounding and wire routing help limit the effects of noise due to 
electromagnetic interference (EMI). Run the ground connection from the 
ground screw to the grounding surface prior to connecting devices. 


ATTENTION 

This product is intended to be mounted to a well-grounded 
mounting surface, such as a metal panel. 


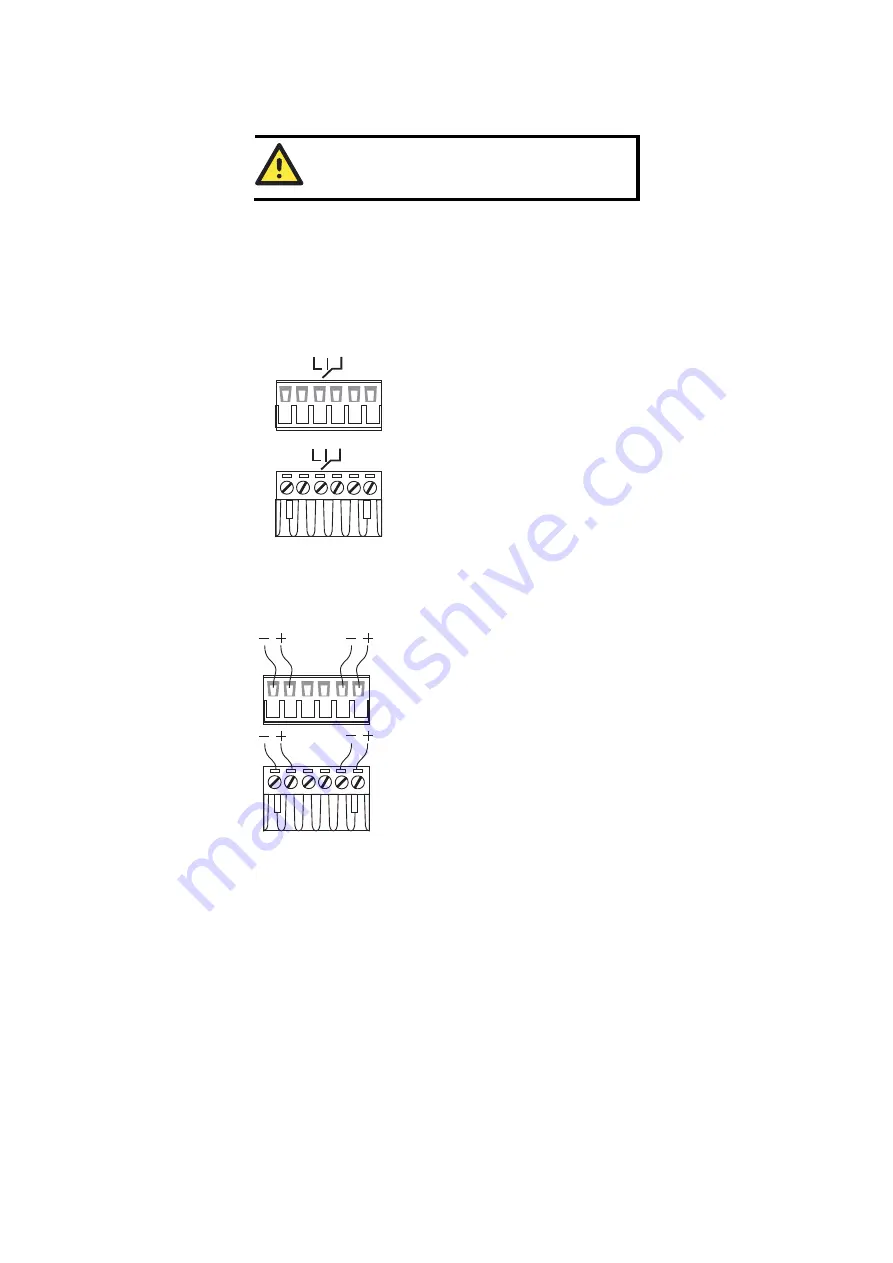
Wiring the Alarm Contact 

The Alarm Contact consists of the two middle contacts of the terminal block on 
EDS’s top panel. You may refer to the next section for detailed instructions on 
how to connect the wires to the terminal block connector, and how to attach the 
terminal block connector to the terminal block receptor. In this section, we 
explain the meaning of the two contacts used to connect the Alarm Contact. 

FAULT

FAULT

Top View

Front View

FAULT

: The two middle contacts of the 

6-contact terminal block connector are used to 
detect both power faults and port faults. The 
two wires attached to the Fault contacts form 
an open circuit when: 

1.


The EDS has lost power from one of the 
DC power inputs. 

 OR 
2.


One of the ports for which the 
corresponding PORT ALARM DIP Switch 
is set to ON is not properly connected.


If neither of these two conditions is satisfied, 
the Fault circuit will be closed. 

Wiring the Redundant Power Inputs 

The top two contacts and the bottom two contacts of the 6-contact terminal 
block connector on the EDS’s top panel are used for the EDS’s two DC inputs. 
Top and front views of one of the terminal block connectors are shown here. 

Top View

Front View

STEP 1

: Insert the negative/positive DC wires 

into the V-/V+ terminals. 
 

STEP 2

: To keep the DC wires from pulling 

loose, use a small flat-blade screwdriver to 
tighten the wire-clamp screws on the front of the 
terminal block connector. 
 

STEP 3

: Insert the plastic terminal block 

connector prongs into the terminal block 
receptor, which is located on the EDS’s top 
panel. 


Содержание EDS-309

Страница 1: ...re Installation Guide Eighth Edition September 2010 2010 Moxa Inc All rights reserved Reproduction without permission is prohibited Fl 4 No 135 Lane 235 Pao Chiao Rd Shing Tien City Taipei Taiwan R O C TEL 886 2 8919 1230 P N 1802003050030 ...

Страница 2: ...epresentative for assistance y Moxa EtherDevice Switch y Hardware Installation Guide y Moxa Product Warranty booklet y Protective caps for unused ports Features High Performance Network Switching Technology y 10 100BaseT X RJ45 100BaseFX SC ST type Multi Single mode y IEEE802 3 802 3u 802 3x y Store and Forward switching process type with 1024 address entries y 10 100M Full Half Duplex MDI MDIX au...

Страница 3: ... 2 3 4 1 Rear Panel View 2 13 12 12 1 Grounding screw 2 Terminal block for power inputs PWR1 PWR2 and relay output 3 Heat dissipation orifices 4 DIP switches 5 Power input PWR1 LED 6 Power input PWR2 LED 7 Fault LED 8 10 100BaseT X Port 9 TP port s 100 Mbps LED 10 TP port s 10 Mbps LED 11 Model Name 12 Screw holes for wall mounting kit 13 DIN rail Kit ...

Страница 4: ...appearance of EDS 305 S SC is identical to EDS 305 M SC 1 Grounding screw 2 Terminal block for power inputs PWR1 PWR2 and relay output 3 Heat dissipation orifices 4 DIP switches 5 Power input PWR1 LED 6 Power input PWR2 LED 7 Fault LED 8 10 100BaseT X Port 9 TP port s 100 Mbps LED 10 TP port s 10 Mbps LED 11 Model Name 12 100BaseFX Port 13 FX port s 100 Mbps LED 14 Screw holes for wall mounting ki...

Страница 5: ...rminal block for power input PWR1 PWR2 and relay output 3 Heat dissipation orifices 4 DIP switches 5 Power input PWR1 LED 6 Power input PWR2 LED 7 Fault LED 8 10 100BaseT X Port 9 TP port s 100 Mbps LED 10 TP port s 10 Mbps LED 11 Model Name 12 100BaseFX Port 13 100 Mbps LED for FX port 14 Screw hole for wall mounting kit 15 DIN rail Kit 16 100 Mbps LED for FX port 7 17 100 Mbps LED for FX port 8 ...

Страница 6: ...rail attachment plate should already be fixed to the back panel of the EDS when you take it out of the box If you need to reattach the DIN rail attachment plate make sure the stiff metal spring is situated towards the top as shown in the figures below STEP 1 Insert the top of the DIN rail into the slot just below the stiff metal spring STEP 2 The DIN rail attachment unit will snap into place as sh...

Страница 7: ...screws in all the way leave about 2 mm to allow room for sliding the wall mount panel between the wall and the screws STEP 3 Once the screws are fixed in the wall insert the four screw heads through the large parts of the keyhole shaped apertures and then slide the EDS downwards as indicated Tighten the four screws for added stability II 3G ATEX Information 1 Certification number DEMKO 09 ATEX 081...

Страница 8: ...sconnect the power cord before installing and or wiring your Moxa EtherDevice Switch Calculate the maximum possible current in each power wire and common wire Observe all electrical codes dictating the maximum current allowable for each wire size If the current goes above the maximum ratings the wiring could overheat causing serious damage to your equipment You should also pay attention to the fol...

Страница 9: ...erminal block connector are used to detect both power faults and port faults The two wires attached to the Fault contacts form an open circuit when 1 The EDS has lost power from one of the DC power inputs OR 2 One of the ports for which the corresponding PORT ALARM DIP Switch is set to ON is not properly connected If neither of these two conditions is satisfied the Fault circuit will be closed Wir...

Страница 10: ...3 Tx 6 Rx 6 Tx RJ45 8 pin to RJ45 8 pin Straight Through Cable Wiring Straight Through Cable RJ45 Plug Pin 1 Switch Port RJ45 Connector RJ45 Connector Tx Tx Rx Rx NIC Port Cable Wiring 3 3 6 6 1 1 2 2 Rx Rx Tx Tx RJ45 8 pin to RJ45 8 pin Cross Over Cable Wiring Cross Over Cable RJ45 Plug Pin 1 Switch Port NIC Port RJ45 Connector RJ45 Connector Tx Tx Rx Rx Rx Rx Tx Tx Tx Tx Rx Rx Switch Port NIC Po...

Страница 11: ...e power source fails the other live source acts as a backup and automatically supplies all of the EDS s power needs Alarm Contact The Moxa EtherDevice Switch has one Alarm Contact located on the top panel For detailed instructions on how to connect the Alarm Contact power wires to the two middle contacts of the 6 contact terminal block connector see the Wiring the Alarm Contact section on page 8 A...

Страница 12: ...wer is not being supplied to power input PWR1 PWR2 AMBER On Power is being supplied to power input PWR2 Off Power is not being supplied to power input PWR2 FAULT RED On When the corresponding PORT alarm is enabled and the port s link is inactive Off When the corresponding PORT alarm is enabled and the port s link is active or when the corresponding PORT alarm is disabled 10M GREEN On TP port s 10 ...

Страница 13: ...to the right side so that it fits snuggly into the port slider slider guide slider ridges slider slider guide slider ridges The 100 Mbps fiber ports are switched ports and perform as a domain providing a high bandwidth backbone connection that supports long fiber cable distances up to 5 km for multi mode and 15 40 and 80 km for single mode for installation versatility Dual Speed Functionality and ...

Страница 14: ...o that as nodes are added or removed or moved from one segment to another the EDS automatically keeps up with new node locations An address aging algorithm causes the least used addresses to be deleted in favor of newer more frequently used addresses To reset the address buffer power down the unit and then power it back up Auto Negotiation and Speed Sensing All of the EDS s RJ45 Ethernet ports ind...

Страница 15: ...lay output with current carrying capacity of 1A 24 VDC Optical Fiber Multi mode Single mode 15 Single mode 40 Single mode 80 Distance km 5 15 40 80 Wavelength nm 1300 1310 1310 1550 Min TX Output dBm 20 15 5 5 Max TX Output dBm 14 6 0 0 Sensitivity dBm 34 to 30 36 to 32 36 to 32 36 to 32 Recommended Diameter Core Cladding μm 50 125 9 125 9 125 9 125 1 dB km 800 MHz km Power Input Voltage 12 to 48 ...

Страница 16: ...5022 class A EMS EN61000 4 2 ESD Level 3 EN61000 4 3 RS Level 3 EN61000 4 4 EFT Level 3 EN61000 4 5 Surge Level 3 EN61000 4 6 CS Level 3 Martime DNV GL Shock IEC60068 2 27 Free Fall IEC60068 2 32 Vibration IEC60068 2 6 WARRANTY 5 years Technical Support Contact Information www moxa com support Moxa Americas Toll free 1 888 669 2872 Tel 1 714 528 6777 Fax 1 714 528 6778 Moxa China Shanghai office T...

Отзывы: