background image

Mountain Trike Owner’s Manual 

Issue 2 


16 

2.0   Riding Instructions


The method of using a Mountain Trike is quite unlike any other wheelchair you may have used 
before. The propulsion and control systems are designed to be simple to use and intuitive and 
give the rider unsurpassed levels for ride and handling performance. However, it may take a few 
moments to become familiar with the controls upon your first try.  
 
Please choose a smooth and level piece of ground that is clear of obstructions and contains 
sufficient space when riding your Trike for the first time.  
 
Areas that contain rough or steep terrain, open water, manoeuvring vehicles or large amounts of 
pedestrian traffic are not recommended.    
 

Note:   Always keep at least one or two fingers resting on the brakes at all times when riding 
and lean into the corners as you turn, lean left when turning left, lean right when turning right. 


2.1  

Pre-Ride Mechanical Safety Checks 

Before riding your Mountain Trike, it is imperative that you make the appropriate safety checks to 
ensure that the Trike is fit to ride.  


First make sure that the modules are correctly attached, the Drive Module Clamp Bolts are 
tight and all the QR levers are closed tight. Pay close attention to the drive module Clamp 
Bolts and the rear shock absorber QR lever.  


Make sure the Rear Wheel Steering Cable Attachment is correctly attached and centred, and 
the steering cables are secured correctly. 


Check both locking pins on the seat back are engaged and the seat is not free to swing or 
fold.  


Ensure that footrest locking pins are correctly engaged so that it is not free to move. 

 
Make a thorough visual inspection for damaged parts or any sections that show excessive wear or 
exhibit unintended movement or looseness.  


Check all of the bolts that connect the parts of the Trike together. For advice on tightening 
bolts see maintenance Section 3: ‘Service’. 


Check the spokes of the wheels, they should all be of uniform tension and none of the spokes 
or adjusting nipples should be loose. For advice checking wheel spokes see maintenance 
Section 4: ‘Service’ 


Check for unintended movement in the wheel bearings by lifting each wheel off the ground 
slightly, and holding the top of the wheel, try to wiggle it side to side. There should be no 
sideways movement or knocking felt.  

Содержание MT3.001.0001

Страница 1: ......

Страница 2: ...Mountain Trike Owner s Manual Issue 2 2 ...

Страница 3: ...ake sure that your dealer has given you all the manufacturers literature that was included with your Mountain Trike a complete list can be found on page 9 In case of a conflict between the instructions in this manual and information provided by a component manufacturer always follow the component manufacturer s instructions If you have any questions or do not understand something take responsibili...

Страница 4: ...n unleash the full potential of your Mountain Trike Please pay special attention to the safety information and cautions shown throughout this owner s manual If you encounter any issues with your Mountain Trike that aren t covered in this manual please contact your nearest Authorized Mountain Trike Dealer As your number one resource your Mountain Trike dealer can answer questions perform required m...

Страница 5: ...ng instructions 16 2 1 Pre Ride Mechanical Safety Checks 16 Suspension 17 Tyre Pressures 17 2 2 Transferring in and out 17 2 3 How to Engage Disengage Drive 19 2 4 Forward Drive 20 2 5 Reverse Drive 20 2 6 Steering 21 2 7 Braking 22 Anti Tip Wheels 22 2 8 Hill and Kerb Climbing 22 2 9 Descending Slopes 23 3 0 The Safety Bit 24 3 1 Riding safely about town 24 3 2 Riding safely Off Road 25 3 3 Wet W...

Страница 6: ...g the consequences of failure to maintain or inspect your Mountain Trike and of failure to follow safe riding practices The combination of the safety alert symbol and the word WARNING indicates a potentially hazardous situation which if not avoided could result in serious injury or death The combination of the safety alert symbol and the word CAUTION indicates a potentially hazardous situation whi...

Страница 7: ...untain Trike is properly fitted to the child that it is in good repair and safe operating condition that you and your child have learned and understand the safe operation of the Mountain Trike As a parent you should read this manual as well as review its warnings and the Mountain Trike s functions and operating procedures with your child before letting your child ride WARNING Make sure that your c...

Страница 8: ...ke sure that you understand each point in this section and refer to the cited sections on any issue which you don t completely understand Please note that not every Mountain Trike has all of the features described in this manual and the Trike pictured in the images may differ slightly to your own Trike Ask your dealer to point out the features of your Mountain Trike 1 1 Intended Operator The Mount...

Страница 9: ...t of the rider is 100 kg 16 stone Arm Reach The Trike uses lever mounted controls It is important that the rider can comfortably reach the drive levers and exact the appropriate amounts of force and control to safely operate the Trike The ability to use the braking system correctly is fundamental to safe operation The efficiency of the lever drive is also dependent on choosing the right size with ...

Страница 10: ...to three distinct modules Chassis Module Left Drive Module Right Drive Module complete with rear wheel steering cable attachment WARNING An understanding of the differences between assembling disassembling a Mountain Trike compared to standard wheelchairs is extremely important as failure to correctly assemble disassemble the product could affect performance causing the rider to lose control and f...

Страница 11: ... pins to retract Once in the upright position release the cord and the locking pins will spring out into the holes in the frame CAUTION Ensure the locking pins are BOTH fully engaged in the holes in the frame before riding Failure to do so could result in the seat back becoming unstable such that the user could lose control and fall Folding the Rear Wheel Like the seat the rear wheel can also be f...

Страница 12: ...onable hand finger strength is sufficient to provide the required compression force upon flipping the lever closed If the lever flips with little or no resistance then the adjusting nut will need tightening until the lever flips with enough resistance to provide adequate compression WARNING It is important that the QR levers are set to the right compression force failure to do so could result in t...

Страница 13: ...blies or modules The lever operated drive system on the Mountain Trike requires that the entire drive module is removed as a single piece including the wheel drive system suspension lever and the brake Please take a moment to familiarize yourself with the features and part names of the Trike to prepare for the following section If the drive module also controls the steering as shown in the diagram...

Страница 14: ...mportant to ensure the bolts are tightened evenly and in sequence to avoid damage to the clamp and to ensure the module is attached securely The recommended torque for the clamp bolts is 8 9Nm 70 80 in lb WARNING It is important that the Clamp Bolts are tightened correctly such that they apply the right compression force Failure to do so could result in a drive module becoming loose and in a worst...

Страница 15: ...ressing the spring loaded button that engages the Steering Cable Attachment onto the rear wheel fork Once the button on the side is depressed the Steering Cable Attachment lifts off and can be stowed with the Drive Module Footrest and Anti tip Wheel Adjustment The footrest and anti tip wheels can be raised lowered or removed by pulling the spring loaded pins located behind the front legs of the fr...

Страница 16: ...rike is fit to ride First make sure that the modules are correctly attached the Drive Module Clamp Bolts are tight and all the QR levers are closed tight Pay close attention to the drive module Clamp Bolts and the rear shock absorber QR lever Make sure the Rear Wheel Steering Cable Attachment is correctly attached and centred and the steering cables are secured correctly Check both locking pins on...

Страница 17: ...untain Trike dealer can help you set the suspension for you needs Tyre Pressure Check that the tyre pressures are even and are suited to the terrain and the type of riding being undertaken The range of acceptable tyre pressures is printed on the tyre depending on the manufacturer s specification Recommended tyre pressures for different riding conditions Wet mud wet grass gravel 20 25 psi 1 38 1 72...

Страница 18: ...otrest to allow you to get closer to the front of the Trike Take a moment to decide the best approach when transferring It may not be possible to use the method you would normally use transferring chair to chair so make sure you re comfortable with any approach before an attempt is made CAUTION Contact with the high performance off road tyres can cause abrasion to skin and clothing during transfer...

Страница 19: ... the drive levers are totally decoupled from the drive system and the levers and are free to move until they hit their end stops Similarly the wheels are free to roll if unobstructed To engage the drive keep the parking brake on and engage one lever at a time Do not release the parking brake until drive is engaged and you are ready to ride off Take up the left lever and with the lever positioned s...

Страница 20: ...st forward too such that you only push when you feel the need to 2 5 Reverse Drive To move the Trike backwards when on flat ground first ensure the steering is straight disengage the drive on both levers and lay them in their resting position Then push on the wheels as if the Trike were a standard wheelchair to propel backwards If reversing down a slope ensure the steering is straight and apply th...

Страница 21: ... push one or both of the drive levers whilst pointing and holding the Steering Handle in the desired direction This can take some practice before it becomes smooth It is also recommended to practice turning and get a feel for the turning circle of the Trike in a flat and smooth area that s free of obstructions before moving onto more challenging terrain or busy or confined spaces It is important t...

Страница 22: ... stops before attempting more challenging terrain Note Always keep at least one or two fingers resting on the brakes at all times when riding WARNING Excessive braking force could cause the Trike to tip causing the rider to lose control and fall WARNING Uneven force applied to each brake when using independent brakes can cause the Trike to change direction causing the rider to lose control and fal...

Страница 23: ...ke still on the brakes while pulling the drive levers back You can wait as long as you need to between pushes provided the brakes are still applied WARNING Riding on steep terrain can be unforgiving and increases the risk of the rider losing control and falling CAUTION When climbing a kerb or similar obstacle always approach it head on and ensure that the steering is straight until the rear wheel ...

Страница 24: ...r s are as safe as possible so they gain the maximum enjoyment from riding their Mountain Trike Seat Belt and Foot Straps A seat belt and foot strap is also provided with your Mountain Trike as an optional extra should you so wish to use them The seat belt can be attached at the fastening points either side of the bottom of the seat back and the foot strap can be attached between the two forward l...

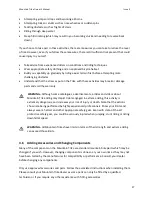
Страница 25: ...es Kerbs pot holes drain covers railway tracks expansion joints construction works debris and other obstructions that could cause you to swerve into the path of others or hinder your progress 6 Slow down and look both ways at street crossings 7 Never ride with headphones as they can drown out noises from potential hazards around you or the cables may tangle in the moving parts of the Trike 8 Never...

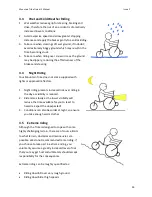
Страница 26: ... lights or approved reflectors 1 Night riding presents increased risk over riding in the day as visibility is reduced 2 Ride more slowly as the lower visibility will reduce the time available for you to react to hazards Expect the unexpected 3 Conditions can also be colder at night so ensure you take enough warm clothes 3 5 Extreme riding Although the Trike is designed to cope with some highly cha...

Страница 27: ...os about Mountain Trike riding may depict riders engaged in extreme riding this activity is extremely dangerous and increases your risk of injury or death Note that the actions shown are being performed by highly experienced professionals Know your limits and always wear a helmet and other appropriate safety gear Even with state of the art protective safety gear you could be seriously injured when...

Страница 28: ...ce schedule shown in 4 2 However some maintenance can and should be performed by the user and requires no special tools Following the bedding in period discussed in 4 3 the Mountain Trike Company recommends a complete service by the Mountain Trike dealer every 6 months or 50 hours of riding which ever comes sooner or if any fault is suspected 4 1 Looking After Your Mountain Trike To keep the Trike...

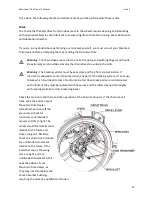
Страница 29: ...n If lubricant is allowed to come into contact with any part of the braking system it can cause failure which could lead to loss of control and a fall Once brake pads are contaminated with lubricant they must be replaced with new ones and the rotors cleaned thoroughly with isopropyl alcohol or disc brake degreaser Check the tension in the chain and the operation of the Chain Tensioners If the chai...

Страница 30: ...n the spokes or rebuild the wheel Check the tyres for any cuts damage excessive tread wear or embedded objects If any damage is found the tyres should be replaced Check the suspension is operating correctly by pushing down on the seat or frame the shock absorbers should move smoothly If the shock absorbers do not move freely or appear to be seized seek the advice of your Mountain Trike dealer as t...

Страница 31: ...periods of the Trike not being ridden the brake bite point can feel poor Simply pump the brake ever several times and the bite point should return to normal as the system pressurises Warning Hydraulic brakes contain fluid which is hazardous to health if ingested and irritates skin on contact The Mountain Trike company recommend any maintenance or service to the brakes themselves is carried out by ...

Страница 32: ...the advice of your Mountain Trike dealer if the looseness persists Check the position of the Steering Handle corresponds to the correct position of the rear wheel When the lever is straight and upright the rear wheel should point straight forward At full lock in either direction the wheel should be close to 90 degrees to the forward direction If the wheel is not straight corresponding to the lever...

Страница 33: ...pecial tools are necessary only your Mountain Trike dealer should do this Wheel drive train and pivot bearings should be serviced every 12 18 months or when looseness is felt in the bearing 4 3 Bedding in Period When first riding the Trike from new it is important to understand that various components and systems will be bedding in and will take time to reach their full operating performance As ev...

Страница 34: ...urer via the Mountain Trike dealer This warranty is limited to the repair or replacement of a defective frame or components and is the sole remedy of the warranty and applies only to a Mountain Trike purchased from an authorised Mountain Trike dealer The warranty does not cover normal wear and tear improper assembly such as crossed clamp bolt threads poor maintenance or installation of parts and a...

Страница 35: ...rights between the Mountain Trike dealer and the owner In the event of a problem the owner should contact the Mountain Trike dealer in the first instance All Mountain Trikes should be checked before every ride and periodically checked by an authorised Mountain Trike dealer for indicators of stress and or potential failure including cracks deformation corrosion paint peeling dents and any other ind...

Страница 36: ...Mountain Trike Owner s Manual Issue 2 36 ...

Страница 37: ...Mountain Trike Owner s Manual Issue 2 37 ...

Отзывы: