background image

7

Model EA91A&EA90A

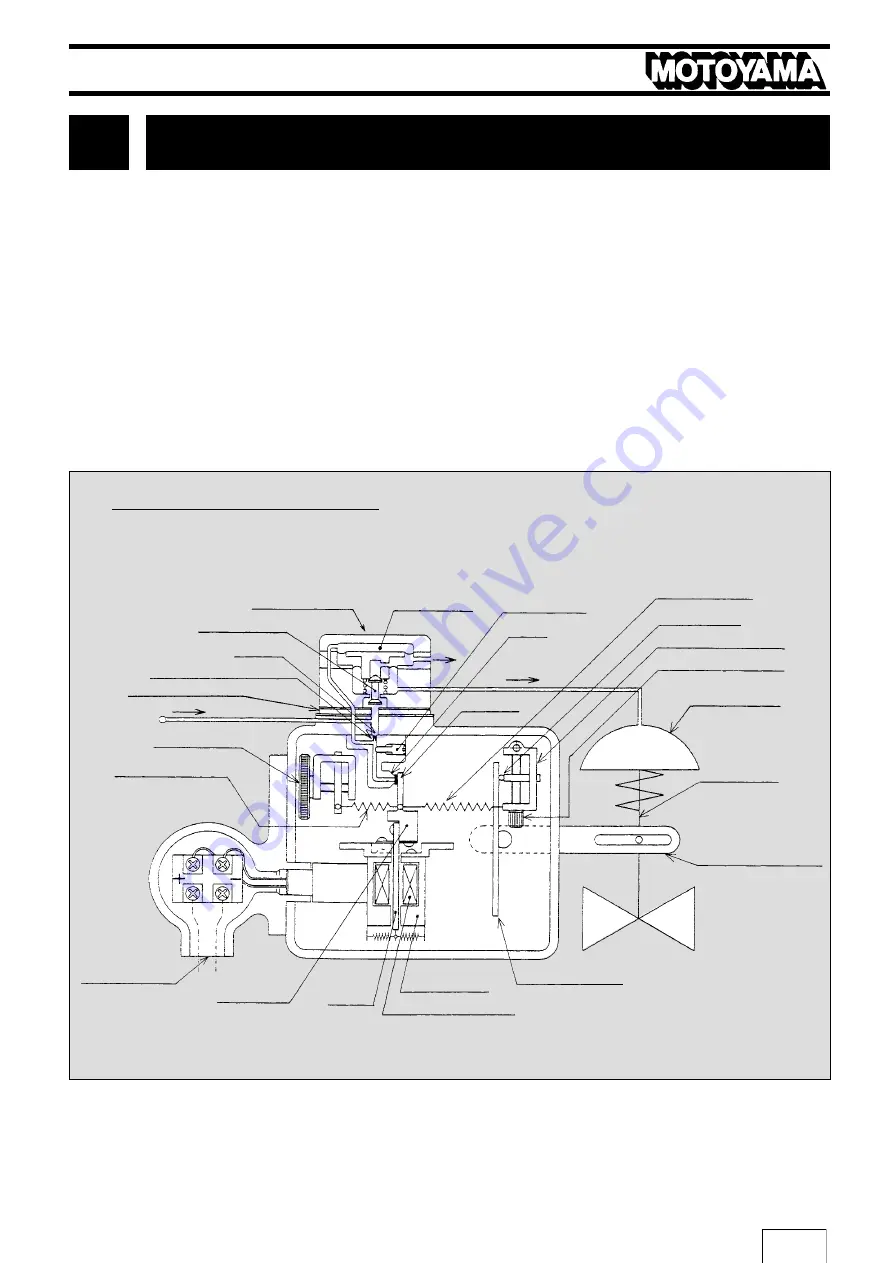
PRINCIPLE 0F OPERATION 

3

Auto/Manual
Switching Screw

Nozzle
Back Pressure

Pilot Valve

Figure of Principle of Operation

Inner Valve

Filter

Restriction

Orifice Plate

Supply Press.

Zero Adjustment Knob

Zero Adjustment Spring

Conduit Connection

Balancer

Armature

Torque Motor

Transmission Lever

Torque Motor Coil

Nozzle

Output

Exhaust

Flapper

Stroke Adjustment Knob

Actuator

Valve Stem

Stroke Adjustment Lever

Transmission

Feedback Lever

The Model EA91A  and EA90A Electro-Pneumatic Positioner is used  as  accessory measuring instrument  to 
pneumatic control valves. This converts electric signals from the controller into pneumatic pressure to position 
the opening of pneumatic control valve. 
As the signal current from the controller or manual operator increases, the torque motor coil generates magnetic 
pole on the armature. The armature receives rotary torque in the counter-clockwise direction, and varies the 
distance between the nozzle and the flapper. As a result, the nozzle back pressure changes, and the pilot 
valve reacts accordingly. 
The output air of pilot valve is supplied to the diaphragm motor, and moves the control valve. The valve stem 
movement is mechanically transmitted to the feedback spring through feedback lever, transmission lever, and 
stroke adjustment lever, and balances the valve movement at a position that is equal to the generated torque due 
to the signal current.

Feedback Spring

Содержание EA90A

Страница 1: ...purpose only and should not be considered certi ed marketability and conformability of this product MOTOYAMA is continuously improving and upqrading its product design speci cations and or dimensions...

Страница 2: ...roduct without notice the speci cations dimensions adjustments illustrations and other items included in this manual might be di erent in details For any questions about the delivered product or this...

Страница 3: ...tuator 4 6 Conformity of Capacity and Characteristics 4 7 Installing Dimensions 2 2 2 3 4 4 4 4 5 5 5 6 7 8 8 9 9 10 11 12 14 15 15 16 16 19 19 20 20 20 20 20 22 22 23 23 24 25 26 26 27 5 EXTERNAL CON...

Страница 4: ...ther the explosive gases are absent or not maintenance must be limited to visual inspection and adjustment of movable parts not requiring the opening of the terminal box such as zero adjustment and st...

Страница 5: ...tenance the EA90A Valve Positioner installed in hazardous area carefully make sure before and during maintenance whether the explosive gases are absent or not by using gas detector 2 Maintenance durin...

Страница 6: ...valve positioners are of explosion protected construction and are improved the positioning accuracy and response performance of process control valves installed in hazardous areas 2 2 Applicable Regu...

Страница 7: ...tioner case 2 The explosion protection WARNING nameplate is attached on the upper part of terminal box EA91A and EA90A have di erent contents each other 3 The speci cation nameplate is attached on the...

Страница 8: ...r the safety barrier selection please refer to the following data for Intrinsically safe approval of model EA90A Performance classi cation and Group ia II C Permissible maximum values Ui 30V Ii 100mA...

Страница 9: ...s from the controller into pneumatic pressure to position the opening of pneumatic control valve As the signal current from the controller or manual operator increases the torque motor coil generates...

Страница 10: ...58 5 164 5 51 7 45 5 137 218 KXB LO 16F Special Option KXB LO 16 Standard 3 51 51 135 12 5 153 5 31 7 Left Lateral View Built in Cam Type See above as left lateral view Leading External Cable Conduit...

Страница 11: ...dered speci cation is conformed with 2 Appearance Check Check the presence of damage on the device due to transport 3 Accessory Identi cation Lever Type Bracket Stem Clamp Connector Arm included Feedb...

Страница 12: ...tion Fix the connector pin to feedback lever and connector arm IMPORTANT IMPORTANT At this point attach the stem clamp upward approx 5 to 10 mm from lock nut Fix the connector arm so as to be parallel...

Страница 13: ...o connecting shaft Attach the bracket Attach the bracket to the preinstalled spacer bolt Attach the connecting pipe Attach the connecting pipe to the serrated portion of the feedback shaft at back sid...

Страница 14: ...ce plate with cut position of gasket When replacing or changing the position of ori ce plate remove pilot cover and loosen three screws xing pilot assembly General classi cation for usage of ori ce pl...

Страница 15: ...amped on the cam Loosen ange nut to select cam or to adjust position of cam 4 6 2 Selection of Buit in Cam The exhaust hole of pilot cover changes due to installation position of the positioner Refer...

Страница 16: ...100 45 45 45 58 185 185 185 195 215 225 233 312 A B C D L Unit mm Actuator Size 240 280 330 400 500 650S 241 241 241 241 125 125 185 185 93 93 143 143 193 205 223 296 250 270 305 405 A B C D L Unit m...

Страница 17: ...afety Construction Supply Pressure Supply Pressure Electro controller Electro controller Hazardous Area Non hazardous Area Hazardous Area Non hazardous Area Safety Barrier Air Filter Regulator Air Fil...

Страница 18: ...pneumatic Valve Positioner Flameproof Explosion protected Construction Connect wires in accordance with the wiring diagram in Item 5 1 1 The parallel pipe female thread G1 2 PF1 2 female screw is used...

Страница 19: ...for outside diameter of cable Screw in connecting assembly to ter minal box and x with lock nut Insert cable gland union coupling and union cover to the cable Then insert washer and rubber packing to...

Страница 20: ...the wires against external damages Be sure to ground uncharged open metallic parts Connect wires in accordance with the wiring diagram shown in Item 5 1 2 The parallel pipe female thread G1 2 PF1 2 f...

Страница 21: ...ossible to inspect and adjust with the cover removed However be very careful not to generate impact sparks during maintenance 6 1 Advance Check before Calibration Switching of Direct Reverse Action fo...

Страница 22: ...tment Common to Linear Type and Built in Cam Type Loosen lock screw xing stroke adjustment knob of the stroke adjustment lever If making the stroke angle wider adjust by turning screw of stroke adjust...

Страница 23: ...Actuator Type 3900 Standard Cam for Linear Special Cam for Eq Kinds of Spring Feedback Spring Identification Color None Blue None Blue Black White Red Yellow Standard 1 2 Standard 1 2 Zero Adjustment...

Страница 24: ...ck at the back of the terminal cover IMPORTANT Never remove the stopper screw IMPORTANT If not venting through the ltered regulator it might apply excessive pneumatic pressure to the positioner or the...

Страница 25: ...bsence of wear and tear Use Plasti lube 00 when reassembling Pressure Gauge Restriction Fixed Restriction Filter Diaphragm Gasket Packing Nozzle Flapper Supply Air Valve Seat for Main Body Feedback Le...

Страница 26: ...f the pilot cover with original position and mount the pilot cover 7 2 2 Pilot Follow the procedure described in Item 7 2 1 for operation of supply air pressure and ltered pressure reducing valve For...

Страница 27: ...al switching mechanism to M adjust supply air pressure and check whether control valve works normally or not If abnormality is present disassemble control valve Remove short circuited part and then ch...

Страница 28: ...k Spring Main Body Pilot Valve Output Pressure Gauge Manual Switching Screw Zero Adjustment Knob Terminal Box Zero Adjustment Spring Nozzle Flapper Model EA91A EA90A Electro pneumatic Valve Positioner...

Страница 29: ...5 10 12 7 2800 3800 3400 2800 3800 2800 2800 3800 3300 9 2 Dimension of Fitting Bracket Note 1 Actuator Type The bracket for 3800 3400 and 3300 can be attached to Model EA91A electro pneumatic valve...

Страница 30: ...293 183 293 191 298 80 80 110 100 110 100 110 100 52 52 70 80 110 90 130 140 240 330 240 330 400 500S 500 500SH BL 500SH BL 650 650 Actuator Size Actuator Type L 40 55 240 280 N24 N40 200 270 C20 330...

Страница 31: ...450 792 0851 1013 1 TEL 0897 40 0270 FAX 0897 40 0305 870 0108 980 1 TEL 097 527 3704 FAX 097 522 2352 116601 39 14 7 TEL 86 411 6589 1277 FAX 86 411 6589 1278 SALES AND SERVICE NETWORK Overseas Marke...

Отзывы: