background image

Navigation

27

ENGLISH

location as described in 

 5.5  “How to Navigate” 

, repeat the process for 

each additional new waypoint. Once you have finished adding waypoints, 
click 

to finish creating the itinerary. 

Note

You can also add a waypoint by selecting any point on the map, and then 
clicking the waypoint button shown on the context bar. Then you can either add 
it to an existing itinerary or create a new one where the selected waypoint will 
be included. 

Changing an Itinerary 

•  Select an itinerary from the list. 

•  To edit the itinerary’s name and description, click 

Edit/Rename


and 

alter 

the fields as described in 

“Creating an itinerary”

•  To delete the itinerary, click 

Delete

 . 

•  To view the whole itinerary on the map, click 

View On Map


. Only the 

route between the itinerary waypoints will be calculated and shown. To 
calculate the route from your current GPS location, select 

Navigate

 . 

•  The first waypoint is represented by a green flag and the last one by a 

chequered flag. The waypoints in between are marked with orange flags. To 
edit the itinerary’s waypoints, click 

Show Waypoints


. You can then add 

a new waypoint as described in “Creating an itinerary”. 

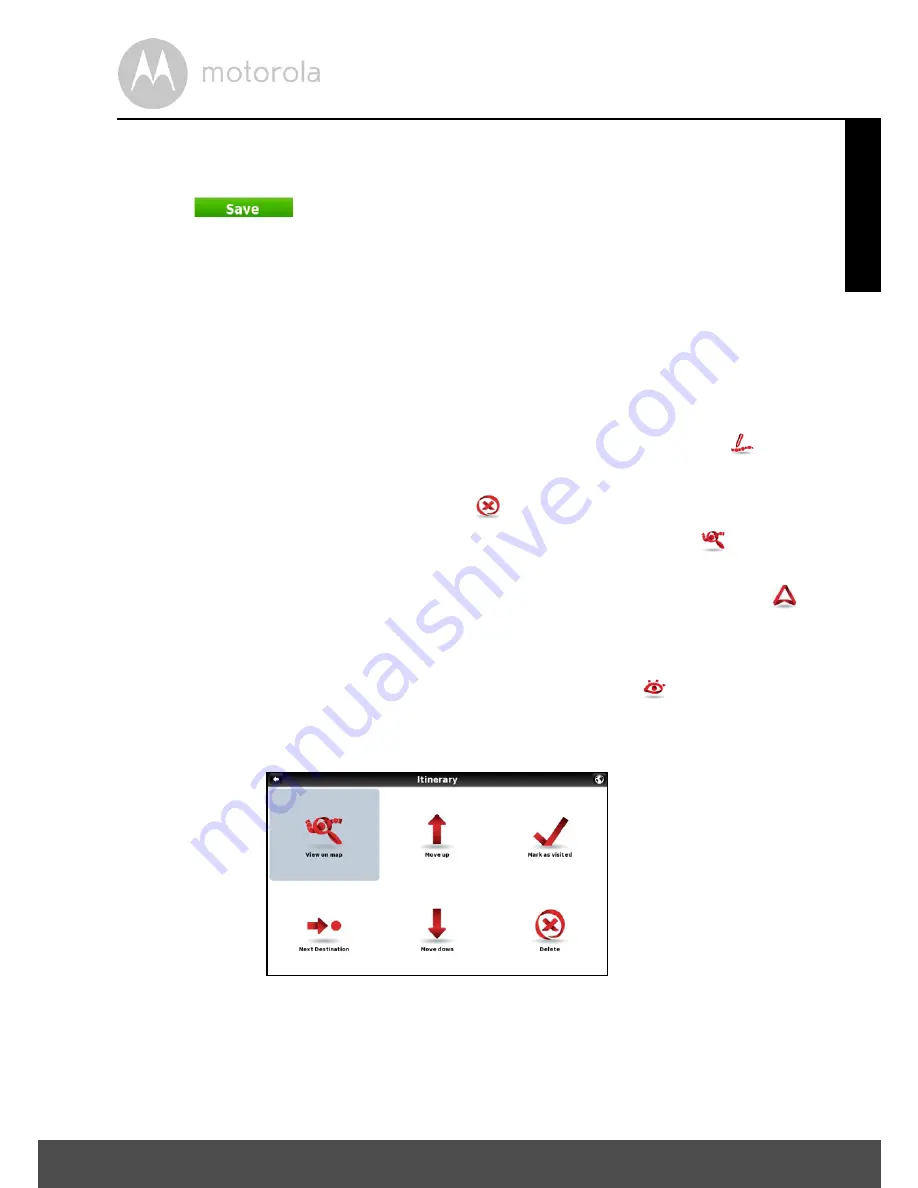
•  You can also select each waypoint in turn and perform several actions: 

•  View the waypoint’s location on the map; 
•  Mark the waypoint as visited, so that when you are navigating the itinerary, 

you skip that location; 

•  Move the waypoint up on the itinerary list; 

Содержание XPLORE 500

Страница 1: ...USER S GUIDE Motorola Satellite Navigation System with Free Map Updates Model XPLORE 500 600 The features described in this guide are subject to modifications without prior notice ...

Страница 2: ...using your finger You can also use this system to plan your trip to suit your personal preferences and interests and to save interesting destinations before you set off on your journey The device comes preloaded with maps which include a free yearly update for the life of your product You will receive all updates to road network addresses and points of interest Please keep the packaging materials ...

Страница 3: ...nit Off or put to sleep via the on screen options 3 Reset Button Insert the tip of a stylus pen or small blunt object into the reset hole to reset the system 4 Charge Indicator Shows the charging status of the battery Red charging Green fully charged 5 Memory Card Slot For use with micro SD cards 6 USB Port For charging and data transfer ...

Страница 4: ... can check the number of satellite signals that the unit is receiving and the strength of those signals by viewing the Satellite Navigation Device Your Satellite Navigation Device operates under open sky conditions in order to receive a satellite signal Please ensure that you are not using the device indoors or in areas where the satellite signal is weak For first time of use or after a few days o...

Страница 5: ... bracket 12 2 6 3 Fitting the Unit 13 3 Basic Device Operations and Settings 14 3 1 Starting Up 14 3 2 Settings 14 3 2 1 Volume 14 3 2 2 Backlight 15 3 2 3 GPS Information 15 3 2 4 Date Time 16 3 2 5 Calibration 16 3 2 6 Language 16 3 2 7 Restore Set 16 3 2 8 System Info 16 4 Additional maps and upgrades 17 5 Navigation 18 5 1 GPS Connection 18 5 2 What you need 18 5 3 Main Map Screen 19 5 3 1 Map...

Страница 6: ...28 5 7 My Route 29 5 7 1 Show Route 29 5 7 2 Stop Navigation 29 5 7 3 Road Book 29 5 7 4 Alternative Routes 29 5 7 4 1 Calculate Alternative 29 5 7 4 2 Roadblock 29 5 7 4 3 Avoid Part of Route 30 5 7 4 4 Calculate Original 30 5 7 5 Start Demo 30 5 8 Settings 31 5 8 1 General 31 5 8 1 1 Speaker 31 5 8 1 2 Light 31 5 8 2 International 31 5 8 2 1 Language 31 5 8 2 2 Keyboard Type 31 5 8 2 3 Kph Mph 3...

Страница 7: ... Home 38 5 9 2 Start up Wizard 38 5 9 3 My Maps 38 5 9 4 GPS 38 5 9 5 Version 38 5 9 6 Data Import Export 38 5 9 6 1 Importing data 39 5 9 6 2 Exporting Data 39 5 10 Store 41 5 11 Nplus 42 5 11 1 Buy 42 5 11 1 1 Paying for purchases 43 5 11 2 Updates 43 5 11 3 My Products 44 5 11 4 Enter Serial 44 5 11 5 Device Information 45 5 11 6 Help 45 6 Frequently asked questions 46 7 Disposal of the Device ...

Страница 8: ...sential that you drive with due care and attention Never modify the settings or program your Sat Nav while driving Only look at the map when it is safe to do so When mounting the Sat Nav in your car make sure that it does not obscure your view or impede the operation of any driving controls Prohibited Areas Do not operate your Sat Nav in hospitals or near any electrical medical equipment Do not op...

Страница 9: ...he other end into the car s cigarette lighter 12V DC socket 3 The charging indicator on the unit will light up red When fully charged the light will turn green The adaptor is also compatible with 24V DC sources as found in many heavy goods vehicles 2 1 2 Using the USB cable sold separately It is possible to charge the unit via a USB cable but the charge time will be significantly increased Also if...

Страница 10: ...er at the bottom as shown above 3 Slide the card gently into the slot until it clicks into place 4 Once the card is installed it does not need to be removed If you need to remove the card push the card in and it will eject from the slot 2 3 Turning the Sat Nav Device On Off 1 To turn on the unit press and hold the On Off button on the top of the unit for about 3 seconds The unit will power up 2 To...

Страница 11: ...in 5 seconds the unit will turn off automatically Note If the unit is not to be used for a long period of time it is advised that you switch the unit Off 2 5 System Reset Under extreme circumstances it may be necessary to reset the system Reset the system if the following situation occurs Slow screen refresh rate or sluggish operation resulting in an inoperable unit The system will not turn Off wi...

Страница 12: ... away from the suction pad Place the pad on the windscreen and push the lever towards the pad until it clicks into place 2 6 2 Fitting the holding bracket It is best to fit this to the unit before it is attached to the windscreen The bracket can only be fitted one way Slide the bracket onto the securing lugs on the end of the car mount and then push down firmly until it clicks into place ...

Страница 13: ...ce at the top To remove the unit from the car mount press and lift the tab at the top of the bracket then pull the unit forward and out of the bottom of the bracket To remove the car mount from the windscreen lift the lever away from the windscreen then gentle pull the tab on the suction cup to release the suction as you pull the mount away from the windscreen ...

Страница 14: ...u press on the icon the following screen is displayed 3 2 1 Volume Press Volume to modify the volume level of the voice prompts You can increase or decrease volume level by tapping or You can also adjust volume level via the navigation software as described in section 5 8 1 1 Speaker If the volume is reduced to 0 bar the unit will be muted You can also switch the screen tap sound on or off by sele...

Страница 15: ...alsthe unit is receiving as well as the strength of these signals This page gives the latitude and longitude of your current position your current speed and the status of your position i e Fixed 3D or Fixed Invalid etc The compass circle shows the satellites that the unit is receiving and the bar chart shows the signal strength for these satellites To exit press Note At least four GPS signals are ...

Страница 16: ... calibration has been completed press anywhere on the screen to return to the previous menu 3 2 6 Language Press Language to change the language Tap on the screen to scroll through the available language options Select the language you want from the available options so that a is shown then press to confirm and exit 3 2 7 Restore Set Under extreme circumstances it may be necessary to restore the s...

Страница 17: ... which include a free yearly update for the life of your product You will receive all updates to road network addresses and points of interest The product life is defined as the useful life of the device Max 3 years which means the period of time that Ndrive continues to support your device with software updates services content or accessories A device will have reached the end of its life when no...

Страница 18: ... on the lower part of the windscreen Note It may take up to 10 minutes to establish the first connection Subsequent connections will be faster 30 seconds to 1 minute but if you have not used the unit for several days or are far away from the last location where you used the unit it may take up to 10 minutes again to find a strong signal 5 2 What you need Please make sure that the battery in your d...

Страница 19: ...rent location on the map and navigation will not be possible Please ensure that you have an open view to the sky in order to obtain a strong enough signal Zoom out Main menu button Map scale Device setting button 3D 2D Tap this button to alternate between 2D and 3D map visualization according to your preference Zoom In Points of Interest Click on the POI to see more information Tap on the middle o...

Страница 20: ...ed time left to destination Estimated time of arrival Speed limit on the current street Distance left to destination Current speed Current time Next street name Next maneuver Distancetothe next maneuver Time speed anddistance controls Return to your GPS location if you have moved Road speed limit Current street Locator will changecolour according to signal strength Add point to favourites Add poin...

Страница 21: ...he screen Different keyboard layouts can be selected depending on the information you wish to enter Here are some tips you should keep in mind When searching for a street you can simply enter the initials separated by a space and results will show up Example when you enter C P W Central Park West will show up on the results list Start entering the first few letters and the results will be automati...

Страница 22: ...eric Keyboard 5 4 2 3 Extended Character Keyboard Symbol Keyboard space bar Remove the keyboard from the screen Access numeric keyboard Delete characters Access the extended characters keyboard Access the symbols keyboard Return to the standard keyboard ...

Страница 23: ... be taken to the Go Screen Click 5 5 2 Navigate to a Recent Location From the main menu select Go To and then Recent Location Select a destination from the list of recent locations used After completing your selection you will be taken to the Go Screen Click 5 5 3 Navigate to an Address From the main menu select Go To and then Address If necessary select the country from the shown list after selec...

Страница 24: ...e asked to set the location 5 5 4 1 Setting Your Home Location From the main menu select My NDrive and then Define Home Select one of the available options for setting your home location Postcode Address Places Recent Location Use the method as described in 5 5 How to Navigate for your chosen option to enter your location Alternatively you can set the location using your current GPS location or th...

Страница 25: ...a City to select a POI which is in a location not around your current GPS location First you will need to enter a location via the city field If the city field already contains your desired location you can skip this step and either begin searching via category or directly for a place name via the places field After completing your selection you will be taken to the Go Screen Click 5 5 5 2 Navigat...

Страница 26: ...and telephone number The Name and Tag information is used when searching for a favourite location as described in Creating an Itinerary Once entered click 5 5 5 4 Navigate Using an Itinerary Select Itineraries You can then create a new itinerary or select an itinerary from the list if you have already created or imported one Creating an Itinerary To create an itinerary click Add New Itinerary Sele...

Страница 27: ...escribed in Creating an itinerary To delete the itinerary click Delete To view the whole itinerary on the map click View On Map Only the route between the itinerary waypoints will be calculated and shown To calculate the route from your current GPS location select Navigate The first waypoint is represented by a green flag and the last one by a chequered flag The waypoints in between are marked wit...

Страница 28: ... on the map 5 6 Go Screen Apart from allowing you to navigate to your chosen destination the Go Screen shows you information about the location you have selected and allows you to carry out the following functions Note Share and Contact are not used on this device as it has no network capability Allows you to view the entered location on the map Allows you to save the location to your favourites f...

Страница 29: ...e of manoeuvre the road name you will be joining as well as an estimated time to that manoeuvre 5 7 4 Alternative Routes Select Alternatives You will be shown a number of options to allow you to make changes alterations to your calculated route 5 7 4 1 Calculate Alternative Select Calculate Alternative the unit will now calculate analternative route based on your set route preferences An overview ...

Страница 30: ...de You willsee asmall red cross appear and the road name will also turn red Once you have selected all the roads you wish to avoid click A new route will be calculated based on the roads you have excluded An overview of the route will be briefly shown with the original route shown with a light blue line 5 7 4 4 Calculate Original Select Calculate Original The unit will re calculate the route that ...

Страница 31: ...n System or Always on then select to confirm the setting Youwill be taken tothe main Settings menu If you select System then the backlight will be set from the setting defined by the GPS unit 5 8 2 International 5 8 2 1 Language Scroll up and down through the list of available languages select the desired language and you will hear an example of the voice in that language To confirm select You wil...

Страница 32: ... mode you are shown the lane layout as simple arrows indicating the directional flow of the traffic for each lane In detailed view the same information is shown but as visual signposts as you would see along the side of the road Select to confirm the setting You will betaken to the main Settings menu 5 8 3 2 North up in 2D When switched to On the map will stay orientated North and the cursor will ...

Страница 33: ...elected Scroll through the available Day or Night templates a snapshot of how the template will look is shown for each option If you select Enable auto toggle the chosen templates will change automatically between day and night according to the times shown for each Select to confirm your settings You will be taken to the Map Appearance menu 5 8 3 5 Points of Interest Allows you to customise which ...

Страница 34: ...e more time and some of the roads may be narrow or steep Pedestrian Mode calculates your route using the shortest path available for walking or riding a bicycle routing calculation will not consider traffic signs and routing is limited to a 20km or 12 4 mile distances Select to confirm your settings You will be taken to the main Settings menu 5 8 4 2 Tolls Allows you to change if toll roads are to...

Страница 35: ...peed Limit Alarm Allows you to activate deactivate an alarm to warn you that you have exceeded the speed limit for the road that you are currently on Use and to switch between the available options Select to confirm your settings You will be taken to the main Settings menu Off The alarm will be switched off Visual The speed limit warning icon will be shown indicating the current speed limit for th...

Страница 36: ...ct Yes to confirm andrestorethe unit or No to cancel After selecting Yes you will then be asked to restart the NDrive software Select OK and you will be taken to the initial screen seen after powering on the device Select Navigation again to restart NDrive 5 8 6 3 Theme Allows you to change between two different themes for the menu button colour Classical and Rainbow With Classical the buttons wil...

Страница 37: ...5 8 7 1 GPS Use and to switch between On and Off When switched Off you will not be able to navigate Select to confirm your settings You will be taken to the main Settings menu 5 8 7 2 Co ordinates Use and to switch between the available options DDD Degrees and decimal degrees DMM Degrees and minutes DMS Degrees minutes and seconds Select to confirm your settings You will be taken to the main Setti...

Страница 38: ...ys information relating to the maps you have installed on your device including the country the map is for and the date when it was compiled 5 9 4 GPS Displays information relating to the status of the GPS signal on your device 5 9 5 Version Displays information relating to the version of NDrive software you are running on your device 5 9 6 Data Import Export Allows you to back up your saved data ...

Страница 39: ...g on it and the import process will begin automatically Once finished click and you will be returned to the Data Import Export screen 5 9 6 2 Exporting Data When exporting your favourites Itineraries the information will be converted back into a KML file and will be exported to the same corresponding folder as described in section 5 9 6 1 Importing data From there you will be able to copy them to ...

Страница 40: ...40 Navigation Exporting Favourites After selecting Export Favourites your favourites will be automatically exported Once finished click and you will be returned to theData Import Export screen ...

Страница 41: ...vice please visit www ndrive com select the support tab and then NPlus Download and install the NPlus software on your PC Once installed connect the device to your PC via a USB cable and then launch the NPlus software Note If connecting the device to a computer with windows XP you will first need to download ActiveSync from the Microsoft website For Windows Vista 7 8 when you connect your device W...

Страница 42: ...e make a note of your login details for future use After logging in you will be shown the main Nplus screen from where you are able to make purchases select updates and install them onto your device 5 11 1 Buy Select Buy to be taken to a different screen where you will be able to purchase additional maps additional language voices TTS voices Text To Speech You can select and purchase items here wh...

Страница 43: ...o the provided fields before selecting to continue with your purchase If you have a serial number to activate a map use the option to be taken to a screen where you can enter your serial number 5 11 2 Updates Select Updates to have Nplus checkyour device for any available map updates If there are no updates available Nplus will show this on the update screen If updates for your device are availabl...

Страница 44: ...updates purchases have been downloaded you will be asked if you wish to install now or later Select Yes to begin installing your updates purchases You will be shown a second pop up window when installation has been completed You can now close down Nplus and disconnect your unit from the computer If you wish to install your updates at a later date select No When you wish to install your updates pur...

Страница 45: ... 5 11 6 Help Select Help to gain access to Ndrives online help sections which will provide help and advice on using the Ndrive software Select from one of the four available categories to be taken directly to the webpage containing that information You can choose from the following categories User guides Frequently Asked Questions FAQ Video Tutorials Technical support ...

Страница 46: ...d like to inform our map data provider Please contact NDrive via the support tab on the website www ndrive com I am experiencing problems getting a GPS fix If you have problems getting a satellite fix with GPS you can see how many satellites are being received by going to the main menu and selecting GPS receiver please make sure you are outside and the GPS antenna has good visibility to the open s...

Страница 47: ...ll Screen responds slowly Make sure that your device is connected via the car charger or has sufficient battery If the problem persists reset the unit with the reset switch found on the rear of the unit Computer connection problems Make sure that your unit and computer are both turned on before trying to establish the connection You should reset your unit prior to connecting and always disconnect ...

Страница 48: ...mbol on the product user s guide and or box indicates this Some of the product materials can be re used if you take them to a recycling point By reusing some parts or raw materials from used products you make an important contribution to the protection of the environment Please contact your local authorities in case you need more information on the collection points in your area Dispose of the bat...

Страница 49: ...sold forusewiththisproductismanufacturedtobefreefrom defectsinmaterialsand workmanship under normal consumer usage for the period outlined below This Warranty is your exclusive warranty and is not transferable Who is covered This Warranty extends only to the first consumer purchaser and is not transferable What will BINATONE do BINATONE or its authorised distributor at its option and within a comm...

Страница 50: ...CE FOR DAMAGES IN EXCESS OF THE PURCHASE PRICE OF THE PRODUCT OR ACCESSORY OR FOR ANY INDIRECT INCIDENTAL SPECIAL OR CONSEQUENTIAL DAMAGES OF ANY KIND OR LOSS OF REVENUE OR PROFITS LOSS OF BUSINESS LOSS OF INFORMATION OR OTHER FINANCIAL LOSS ARISING OUT OF OR IN CONNECTION WITH THE ABILITY OR INABILITY TO USE THE PRODUCTS OR ACCESSORIES TO THE FULL EXTENT THESE DAMAGES MAY BE DISCLAIMED BY LAW Som...

Страница 51: ...t the fault of MOTOROLA or BINATONE are excluded from coverage Use of Non Motorola branded Products and Accessories Defects or damage that result from the use of Non Motorola branded or certified Products or Accessories or other peripheral equipment are excluded from coverage Unauthorised Service or Modification Defects or damages resulting from service testing adjustment installation maintenance ...

Страница 52: ...rised Repair Centre To obtain service you must include a the Product or Accessory b the original proof of purchase receipt which includes the date place and seller of the Product c if a warranty card was included in your box a completed warranty card showing the serial number of the Product d a written description of the problem and most importantly e your address and telephone number These terms ...

Страница 53: ......

Страница 54: ...ifications Antenna Built in GPS high sensitivity receiver 42 channels Memory 128MB SDRAM Built in Display Xplore 500 5 colour TFT touch screen Xplore 600 6 2 colour TFT touch screen Weight Xplore 500 0 169 kg Xplore 600 0 245 kg Dimension Xplore 500 135mmx84mmx13 8mm Xplore 600 169mmx100mmx14 6mm Battery Re chargeable Lithium Polymer Battery 2000mAh USB MiniUSBsocketforchargingandconnecttoPCformap...

Страница 55: ... this product MOTOROLA and the Stylised M Logo are trademarks or registered trademarks of Motorola Trademark Holdings LLC and are used under license All other trademarks are the property of their respective owners 2017 Motorola Mobility LLC All rights reserved UK_EN Version 1 0 Printed in China ...

Страница 56: ... harmful interference in a residential installation This equipment generates uses and can radiate radio frequency energy and if not installed and used in accordance with the instructions may cause harmful interference to radio communications However there is no guarantee that interference will not occur in a particular installation If this equipment does cause harmful interference to radio or tele...

Отзывы: