background image

Keypads

B - 3

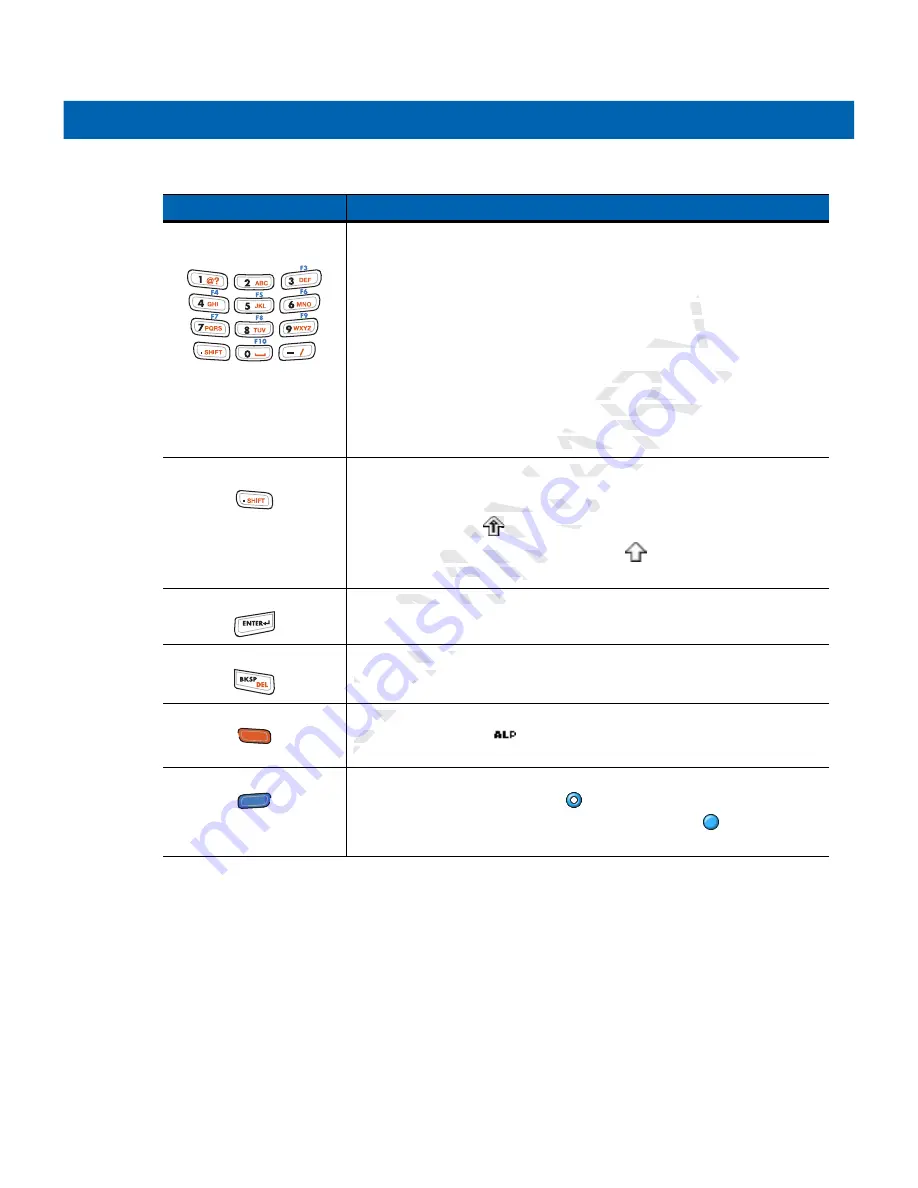
Numeric/Alpha/Special
Function

Numeric, alpha or special function keys. Numeric by default.

Produces a special function when the blue 

FUNC

key is activated.

Produces alpha values when the orange 

ALPHA

 key is activated.

In Alpha state, produces the lower case alphabetic characters on the key. Each 
key press produces the next alphabetic character in sequence. For example, 
press and release the 

ALPHA

 key and then press the 

4

 key once to produce the 

letter ‘g’; press and release the 

ALPHA

 key and then press the 

4

 key three times 

to produce the letter ‘i’.

When the 

SHIFT

 key is pressed in Alpha state, the upper case alphabetic 

characters on the key are produced. For example, press and release the 

ALPHA

 key, press and hold the 

SHIFT

 key and then press the 

4

 key once to 

produce the letter ‘G’; press and release the 

ALPHA

 key, press and hold the 

SHIFT

 key and then press the 

4

 key three times to produce the letter ‘I’.

Period/Decimal Point 

Produces a period for alpha entries and a decimal point for numeric entries by 
default.

Press the Orange key then the 

SHIFT

 key to activate the keypad alternate 

SHIFT functions. The 

 icon appears on the taskbar. Press the SHIFT key a 

second time to enable Shift-Lock feature. The 

 icon appears on the taskbar. 

Press and release the 

SHIFT

 key again to return to the default keypad functions.

Enter

Executes a selected item or function.

BKSP

Backspace function by default.

Decreases brightness when the blue 

FUNC

key is activated.

Orange

Press the orange key to access the alternate 

ALPHA

 characters (shown on the 

keypad in orange). The 

 icon appears on the taskbar. Press and release the 

orange key again to return to the default keypad functions.

Blue

Press and release the blue key to activate the keypad alternate functions 

(shown on the keypad in blue). The 

 icon appears on the taskbar. Press and 

release the blue key a second time to lock the function. The 

 icon appears on 

the taskbar. Press and release again to return to the default keypad functions.

Table B-1

27-Key Descriptions (Continued)

Key

Description

PRELIMINARY

te

te

quence

en

4

 key once t

y o

en press the 

en press th

4

 key 

ate, the upper case alp

ate, the upper case al

example, press and re

example, pres

T

 key and then press t

y and then press t

ease the 

ea

ALPHA

ALP

 key,

key three times to pro

ey three times to p

entries and a decima

entries and a decima

y then the 

then the 

SHIFT

HIFT

 key to

 key 

The 

 icon appears

The 

 icon appears

to enable Shift-Lock fe

 enable Shift-Lock 

release the 

se the 

SHIFT

HIFT

 key

 key

tes a selected item or

es a selected item o

Backspace functio

ce functio

Decreases brig

Decreases brig

Press th

ess th

keyp

keyp

or

or

EL

A

MI

LIM

EL

RE

P

R

R

R

R

R

PR

PR

PR

PR

PR

Содержание MC2100 Series

Страница 1: ...MC21XX SERIES MOBILE COMPUTER USER GUIDE L I M I M I N A R Y I M P R E L I M E L I E L I E L I E L E L L L L L L ...

Страница 2: ...P R E L I M I N A R Y ...

Страница 3: ...MC21XX SERIES MOBILE COMPUTER USER GUIDE 72E 155020 01 Rev 101411 October 2011 Y P R E L I M I N A R Y O O CO USE 7 ...

Страница 4: ... program in a network without written permission from Motorola The user agrees to maintain Motorola s copyright notice on the licensed programs delivered hereunder and to include the same on any authorized copies it makes in whole or in part The user agrees not to decompile disassemble decode or reverse engineer any licensed program delivered to the user or any portion thereof Motorola reserves th...

Страница 5: ...iii Revision History Changes to the original guide are listed below Change Date Description R Y Y Y R Y A R Y R Y P R E L I M I N A R A R ...

Страница 6: ...iv MC21XX Series User Guide P R E L I M I N A R Y ...

Страница 7: ...roSD Card 1 3 Install Main Battery 1 4 Battery Charging 1 5 Spare Battery Charging 1 7 Starting the MC21XX 1 7 Calibration Screen 1 7 Main Battery Removal 1 8 Turning Off the Radios 1 9 WLAN Radio 1 9 Safe System Shutdown Re boot 1 9 Chapter 2 Operation Introduction 2 1 Power Button 2 1 Windows CE Sample Applications Window 2 1 R E L I M I N A R A R Y A R ware arted rted e Mobile Computer e Mobile...

Страница 8: ... Properties 2 9 Stylus 2 10 Entering Information 2 11 Entering Information Using Keypad 2 12 Entering Information Using the Keyboard Input Panel 2 12 Entering Data via the Bar Code Scanner 2 12 Resetting the MC21XX 2 12 Performing a Warm Boot 2 12 Performing a Cold Boot 2 13 Waking the MC21XX 2 13 Battery Health 2 14 Using the Keypad 2 15 Browser 2 16 TEAM Express 2 17 Installation 2 17 Group Broa...

Страница 9: ...ignal Strength Icon 5 3 Turning Off the Radio 5 3 Minimum Setup 5 3 Chapter 6 Accessories Introduction 6 1 Single slot USB Cradle 6 3 Battery Charging 6 3 Four slot Charge Only Cradle 6 4 Battery Charging 6 4 Power LED 6 4 Four slot Ethernet Cradle 6 5 Battery Charging 6 5 LED Charge Indications 6 5 Speed LED 6 6 Link LED 6 6 Four slot Spare Battery Charger 6 7 Spare Battery Charging 6 7 Modem Ada...

Страница 10: ... Required 7 3 Cleaning the MC21XX 7 4 Housing 7 4 Display 7 4 Scanner Exit Window 7 4 Connector 7 4 Cleaning Cradle Connectors 7 4 Cleaning Frequency 7 5 Troubleshooting 7 6 MC21XX 7 6 Single slot USB Cradle 7 8 Four slot Charge Only Cradle 7 8 Four slot Spare Battery Charger 7 9 USB ActiveSync Charge Cable 7 9 Appendix A Specifications MC21XX and Accessory Technical Specifications A 1 Appendix B ...

Страница 11: ...to use Microsoft developed applications Application Guide for Motorola Enterprise Mobility Devices describes how to use Motorola Enterprise Mobility developed applications EMDK Help File provides API information for writing applications NOTE Screens and windows pictured in this guide are samples and may differ from actual screens M I N A R A R Y A R 1XX mobile computer 1XX mobile compute P R E L I...

Страница 12: ... the Fusion software version Tap Wireless Strength icon Wireless Status Versions Configuration Radios Display Memory Data Capture Operating System MC2100 None Color no touch 128 MB RAM 256 MB Flash Linear imager or 1D laser Windows CE 6 0 MC2180 WLAN 802 11 b g n WPAN Bluetooth Color touch screen 128 MB RAM 256 MB Flash Linear imager 1D laser or 2D imager Windows CE 6 0 NOTE MC2180 only Y Y ger er...

Страница 13: ...utions for potential problems during MC21XX operation Appendix A Specifications includes a table listing the technical specifications for the MC21XX Appendix B Keypad contains keypad descriptions and special character generation tables Notational Conventions The following conventions are used in this document The term mobile computer refers to the Motorola MC21XX Italics are used to highlight the ...

Страница 14: ...rise Mobility support for your region Contact information is available at http www motorola com enterprisemobility contactsupport When contacting Enterprise Mobility support please have the following information available Serial number of the unit Model number or product name Software type and version number Motorola responds to calls by email telephone or fax within the time limits set forth in s...

Страница 15: ...About This Guide v Manufacturing Label Location P R E L I M I N A R Y ...

Страница 16: ...vi MC21XX Series User Guide P R E L I M I N A R Y ...

Страница 17: ...uch screen configurations only Battery Power supply Regulatory Guide Quick Start Guide Inspect the equipment for damage If any equipment is missing or damaged contact the Motorola Enterprise Mobility Support immediately See Service Information on page xvi for contact information NOTE AC line cord has to be ordered separately P R E L I M I N A R A R Y A R D racteristics how to in racteristics how t...

Страница 18: ...D Indicator I O Connector Power Input Port Volume Down Button Default Programmable MC2180 only Volume Up Button Default Programmable MC2180 only Navigation Pad A R Y A A A A A A A A A R Scan But an But P R E L I M I N A R Mobile Computer Fron obile Computer Fron M I N A R M I N A R M I N A R M I N A R M I N A R M I N M M I N M I N M I M I M M M I N M I N A R M I N A A A A A A A A M I N Microphone ...

Страница 19: ...ylus Battery Speaker Battery Release Latch CAUTION Follow proper Electro Static Discharge ESD precautions to avoid damaging the microSD card Proper ESD precautions include but are not limited to working on an ESD mat and ensuring that the operator is properly grounded Do not use the microSD card slot for any other accessories P R E L I M I N A R Y puter Back View uter Back View L I rtup rtup MC21X...

Страница 20: ... Charging on page 1 5 To remove the main battery see Main Battery Removal on page 1 8 Insert the battery into the slot bottom first and press the battery gently into the slot The battery latches lock the battery into place NOTE Select microSD cards with environmental and or the write cycle performance specifications that meet or exceed the application requirements microSD Card microSD Card tacts f...

Страница 21: ...from the MC21XX or the main battery is fully discharged the memory backup battery completely discharges in several hours When the main battery reaches a very low battery state the combination of main battery and backup battery retains data in memory for at least 72 hours Batteries must be charged within the 0 to 40 C 32 to 104 F ambient temperature range To charge the MC21XX using the supplied pow...

Страница 22: ...using the accessories Table 1 1 LED Indicators LED Indication Off MC21XX not placed correctly in the cradle charge cable not connected correctly or charger is not powered Fast Blinking Amber Error in charging Check placement of the MC21XX Slow Blinking Amber MC21XX is charging Solid Amber Charging complete Note When the battery is initially inserted in the MC21XX the LED flashes once if the batter...

Страница 23: ...e Calibration screen appears If the MC21XX does not power on see Resetting the MC21XX on page 2 12 Calibration Screen Use the Calibration screen to align the touch screen 1 Remove the stylus from the stylus holder 2 Carefully press and briefly hold the stylus tip on the center of the Calibration screen target Repeat the procedure as the target moves and stops at different locations on the screen T...

Страница 24: ...ng the battery follow the Safe Battery Swap procedures below otherwise loss of data or system corruption may occur When in Safe Battery Swap mode the MC21XX goes into a low power suspend state All wakeup are disabled CAUTION Replace the new battery within five minutes to prevent loss of data P R E L I M I N A R Y 1XX Battery Swap attery Swap Press Pr ttery ejects slightly ects slight e 1 8 e 1 8 R...

Страница 25: ...ttery Swap procedure when replacing the battery See Main Battery Removal on page 1 8 If the MC21XX stops responding first perform a warm boot A warm boot maintains radio status and registry settings Do not perform a cold boot unless necessary Performing a cold boot resets the MC21XX to factory defaults and loss of all registry settings To perform a warm boot press and hold the Power button for fiv...

Страница 26: ...1 10 MC21XX Series User Guide P R E L I M I N A R Y ...

Страница 27: ...Integrator Guide for installation and configuration The Sample Applications window links to sample applications The sample applications are intended to be used by application developers as application development examples These applications were not developed to support end users Refer to the Application Guide for Motorola Enterprise Mobility Devices for the sample applications P R E L I M I N A R...

Страница 28: ... Using the Keypad to Navigate Applications The MC2100 screen is a non touch screen and therefore navigation and control of an application is performed using the keypad Key Combinations The MC2100 uses special key combinations to easily navigate applications Table 2 1 lists the key combinations required to perform various application navigation and control dows CE configuration ws CE configu tions ...

Страница 29: ...ion copy paste etc Table 2 1 Key Combinations Action Key Combination Access the Start menu on the Task bar Press CTRL ESC Switch fields within an application Press TAB Close windows or cancel operations Press ESC Access the Task Manager Press ALT TAB Minimize current window Press ALT ESC Access a menu bar Press ALT CTRL Press a button in an application window Press F TAB until the button is highli...

Страница 30: ... seconds of inactivity the settings are saved and the box disappears Adjusting the Screen Brightness To adjust the screen brightness 1 Press Orange key F2 The brightness contrast control box appears Figure 2 4 Brightness Control Box 2 Use the navigation pad to adjust the contrast 3 After three seconds of inactivity the settings are saved and the box disappears R E L I M I N A R Y gs are saved and ...

Страница 31: ...urrent time Battery This icon indicates that the main battery is charging or that the terminal is operating on AC power Double tapping on this icon opens the Power Properties window Indicates that communication with the battery has not been established After a MC21XX reset this icon may be displayed for up to 30 seconds See Battery Unknown Icon on page 2 6 for additional information Indicates that...

Страница 32: ...g Indicates that the DataWedge application is running DataWedge Idle Indicates that the DataWedge application is idle Shift Indicates that the Shift function is selected Shift Lock Indicates that the Shift Lock function is selected Function Indicates that the Function feature is selected Function Lock Indicates that the Function Lock feature is selected CTRL Indicates that the CTRL button function...

Страница 33: ...tings Audio Settings Printer Settings Date and Time Settings Touch Screen Settings etc MSP Agent Interacts with MSP agents to collect monitoring and asset information to enable the configuration provisioning monitoring and troubleshooting of the MC21XX Refer to the MC21XX Integrator Guide for more information RhoElements Basic Browser Browse Web and WAP sites Rapid Deployment Client Facilitates so...

Страница 34: ...ernet using a modem Owner Change owner s personal profiles Password Set a password for the MC21XX PC Connection Change settings for connectivity of a host computer Power View and control MC21XX power settings Regional Settings Change how numbers currencies dates and times appear Remove Programs Remove programs installed on the MC21XX Stylus Calibrate the touch screen and adjust double tap timing S...

Страница 35: ...igure 2 6 Task Manager Window 2 Select a task in the Active Tasks list and select Switch To to make that task the primary task or select End Task to end the selected task 3 Tap X or press ESC to exit the Task Manager window Properties 1 Select Start Settings Taskbar and Start Menu The Task Bar and Start Menu window displays Figure 2 7 Taskbar and Start Menu General Tab 2 This menu provides taskbar...

Страница 36: ...xpand Control Panel checkbox to display the entire contents of the Control Panel in list form rather than icons Figure 2 8 Taskbar and Start Menu Advanced Tab 4 Select OK to save the settings and exit the window Stylus To remove the stylus Lift the point end of the stylus up and slide it out of the bar Figure 2 9 Mini Stylus Removal To store the stylus slide the flat end of the stylus under the ba...

Страница 37: ...ut panel soft keyboard to enter text Scan bar code data into data fields Use Microsoft ActiveSync or Windows Mobile Device Center WMDC to synchronize or copy information from the host computer to the MC21XX For more information on ActiveSync and WMDC refer to the MC21XX Series Mobile Computer Integrator Guide P R E L I M I N A R Y reen The stylus funct n The stylus funct s and open menu item s and...

Страница 38: ...data is entered via the keypad Resetting the MC21XX If the MC21XX stops responding to input reset it There are two reset functions warm boot and cold boot A warm boot restarts the MC21XX by closing all running programs All data that is not saved is lost A cold boot also restarts the MC21XX but erases all stored records and entries from RAM In addition it returns formats preferences and other setti...

Страница 39: ...essing the Power button or automatically by Control Panel time out settings These settings are configurable and the factory default settings are shown in Table 2 5 To access the Wakeup settings Select Start Settings Control Panel Power icon Wakeup tab CAUTION Cold boot resets the MC21XX to the default settings All added applications and all stored data are removed Do not cold boot without support ...

Страница 40: ...cates the current state of the battery Healthy or Unhealthy Battery Usage Indicator Indicates the usage of the battery Battery Usage Threshold Indicates the usage indicator threshold Battery Serial Displays the serial number of the battery M I N A R Y er applet Select applet Select Start M I N esc M I e current state of the e current state of the L I M es the usage of the ba s the usage of the L I...

Страница 41: ...ypad Figure 2 14 Entering Data on the Keypad Single hand Method Two hand Method re 2 14 re 2 14 Entering Data Enter A R Y A R Y A R Y A R Y A R R R Y A R Y A A R A R A A R A A R Y N A N A A A Single hand Method Single hand Method ...

Страница 42: ...Enter an address into the Address Bar 2 Press the Enter key The web page loads NOTE MC2180 only Display Address and Menu Bar Address Bar Menu Bar Favorites Forward Back History Full screen R E L I M I N A R Y Me Me N Favorite vorite E L Forw Forw B B E R E P R E 16 16 Menu Bar Menu Bar Enter an address in Enter an address in s the s the Ente R R E R L I ...

Страница 43: ...m boot the MC2180 Group Broadcast Communication Buttons Group Broadcast Private Response Figure 2 17 MC2180 TEAM Express Button Assignment Group Broadcast Press and hold to start communicating with other voice client users or to make a Private Response Private Response Press and hold to respond to the originator of the last broadcast ...

Страница 44: ...2 20 MC21XX Series User Guide P R E L I M I N A R Y ...

Страница 45: ...ing the most popular linear postal and 1 D code types Intuitive aiming for easy point and shoot operation 2D Imaging The MC21XX with an integrated 2D imager has the following features Omnidirectional 360 reading of a variety of bar code symbologies including the most popular linear postal PDF417 and 2D matrix code types The ability to capture and download images to a host for a variety of imaging ...

Страница 46: ... is complicated by the availability of various integrated scanning modules The best way to specify the appropriate working range per bar code density is through a chart called a decode zone for each scan module A decode zone simply plots working range as a function of minimum element widths of bar code symbols Angle The scan angle is important for optimizing decode performance When laser beams ref...

Страница 47: ...t the beam is on The LED Indicator turns green and a beep sounds to indicate a successful decode Figure 3 2 Laser Aiming Figure 3 3 Linear Aiming Optimal scanning distance varies with bar code density and scanner optics Hold the scanner farther away for larger symbols Move the scanner closer for symbols with bars that are close together Correct Incorrect Correct Incorrect re the red scan beam the ...

Страница 48: ...iming Pattern Bar Code Not Centered Figure 3 6 Pick List Mode with Multiple Bar Codes in Aiming Pattern 4 Release the scan button NOTE Scanning procedures depend on the application and MC21XX configuration An application may use different scanning procedures from the one listed above Correct Incorrect Decoded Not Decoded P R E L I M I N A R Y de co e c ge on page 3 5 ge on pag ming Ensure the bar ...

Страница 49: ... the navigation pad to change Beeper Volume Select a value between 0 and 3 where 0 is the lowest and 3 the highest 4 Select OK 5 Select Exit Using DataWedge When using DataWedge the beep volume can only be changed using the DataWedge setting 1 Select Start Settings Control panel DataWedge 2 Select 3 Basic format 3 Select 2 Keystroke output NOTE Imager decoding usually occurs instantaneously The MC...

Страница 50: ...C21XX Series User Guide 4 Select 5 Feedback 5 Select 2 On Send 6 Select 1 Beeper 7 Select 4 Volume 8 Enter a value between 0 and 3 where 0 is the lowest and 3 the highest 9 Select Save P R E L I M I N A R Y ...

Страница 51: ...oid making Bluetooth connections and discoveries during critical 802 11b communications AFH for Bluetooth consists of four main sections Channel Classification A method of detecting an interference on a channel by channel basis or pre defined channel mask Link Management Coordinates and distributes the AFH information to the rest of the Bluetooth network Hop Sequence Modification Avoids interferen...

Страница 52: ...er 128 bit keys used for security and encryption The encryption key is derived from the link key used to authenticate the pairing devices Also worthy of note is the limited range and fast frequency hopping of the Bluetooth radios that makes long distance eavesdropping difficult Recommendations are Perform pairing in a secure environment Keep PIN codes private and don t store the PIN codes in the m...

Страница 53: ... radio Suspend When there is an active Bluetooth connection the Bluetooth radio goes into low power mode maintaining the active connection When there is no active connection the Bluetooth radio turns off Resume When the MC2180 resumes the user must re connect to the Bluetooth device s into low power mod into low power mo h radio turns off o turns t to the Bluetooth dev Bluetooth d ...

Страница 54: ...device 2 Ensure that the Bluetooth device to discover is in discoverable and connectable modes 3 Ensure that the two devices are within 10 meters 30 feet of one another 4 Tap Start Settings Control Panel Bluetooth Device Properties icon Figure 4 1 Bluetooth Manager 5 Tap Enable Bluetooth 6 Tap Scan Device button The MC2180 begins searching for discoverable Bluetooth devices in the area Discovered ...

Страница 55: ...d If services are not selected you will be continually re prompted for the passcode from the device 15 The device appears in the list on the main window After the passcodes have been accepted on both sides you have a trusted paired connection Available Services The MC2180 with Microsoft Bluetooth stack offers the Serial Port service and DUN Client service NOTE Some devices might not require a PIN ...

Страница 56: ...4 6 MC21XX Series User Guide P R E L I M I N A R Y ...

Страница 57: ...nformation on configuring wireless profiles Go to http www motorola com enterprisemobility manuals for the latest version of this guide See Software Versions on page ii to determine the Fusion version on the MC21XX Tap the Signal Strength icon to display the Wireless Launcher menu NOTE MC2180 only NOTE 802 11d is enabled by default When enabled the AP must be configured the same in order to connec...

Страница 58: ...he Options application which allows you to configure the Fusion option settings Wireless Status Invokes the Wireless Status application which allows you to view the status of the current wireless connection Wireless Diagnostics Invokes the Wireless Diagnostics application which provides tools with which to diagnose problems with the wireless connection Log On Off Invokes the Network Login dialog w...

Страница 59: ...tions Icon Status Action Excellent signal strength WLAN network is ready to use Very good signal strength WLAN network is ready to use Good signal strength WLAN network is ready to use Fair signal strength WLAN network is ready to use Notify the network administrator that the signal strength is only Fair Poor signal strength WLAN network is ready to use Performance may not be optimum Notify the ne...

Страница 60: ...5 4 MC21XX Series Integrator Guide 3 Enter the Manage Profile screen select the profile press and hold and select the Connect option in the context menu that appears P R E L I M I N A R Y ...

Страница 61: ...ur MC21XX spare batteries Power Supply PWRS 14000 249R Provides power to the MC21XX Single slot USB Cradle and the USB ActiveSync Charge cable Power Supply PWRS 14000 148R Provides power to the Four slot Charge Only Cradle and the Four slot Ethernet cradle Power Supply PWRS 14000 241R Provides power to the Four slot Spare Battery Charger DC Line Cord 50 16002 042R Provides power from the power sup...

Страница 62: ...0R Provides modem connectivity through the MC21XX and Modem Adapter Cable Modem Adapter Cable 25 154074 01R Connects Modem Dongle to the MC21XX 2400 mAh Battery BTRY MC21EAB0E Replacement battery Stylus 11 42794 03R Replacement stylus 3 pack Tether TBS Replacement tether 3 pack Screen protector TBS Replacement screen protectors 3 pack Table 6 1 MC21XX Accessories Continued Accessory Part Number De...

Страница 63: ...atus indications Figure 6 1 Single slot USB Cradle 2 When charging is complete remove the MC21XX from the cradle Each Single slot USB cradle comes with a mating adapter Use the mating adapter to connect two or more cradles together Each cradle still requires a power supply CAUTION Ensure that you follow the guidelines for battery safety described in Battery Safety Guidelines on page 7 2 LED Indica...

Страница 64: ...dications 3 When charging is complete remove the MC21XX from the cradle Power LED The green Power LED lights to indicate that the Four slot Charge Only cradle is connected to a power source CAUTION Ensure that you follow the guidelines for battery safety described in Battery Safety Guidelines on page 7 2 LED Indicator Power LED N A R Y ltaneously To charge ously To charge M I N A M I N M I N M I N...

Страница 65: ... complete remove the MC21XX from the cradle LED Charge Indications The Four slot Ethernet cradle use the MC21XX amber LED Indicator to indicate the battery charging status See Table 1 1 on page 1 6 for charging status indications CAUTION Ensure that you follow the guidelines for battery safety described in Battery Safety Guidelines on page 7 2 100 Mbps LED Indicator Speed LED Link LED P R E L I M ...

Страница 66: ...he transfer rate is 100 Mbps When it is not lit it indicates that the transfer rate is 10 Mbps Link LED The yellow Link LED blinks to indicate activity or stays lit to indicate that a link is established When it is not lit it indicates that there is no link P R E L I M I N A R Y ed W d ...

Страница 67: ... press the battery clip and lift battery out of the slot The Spare Battery Charging LEDs indicate the spare battery charging status See Table 1 1 on page 1 6 for charging status indications CAUTION Ensure that you follow the guidelines for battery safety described in Battery Safety Guidelines on page 7 2 Spare Batteries Spare Battery Charging Slot Spare Battery Charging LEDs 4 WARNING Do not use a...

Страница 68: ...erver administrator Dial in account on the host system including a user ID and password RJ11 or RJ12 modem cable Functioning telephone jack that supports plug in modems connected to the local telephone system Setup of Country Codes to use the modem with the appropriate country s telephone network Serial Port Line In Port LEDs Phone Port P R E L I M I N A R Y Dongle ngle tems are required for tems ...

Страница 69: ... are using the right type of line before sending data Modem Dongle Modem Adapter Cable CAUTION Do not connect the modem s 15 pin connector into a VGA port of a host computer NOTE If using a phone connect the cord from the phone to the Phone port on the modem P R E L I M I N A R Y Dongle Setup Dongle Setup sing the Correct Telep sing the Correct T Use a standard an Use a stan modem In a mode compa ...

Страница 70: ...D Indicator LED Indication Off Modem is not properly connected to the MC21XX modem is not receiving power Green Modem is connected to the MC21XX and is receiving power Solid Amber MC21XX is communicating with the host computer P R E L I M I N A R Y Y ...

Страница 71: ...harging and Operating Power To charge the MC21XX battery 1 Connect the USB Charge Cable power input connector to the approved power source Figure 6 9 USB Charge Cable 2 Slide the bottom of the MC21XX into the MC21XX connector end of the MC21XX Communication Charge cable and gently press in until the snaps latch into the MC21XX CAUTION Ensure that you follow the guidelines for battery safety descri...

Страница 72: ...1 6 for charging status indications 4 When charging is complete remove the cable by gently pulling the MC21XX and the cable apart until the snaps release the MC21XX LED Charge Indications The MC21XX Charge cable use the amber LED Indicator to indicate the MC21XX battery charging status See Table 1 1 on page 1 6 for charging status indications P R E L I M I N A R Y charging ar ...

Страница 73: ... provides a holder for the MC21XX Figure 6 10 Holster The holster holds the MC21XX on a belt or waist band Slide the MC21XX into the holster with the screen facing the user P R E L I M I N A R Y belt or waist band Sli elt or waist band S ...

Страница 74: ...oop over the strap tab and push all the way down Belt Buckle Mini Stylus Holder Loop Loop Material Hook Material Loop Strap Tab Mounting Slots R E L I M I N A R Y through the mounting hrough the mounting M I N A R R R R E R R R P R E R E R P R P P R P R P P R P P P P P P P P P P P P P R P R E P R P R E R P R R R R R R P R R R P R E P R E P R P R P R P R P P R P R P R P R P P P P R P R P P P P P P ...

Страница 75: ...trap 1 Pull the belt through the buckle 2 Pull the belt through the handstrap bar 3 Lift the strap tab 4 Lift both loops off the strap tab 5 Pull loops through the mounting slots P R E L I M I N A R Y nect Handstrap to Han ct Handstrap to Han he belt through the bu he belt through the bu al al To remove the hands To remove the hand Pull the belt Pull the the E L I M E L I E L I M E L I I L I M L I...

Страница 76: ...gh the buckle Removal Mini Stylus Holder Belt Buckle 1 2 E L I M I N A R Y handstrap bar ands M I N M I N M I N M I N M I N I N M I M I M I M I us Holder er P R E L P R P R E P R P R P R R P R P R P R P R P R R R R R R R R R R R R R R R R R R R R R P R P P P P P R P R P R P R P R P R P R P R E P R E R R R E R R R R R R R R R R R R R R R R R P R P R E R P R E R R P R ...

Страница 77: ...ini stylus or pen stylus to the MC21XX handstrap bar To install the tether Insert loop into mounting hole on stylus Feed other end through loop and pull taught Feed loop into mounting hole on handstrap bar Feed stylus through loop and pull taught P R E L I M I N A R Y ...

Страница 78: ...6 18 MC21XX Series User Guide P R E L I M I N A R Y ...

Страница 79: ... Do not leave it on the dashboard of a car on a hot day and keep it away from heat sources Do not store or use the MC21XX in any location that is dusty damp or wet Use a soft lens cloth to clean the MC21XX If the surface of the MC21XX screen becomes soiled clean it with a soft cloth moistened with a diluted window cleaning solution Periodically replace the rechargeable battery to ensure maximum ba...

Страница 80: ...ause 10 2 1 all batteries will carry a Motorola hologram Do not fit any battery without checking it has the Motorola authentication hologram Do not disassemble or open crush bend or deform puncture or shred Severe impact from dropping any battery operated device on a hard surface could cause the battery to overheat Do not short circuit a battery or allow metallic or conductive objects to contact t...

Страница 81: ...for medical use and are known to be harmful to the housing of the MC21XX The MC21XX should not be handled while wearing vinyl gloves containing phthalates or before hands are washed to remove contaminant residue after gloves are removed If products containing any of the harmful ingredients listed above are used prior to handling the MC21XX such as hand sanitizer that contain ethanolamine hands mus...

Страница 82: ...e connector area 6 Use a dry cotton tipped applicator and repeat steps 4 through 6 7 Spray compressed air on the connector area by pointing the tube nozzle about inch away from the surface 8 Inspect the area for any grease or dirt repeat if required Cleaning Cradle Connectors To clean the connectors on a cradle 1 Remove the DC power cable from the cradle 2 Dip the cotton portion of the cotton tipp...

Страница 83: ...s high longer drying time is required Warm temperature and dry humidity requires less drying time Cleaning Frequency The cleaning frequency is up to the customer s discretion due to the varied environments in which the mobile devices are used They may be cleaned as frequently as required However when used in dirty environments it may be advisable to periodically clean the scanner exit window to en...

Страница 84: ...ing communication Replace the MC21XX in the cradle or reattach the cable and re transmit Incorrect cable configuration See the system administrator or refer to the MC21XX Series MC21XX Integrator Guide Communication software was incorrectly installed or configured See the system administrator or refer to the MC21XX Series MC21XX Integrator Guide MC21XX does not emit sound Volume setting is low or ...

Страница 85: ...d a beep is not heard check that the application is set to generate a beep on good decode Battery is low Check the battery level When the battery is low the MC21XX automatically goes into suspend mode Warning appears on screen during boot up Battery not removed properly Follow Battery Swap procedure See Main Battery Removal on page 1 8 MC21XX performs a cold boot after performing a Battery Swap Ba...

Страница 86: ...king properly Incorrect communication cable used Obtain correct cable from vendor Cable should be microUSB A to USB B Table 7 3 Troubleshooting the Four slot Charge Only Cradle Problem Cause Solution MC21XX battery is not charging Indicator does not light Cradle is not receiving power Ensure the power cable is connected securely to both the cradle and to AC power No battery installed Install batte...

Страница 87: ...to AC power No battery installed Install battery Battery is faulty Verify that other batteries charge properly If so replace the faulty battery The MC21XX is not fully seated in the cable Remove and re attach the MC21XX to the cable ensuring it is correctly seated During data communication no data was transmitted or transmitted data was incomplete Cable removed from MC21XX during communication Rea...

Страница 88: ...7 10 MC21XX Series User Guide P R E L I M I N A R Y ...

Страница 89: ...ht LED backlight Battery Rechargeable Lithium ion 2400 mAh minimum 3 7V Expansion Slot User accessible microUSB slot located under battery up to 32 GB Network Connections Full speed USB host or client Bluetooth MC2180 only WLAN MC2180 only USB available with appropriate cables only Notification LED and audible alert Keypad Options 27 key Numeric Audio Speaker and microphone MC2180 only Beeper MC21...

Страница 90: ...el 14 2484 MHz Japan only actual operating channels frequencies depend on regulatory rules and certification agency Security Security Modes Legacy WPA and WPA2 Encryption WEP 40 or 128 bit TKIP and AES Authentication TLS TTLS MS CHAP TTLS MS CHAP v2 TTLS CHAP TTLS MD5 TTLS PAP PEAP TLS PEAP MS CHAP v2 PEAP EAP GTC EAP FAST TLS EAP FAST MS CHAP v2 EAP FAST EAP GTC and LEAP Spreading Technique Direc...

Страница 91: ...itch Angle 65 from normal Skew Tolerance 40 from normal Ambient Light Sunlight 107 640 Lux Artificial Light 4 844 Lux Scan Rate 104 12 scans sec bidirectional Scan Angle 47 typical 2D Imager Engine Specifications Field of View Horizontal 39 2 Vertical 25 4 Optical Resolution 752 H x 480 V pixels gray scale Roll 360 Pitch Angle 60 from normal Skew Tolerance 60 from normal Table A 1 MC21XX Technical...

Страница 92: ...User Guide Ambient Light Sunlight 96 900 Lux Aiming Element VLD 655 nm 10 nm Laser Illumination Element LED 625 nm 5 nm LEDs 2x Table A 1 MC21XX Technical Specifications Continued Item Description P R E L I M I N A R Y Y ...

Страница 93: ...ction as described See Table B 1 on page B 2 for key and button descriptions and Table B 2 on page B 4 for the keypad alternate functions NOTE For information about using the soft keyboard input panel For more information see Entering Information Using the Keyboard Input Panel on page 2 12 M I N A R A R Y A R E L I M I ns a s a Power button ap tton ap r e the alternate functio e the alternate func...

Страница 94: ...nction by default CTRL Press and release the CTRL key to activate the keypad alternate CTRL functions The icon appears on the taskbar Press and release the CTRL key again to return to the default keypad functions Press and release the blue FUNC key and then the CTRL key to activate the ALT functions The icon appears on the taskbar Press and release the CTRL key two times to return to the default k...

Страница 95: ...nd release the SHIFT key again to return to the default keypad functions Enter Executes a selected item or function BKSP Backspace function by default Decreases brightness when the blue FUNC key is activated Orange Press the orange key to access the alternate ALPHA characters shown on the keypad in orange The icon appears on the taskbar Press and release the orange key again to return to the defau...

Страница 96: ...4 g h i G H I 5 5 5 j k l J K L 6 6 6 m n o M N O 7 7 7 p q r s P Q R S 8 8 8 t u v T U V 9 9 9 w x y z W X Y Z 0 0 0 space 0 Note 1 An application can change the key functions The keypad may not function exactly as described Note 2 Press the 1 key up to ten times to create the following characters I N A R Y C C E F E F H I H J K L K L M N M N P Q P Q T T z W z W I N N A A R R Y Y Y R Y R Y R Y A ...

Страница 97: ...Keypads B 5 P R E L I M I N A R Y ...

Страница 98: ...B 6 MC21XX Series User Guide P R E L I M I N A R Y ...

Страница 99: ...rmine the code type of a scanned bar code After this determination is made the information content is decoded B Bar The dark element in a printed bar code symbol Bar Code A pattern of variable width bars and spaces which represents numeric or alphanumeric data in machine readable form The general format of a bar code symbol consists of a leading margin start character data or message character che...

Страница 100: ...represent a specific character or numeric value Bits are numbered from the right 0 through 7 with bit 0 the low order bit One byte in memory is used to store one ASCII character BOOTP A protocol for remote booting of diskless devices Assigns an IP address to a machine and may specify a boot file The client sends a bootp request as a broadcast to the bootp server port 67 and the bootp server respon...

Страница 101: ...rs 6 12 battery charging backup battery 1 5 four slot cradles 6 4 6 5 four slot spare battery charger 6 7 main battery 1 5 temperature range 1 5 battery icon 2 5 battery status 2 5 Bluetooth 4 1 adaptive frequency hopping 4 1 security 4 2 bluetooth discovering devices 4 4 boot cold 4 3 warm 4 3 bullets iv C calibration screen 1 7 charge LED indicator 1 2 charging spare batteries 1 7 charging batte...

Страница 102: ... 1 battery charging 6 7 LED indicators 6 7 troubleshooting 7 9 function status 2 5 H hard reset 2 12 2 13 4 3 I icons alpha mode 2 6 ALT 2 6 CTRL 2 6 function 2 6 shift 2 6 imager See data capture imaging imaging 3 2 indicator LED bar 6 3 information service iv Internet Explorer Mobile 2 7 K key combinations using the keypad 2 2 keypad 2 3 27 key B 1 28 key B 1 keypads input modes B 4 L laser scan...

Страница 103: ... 2 6 starting the mobile computer 1 3 1 7 startup 1 3 status icon 2 5 storing 7 1 stylus 2 10 2 11 6 2 suspend 2 7 4 3 T task manager 2 9 taskbar 2 5 technical specifications A 1 temperature A 2 terminal charging 2 5 terminal charging 2 5 troubleshooting 7 6 cables 7 9 four slot charge only cradle 7 8 four slot spare battery charger 7 9 mobile computer 7 6 single slot USB cradle 7 8 turning the ra...

Страница 104: ...Index 4 MC21XX Series User Guide P R E L I M I N A R Y ...

Страница 105: ...P R E L I M I N A R Y ...

Страница 106: ...OLUTIONS and the Stylized M Logo are trademarks or registered trademarks of Motorola Trademark Holdings LLC and are used under license All other trademarks are the property of their respective owners 2011 Motorola Solutions Inc All Rights Reserved P R E L I M I M I N A R Y M I R R R R P a Solutions Inc a Solutions Inc Algonquin Rd Algonquin urg IL 60196 urg IL motoro motor ...

Отзывы: