background image


4-10

External Connections 

Punch a hole at the relevant location and of the appropriate size in one of the perforated 
circles at the bottom of the RTU housing and thread the wires through the opening. 
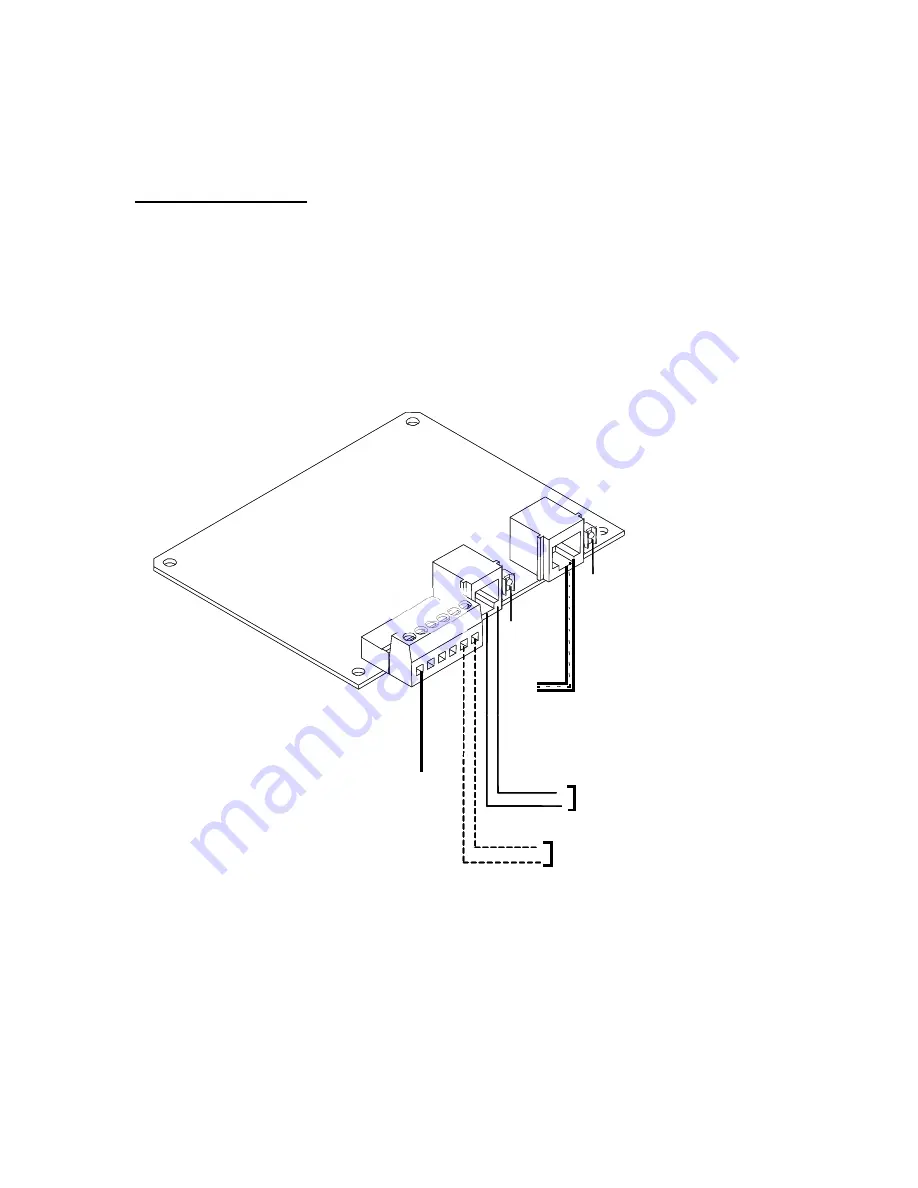
Telephone Line Option (See Figure 


4-6) 

There are two options for connecting the line wire to the Line Interface Unit: 

– If the telephone line has an RJ11 connector plug it into the LINE connector on the unit’s 
front panel. 

Or: 

– If the telephone line is comprised of two wires connect the wires to terminals #1 and #2 
of the unit’s front panel TB. The polarity is insignificant. 

Figure 


4-6 Telephone Line Option - Electrical Connections 


PROT

GND

Telephone 

Cablewith RJ11 

connectors

To 

CPU

LED 

6 5

4 3

2 1

Option

Telephone Line

Telephone Line

LED 

PROT 

GND

Telephone 

Cablewith RJ11 

connectors

To 

CPU

LED 

6 5

4 3

2 1

Option

Telephone Line

Telephone Line

Telephone Line

LED 

StockCheck.com

Содержание IRRInet-XL

Страница 1: ...IRRInet XL Remote Terminal Unit Owner s Manual A 68P02962C86 O 6802962C86 September 2001 Commercial Government and Industrial Solutions Sector S t o c k C h e c k c o m ...

Страница 2: ...ld Replaceable Parts 2 14 2 6 Backup Battery Connections 2 14 2 6 1 5AH Backup Battery 2 14 2 6 2 5AH Backup Battery Field Replaceable Parts 2 15 2 6 3 3AH Backup Battery 2 16 2 6 4 3AH Backup Battery Field Replaceable Parts 2 16 2 7 Radio Connections 2 17 2 7 1 Mobile Radio 2 17 2 7 2 Mobile Radio Field Replaceable Parts 2 18 2 7 3 Portable Radios 2 19 2 7 4 Portable Radio Field Replaceable Parts...

Страница 3: ...ED Panel 3 17 3 5 3 I O DC Module Field Replaceable Parts 3 18 3 6 Single Cable Module 3 19 3 6 1 Wire Connections 3 20 3 6 2 Diagnostic LED Panel 3 22 3 6 3 Single Cable Module Field Replaceable Parts 3 24 CHAPTER 4 IN BOX COMMUNICATION UNITS 4 1 4 1 Communication Management Unit CMU 4 1 4 1 1 Wire Connections 4 2 4 1 2 Removal and Installation 4 6 4 1 3 Diagnostic LED Panel 4 6 4 1 4 Setting the...

Страница 4: ...to RTU Synchronous Communications Connection via port 1B 5 6 5 3 4 RTU to RTU RS 232 Synchronous Communications Connection via port 3 5 7 5 4 Connecting a User Port to a Printer 5 8 5 5 45 VA Transformer to Power Supply Cable FKN4463 5 9 5 6 Solar Panel to Power Supply Module Cable FKN4469 5 9 CHAPTER 6 CABLE SUPPRESSION CORES 6 1 6 1 Cable Suppression Cores Field Replaceable Parts 6 2 CHAPTER 7 D...

Страница 5: ...4 Housing Enclosure 2 8 Figure 2 10 8 Ampere Power Supply 115VAC or 230 VAC TB Layout 2 9 Figure 2 11 8 Ampere Power Supply Front Panel 2 10 Figure 2 12 Connecting the 45 VA Transformer on 3 Slot Chassis or NEMA4X Housing Enclosure 2 13 Figure 2 13 Connecting the 45 VA Transformer in NEMA4 Housing Enclosure 2 14 Figure 2 14 5AH Backup Battery Connection 2 15 Figure 2 15 3AH Backup Battery Connecti...

Страница 6: ... 4 11 Figure 4 8 2W Leased Line Option Electrical Connections 4 12 Figure 4 9 4W Leased Line Option Electrical Connections 4 13 Figure 4 10 Typical 4 Wire Line Modem Interconnection 4 13 Figure 4 11 RS 485 Connection Board Installation Location 4 16 Figure 5 1 RJ45 to D Type Female Connector Adapter 5 2 Figure 5 2 RJ45 to D Type Male Connector Adaptor 5 3 Figure 5 3 RJ45 to D Type Male Connector A...

Страница 7: ...tions 3 6 Table 3 3 CPU Module Field Replaceable Parts 3 8 Table 3 4 I O AC Module Indication Display 3 13 Table 3 5 I O AC Module Field Replaceable Parts 3 14 Table 3 6 I O DC Module Diagnostic Led Display 3 17 Table 3 7 I O DC Module Field Replaceable Parts 3 18 Table 3 8 Single Cable Module Diagnostic Led Display 3 22 Table 3 9 Single Cable Module Field Replaceable Parts 3 24 Table 4 1 CMU and ...

Страница 8: ...nsult the manufacturer of your device to determine if it is adequately shielded from RF energy Your physician may be able to assist you in obtaining this information Antennas Do not use any terminal that has a damaged antenna If a damaged antenna comes into contact with your skin a minor burn can result The antenna installation must comply with the following requirements in order to assure optimal...

Страница 9: ...olar Panel 805 mAmps 115 VAC 485 mAmps 8 Ampere Power Supply 230 VAC 260 mAmps 8 Ampere Power Supply Portable Radios HT1000 DC Solar Panel 450 mAmps 115 VAC 535 mAmps 45 VA Transformer 230 VAC 285 mAmps 45 VA Transformer Mechanical NEMA4X Housing Enclosure Dimensions H x W x D 51 0 x 41 0 x 23 0 cm 20 08 x 16 14 x 9 06 inch Weight 7 10 Kg NEMA4 Housing Enclosure Dimensions H x W x D 28 0 x 37 6 x ...

Страница 10: ...e IRRInet XL RTU Remote Terminal Unit It also provides on site replacement instructions for RTU elements that do not necessarily require shop level assistance This manual also covers the enclosure assemblies communication options and various Input Output I O options S t o c k C h e c k c o m ...

Страница 11: ... where AC power is not available For DC power connections see Electrical Connections for External DC Power Supply in the Installation section 1 1 IRRInet XL RTU Wall Mount and Housing Options The IRRInet XL RTU is available in two basic housing styles and one wall mount chassis style Figure 1 1 shows an RTU on a 3 slot metal chassis suitable for direct wall mounting with no housing enclosure of an...

Страница 12: ...4X plastic housing specification refer to the Installation section Figure 1 2 NEMA4X Plastic Housing Style Mobile Radios Figure 1 3 NEMA4X Plastic Housing Style Portable Radio Figure 1 4 NEMA4 Housing Style Portable shows an RTU inside the NEMA4 housing enclosure Portable Radio Mobile Radios S t o c k C h e c k c o m ...

Страница 13: ...CPU Module Grounding Strip Power Supply Module More Main Power Transformer 45 VA Main Power Fuse Figure 1 4 NEMA4 Housing Style Portable Figure 1 5 shows the External Radio Ready setup This includes a multi slot I O card cage with 3 I O plug in modules CPU Module Power Supply Module and the CMU Module Mounted on the top of the I O card cage Figure 1 5 External Radio Ready Setup S t o c k C h e c k...

Страница 14: ... kHz 15 Watt F5883 MCS2000 Trunk VHF 12 5 kHz 15 Watt F5884 MCS2000 Trunk UHF 12 5 kHz 15 Watt F5885 MCS2000 Trunk 800 15 Watt F5858 MTS2000 3 Watt 800 MHz F5853 HT1000 Conventional VHF 12 5 kHz 5 Watt F5854 HT1000 Conventional UHF 12 5 kHz 4 Watt N No ot te e Mobile Radios with a 25 kHz Channel Spacing can be ordered using special option numbers The following Line RS232 and RS485 communication in...

Страница 15: ...making it possible for the user to record the appropriate slot number and I O connections of each module in use Table 1 2 I O Communication Modules Option No Model V379 I O DC Module V233 I O AC Module V318 Single Cable Module V143 CMU Communication Management Unit Module N No ot te e All MOSCAD L I O Modules should operate properly in the IRRInet XL RTU However for complete compatibility and conn...

Страница 16: ...ies and Backup Battery Options Option No Description V251 8 Ampere Power Supply 220VAC Backup Battery 5AH V346 8 Ampere Power Supply 110VAC Backup Battery 5AH V266 Main Power 45 VA Transformer 220VAC Backup Battery 3AH V004 Main Power 45 VA Transformer 110VAC Backup Battery 3AH V274 External 12VDC Cables Internal Option S t o c k C h e c k c o m ...

Страница 17: ...es to the DC power cable according to the local electrical standards and requirements When the IRRInet XL is operated from a DC power source and has a portable radio a use 5 Amp disconnect device circuit breaker in series to the AC power cable according to the local electrical standards and requirements When the IRRInet XL is operated from an AC power source by 8 Ampere power supply use 10 Amp dis...

Страница 18: ...ght 46 75 cm 18 41 inch Depth 25 00 cm 10 00 inch Four holes are provided one in each corner of the RTU for wall mounting of the RTU Figure 2 2 shows the distances between the holes Choose the mounting means screws etc appropriate for mounting the RTU on the wall 32 50cm 12 79 36 50cm 14 37 18 41 46 75cm 16 73 42 50cm Figure 2 2 RTU 3 slot Chassis Installation Dimensions S t o c k C h e c k c o m ...

Страница 19: ...m 11 8 inch When mounted on the wall four mounting brackets that are provided support the RTU box Refer to Figure 2 3 and Figure 2 4 To mount the RTU on the wall perform the following 1 Choose the appropriate screws for mounting the RTU on the wall 2 Fasten the mounting brackets on the back corners of the housing Use the brackets supplied in the plastic bag 36 2 cm 14 25 56 2 cm 22 12 46 2 cm 18 1...

Страница 20: ...dard plastic enclosure that meets the IP66 Hermetic Sealing Specification The size of the NEMA4 plastic housing is as follows Width 37 6 cm 14 80 inch Height 28 0 cm 11 02 inch Depth 21 6 cm 8 51 inch 28 4 cm 11 18 29 5 cm 11 61 32 1 cm 12 64 37 1 cm 14 6 35 5 cm 13 98 22 4 cm 8 82 25 9 cm 10 2 1 0 cm 0 39 Back View Front View 21 6 cm 8 51 28 0 cm 11 02 37 6 cm 14 8 Figure 2 5 Installation of NEMA...

Страница 21: ... portable radio and a power supply Less module FPN5957 is powered from a DC power source such as solar panel This DC Line Filter is supplied with the option number V274 Refer to CHAPTER 7 for assembly instructions 2 5 1 Ground Connection Connect the Line ground cable directly to the protective grounding strip located under the AC power supply See Figure 2 6 N No ot te e Verify that all power and g...

Страница 22: ...70 Connect to the external DC power source red wire to positive voltage and black wire to negative voltage Gnd Refer to Figure 2 7 for proper connections 3 For Portable Radios use the DC power cable Motorola number FKN4465 Connect to the Power Supply Module AUX connector Refer to Figure 2 8 and Figure 2 9 for proper connections N No ot te e To comply with CE Standards a DC line filter should be us...

Страница 23: ...5 Power Supply Module Less FPN5957 Solar Panel Battery Portable Radio Note Place Line filter here Refer to Chapter 7 FKN8024 FKN4469 Figure 2 8 External DC Power Source Connections Using Portable Radio on Wall Mount or NEMA4X Housing Enclosure S t o c k C h e c k c o m ...

Страница 24: ... Less of the IRRInet XL and to charge the RTU Backup Battery The following 8 Ampere power supply models are used 1 FPN5128 115VAC 8 0 Amp 2 FPN5228 230 VAC 8 0 Amp For information on the 8 Ampere Power Supply refer to the MOSCAD Service Manual CD p n 9808901C76 Assembly Instructions 1 Be sure that the line power is off before connecting wires to the 8 Ampere power supply 2 The operating voltage of...

Страница 25: ... Power Radio Connect the radio DC power cable to the power supply outlet RADIO J2 6 Low Power Radio Connect the radio DC power cable to the power supply outlet AUX J3 7 Connect the cable from the battery to the power supply inlet BATT J1 This cable is disconnected at the factory to remove power from the unit during shipment OUT IN Black 115 VAC or Brown 230 VAC White 115 VAC or Blue 230 VAC Green ...

Страница 26: ...OX P F D D L B J2 230V F1 Figure 2 11 8 Ampere Power Supply Front Panel Table 2 1 8 Ampere Power Supply Front Panel Controls Indicators and Connectors Item Name Function 1 LOGIC J4 Connects DC power to Power Supply Module 2 AUX J3 Supplies 12 VDC power to Low Power Mobile Radio 3 RADIO J2 Supplies 12 VDC power to High Power Mobile Radio 4 BATT J1 Interconnects 12 VDC power from the backup battery ...

Страница 27: ...FPN5128 Fuse 3AG 5 0 Amp 250V MIL F 15160 2 6580373L91 F1 FPN5228 Fuse 3AG 3 0 Amp 250V Slow Blow 6580373L92 F2 FPN5128 FPN5228 Fuse 3AG 10 Amp 32V Slow Blow Little fuse p n 313 010 ID 2 5 5 Electrical Connections for 45 VA Power Transformer The 45 VA main power transformer is used for AC power connections with Portable Radios ONLY The 45 VA transformer provides AC power to the power supply module...

Страница 28: ...he line Voltage The operating input voltage of the 45 VA transformer is indicated above its primary terminal connection posts 2 The cable from the main power line should be inserted into the housing enclosure through the round opening provided at the bottom of the housing 3 Connect the primary live wires of the 45 VA Power Transformer and of the I O AC Transformer if assembled into the terminal co...

Страница 29: ...cable should be inserted into the housing enclosure through the round opening provided at the bottom of the housing punch out the appropriate size hole if necessary 3 Use the supplied cable connectors to connect the Live line wire to the Live TB and the Neutral line wire to the Neutral TB Refer to Figure 2 13 for the wire connections N No ot te e Verify that the cable wires and connection colors c...

Страница 30: ...eable Parts Part No Description FPN5554 45 VA Main Power Transformer 115 VAC FPN5598 45 VA Main Power Transformer 230 VAC 6500052281 Fuse 1 0 Amp 250 V Fast Blow 2 6 Backup Battery Connections 2 6 1 5AH Backup Battery The 5AH Backup Battery p n FLN4666 is assembled ONLY on the chassis wall mount or with the NEMA4X housing enclosure N No ot te e The IRRInet XL RTU is supplied with the backup batter...

Страница 31: ...pere Power Supply as shown in the Figure 2 14 Figure 2 14 5AH Backup Battery Connection 2 6 2 5AH Backup Battery Field Replaceable Parts Table 2 4 5AH Backup Battery Field Replaceable Parts Part No Description 6580283E05 10 Amp Fuse Blade Backup Battery Backup Battery User Connector S t o c k C h e c k c o m ...

Страница 32: ... 0780311K01 Refer to Figure 2 15 Assembly Instructions 1 Connect the loose end of the battery cable to the BAT connector on the Power Supply Module More as shown in Figure 2 15 N No ot te e The IRRInet XL RTU is supplied with the backup battery cable disconnected in order to prevent battery leakage during shipping Battery Connection Battery Connection Backup Battery Backup Battery Figure 2 15 3AH ...

Страница 33: ...The High Power Mobile Radio power cable p n FKN5932 is connected to the RADIO connector of the 8 Ampere Power Supply 2 The Low Power Mobile Radio power cable p n FKN5932 is connected to the AUX connector of the 8 Ampere Power Supply 3 If the RTU has a CMU Module installed verify that the radio communication cable is connected according to the CMU user connections Figure 4 2 and Figure 4 3 4 If the...

Страница 34: ...io to its mounting bracket Installing The Mobile Radio To install the radio from the RTU proceed as follows 1 Turn off the DC power 2 Place the radio and secure the screw of the mounting bracket to the door 3 Reconnect the communication cable 4 Reconnect the DC power and antenna cables to the radio 2 7 2 Mobile Radio Field Replaceable Parts Table 2 6 Mobile Radio Field Replaceable Parts Part No De...

Страница 35: ...pre installed on the metal chassis using a bracket p n FHN5750 Refer to Figure 2 17 Figure 2 17 NEMA4X Plastic Housing Style With Portable Radio For the NEMA4 housing the Portable Radio is pre installed on the door of the RTU housing using a bracket p n FHN5842 Refer to Figure 2 18 Figure 2 18 NEMA4 Housing Style With Portable Radio S t o c k C h e c k c o m ...

Страница 36: ... SMA p n 0980411L01 and the other end to the RTU housing enclosure Operation Turn the radio On OFF Volume knob to the ON position N No ot te e Setting the radio volume level is insignificant However set the volume knob to minimum to save battery power in case of power failure Removing The Portable Radio To remove the radio from the RTU proceed as follows 1 Turn off the DC power 2 Disconnect the DC...

Страница 37: ...64 Portable Radio Antenna Cable For NEMA4 Housing Enclosure 5880384G68 Adapter SMA female to BNC female for Antenna For 3 slot Chassis 0980411L01 Adapter SMA female to SMA female for Antenna For NEMA4 Housing Enclosure FKN5817 Communication Cable For 3 slot Chassis FKN5953 Communication Cable For NEMA4 Housing Enclosure FKN4465 Portable Radio Power Cable S t o c k C h e c k c o m ...

Страница 38: ...the basic interconnection diagram of the IRRInet XL RTU N No ot te e This setup is used for Portable Radios ONLY POWER SUPPLY CPU Backup BATTERY Portable RADIO AUX BAT PORT3 ANTENNA PROTECTIVE GROUNDINGSTRIP CPUTORADIOCOMM RADIOPOWERSUPPLY BATTERY POWER SUPPLY FKN8015 FKN4465 FKN5953 45VAPOWER TRANSFORMER PWRIN FKN4463 ACINPUT I O I O I O DOOR NEMA4Housing M O T H E R B O A R D MODULE MORE Figure ...

Страница 39: ...3 Slot Chassis Power Supply LOGIC RADIO PGND IN BATT Back Up Battery Jumper Strip Protective Gnd Strip Power Supply Module AUX BAT PWR IN Primary Power Supply AUX Battery Power Supply Intrac Line Data CPU Module Port 3 Port 2 AC Input To RTU 8 Ampere LESS Figure 2 20 Connecting the RTU by Wire Line Interconnection Diagram S t o c k C h e c k c o m ...

Страница 40: ...e The High Powered Mobile Radio is used in this setup VCC CMU 3 Slot Chassis AC Input Antenna Power Supply LOGIC RADIO PGND IN BAT T Back Up Battery Radio High Power Jumper Strip CPU Module Port3 Port2 Data Protective Gnd Strip Power Supply Module LESS AUX BAT PWR IN Primary Power Supply Radio Power Supply AUX Battery Power Supply Comm Cable Adaptor VCC CMU 8 Ampere Figure 2 21 Connecting the RTU ...

Страница 41: ...rt 3 MDLC is to be connected to the High Power Radio VCC CMU VCC CMU 3 Slot Chassis AC Input Antenna Power Supply LOGIC RADIO PGND IN BATT Back Up Battery Radio High Power Radio Low Power Jumper Strip CPU Module Port 3 Port 2 Data Data ProtectiveGnd Strip Power Supply Module Less AUX BAT PWR IN Primary Power Supply Radio Power Supply Aux Power Supply AUX Battery Power Supply Comm Cable Adaptor Ant...

Страница 42: ...le is installed in the second slot from the left The optional I O Modules are installed in the remaining 3 slots in accordance with the setup made in the site configuration file inside the MOSCAD ToolBox One of the following RTU communication units can be installed horizontally on the top of the card cage CMU Module RS485 Adaptor N No ot te e All modules and units ordered are pre installed in the ...

Страница 43: ...ections from the module 3 Press the snap located at the bottom of the front plastic panel in the downward direction and pull the module out 2 10 2 Installing the Power Supply Module To install module in the RTU card cage proceed as follows 1 Turn off the DC power 2 Place the module into the first left hand slot 3 Slide it into the slot until the snaps click into place 4 Reconnect all wire connecti...

Страница 44: ... the door latches shut when swung closed Once the door is latched verify that the lock is vertically positioned as shown below Open Close 2 11 Radio Antenna Placement W Wa ar rn ni in ng g The radio antenna should not be placed on top of the plastic housing An antenna placed on top of the plastic housing produces strong electromagnetic fields that may be harmful to the people in the vicinity and t...

Страница 45: ...Power Cable 8 Ampere PS to Power Supply Module FKN5932 Power Cable 8 Ampere PS to Mobile Radio FKN8017 Backup Battery Cable 8 Ampere PS to 5 AH Battery FKN8015 Backup Battery Cable Power Supply Module to 3 AH Battery FKN5817 Communication Cable CPU Port 3 to Radio FKN5952 Antenna Cable for Mobile Radio FKN4464 Antenna Cable for Portable Radio FLN2722 CPU Module FRN5907 External Radio CPU Interface...

Страница 46: ...ransformer 3 1 2 Powering the Module N No ot te e The input and output circuits of the Power Supply Module are protected by on board fuses External 12 to 16 VDC Power Supply or Solar Panel To power on the IRRInet XL RTU use power cable p n FKN4469A Connect this power cable directly from the external source to the PWR IN of the Power Supply Module 8 Ampere Power Supply To power on the IRRInet XL RT...

Страница 47: ...es loc a ted in sid e p an e l A U X D C o u tp u t c o nn ec to r S u p plie s 1 2 V D C p o we r to P o rta ble R a dio D C ON OFF S w itc h C o ntro ls the D C o u tp u t o f th e P o w e r S u pp ly mo d ule In d ic a tio n L ED L it w h e n th e P o w e r S u pp ly rec eive s valid in p u t V oltag e P o w e r In C on n ec to r FK N 4 46 3 c a ble T o 4 5 VA P o w e r T ran s fo rm e r FK N 4...

Страница 48: ...able Parts Table 3 1 Power Supply Module Field Replaceable Parts Part No Description 6502069C09 F1 F2 F3 Fuse 4 Amp SB 5 x 20 6486318F01 PS Plastic Panel FPN5957 Power Supply Module Less FPN5555 Power Supply Module More S t o c k C h e c k c o m ...

Страница 49: ...hered and communicates with external devices The CPU module is based on the Motorola 68LC302 microprocessor and includes on board memory communication circuits I O bus drivers and other circuits The CPU Module is installed in the second slot from the left in the multi slot I O card cage Figure 3 2 CPU Module Front Panel S t o c k C h e c k c o m ...

Страница 50: ...M3 LOAD 1 CONF 5 APPL 9 MON 13 RST 2 Tx1 6 Tx2 10 Tx3 14 ERR 3 Rx1 7 Rx2 11 Rx3 15 BAT 4 CM1 8 CM2 12 CM3 16 Figure 3 3 CPU LED Display 3 3 2 Front Panel Controls To start and reset the CPU Module turn the Main Power Supply switch off and then on again The pushbutton is used for the following operations Activate the LED Display Panel Toggle the LED panel to display the status of the CPU or one of ...

Страница 51: ...Application Programmer s monitoring program to perform diagnostic operations The application run time is to long Could be caused by an error in the Ladder Diagram Program i e infinite loop The Application Program is in STOP state This occurs when the Programming Toolbox s Hardware Test Calibration Program is performing a Hardware Test MON On The Monitoring Program of the Toolbox Application Progra...

Страница 52: ...ton will return the display to the CPU Led position upper left corner LED Display Off When the display is programmed to turn off after a pre defined time out set through the Toolbox Site Configuration file if the pushbutton is not pressed for this timeout the display will turn off automatically LED Test When the pushbutton is pressed continuously for a few seconds all of the LED s light up simulta...

Страница 53: ...e normal power up procedure is performed or an error message is displayed on the PC 3 3 4 Connectors The CPU ports are designed for the following uses PORT 1A Data Port RS 485 PORT 1B Data Port RS 232 PORT 2 Data Port RS 232 PORT 3 Data Port RS 232 Radio or Line Connection N No ot te e Ports 2 and 3 can operate simultaneously with each other and with either Port 1A or Port 1B Ports 1A and 1B canno...

Страница 54: ...irectly connected to the module The 24 VAC power source also enables the operation of the Digital Inputs The number of solenoid valves connected to the module can be limited by the software The software indicates the maximum number of solenoids to operate properly This limitation can be set per module and per IRRInet XL RTU Each valve is energized separately to avoid the inrush current influence T...

Страница 55: ...ary outputs of the transformer to the I O AC module VAC to pin 1 or 2 Red wire if using Motorola option V240 or V260 VAC to pin 3 or 4 Green wire connected to protective ground strip if using Motorola option V240 or V260 5 Connect all I O wires to the mating connector according to your settings in the Site Configuration Program in the Programming Tool Box see Figure 3 6 Ensure that the mating conn...

Страница 56: ... 115 or 230 V AC From Power Supply NOT ES 1 If using 45 VA Main PowerTransformer connect to AC Line source using Line Connector on Chassis 2 In the NEMA4 housing enclosure there is no designated location for the I O AC 24 V AC Power Transformer Green Green Red Tied to Tra nsfor mer Housing GND Wire FKN8037 Figure 3 5 I O AC Module External 75 VA Transformer User Connections S t o c k C h e c k c o...

Страница 57: ...7 OUT 8 OUT 9 OUT 10 OUT 11 OUT 12 OUT 13 OUT 14 DI 1 DI 2 OUT 1 OUT 2 OUT 3 OUT 4 Ferrite refer to Chapter 6 Ground Strip Ground Strip SOL 1 SOL 14 Input 2 Input 1 Figure 3 6 I O AC Module I O User Connections S t o c k C h e c k c o m ...

Страница 58: ...mple Figure 3 7 shows indications from the module in slot number 1 M1 LED number 1 is on indicating that the module is reading signal from Input number 1 DI 1 LED number 11 is on indicating that the module is energizing Output number 9 OUT 9 Table 3 4 specifies the LED indications for the I O AC Module CPU M1 M2 M3 LOAD 1 CONF 5 APPL 9 MON 13 RST 2 Tx1 6 Tx2 10 Tx3 14 ERR 3 Rx1 7 Rx2 11 Rx3 15 BAT...

Страница 59: ...O AC Module 3108509G18 User Connector Plug 10 Pin 6502069C09 Fuse 4 Amp SB 6486016T01 I O AC Front Panel 5486590T01 Pre Printed User ID Label Card I O AC FKN8037 Ground Wire for I O AC Module FLN9587 230 to 24 VAC External Transformer FLN9588 115 to 24 VAC External Transformer FLN9448 Suppression Core S t o c k C h e c k c o m ...

Страница 60: ...o responds to back indication signals from 8 different field input sensors The I O DC Module should be located in the slot designated by the Site Configuration application Programming Tool Box The Special Features of this Module are Output short circuit protection Automatic solenoid detection Software controllable output voltage to operate DC solenoids 2 to 49 VDC Figure 3 8 I O DC Module General ...

Страница 61: ...CC standards a ferrite p n FLN9448 must be clamped onto the I O wires Refer to CHAPTER 6 for assembly instructions 3 Use the ID label card to record the TB pin connections Figure 3 9 I O DC Module User Connections I O DC COM1 4 OUT 1 OUT 2 OUT 3 OUT 4 COM5 8 OUT 5 OUT 6 OUT 7 OUT 8 COM1 4 DI 1 DI 2 DI 3 DI 4 COM5 8 DI DI DI DI 5 6 7 8 5 6 7 8 Input 1 SOL 1 SOL 5 Input 5 Input 2 SOL 2 SOL 6 Input 6...

Страница 62: ...ple Figure 3 10 shows indications from the module in slot number 2 M2 LED number 1 is on indicating that the module is reading signal from Input number 1 DI 1 LED number 11 is on indicating that the module is energizing Output number 3 OUT 3 Table 3 6 specifies the LED indications for the I O DC Module CPU M1 M2 M3 LOAD 1 CONF 5 APPL 9 MON 13 RST 2 Tx1 6 Tx2 10 Tx3 14 ERR 3 Rx1 7 Rx2 11 Rx3 15 BAT...

Страница 63: ... DC Module Field Replaceable Parts Part No Description FTN8019 I O DC Module 3108509G18 User Connector Plug 10 Pin 6486016T02 I O DC Front Panel 5486590T02 Pre Printed User ID Label Card I O DC FLN9448 Suppression Core FKN8037 Ground Wire S t o c k C h e c k c o m ...

Страница 64: ...located in the slot designated by the Site Configuration definition Programming Tool Box The Special Features of this Module are 1 Short Wire protection between the two line wires and short wire protection between each line wire shorted to ground 2 Software notification of short circuit occurrence 3 Automatic Piccolo RTU detection 4 Up to 63 Piccolo RTUs supported 5 Up to 126 inputs supported i e ...

Страница 65: ...bottom of the housing 2 Connect the I O wires used to the mating connector plug located at the front of the module Refer to Figure 3 12 for user connections 3 Ensure that the plug with connections 1 3 is inserted in the TB of the module Pin No Signal Name 1 LINE 2 Ground 3 LINE N No ot te e To comply with CE and FCC standards a ferrite p n FLN9448 must be clamped onto the I O wires Refer to CHAPTE...

Страница 66: ...nit Ground Strip Line Protection Unit Line Protection Unit SINGLE CABLE LINE Ferrite Refer to Chapter 6 Ground Strip SINGLE CABLE LINE RTU 1 Piccolo RTU 63 Piccolo RTU 1 Piccolo RTU 63 Piccolo Ferrite Refer to Chapter 6 Line Protection Unit Line Protection Unit Line Protection Unit Line Protection Unit Ground Strip Line Protection Unit Line Protection Unit Line Protection Unit Line Protection Unit...

Страница 67: ...ple Figure 3 13 Single Cable Module LED Display shows indications from the module in slot number 3 M3 LED number 5 is on indicating that at least one of the connected RTUs is turned on Table 3 8 specifies the LED indications for the Single Cable Module CPU M1 M2 M3 LOAD 1 CONF 5 APPL 9 MON 13 RST 2 Tx1 6 Tx2 10 Tx3 14 ERR 3 Rx1 7 Rx2 11 Rx3 15 BAT 4 CM1 8 CM2 12 CM3 16 Figure 3 13 Single Cable Mod...

Страница 68: ...dication status report 9 Toggle Line In Test Mode ONLY Polarity Control for Line Voltage LED ON Line Connector Pin 1 is powered with 40V and Pin 3 is return LED OFF Line Connector Pin 3 is powered with 40V and Pin 1 is return 10 Not Used 11 Not Used 12 Not Used 13 Restart LED ON during the Cold or Warm Restart of Single Cable Module 14 Busy LED ON during the Single Cable Module initialization and ...

Страница 69: ...laceable Parts Part No Description FCN5991 Single Cable Module 3108509G16 User Connector Plug 3 Pin 6486016T03 Single Cable Front Panel 5486590T03 Pre Printed User ID Label Card Single Cable FLN2169 Line Protection Unit FLN9448 Line Suppression Core FKN8037 Ground Wire S t o c k C h e c k c o m ...

Страница 70: ...ine together For Port 3 MDLC the communication media is radio only The CMU Module is installed on the top of the multi slot I O card cage held in place by the four corner posts and two side snaps The CMU does not have a plastic panel or slot location Power Connector Port 2 Port 3 Radio Wire Line Figure 4 1 CMU Module General View Jumper P2 Master Slave For Master Mode factory default position Pin ...

Страница 71: ... p n FKN4869 When powered on the CMU LED should light 2 Connect the CPU Port 2 to the CMU Port 2 3 Connect the CPU Port 3 to the High Power Mobile Radio communications connector 4 Connect the CMU Radio to the Low Power Mobile Radio communications connector 5 For CMU P3 Jumper and Site Configuration settings refer to Table 4 1 CPU Port2 to CMU Port2 CMU Radio to Low Power Radio CPU Port3 to High Po...

Страница 72: ...ble p n FKN4869 When powered on the CMU LED should light 2 Connect the CPU Port 2 to the CMU Port 2 3 Connect the CPU Port 3 to the CMU Port 3 4 Connect the CMU Radio to the Mobile Radio communications connector 5 For CMU P3 Jumper and Site Configuration settings refer to Table 4 1 CPU Port2 to CMU Port2 CMU Radio to Mobile Radio CPU Port3 to CMU Port3 Figure 4 3 CMU Unit and Single Mobile Radio U...

Страница 73: ...the factory default When Port 2 is used for Wire Line communication the IRRInet XL RTU is usually set as Master Master is the factory default position For Master operation the Jumper P2 pins 1 and 2 are shorted together See Figure 4 1 To change the IRRInet XL RTU to Slave Mode change the position of the P2 jumper so that pins 2 and 3 are shorted together 3 To enable Port 2 Intrac using both a radi...

Страница 74: ...o with its CM set to Low Short pins 2 3 High Wire Line Only Short pins 2 3 High Radio with its CM set to High Port 2 Wire Line Short pins 1 2 High Radio with its CM set to Low Port 2 Wire Line Short pins 2 3 High CM Channel Monitor N No ot te e Factory Default settings CMU jumper P3 is Short pins 1 2 CM High CMU jumper P2 is Short pins 1 2 Master Site Configuration sets Port 2 Channel Monitor to H...

Страница 75: ...top of the multi slot I O card cage in alignment with the 4 corner posts 3 Press the module into place until the two side snaps lock the module in place 4 Reconnect the modules power cable and various communications cables according to the user connections shown in Figure 4 2 Figure 4 3 and Figure 4 4 4 1 3 Diagnostic LED Panel The matrix of 5 x 4 LED s located on the CPU Module is used for diagno...

Страница 76: ...ption 12 Port 2 Transmission or Reception 14 Port 3 Transmission or Reception 15 Port 3 Transmission or Reception 16 Port 3 Transmission or Reception 4 1 5 CMU Unit Field Replaceable Parts Table 4 3 CMU Unit Field Replaceable Parts Part No Description FLN2880 CMU Unit 3108509G16 User Connector Plug 3 Pin 6502069C06 Fuse 1Amp 250V SB 5 x 20 mm 5486773J01 CMU Label GLN7306 Rubber Sealing Plug RJ45 C...

Страница 77: ...Types Type Description Tel Line V226 Interface the internal modem to a telephone line The telephone line interface operates in full duplex mode Multi Drop V219 This option allows the CPU internal line modem to communicate with several modems in other RTUs using a single pair of wires The multi drop interface operates in half duplex mode Note that only the 1200 BPS internal line modem is supported ...

Страница 78: ...d in the RTU 4 4 1 Wire Connections Follow the Internal Connection instructions for all options and the specific External Connection instructions corresponding to the option being installed Internal Connections 1 Connect communication cable FKN5953 between the port marked FROM MODEM of the Line Interface Unit and Port 3 of the CPU 2 Connect a grounding wire between terminal 6 of the TB connector l...

Страница 79: ... an RJ11 connector plug it into the LINE connector on the unit s front panel Or If the telephone line is comprised of two wires connect the wires to terminals 1 and 2 of the unit s front panel TB The polarity is insignificant Figure 4 6 Telephone Line Option Electrical Connections PROT GND Telephone Cablewith RJ11 connectors To CPU LED 6 5 4 3 2 1 Option Telephone Line Telephone Line LED PROT GND ...

Страница 80: ...s to terminals 4 and 5 of the Line Interface Unit s front panel TB See Figure 4 7 Figure 4 7 Multi Drop Option Electrical Connections 6 5 4 3 2 1 PROT GND Line To CPU LED 6 5 4 3 2 1 6 5 4 3 2 1 PROT GND Line To CPU LED S t o c k C h e c k c o m ...

Страница 81: ... an RJ11 connector plug it into the 2 WIRE LINE connector on the unit s front panel Or If the telephone line does not have an RJ11 connector connect the wires to terminals 1 and 2 of the unit s front panel TB The polarity is insignificant Figure 4 8 2W Leased Line Option Electrical Connections PROT GND 2W Tx Rx Leased Line To 2W Tx Rx Leased Line Optional Telephone Cable with RJ11 Connectors Dip S...

Страница 82: ...e that this line should be connected to the Rx input of the line s interface modem at the other end of the line Tx Rx Tx Rx Figure 4 10 Typical 4 Wire Line Modem Interconnection 3 Connect the Rx line wires to terminals 4 and 5 of the TB on the front panel of the unit The polarity is insignificant Note that this line should be connected to the Tx input of the line interface modem at the other end o...

Страница 83: ... new Line Interface Unit remove it from the plastic cover and install the bare board in its place in the RTU housing To install a Line Interface Unit in the RTU proceed as follows 1 Turn off the DC power 2 Place the module on the top of the multi slot I O card cage Press down until the snaps click into place 3 Reconnect the Line Interface Unit connections 4 4 3 Diagnostic LED s The LED indications...

Страница 84: ... 2808508G10 Modem connection TB 6 Contacts FRN1985 Line Interface Dial Answer using the FRN5648 board FRN1986 Line Interface Multidrop using the FRN5649 board FRN1987 Line Interface PTPT 2W 4W using the FRN5650 board FRN5669 CPU Internal interface board used with option V219 FRN5639 CPU internal Interface board used with options V226 and V404 S t o c k C h e c k c o m ...

Страница 85: ...e Unit are installed in the same place and mutually exclusive i e only one of these modules can be installed in the RTU 4 5 2 Wire Connections To connect the RS485 adapter proceed as follows 1 Connect communication cable between the Multiplexer Input port and the CPU RS485 port Port 1A 2 Punch a hole at the relevant location and of the appropriate size in one of the perforated circles at the botto...

Страница 86: ...follows 1 Turn off the DC power 2 Disconnect all RS485 Connection Board input and output connections 3 Pull out the RS485 Multiplexer by pressing the side snaps Installing a RS485 Connection Board To install a RS485 Connection Board in the RTU proceed as follows 1 Turn off the DC power 2 Slide the RS485 Connection Board into its slot until the snaps click into place 3 Reconnect the RS485 Adapter c...

Страница 87: ... Power Supply module 5 1 RTU to Computer Terminal Connections For a 25 pin or 9 pin D type connector use the FLN6457 cable kit in order to connect one of the RTU RS 232 ports to a computer or terminal The kit includes a cable with RJ45 modular jacks on both ends and a RJ45 to 25 pin female D Type adaptor see Figure 5 1 The RTU port configuration is as follows CPU Port Number Used with Piggyback Bo...

Страница 88: ...e RTU will not receive unless it receives a DTR no signal from the Computer Terminal Figure 5 1 RJ45 to D Type Female Connector Adapter J1 RJ45 J2 25 PIN D TYPE Tx_DATA Rx_DATA RTS CTS DSR GND DTR Rec_LINE DCD 2 1 5 8 7 4 3 6 3 2 2 3 7 4 8 5 6 6 5 7 4 20 1 8 Tx_DATA Rx_DATA RTS CTS DSR GND DTR Rec_LINE DCD 9 PIN D TYPE RJ45 Connector Pin No 1 Pin No 8 S t o c k C h e c k c o m ...

Страница 89: ... 1 Before transmitting the RTU sends a RTS on signal to the modem and will not transmit unless it receives a feedback CTS on signal from the modem 2 The RTU will not receive unless it receives a DCD on signal from the modem 3 When using a modem in auto answer mode connected to a computer port for remote service the RTU does not support the RTS CTS protocol as the port is designed to operate with a...

Страница 90: ...ns are detailed in Table 5 2 below Table 5 2 RTU to Modem Synchronous Connection DTE to DCE CPU Port No Used with Piggyback Board Toolbox Definition 3 FRN5724A RS 232 Asynchronous External Modem Full Duplex or Multi Drop Half Duplex Darcom Modem Darcom Master Repeater J1 RJ45 J2 25 PIN D TYPE Tx_DATA Rx_DATA RTS CTS GND TxCLK Rec_LINE RxCLK 1 2 6 3 4 8 5 7 2 3 4 5 7 15 8 Tx_DATA Rx_DATA RTS CTS GN...

Страница 91: ...TA Rx CLK GND SITE C PORT 1B PORT 1B RJ45 Connector Pin No 1 Pin No 8 Figure 5 4 Time Synchronization using SYNCH Broadcast Interconnection Diagram 5 3 2 RTU to RTU Asynchronous Communications Connection This section provides data on the cable recommended for the RTU to RTU RS 232 asynchronous interconnection not supplied See Figure 5 5 The following table defines the RTU port for this connection ...

Страница 92: ...s Communications Cable 5 3 3 RTU to RTU Synchronous Communications Connection via port 1B This section provides data on the cable recommended for RTU to RTU RS 232 synchronous communications via RTU port 1B not available See Figure 5 6 The cable should be connected to the CPU as follows CPU Port No Used with Piggyback Board Toolbox Definition 1B RS 232 Synchronous RTU to RTU MDLC Full Duplex or Ha...

Страница 93: ... 232 Synchronous Communications Connection via port 3 This section provides data on the cable recommended for RTU to RTU RS 232 synchronous communications via RTU port 3 not supplied See Figure 5 7 The cable should be connected to the CPU as follows CPU Port No Used with Piggyback Board Toolbox Definition 3 FRN5724A RS 232 Synchronous External Modem Full Duplex or Multi Drop Half Duplex S t o c k ...

Страница 94: ...S 232 standard different printer manufacturers have their own definitions for the connectors Select the specific adaptor according to the functions defined in your printer for the various pins If the FLN6457 cable with female 25 pin D type connector is used refer to the following table RS232 Function 25 pin Female Used As Direction RX DATA 3 Printer Rx Data To Printer DTR 20 Printer Ready From Pri...

Страница 95: ... FKN4469 To connect the solar panel to the power supply use the power supply module FKN4469 kit See Figure 5 9 SolarPanel Power Supply Module SolarPanel Red Black 1 Solar_p 2 Vin_p 3 Pgrd Not used 4 Vin_n Not used SolarPanel Figure 5 9 Solar Panel to Power Supply Module Cable FKN4469 Transformer Power Supply To transformer load To Ground strip To transfer load Red Black 2 Vin_p 3 Pgnd 4 Vin_n 1 So...

Страница 96: ...asy insertion into one ferrite as shown in Figure 6 1 2 Clamp one ferrite on all Input and Output wires per module as shown in Figure 6 1 3 Each ferrite is to be placed as close as possible to the mating connector plug The ferrite should not exceed a distance of 10 0 cm from the module itself 4 Clamp a ferrite on the CPU Port 2 communication cable as close to the radio as possible as shown in and ...

Страница 97: ...ection 6 1 Cable Suppression Cores Field Replaceable Parts Table 6 1 Cable Suppression Cores Field Replaceable Parts Part No Description FLN9448 Medium Diameter Ferrite Assembly Motorola p n 7604185k04 Fair Rite p n 0443167251 Ferrite S t o c k C h e c k c o m ...

Страница 98: ...Y when 1 Main Power to the IRRInet XL is from a DC Power Source such as a Solar Panel AND 2 Portable Radio is installed in the RTU AND 3 Using Power Supply Module Less FPN5957 The DC Line Filter is NOT required and NOT to be used if 1 An AC Power Source powers RTU OR 2 Mobile Radio is installed in the RTU OR 3 Using Power Supply Module More FPN5555 To DC Source To Power Supply Module Power IN Conn...

Страница 99: ...r 3 Connect the opposite end of the Line Filter to the IRRInet XL Main Power Cable FKN4469 Red to red black to black and shield drain wire 4 Turn on Power 5 IRRInet XL should be powered on 7 3 DC Line Filter Field Replaceable Parts Table 7 1 DC Line Filter Field Replaceable Parts Part No Description FKN8024 DC Line Filter 6580283E03 Fuse Tube 5 Amp 250V S t o c k C h e c k c o m ...

Страница 100: ... Module RAM to be erased In order to preserve the data inside the CPU Module RAM while the RTU is powered off perform the following steps Assembly Instructions See Figure 8 1 1 While the IRRInet XL RTU is powered on connect a small 9 VDC battery to the Power Supply Module BAT connector Refer to Figure 8 1 CPU RAM Backup Battery User Connections 2 Power off the RTU 3 Replace the I O Module 4 Power ...

Отзывы: