background image

7

English

R

ADIO OVER

VIE

W

RADIO OVERVIEW

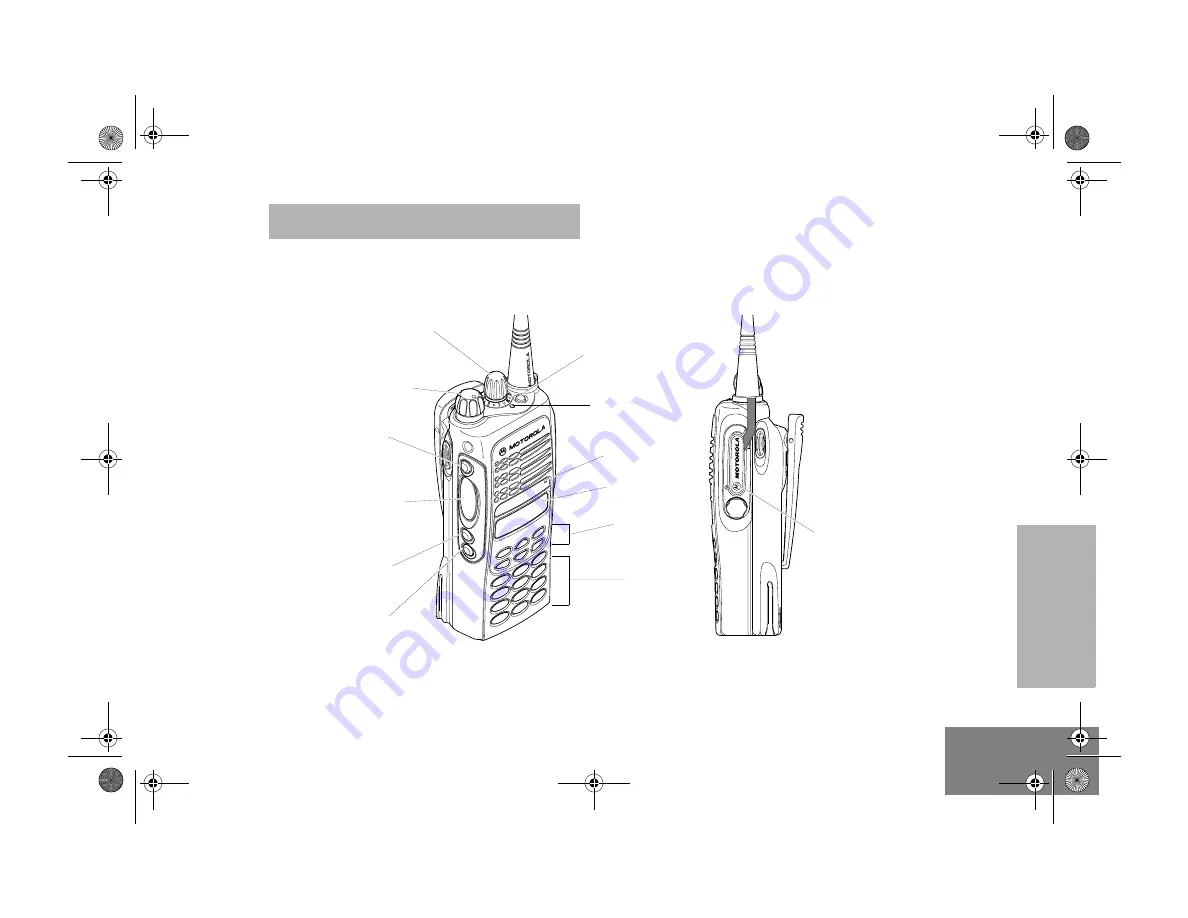
PARTS OF THE RADIO

HT1250 Full-Keypad Model

On/Off/Volume Knob

LCD Screen

Microphone

Keypad

Menu Keys

(programmable)

Side Button 1 (A)

Push-to-Talk (PTT)

LED Indicator

(programmable)

Side Button 2 (B)

(programmable)

Side Button 3 (C)

Channel Selector Knob

(programmable)

Top Button (D)

Button

(P1, P2, P3)

(programmable)

Side

Connector

Cover 

Radio Overview.fm  Page 7  Monday, September 30, 2002  2:07 PM

Содержание HT1250

Страница 1: ...c All rights reserved Printed in U S A MOTOROLA Le logo stylisé M et intelligence universelle sont des marques de Motorola Inc 2002 Motorola Inc Tous droits réservés Imprimé aux États Unis 6881088C37 68P81088C37 A HT1250 Professional Series Two Way Radio User Guide Série Professionnelle Manuel de l utilisateur pour radios bidirectionnelles 88C37 A_cvr qxd 9 25 2002 4 06 PM Page 1 ...

Страница 2: ......

Страница 3: ...8 Attaching the Battery 19 Removing the Battery 19 Accessory Information 20 Attaching the Antenna 20 Removing the Antenna 20 Attaching the Belt Clip 21 Removing the Belt Clip 21 Attaching the Side Connector Cover 22 Turning The Radio On or Off 22 Adjusting the Volume 23 Selecting a Zone 23 Selecting a Radio Channel 23 Sending a Call 24 Receiving a Call 24 Radio Calls 25 Making a Selective Call 25 ...

Страница 4: ...Channels 36 Phone 37 Making a Phone Call D 37 Modifying The Phone List K 38 To Add an Entry for full keypad radios only 38 To Delete an Entry 39 To Edit an Entry for full keypad radios only 40 Audio Tone Settings 41 Utilities 43 Setting the Time 45 Warranty 47 Limited Warranty 47 Accessories 51 Carry Cases 51 Chargers 51 Headsets 52 Remote Speaker Microphones 52 Adapters 52 Batteries 52 Antennas 5...

Страница 5: ...Accordingly any copyrighted Motorola computer programs contained in the Motorola products described in this manual may not be copied reproduced modified reverse engineered or distributed in any manner without the express written permission of Motorola Furthermore the purchase of Motorola products shall not be deemed to grant either directly or by implication estoppel or otherwise any license under...

Страница 6: ...4 English CONTENTS Notes 88C37 A_PR_UG_HT1250_EngTOC fm Page 4 Monday September 30 2002 2 02 PM ...

Страница 7: ... use to ensure optimum capacity and performance The battery was designed specifically to be used with a Motorola charger Charging in non Motorola equipment may lead to battery damage and void the battery warranty Note When charging a battery attached to a radio turn the radio off to ensure a full charge The battery should be at about 77 F 25 C room temperature whenever possible Charging a cold bat...

Страница 8: ...6 English SAFETY Notes SafetyNA fm Page 6 Monday September 30 2002 2 06 PM ...

Страница 9: ...Screen Microphone Keypad Menu Keys programmable Side Button 1 A Push to Talk PTT LED Indicator programmable Side Button 2 B programmable Side Button 3 C Channel Selector Knob programmable Top Button D Button P1 P2 P3 programmable Side Connector Cover Radio Overview fm Page 7 Monday September 30 2002 2 07 PM ...

Страница 10: ...creen Microphone Menu Keys programmable Side Button 1 A Push to Talk PTT LED Indicator programmable Side Button 2 B programmable Side Button 3 C Channel Selector Knob programmable Top Button D Button P1 P2 P3 programmable Radio Overview fm Page 8 Monday September 30 2002 2 07 PM ...

Страница 11: ... on the type of button press short press quickly pressing and releas ing the programmable buttons or long press pressing and holding the pro grammable buttons for a period of time at least 1 1 2 seconds or hold down pressing and holding down the programmable buttons while checking status or making adjustments The table on pages 10 and 9 summarizes the programmable features available and shows the ...

Страница 12: ...the battery s charge status 18 Scan Nuisance Channel Delete G Toggle scan on and off Deleteanuisance channelwhilescanning 34 Power Level B Toggle transmit power level between High and Low 30 Keypad Lock L Toggle keypad between Locked and Unlocked Repeater Talkaround J Toggle between using a repeater or transmitting directly to another radio 29 Squelch Toggle squelch level between Tight and Normal ...

Страница 13: ... is installed N Toggle between activating and deactivating the option board Phone D Access Phone Mode 37 Speed Dial Access your phone list 37 Radio Call Make a radio call 25 Light Turn on your radio backlight Zone Access your zone list 23 This function is activated by EITHER a short OR a long press but not both Function Indicator Short Press Long Press Hold Down Page Button P2 P3 P1 Left Up Down R...

Страница 14: ... cursor right or inserts a space when editing This key can also be programmed Left Key Used as a backspace key when editing This key can also be programmed Keypad Keys for full keypad radios These keys are used for dialing a phone number making a radio call entering information when programming radio lists Each key can generate several different characters For example to enter the character C pres...

Страница 15: ...mes Key is Pressed Key 1 2 3 4 5 6 7 8 9 10 11 0 0 1 1 2 A B C 2 a b c 2 3 D E F 3 d e f 3 4 G H I 4 g h i 4 5 J K L 5 j k l 5 6 M N O 6 m n o 6 7 P Q R S 7 p q r s 7 8 T U V 8 t u v 8 9 W X Y Z 9 w x y z 9 Blank Space Radio Overview fm Page 13 Monday September 30 2002 2 07 PM ...

Страница 16: ...he selected channel is being monitored Call Received D Phone Phone Mode is selected E Emergency An Emergency Alert is being sent F Call Received A Selective Call or Call Alert has been received G Scan The Scan feature has been activated Also during Scan indicates that there is some activity on a non priority channel Priority 1 Scan flashing During Scan indicates that there is some activity on a Pr...

Страница 17: ...List is being edited L Keypad Lock Keypad is locked M Signal Strength The more bars the stronger the signal being received N Option Board Option board is activated P Battery Level The number of bars 0 4 shown indicates the charge remaining in your battery Symbol Indication Q Not Currently Assigned U Clock Shows the time 12 or 24 hour Symbol Indication Radio Overview fm Page 15 Monday September 30 ...

Страница 18: ...High Low Tone Low High Tone Button High Low Tone Low High Tone Scan Start scan Stop scan Power Level Low power selected High power selected Squelch no visual indicator Tight squelch Normal squelch Option Board Activated Deactivated Keypad Lock Locked Unlocked Repeater Talkaround Does not use repeater Uses repeater Radio Overview fm Page 16 Monday September 30 2002 2 07 PM ...

Страница 19: ...r Status No LED Indication Battery inserted incorrectly Single Green Flash Successful charger power up Flashing Red Battery unchargeable or not making proper contact Steady Red Battery in rapid charge mode Flashing Yellow Battery in charger not in rapid charge mode but waiting to be charged Flashing Green Battery 90 or more charged Steady Green Battery fully charged Remove the battery from the cha...

Страница 20: ...y charge the Motorola authorized batteries listed below other batteries may not charge Battery Level Status Indicator P High P Sufficient P or P Low P Very Low P flashing Part No Description HNN9008 High Capacity NiMH HNN9009 Ultra High Capacity NiMH HNN9010 Ultra High Capacity Factory Mutual NiMH HNN9011 High Capacity Factory Mutual NiCd HNN9012 High Capacity NiCd HNN9013 High Capacity Lithium Io...

Страница 21: ... into the bottom slots on the radio 2 Press the top part of the battery toward the radio until you hear a click 1 2 1 Turn off the radio see page 22 2 Slide both battery latches downward 3 Pull the top part of the battery away from the radio 3 2 Battery Latches GettingStarted fm Page 19 Monday September 30 2002 2 08 PM ...

Страница 22: ... STARTED ACCESSORY INFORMATION Attaching the Antenna Removing the Antenna Turn the antenna clockwise to attach it Turn the antenna counterclockwise to remove it GettingStarted fm Page 20 Monday September 30 2002 2 08 PM ...

Страница 23: ...e grooves of the belt clip with those of the battery 2 Press the belt clip downward until you hear a click 1 Use a key to press the belt clip tab away from the battery 2 Slide the belt clip upward to remove it 2 1 Belt Clip Tab GettingStarted fm Page 21 Monday September 30 2002 2 08 PM ...

Страница 24: ...nector and align the thumbscrew with the threaded hole in the radio 4 Tighten the thumbscrew to hold the cover in place Do not overtighten the thumbscrew Loop Slot Thumbscrew Antenna ON OFF Turn the On Off Volume Control knob clockwise If power up is suc cessful you will hear the Self Test Pass Tone and see the LED turn green If the radio fails to power up you will hear the Self Test Fail Tone Tur...

Страница 25: ...ct a channel 1 Hold down the Volume Set or Monitor button see page 10 you will hear a continuous tone 2 Turn the On Off Volume Control knob to the desired volume level 3 Release the Volume Set or Monitor button 1 to enter Menu Mode 2 or until 3 to select 4 or until you see the desired zone name 5 to select the zone 1 Select the appropriate Zone if required see Selecting a Zone on page 23 2 Turn th...

Страница 26: ... PTT button and talk at a distance of about 1 to 2 inches 2 5 to 5 cm from the microphone 4 Release the PTT button to listen 1 Turn your radio on 2 Adjust the radio s volume see page 23 3 Switch to the desired channel Hold the radio in a vertical position with its microphone 1 to 2 inches 2 5 to 5 cm away from your mouth MAN WITH RA GettingStarted fm Page 24 Monday September 30 2002 2 08 PM ...

Страница 27: ...e calling radio To answer the call press the PTT button 1 to enter Menu Mode 2 or until 3 to select RADIO CALL 4 or until SELECTIVE CALL 5 to select SELECTIVE CALL 6 or to locate the desired ID in the Radio Call List or for full keypad radios only Enter the ID number of the radio you want to call 7 Press the PTT button to send the call The radio sounds a continuous tone 8 Press the PTT button and ...

Страница 28: ...d Also your radio will not receive any Selective Calls until you clear the page 1 to enter Menu Mode 2 or until 3 to select RADIO CALL 4 or until Call Alert 5 to select Call Alert 6 or to locate the desired ID in the Radio Call List or for full keypad radios only Enter the ID number of the radio you want to page 7 Press the PTT button to send the page You will see Call In Prog 8 If the Call Alert ...

Страница 29: ...cy alerts have priority over all other calls The E symbol will appear on the LCD screen when your radio is in the Emergency Alert state 1 to enter Menu Mode 2 or until 3 to select Radio Call 4 or until Radio Check 5 to select Radio Check 6 or to locate the desired ID in the Radio Call List or for full keypad radios only Enter the ID number of the radio you are checking 7 Press the PTT button You w...

Страница 30: ...e names associated with these IDs The K symbol will appear on the LCD screen when you are editing Note The radio cannot receive any calls while you are editing To Edit a Call List entry 1 to enter Menu Mode 2 or until 3 to select Program Lists 4 or until RadioCall List 5 to select RadioCall List 6 or until Edit Entry 7 to select Edit Entry 8 or until you locate the desired entry 9 to select the en...

Страница 31: ...e and Talkaround Mode or SETTING TIGHT OR NORMAL SQUELCH Use this feature to filter out nuisance unwanted calls and or background noise However tightening squelch could cause calls from remote locations to be filtered out as well In this case normal squelch may be more desirable To select tight or normal squelch Press the preprogrammed Squelch button see page 10 to toggle between tight and normal ...

Страница 32: ...might change your radio s power level to low This may cause radios that are farther away not to receive your transmis sions To set the power level Press the preprogrammed Power Level button see page 10 to toggle between low and high or Do the following 2 or until Utilities 3 to select Utilities 4 or until Squelch 5 to select Squelch 6 or until or until 7 to confirm your selection 1 to enter Menu M...

Страница 33: ...s to select from See the table on page 41 To tag a specific user s name 6 or until or until or until 7 to confirm the selection 1 to enter Menu Mode 2 or until Audio Tones 3 to select Audio Tones 4 or until Name Tone Tag 5 to select Name Tone Tag 6 or until you see the name you want to tag 7 to confirm the selection Power High Power Low Power Auto Audio Tones Audio Tones Name Tone Tag Name Tone Ta...

Страница 34: ...Audio Tones 4 or until Call Tone Tag 5 to select Call Tone Tag 6 or until you see the call type you want to tag 7 to confirm the selection 8 or until you see and hear the tone you want to use for this type of call 9 to confirm the selection You will see Call Tone Set 10 to return to Call Tone Tag or Hold down to exit Menu Mode Name Tag Set Name Tone Tag Audio Tones Call Tone Tag Audio Tones Call T...

Страница 35: ... scan operation and stops blinking when the radio switches to a channel Note If you enter Menu Mode while the radio is scanning scanning will stop It will resume when you exit Menu Mode To start or stop a scan operation Press the preprogrammed Scan button see page 10 to start or stop scanning or Do the following TALKBACK While your radio is scanning Talkback allows you to participate in a call in ...

Страница 36: ...ned to it The same channel can be included in several scan lists and the same scan list can be assigned to several Channel Selector positions For example When you edit a scan list you can either add delete or prioritize channels Your radio cannot receive any calls while you are editing a scan list The K symbol will be displayed while you are in edit mode 1 While the radio is on the nuisance channe...

Страница 37: ...e the channel you want to add or delete Note You cannot delete the last remaining channel of a scan list 9 to confirm your selection 10 If you added a channel you will see Entry Saved or If you deleted a channel you will see Delete to confirm the deletion You will see Delete 11 to return to Add Entry or to return to Delet or Hold down to exit Menu Mode Priority Channel Scanning Sequence None speci...

Страница 38: ...ect Scan List Priority Channel Scanning Sequence 6 or until Edit Priority 7 to select Edit Priority 8 or until or until 9 to select the desired priority level 10 or until you see the channel you want to prioritize 11 to prioritize that channel 12 to return to Edit Priority or Hold down to exit Menu Mode Notes You cannot reprioritize a Priority 1 channel to Priority 2 If you want to reprioritize al...

Страница 39: ...e a phone call Press the Phone Button or Do the following 1 to enter Menu Mode 2 or until Phone 3 to select Phone 4 You will hear a series of tones indicating that an access code is being sent automatically and see your access code or for full keypad radios only enter your access code using the keypad 5 When you hear a dial tone For full keypad radios only enter the phone number using the keypad o...

Страница 40: ...dio sends the last number dialed or If you entered your access code using the keypad press the key once to access the last number dialed then press and release the PTT button 6 Switch to the desired channel Hold the radio in a vertical position with the microphone 1 to 2 inches 2 5 to 5 cm away from your mouth 7 To end a phone call do one of the following Enter the deaccess code using the keypad o...

Страница 41: ...ct the phone number 12 or until you see the location in the list where you want to store the phone number 13 to store the phone number You will see 14 to return to Add Entry or Hold down to exit Menu Mode 1 to enter Menu Mode 2 or until Program Lists 3 to select Program Lists 4 or until Phone List 5 to select Phone List 6 or until Delete Entry 7 to select Delete Entry 8 or until you see the entry ...

Страница 42: ...edit 9 to select the entry 10 or until Edit Name to edit the name or until Edit Nu to edit the phone number or until Edit Loc to edit the location in the phone list 11 to confirm your selection 12 Use the keypad to edit the entry see page 12 or or until you see the location where you want to store the phone number 13 to store the information 14 to return to Edit Entry or Hold down to exit Menu Mod...

Страница 43: ...and Call Tone Tagging see page 31 7 to select the desired setting Audio Tone Settings Feature What it Does Settings Alert Vol Lvl Makes the volume level of the audio and alert tones inde pendent These two volume levels can be adjusted inde pendently Ind Alert Off Ind Alert On Tone Disable Turns all tones on or off Tones On Tones Off Name Tone Tag Assigns a specific ring tone when receiving a call ...

Страница 44: ...ases the volume of the alarm tones when a call is not answered Escalert On Escalert Off Companding Provides the same audio quality for 12 5kHz channels as for 25kHz channels Compand On Compand Off Keypad Tones Turns keypad tones on or off Tones On Tones Off Audio Tone Settings Continued Feature What it Does Settings Indicators fm Page 42 Monday September 30 2002 2 10 PM ...

Страница 45: ...r available settings 7 to select the desired setting Utilities Features Feature What it Does Settings Squelch Sets radio squelch at either normal or tight see page 29 Sqlch Normal Sqlch Tight Power Level Changes the power level of the radio to high low or auto see page 30 Power High Power Low Power Auto Clock Sets the time or turns the clock on or off see page 45 Clock On Clock Off Set Time Utilit...

Страница 46: ...s the option board installed in your radio Opt Board On Opt Board Off Light Disable Turns the display and keypad backlight feature on or off Lights On Lights Off Software Ver Displays the radio s software version number when you press Utilities Features Continued Feature What it Does Settings Utilities fm Page 44 Monday September 30 2002 2 10 PM ...

Страница 47: ...ng is blinking you can change it with or Note You cannot select 24 hr for Reminder Alarm 9 to move to the next setting 10 to save your changes 11 to return to or to return to or Hold down to exit Menu Mode Hour AM or PM AM PM or 24 hr 3 05 PM Minutes Utilities Utilities Clock Set Time Set Time Clock Reminder Alarm Reminder Alarm Utilities fm Page 45 Monday September 30 2002 2 10 PM ...

Страница 48: ...46 English UTILITIES Notes Utilities fm Page 46 Monday September 30 2002 2 10 PM ...

Страница 49: ...property of MOTOROLA This express limited warranty is extended by MOTOROLA to the original end user purchaser only and is not assignable or transferable to any other party This is the complete warranty for the Product manufactured by MOTOROLA MOTOROLA assumes no obligations or liability for additions or modifications to this warranty unless made in writing and signed by an officer of MOTOROLA Unle...

Страница 50: ...E DISCLAIMED BY LAW III STATE LAW RIGHTS SOME STATES DO NOT ALLOW THE EXCLUSION OR LIMITATION OF INCIDENTAL OR CONSEQUENTIAL DAMAGES OR LIMITATION ON HOW LONG AN IMPLIED WARRANTY LASTS SO THE ABOVE LIMITATION OR EXCLUSIONS MAY NOT APPLY This warranty gives specific legal rights and there may be other rights which may vary from state to state IV HOW TO GET WARRANTY SERVICE You must provide proof of...

Страница 51: ...gal or unauthorized alteration of the software firmware in the Product does not function in accordance with MOTOROLA s published specifications or the FCC type acceptance labeling in effect for the Product at the time the Product was initially distributed from MOTOROLA I Scratches or other cosmetic damage to Product surfaces that does not affect the operation of the Product J Normal and customary ...

Страница 52: ...nt or software not furnished by MOTOROLA which is attached to or used in connection with the Product The foregoing states the entire liability of MOTOROLA with respect to infringement of patents by the Product or any parts thereof Laws in the United States and other countries preserve for MOTOROLA certain exclusive rights for copyrighted MOTOROLA software such as the exclusive rights to reproduce ...

Страница 53: ...ery with Belt Loop HLN9702_ Nylon Case Standard Battery with Belt Loop HLN9703_ Nylon DTMF Case Thin Battery with Belt Loop HLN9704_ Nylon DTMF Case Standard Battery with Belt Loop HLN9710_ Soft Leather Case Short Plain Belt Loop Thin Battery AAD DC HLN9711_ Soft Leather Case Short Plain Belt Loop Standard Battery AAD DC HLN9712_ Soft Leather Case Short DTMF Belt Loop Thin Battery AAD DC HLN9713_ ...

Страница 54: ...pter HNN9008_R Small NiMH High Capacity HNN9009_R Large NiMH Ultra High Capacity HNN9010_R Large NiMH Ultra High Capacity FM HNN9011_R Large NiCd High Capacity FM HNN9012_R Large NiCd High Capacity HNN9013_R Slim Lilon High Capacity NAB6064_ Lowband Heliflex PMAD4012_ VHF 136 155 MHz 9 cm Stubby PMAD4013_ VHF 155 174 MHz 9 cm Stubby PMAD4014_ VHF 136 155 MHz 14 cm Standard Length PMAD4015_ VHF 155...

Страница 55: ...uffered dial or For full keypad radios only Enter phone number using the keypad Press PTT if buffered dial 4 Hold radio in vertical position with microphone about 2 5 to 5 cm 1 to 2 inches away from your mouth Press PTT to talk release it to listen Ending a Phone Call 1 Send de access code if required 2 Press preprogrammed Phone button or press Sending and Cancelling an Emergency Alert Press prepr...

Страница 56: ...ht Power Level high low auto Software Ver Light Disable on off Option Board on off Reminder Alarm on off set time Clock on off set time to enter Menu Mode or to scroll through the list to select Menu item to return to previous menu level or Hold down to exit Menu Mode or to scroll through sub list to select sub menu item RadioCall List p 28 Phone p 37 Program Lists System Scan p 33 Audio Tones p 4...

Страница 57: ......

Страница 58: ...c All rights reserved Printed in U S A MOTOROLA Le logo stylisé M et intelligence universelle sont des marques de Motorola Inc 2002 Motorola Inc Tous droits réservés Imprimé aux États Unis 6881088C37 68P81088C37 A HT1250 Professional Series Two Way Radio User Guide Série Professionnelle Manuel de l utilisateur pour radios bidirectionnelles 88C37 A_cvr qxd 10 1 2002 9 34 AM Page 1 ...

Отзывы: