Motorola E680 - Smartphone - GSM Скачать руководство пользователя страница 1


1

Welcome

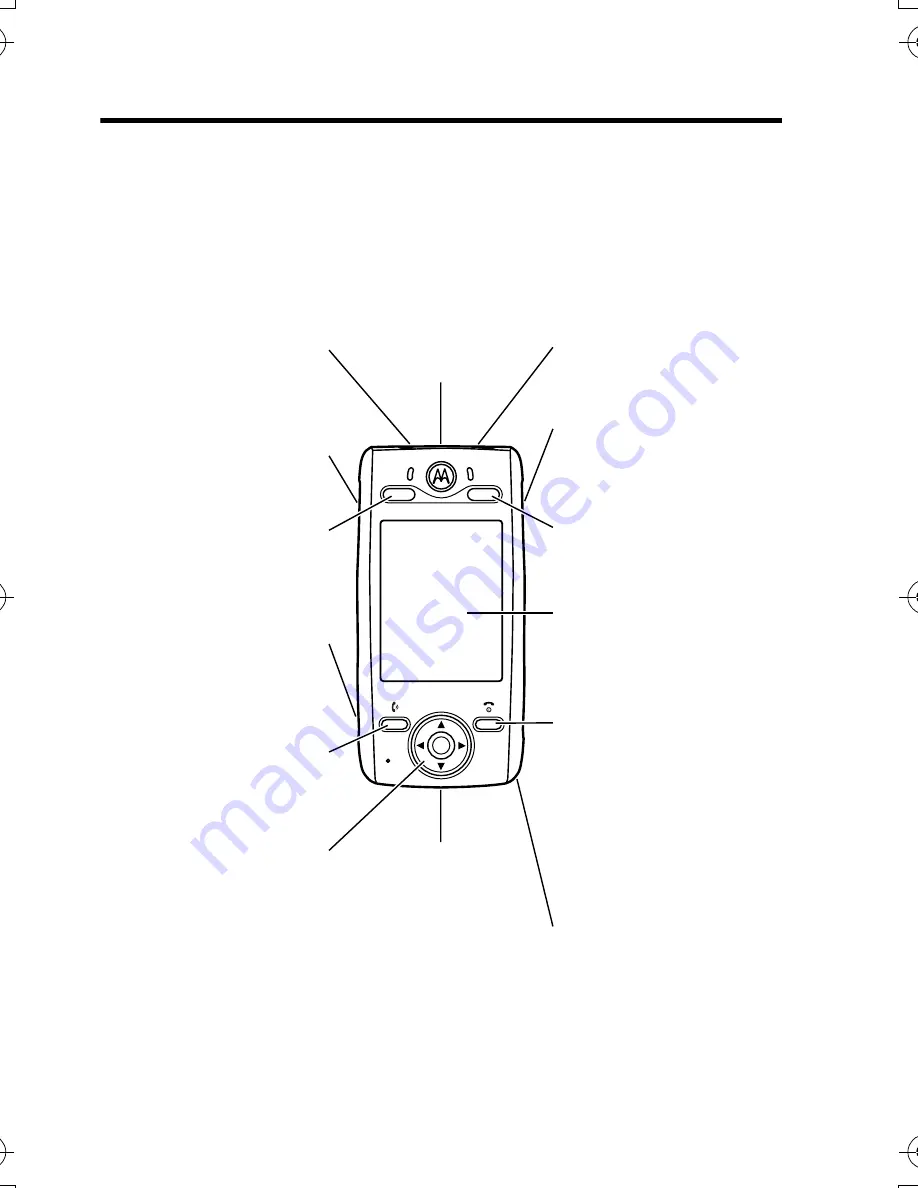
Welcome to the world of Motorola digital wireless 
communications! We are pleased that you have chosen the 
Motorola E680 GSM wireless phone.

Note: 

Your phone may not appear exactly as shown above. 

All features and functions remain the same regardless of your 
phone’s appearance.

040112o

Game Card & 

Memory Card

Slot

Phone Lock 

Switch

Up Volume &

Right Game Key

Down Volume &

Left Game Key

4-Way Navigation 

Key with Center 

Select

Headset Jack

Game Key "A"

Send Key

Make & answer 

calls.

Touchscreen 
Display

Camera Key

Game Key "B"

Stylus

Power & End Key

Turn phone 
on/off, end calls, 
return to main 
screen.

USB Connector

CG.GSM.E680.book  Page 1  Wednesday, September 15, 2004  9:04 AM

Содержание E680 - Smartphone - GSM

Страница 1: ...e All features and functions remain the same regardless of your phone s appearance 040112o Game Card Memory Card Slot Phone Lock Switch UpVolume Right Game Key DownVolume Left Game Key 4 Way Navigation Key with Center Select Headset Jack Game Key A Send Key Make answer calls Touchscreen Display Camera Key Game Key B Stylus Power End Key Turn phone on off end calls return to main screen USB Connect...

Страница 2: ...en press the camera key to take a photo Record Video Press the camera key to activate the camera Tap then tap Record video Tap Record to start video recording Tap Done to stop video recording 041013o Stylus Camera Key Activate camera take photos Mirror Aim camera lens for self portraits Camera Lens Stereo Speakers ...

Страница 3: ...r watch a video clip stored on your phone Tap RealPlayer tap then tap Open Tap File then tap filename to play Wireless Connection Set up a Bluetooth wireless connection to a headset accessory car kit or external device Tap Bluetooth tap Tap Turn on Tap Search to locate the Bluetooth device Phone Theme Apply a phone theme Tap Theme tap and hold theme name tap Set to Current Feature Description 0323...

Страница 4: ...ser s authority to operate the equipment Mobile Phone Tools Software Disclaimer Music or other audio works whether originating from CD s MP 3 s or some other source Music Materials may be protected under copyright law Unauthorized copying of copyrighted works may be contrary to the provisions of the copyright laws of the United States and other countries It is your responsibility not Motorola s to...

Страница 5: ... Making a Call 25 Answering a Call 26 Changing the Call Alert 26 Viewing Your Phone Number 27 Locking and Unlocking Your Phone 27 Highlight Features 28 Using the Camera 28 Sending a Multimedia Message 31 Receiving a Multimedia Message 35 Using the RealOne Media Player 36 Using a Bluetooth Wireless Connection 37 Learning to Use Your Phone 41 Using the Touchscreen Display 41 Using the 4 Way Navigati...

Страница 6: ... Calling Features 59 Changing the Active Line 59 Redialing a Number 59 Using Automatic Redial 60 Using Caller ID 60 Canceling an Incoming Call 61 Turning Off a Call Alert 61 Calling an Emergency Number 62 Dialing International Numbers 62 Direct Dialing an Extension or Voicemail Number 63 Dialing an Extension Number During a Call 63 Dialing Recent Calls 64 Calling With Turbo Dial 64 Putting a Call ...

Страница 7: ...der 77 Moving Messages Between Folders 78 Setting Up the Message Inbox 79 Using Instant Messaging 82 Email 85 Using Mailboxes and Folders 85 Sending an Email Message 86 Receiving an Email Message 88 Reading Copying or Moving Email Messages 88 Creating and Using a Personal Folder 89 Setting Up the Email Mailbox 89 Setting Up Your Address Book 93 Viewing Your Contact List 93 Adding a New Contact 94 ...

Страница 8: ...tions 104 Clearing All Stored Information 104 Getting More Out Of Your Phone 106 Viewing Recent Calls 106 Making a Conference Call 107 Forwarding Calls 107 Barring Calls 109 Using Fixed Dialing 109 Monitoring Phone Use 110 Using Handsfree Features 113 Sharing Information 115 Using Sync 116 Using a Modem Connection 119 Adjusting Network Settings 120 Managing Your Files 123 Using Voice Instruction 1...

Страница 9: ...te Data 165 Software Copyright Notice 167 RF Energy Interference 167 Index 168 Note The functions available on this mobile phone may vary in different regions and nations Please contact your local customer service centers agencies or retailers if you have any question about the mobile phone functions Motorola reserves all rights to revise and change this user s manual without obligation to notify ...

Страница 10: ...ly with local regulatory requirements in your country concerning exposure of human beings to RF energy Operational Precautions To assure optimal phone performance and make sure human exposure to RF energy is within the guidelines set forth in the relevant standards always adhere to the following procedures External Antenna Care Use only the supplied or Motorola approved replacement antenna Unautho...

Страница 11: ...e phone and its antenna are at least 1 inch 2 5 centimeters from your body when transmitting Data Operation When using any data feature of the phone with or without an accessory cable position the phone and its antenna at least 1 inch 2 5 centimeters from your body Approved Accessories Use of accessories not approved by Motorola including but not limited to batteries and antennas may cause your ph...

Страница 12: ...er Persons with pacemakers should ALWAYS keep the phone more than 6 inches 15 centimeters from your pacemaker when the phone is turned ON NOT carry the phone in the breast pocket Use the ear opposite the pacemaker to minimize the potential for interference Turn OFF the phone immediately if you have any reason to suspect that interference is taking place Hearing Aids Some digital wireless phones ma...

Страница 13: ...e If a phone is placed in the air bag deployment area and the air bag inflates the phone may be propelled with great force and cause serious injury to occupants of the vehicle Potentially Explosive Atmospheres Turn off your phone prior to entering any area with a potentially explosive atmosphere Do not remove install or charge batteries in such areas Sparks in a potentially explosive atmosphere ca...

Страница 14: ...d battery particularly when placing it inside a pocket purse or other container with metal objects Use only Motorola original batteries and chargers Your battery or phone may contain symbols defined as follows Seizures Blackouts Some people may be susceptible to epileptic seizures or blackouts when exposed to flashing lights such as when watching television or playing Symbol Definition Important s...

Страница 15: ...nts or disorientation To limit the likelihood of such symptoms please take the following safety precautions Do not play or use a flashing lights feature if you are tired or need sleep Take a minimum of a 15 minute break hourly Play in a room in which all lights are on Play at the farthest distance possible from the screen Repetitive Motion Injuries When you play games on your phone you may experie...

Страница 16: ...l other relevant EU Directives The above gives an example of a typical Product Approval Number You can view your product s Declaration of Conformity DoC to Directive 1999 5 EC the R TTE Directive at www motorola com rtte to find your DoC enter the product Approval Number from your product s label in the Search bar on the Web site IMEI 350034 40 394721 9 0168 Type MC2 41H14 Product Approval Number ...

Страница 17: ...Features This label identifies an optional network SIM card or subscription dependent feature that may not be offered by all service providers in all geographical areas Contact your service provider for more information Optional Accessories This label identifies a feature that requires an optional Motorola Original accessory 032380o ...

Страница 18: ...SIM Card Your Subscriber Identity Module SIM card contains your phone number service details address book and messages Caution Do not bend or scratch your SIM card Avoid exposing your SIM card to static electricity water or dirt 1 2 3 4 ...

Страница 19: ... and nor allow it to touch static electricity dust or dip in water Prompt For the safety of the data in the memory card before pulling out it please press the status of the main screen and click the options in SD MMC card to eject Note Due to a known Microsoft Windows USB driver issue a computer running Windows 2000 with Service Pack 1 or Service Pack 2 will not recognize a memory card inserted in...

Страница 20: ...attery terminals To maximize your battery s performance Always use Motorola Original batteries and battery chargers The phone warranty does not cover damage caused from using non Motorola batteries and or battery chargers New batteries or batteries that have been stored for a long time may require a longer charge time Maintain the battery at or near room temperature when charging Do not expose bat...

Страница 21: ... or an increase in charging time then it is probably time to purchase a new battery The rechargeable batteries that power this phone must be disposed of properly and may need to be recycled Refer to your battery s label for battery type Contact your local recycling center for proper disposal methods Warning Never dispose of batteries in a fire because they may explode ...

Страница 22: ...only Motorola Original batteries and accessories We recommend that you store batteries in their protective cases when not in use Note Your phone battery may be enclosed in a protective clear plastic case Remove the battery from the case before attempting to install it 1 2 3 ...

Страница 23: ...to 10 seconds for your phone to provide a visible or audible indication that the battery is charging 2 Plug the other end of the travel charger into the appropriate electrical outlet 3 When your phone indicates Charge Complete remove the travel charger Tip You can safely leave the travel charger connected to the phone after charging is complete This will not damage the battery When the phone is on...

Страница 24: ... If you enter an incorrect PIN code 3 times in a row your SIM card is disabled and your phone displays SIM Blocked 3 If necessary enter your 4 digit unlock code and tap OK to unlock the phone Note If you do not insert a SIM card your phone displays No SIM card You can select Antenna on to make an emergency call or Antenna off to play games or use your phone s personal organizer features Turning Yo...

Страница 25: ...lay an audio file or have the radio playing in the background Making a Call 1 Tap in the top application selector bar to display the phone keypad 2 Tap the keypad keys to dial the phone number 3 Tap Send to make the call Alternatively you can press the send key to make the call 4 When you are finished tap End to end the call Alternatively you can press the end key to end the call 040126o Send ...

Страница 26: ...ively you can press the send key to answer the call 2 When you are finished tap End to end the call Alternatively you can press the end key to end the call Tip If you prefer not to answer the call you can tap Ign to hang up on the caller or tap Busy to transmit a busy tone signal to the caller Changing the Call Alert Tap in the bottom button bar in the home screen to change the call alert setting ...

Страница 27: ...hen tap My number Note Your phone number must be stored on your SIM card to use this feature To store your phone number on the SIM card see page 53 If you do not know your phone number contact your service provider Locking and Unlocking Your Phone You can lock your phone to prevent accidental keypresses for example when carrying your phone in a purse or pocket Slide the lock key to the right to lo...

Страница 28: ... the camera Press the camera key again to take a photo To activate the camera from the main screen tap Camera The active viewfinder image appears on your display Tap to view photo or video Press S left or right to decrease or increase image brightness Press S up or down to zoom in or out Tap to open camera menu Number of Additional Photos Minutes of Video Storage Space Left Tap to take photo or re...

Страница 29: ...ge location Taking a Photo Tap Capture or press the camera key to take a photo Tip If the camera is in video mode tap then tap Capture photo to put the camera in photo mode The mode indicator in the upper right corner of the viewfinder changes to to show that the camera is in photo mode Recording a Video Tap then tap Record video to put the camera in video mode The mode indicator in the upper righ...

Страница 30: ...to and video files Using Effects Tap then tap Effects to open the camera effects menu You can adjust the Brightness of your photo or video specify the Light conditions and select a photo Style such as Black and white or Sepia tones Adjusting Setup Options Tap then tap Setup to open the camera setup menu You can set or adjust the following options Option Description Photo Set the Size and image Qua...

Страница 31: ...ror to aim the camera lens When you hear the camera click tap to view your photo Sending a Multimedia Message A Multimedia Messaging Service MMS multimedia message contains one or more pages with text and embedded media objects including photos pictures animations sounds voice records and or video clips You can send an MMS message to other wireless phone users and to email addresses Default name A...

Страница 32: ...n the page When you are finished tap then tap Hide keyboard to hide the text entry keyboard or pad 5 Tap a button in the media toolbar at the bottom of the screen to insert media objects on the page or attach files to the message Tap to insert a picture video or new drawing on the page Tap to insert a sound file or new voice record on the page Tap to activate the Camera take a photo and insert it ...

Страница 33: ...ional recipients or a message subject Use the MMS menu described below to show or hide these fields 9 Tap Send to send the message When composing an MMS message you can tap to perform various operations on the message prior to sending it The MMS menu can include the following options Option Description Load Insert a quick card quick text note or auto signature on the page Save to Save the message ...

Страница 34: ...ify a subject for the message Send options Receipt request Request a delivery report or read report for the message Expire after Set the expiration time for an undelivered message Priority Set message priority Delivery Time Set a time and date for your network server to send the message Delete Delete the current page delete an object on the page or delete the message Option Description ...

Страница 35: ... message Option Description Reply to all Send a reply to sender and contacts on Cc and Bcc Forward Forward the received MMS message Save object Save the current MMS page as a quick card You can insert the quick card into MMS messages that you compose Save as quick SavethecurrentMMSpageasaquick page page You can insert the quick page intoMMSmessagesthatyoucompose 032380o Tap to perform various oper...

Страница 36: ...player To play a media file tap then tap Open Tap File to play a media file stored on your phone or tap URL to download and play a media file from a Web site In the media player window Tap to play the current media file Tap to stop playing Tap tap or to play the previous or next file Tap tap the volume slider to adjust the volume Alternatively you can press the volume keys to adjust volume Tap che...

Страница 37: ...k with a Bluetooth headset accessory speakerphone or handsfree car kit or connect to a computer or hand held device to exchange and synchronize data Turning Bluetooth On Off 1 Tap Bluetooth in the main screen to display the device list 2 Tap then tap Turn on or Turn off to activate or deactivate Bluetooth Searching for Other Devices To connect your phone to a headset accessory or handsfree device ...

Страница 38: ...scover and connect to your phone 1 Tap Bluetooth in the main screen to display the device list 2 If necessary turn Bluetooth on 3 Tap tap Discoverable to put your phone into discoverable mode until a connection is made or until the discoverable time elapse The device may request permission to bond with your phone Enter the correct PIN code to create a secure connection with the device Connecting t...

Страница 39: ...t from a device tap and hold the device name to open a pop up menu then select Disconnect to drop the connection Exchanging Objects With Another Device You can use a Bluetooth wireless connection to exchange a multimedia object or vObject such as a vCard address book entry or vCalendar calendar event with another phone computer or hand held device Sending an Object Turn on Bluetooth then 1 Tap and...

Страница 40: ...bject Turn on Bluetooth Your phone alerts you when it receives a data transfer request from the other device Tap OK to accept the data If necessary enter the correct PIN code to create a secure connection with the device Your phone notifies you when object transfer is complete and may prompt you to specify the location where you wish to store the file ...

Страница 41: ...an use all of your phone s features by tapping on feature icons buttons and text with the provided stylus Tap a page label on the left side of the screen to display main screen pages 1 2 3 or 4 Tap on a feature icon to select the feature Main Screen Icon Selected Main Screen Page Labels Application Selector Bar Status Bar Feature Icons Button Bar Recent IM Recorder Browser Email Note Pad ...

Страница 42: ...e you select Application Selector Bar Icons in the application selector bar give you easy access to commonly used applications In addition to the standard icons your phone displays a Prompt icon in the application selector bar to notify you of a missed call or new message Tap to view information about the call or message Main Screen Go to the main screen Address Book Go to the address book Message...

Страница 43: ...eneral Packet Radio Service GPRS network connection GPRS allows faster data transfer speeds A darkened indicator shows that a GPRS connection is not available 3 Bluetooth Indicator Shows that your phone has established a Bluetooth wireless connection with a headset accessory or other external device 4 Battery Level Indicator Vertical bars show the battery charge level Recharge the battery when Low...

Страница 44: ...4 Way Navigation Key Press the 4 way navigation key up down left or right to scroll through screens and feature icons highlight items change feature settings and play games Return Tap to return to the previous screen or to exit a feature or application Menu Press to open a context sensitive menu Ring Style Tap to set the ring style and select one of the following settings ring alert vibrate alert ...

Страница 45: ...n your phone See the game s playing instructions for additional information When you are not playing a game you can perform the following actions Press game key A at any time to launch the RealOne Media Player see page 36 Press game key B at any time to to turn on the radio and or access the radio controls see page 155 Opening Phone Features Your phone has many built in features for communications...

Страница 46: ...abel on the left side of the screen to display main screen pages 1 2 3 or 4 Tap on a feature icon to select the feature The following icons identify features available on the main screens Alarm Bluetooth Browser Calculator Calendar Camera Drawing Email File Mgr IM RealPlayer Modem Network Note Pad FM radio Recent Recorder Security Setup STK Sync Tasks Theme World Time r ...

Страница 47: ...Text Multiple text entry methods make it easy for you to enter names numbers and messages The method you select remains active until you select another method Tap a text entry area on the screen to bring up a text entry window If necessary tap the entry method button at the bottom of the screen to select a text entry method Handwriting You can use the stylus as a pen to write letters numbers and p...

Страница 48: ... you are writing Tap a word in the prediction area to place it in the text entry window To enter special characters or edit text use the function buttons described on page 49 Pinyin Keyboard Use the Pinyin keyboard shown at right to enter Chinese characters Tap keyboard characters in sequence to spell the pinyin The letters you enter display in the pinyin area and corresponding Chinese characters ...

Страница 49: ...pad shown at right to enter digits and or numeric symbols at the cursor location in the text entry window Function Buttons Tap or with any text entry method to open the symbol pad to enter a symbol at the cursor location Tap to lock or hide the symbol pad To delete the character to the left of the cursor tap To move the cursor to the next line tap To enter a space at the cursor location tap ...

Страница 50: ... is disabled when you connect your phone to a handsfree car kit or headset accessory Changing a Code PIN or Password Your phone s 4 digit unlock code is originally set to 1234 and the 6 digit security code is originally set to 000000 Your service provider may reset these codes before you receive your phone If your service provider has not reset these codes we recommend that you change them to prev...

Страница 51: ...rings or vibrates for incoming calls or messages but you must unlock it to answer You can make emergency calls on your phone even when it is locked see page 62 Locking Your Phone Tap Security in the main screen then tap Phone lock tap On Your phone prompts you to enter the unlock code Enter your unlock code to lock the phone Unlocking Your Phone When you see the Lock code prompt enter your unlock ...

Страница 52: ...iginally set to 1234 and the 6 digit security code is originally set to 000000 Many service providers reset the unlock code to the last 4 digits of your phone number before you receive your phone If you forget your security code SIM card PIN code PIN2 code or call barring password contact your service provider ...

Страница 53: ...splay the phone keypad 2 Tap in the bottom button bar to open the phone menu 3 Tap Setup to open the phone setup menu 4 Tap My number to open the number editor 5 Enter your name and number for line 1 and line 2 if applicable then tap Done to store the information If you do not know your phone number contact your service provider ...

Страница 54: ...n you are finished tap Done to return to the setup screen Setting a Ring Style Your phone rings or vibrates to notify you of an incoming call or other event This ring or vibration is called an alert You can select one of 3 different ring styles or turn off the incoming call alert To set a ring style tap the ring style button in the main screen and select one of the ring styles described on page 44...

Страница 55: ...up screen image power down screen image The wallpaper image is a photo picture or animation that appears in your phone s display when no feature or application is selected Ring tones are alerts that notify you of incoming calls messages and phone events You can modify a theme s components to customize the theme for your phone Your phone includes several preloaded themes You can download and instal...

Страница 56: ...ld the theme name to open a pop up menu then tap Set to Current Configuring a Theme You can change a theme s settings to customize the theme for your phone 1 Tap Theme in the main screen to display the theme screen 2 Tap the theme name to open the theme edit menu 3 Edit theme settings as desired then tap Done to save your changes Tip To reset the default theme settings tap and hold the theme name ...

Страница 57: ...p Backlight setup 2 Tap and to decrease or increase backlight brightness 3 Tap LCD sleep time to set the amount of time that the backlight remains on 4 Tap Done to save your settings Tip Tap to return to the setup screen without saving your changes Note Your phone s display normally is visible only when the display backlight is on or when the display is viewed in direct sunlight To extend battery ...

Страница 58: ...ery power The Battery Save feature automatically adjusts phone settings to maximize battery life Set Battery Save to On or Off to activate or deactivate the feature The Auto off feature automatically turns your phone off after a period of inactivity Tap On to activate the feature then tap Off time to specify the period of inactivity in hours and minutes after which your phone turns itself off Tap ...

Страница 59: ...re is available only for dual line enabled SIM cards 1 Tap in the top application selector bar to display the phone keypad 2 Tap in the bottom button bar to open the phone menu 3 Tap Switch to line 2 or line 1 to switch to the other line Redialing a Number 1 Tap in the top application selector bar to display the phone keypad 2 Tap then tap Dialled calls to go to the dialed calls list 3 Tap the num...

Страница 60: ...one s display The phone displays the caller s name and picture ID if available when the name is stored in your address book or Incoming Call when caller ID information is not available You can also set your phone to play a distinctive ring tone for specific contacts stored in your address book For more information see page 94 Outgoing Calls You can show or hide your phone number as an ID for the c...

Страница 61: ...etwork determine your caller ID status Canceling an Incoming Call While the phone is ringing or vibrating tap Ign to cancel the incoming call Depending on your phone settings and or service subscription the call may be forwarded to another number or the caller may hear a busy signal Turning Off a Call Alert You can turn off your phone s incoming call alert before answering the call Press either vo...

Страница 62: ...k in all locations and sometimes an emergency call cannot be placed due to network environmental or interference issues 1 Tap in the top application selector bar to display the phone keypad 2 Tap the keypad keys to dial the emergency number 3 Tap Send to make the call Dialing International Numbers When the phone keypad is displayed tap and hold to insert the local international access code for the...

Страница 63: ...on 3 Dial the extension number 4 Tap Send to make the call Your phone dials the phone number waits for the call to connect then dials the remaining digits Tip Use the same procedure to insert a wait W character in the dialing sequence Your phone dials the number waits for the call to collect then prompts you for confirmation before it dials the remaining digits Dialing an Extension Number During a...

Страница 64: ... keypad 2 Tap to open the recent calls menu 3 Tap Answered calls Missed calls or Dialled calls to view the corresponding call list 4 Tap an entry to call the entry s number Calling With Turbo Dial You can store up to 9 frequently used phone numbers in the turbo dial list then dial the numbers by tapping and holding a single keypad number key To turbo dial a phone number 1 Tap in the top applicatio...

Страница 65: ...ctor bar to display the phone keypad 2 Tap then tap Setup to open the setup menu 3 Tap Turbo dialling to open the turbo dial list 4 Enter phone numbers in the turbo dial list Putting a Call On Hold During a call tap Hold to put the call on hold Tap Hold again to resume the call Muting a Call During a call tap Mute to turn off your phone s microphone Tap Mute again to resume the call ...

Страница 66: ...the phone keypad 2 Tap the keypad keys to dial the phone number 3 Tap Send to make the call When the new call connects the first call is put on hold while you talk to the third party To switch between the 2 calls 1 Tap then tap Switch to put the current active call on hold and switch to the other call 2 Tap End to end the current active call 032380o ...

Страница 67: ...l on hold 2 Tap the keypad button to display the phone keypad 3 Tap the keypad keys to dial the number where you are transferring the call 4 Tap Send to make the call and speak to the person who answers 5 Tap then tap Place on hold Do Not Announce the Call Transfer During a call 1 Tap then tap Transfer 2 Tap the keypad keys to dial the number where you are transferring the call 3 Tap Send to trans...

Страница 68: ...st set up your message inbox before you can send and receive messages Usually your service provider has already set up the message inbox for you For setup instructions see page 79 Tap in the top application selector bar to go to the message center shown at right Your messages are stored in different folders in the message center The number to the right of each folder name indicates the number of m...

Страница 69: ...s copies of SMS messages you have sent Trash Stores messages you have deleted If you have not permanently deleted a message you can retrieve it Personal Folder A personal folder that you can rename and use as desired Setting Up Your Signature You can store your signature and manually or automatically append it to the messages you send 1 Tap in the top application selector bar to go to the message ...

Страница 70: ...n SMS message 1 Tap in the top application selector bar to go to the message center 2 Tap Compose 3 Tap the message type pull down menu then tap SMS to open the SMS message composition screen 4 Tap then tap a text entry method to enter text in the message field Alternatively you can tap then tap Load to insert a prewritten quick text note in the message field 5 To enter the message recipient s tap...

Страница 71: ...Message For instructions on how to send an MMS multimedia message see page 31 Option Description Load Insert a quick text note or auto signature in the message Save to Save the message to the Draft folder Send options Receipt request Request a delivery report or read report for the message Expire after Set the expiration time for an undelivered message Delete Delete the message 032380o ...

Страница 72: ...unter at the top right corner of the display shows the number of characters on the current page and the number of pages you have written character page When you enter an MMS multimedia message a counter at the top of the display shows the current message size in kilobytes Another counter shows the number of pages When you manually enter phone numbers and or email addresses in the To field you must...

Страница 73: ...he message Tap Reply to send an MMS reply to the message Tap to perform various operations on the message The received MMS message menu can include the following options Option Description Reply to all Send a reply to sender and contacts on Cc and Bcc Forward Forward the received MMS message Save object Save the current MMS page as a quick card You can insert the quick card into MMS messages that ...

Страница 74: ...to read it Your phone displays the sender s name if stored in your address book or phone number the message contents and the time it was sent Tap to call the sender Tap Reply to send an SMS or MMS reply to the message depending on the received message type Tap to return to the previous screen without making any changes Tap to perform various operations on the message The received SMS message menu ...

Страница 75: ...Outbox or Trash screen tap then tap Sort by to select a view mode You can choose to view messages by Name Subject or Time Viewing Draft Messages Messages that you are still writing are stored in the drafts folder On the message center screen tap Drafts to display its contents Tap a message to read it You can edit the message while it is open and then send it immediately With content Include a copy...

Страница 76: ...y its contents Tap a message to read it You can edit the message while it is open Tap Delete all to permanently delete all messages in the trash folder Viewing Messages on Your SIM Card On the message center screen tap SIM card to display the messages stored on your SIM card Tap a message to read it You can edit the message while it is open ...

Страница 77: ...4 To lock the folder to prevent unauthorized access tap the check box below the name to Protect by phone lock code A check mark indicates that the folder lock feature is activated 5 Tap Done to save the folder The personal folder is listed on the message center screen along with your other folders If the personal folder is locked your phone prompts you to enter the phone unlock code when you try t...

Страница 78: ...IM card folder and take it with you when you use your SIM card in another phone or move it to a locked personal folder to prevent others from reading it To move a message to a new folder 1 Tap in the top application selector bar to go to the message center 2 Open the folder that contains the message you want to move 3 Tap and hold the message to open a pop up menu then select Move to folder 4 On t...

Страница 79: ...to save your settings SMS Setup Options Note Actual field names and values may vary depending on the technologies available to your service provider Some settings may not be available for all phone models Option Description Service number Number of the service center that handles your outgoing text messages Expire after Number of days your network should attempt to send undelivered text messages U...

Страница 80: ...t an MMS network profile See next section to edit profile settings or create a new profile Expire after Number of days your network should attempt to send undelivered MMS messages Max size Maximum size of incoming multimedia message to be downloaded to your phone Auto download Set auto download on or off and choose download options Show my number Send your number with outgoing MMS messages Allow d...

Страница 81: ...n you are finished tap Done to save your settings You must enter the following configuration settings If necessary contact your service provider to obtain the following information Option Description Profile name Enter the profile name MMSC Select the server you want to use information may be viewable only Network profile Select a network connection profile to connect to the Internet WAP Gateway G...

Страница 82: ...your password Tip To have the phone remember your password for future logins tap the check box next to Remember Password A check mark indicates that the remember password feature is activated 4 Tap Login to log in to instant messaging Your contact list is sorted by online status Online Contacts are logged in to IM Tap a contact s name to send the person a message A busy indicator shows that someon...

Страница 83: ...r message text Tap Send to send the message Setting Your Online Status When you log in to IM your online status is visible to other IM users To set your online status tap My Status then select Available Busy or Invisible Setting Up IM Adding and Removing Contacts To add a buddy to your contact list go to the contact list tap then tap Add Buddy Enter the new buddy ID and tap OK IM returns an error ...

Страница 84: ... to new messages you can set the busy indicator to display next to your name in everyone else s contact list On the startup IM online screen tap My Status then tap Busy Note The startup IM online screen displays when you log in Logging Out of IM Tap Log Out from the IM online screen ...

Страница 85: ... before you can send and receive email messages Usually your service provider has already set up the email mailbox for you For setup instructions see page 89 Tap Email in the main screen to launch the email application Email messages are stored in different folders in your email mailbox Inbox Email messages you have received Outbox Your email messages that have not yet been sent You may have addit...

Страница 86: ...e address book When you manually enter email addresses you must insert a comma semicolon or colon between each address To compose and send an email message 1 Tap Email in the main screen to launch the email application 2 Tap to open the email message composition screen 3 To enter the message recipient s tap To to select numbers or addresses from your address book or tap the direct line in the To f...

Страница 87: ...mail message menu can include the following options Option Description Save Save the message to the Drafts folder Insert Signature Append your signature to the end of the message Insert Attachme nt Attach a contact calendar event task or media object to the message Delete Attachme nt Delete message attachments Show Cc Bcc Display Cc and or Bcc header fields to carbon copy or blind carbon copy the ...

Страница 88: ...ils sender subject time and size Tap Download to download the message to your phone Tap to return to the previous screen without downloading the message When you download an email message Tap to display message details sender subject time and size Tap the message to read it Tap Reply to send an email reply to the message Reading Copying or Moving Email Messages The procedures for reading copying o...

Страница 89: ...il service provider from the mailbox setup list then tap OK 2 Enter your User name and Password in the appropriate fields confirm your password in the Re enter password field then tap OK 3 To edit email sending receiving and or signature options tap and select Mailbox Setup Reenter your password then enter settings as described in the following section Manual Mailbox Setup If your service provider...

Страница 90: ...eck mark indicates that automatic signature is activated 6 Tap OK to save your signature 7 Tap OK to store your mailbox settings Tip You can set up separate mailboxes for different email accounts If you do not assign a name on the mailbox setup screen your phone assigns a different name to each mailbox Send Setup Options Note Actual field names and values may vary depending on the technologies ava...

Страница 91: ...ed a user name and password to access your outgoing email server Select Same as Receive setup if user name and password are the same as for your incoming email server Otherwise enter your outgoing email server User name and Password and confirm your password in the Re enter password field Setting Description POP3 or IMAP Select the protocol to communicate with the receiving host POP3 or IMAP Serve...

Страница 92: ...your email messages on the remote server For POP3 prevents message deletion on remote server after message is downloaded to your phone For IMAP prevents message deletion on remote server after message is deleted on your phone Incoming messages size limit Maximum size of an email message to be downloaded to your phone Setting Description ...

Страница 93: ...y Views Defining categories for your contacts helps you manage address book information You can classify contacts in different categories according to your communication needs and display contacts by category Your phone provides the following basic categories All Lists all contacts from all categories Unfiled Lists contacts that are not classified This is the default category setting for new conta...

Страница 94: ...diting contact information tap Done to store your changes and return to the contact list Adding a New Contact 1 Tap in the top application selector bar to open the address book 2 Tap then tap New contact 3 On the new contact screen shown at right tap to assign a picture ID to the entry Your phone displays the picture when you receive a call from this contact 4 Tap the direct line in a field to ent...

Страница 95: ... the contact to the SIM card Your phone removes the information fields that cannot be stored on the SIM card Tip Tap to exit without storing the contact Creating a Group You can create a group mailing list consisting of multiple contacts stored in the address book Groups make it easy for you to send a message to multiple recipients simultaneously 1 Tap in the top application selector bar to open t...

Страница 96: ...mail address next to the email indicator to send an email or MMS message to the address Calling a Contact with Fast Dial For a contact stored in phone memory you can store multiple phone numbers for a single contact such as mobile home and work numbers You can set one number as the fast dial number for the contact Note If you do not set a fast dial number for a contact the default fast dial number...

Страница 97: ...ial number then tap OK 5 Tap Done to store the setting Setting a Category Ring Tone You can set a distinctive ring tone for an address book category Your phone sounds the tone when you receive a call from a contact in the category 1 Tap in the top application selector bar to open the address book 2 Tap then tap Category settings 3 Tap the Categories field and select the category 4 Tap the Ring ton...

Страница 98: ...ed information in the Find for field then tap Find Your phone displays the search result or notifies you that no match can be found To continue searching tap Fine new To return to the contact list tap Deleting a Contact 1 Tap in the top application selector bar to open the address book 2 Tap then tap Delete contacts 3 Check the contact s you want to delete then tap Delete 4 Tap OK to confirm the d...

Страница 99: ...ne prompts you to specify the number you want to store for the contact 1 Tap in the top application selector bar to open the address book 2 Tap then tap Copy to 3 Select Phone to SIM or SIM to phone then tap OK 4 Check the number s you want to copy If you copy from the SIM card to phone memory specify the number type 5 Tap OK to copy the numbers to the new location Note The number of entries you c...

Страница 100: ...and the SIM card capacity number of contacts 3 Tap OK to return to the address book Sharing Contact Information You can share contact information with others by sending the data as a vCard to another phone computer or hand held device 1 Tap in the top application selector bar to open the address book 2 Tap the name of the contact you want to send Your phone displays contact details 3 Tap then tap ...

Страница 101: ...f you lose your phone the person who finds it can contact you to return the phone 1 Tap in the top application selector bar to open the address book 2 Tap then tap Owner Info 3 If owner s information is stored the phone displays the owner s contact details Tap Edit to edit the owner s information 4 If owner s information is not stored the phone displays the owner s information entry screen Enter i...

Страница 102: ...e based on your current location 3 Tap Done to save your language selection Tip Tap to return to the setup screen without saving your changes Setting Sound Volume Set the volume of your phone s system sounds incoming call ring tones and event notification alerts You can also set the volume of the integrated stereo speakers and activate and adjust audible feedback settings for the touchscreen displ...

Страница 103: ...nguage preferences specify your writing hand left or right and handwriting speed activate word recognition and a user dictionary and apply a watermark to the text you enter Tap Setup in the main screen then tap Input setting to open the input setting screen Adjust settings as necessary then tap Done to save your settings and return to the setup screen Calibrating the Touchscreen Display You should...

Страница 104: ...lifetime timer 1 Tap Setup in the main screen then tap Master reset 2 Enter your security code when prompted and then tap OK 3 Tap OK to confirm that you want to perform master reset Tip Tap Cancel to exit without performing the master reset procedure Clearing All Stored Information Clear all user settings and entries except for information stored on the SIM card erase all downloaded pictures and ...

Страница 105: ...alendar entries After you erase the information you cannot recover it Master clear does not delete any information stored on the SIM card 1 Tap Setup in the main screen then tap Master clear 2 Enter your security code when prompted and then tap OK 3 Tap OK to confirm that you want to perform master clear Tip Tap Cancel to exit without performing the master clear procedure ...

Страница 106: ...e added 1 Tap Recent in the main screen to display the recent calls screen 2 Tap Answered calls Missed calls or Dialled caller to view the corresponding call list 3 Tap an entry to display call details 4 Tap Call to call the entry s number or tap to perform various operations on the entry Option Description Store Create an address book entry with the number stored in the number type field you spec...

Страница 107: ... connects tap the keypad button to display the phone keypad 5 Tap the keypad keys to dial the next party s number 6 Tap Send to make the call 7 When the call connects tap Link to connect the 2 calls Tip Repeat steps 4 to 7 to add additional parties to the conference call Forwarding Calls Forward your phone s incoming voice fax and or data calls directly to another phone number 1 Tap in the top app...

Страница 108: ...arding options are available for fax calls and data calls Option Description All voice calls Forward all calls When unavailable Forward calls if your phone is unavailable When busy Set a forwarding number for when your phone is busy voice calls only When unreachable Set a forwarding number for when your phone is out of range voice calls only When no answer Set a forwarding number for when you are ...

Страница 109: ...OK 4 Tap Done to save your settings Using Fixed Dialing When you turn on fixed dialing you can only call send messages and send data to numbers stored in the fixed dial list Use this feature to limit outgoing calls messages and data transmissions to a predefined list of numbers country codes area codes or other prefixes 1 Tap Security in the main screen then tap Fixed dialling 2 Enter your SIM car...

Страница 110: ...ed time from the moment you connect to your service provider s network to the moment you end the call by pressing End This time includes busy signals and ringing The amount of network connection time you track on your resettable timer may not equal the amount of time for which you are billed by your service provider For billing information please contact your service provider directly To view and ...

Страница 111: ...imer to beep at specified intervals during a call tap Audible timer and select one of the following options Off 1 min 5 mins 10 mins or 15 mins Option Description Total call costs Amount spent on dialed and received calls since the last time you reset the cost tracker Total call time Approximate total time spent on dialed and received calls since the last time you reset the call timer Call lifetim...

Страница 112: ...nt call Costs Display the cost of the current call if you subscribe to a call cost option or advice of charge Total cost Display the cost of all calls since the last time you reset the cost tracker if you subscribe to a call cost option or advice of charge Credit Display how much credit you have left if you subscribe to a call cost option or advice of charge Off No in call timer display 032380o 03...

Страница 113: ...Information If you subscribe to an advice of charge option tap Available credit to view the amount of credit available Using Handsfree Features Your phone includes an integrated handsfree speaker that you can use for handsfree applications For instructions on how to use the handsfree speaker see page 50 You can also purchase an optional Motorola Original handsfree car kit speakerphone or headset f...

Страница 114: ...e control you can use your phone s volume keys to set the device s speaker volume during a handsfree call Activating Auto Answer Set your phone to automatically answer calls after ringing a few seconds when using the handsfree speaker or when the phone is connected to a headset car kit or external speakerphone 1 Tap in the top application selector bar to display the phone keypad 2 Tap then tap Set...

Страница 115: ... tap then tap Share to display a list of share options 2 Tap Bluetooth then tap OK to exchange the data through a Bluetooth wireless connection Tap MMS or Email then tap OK to send the data in an MMS or email message 3 Complete the setup procedure for the transfer method you selected 4 Tap Send to send the data For more information about using a Bluetooth wireless connection see page 37 Receiving ...

Страница 116: ... cable connection or with an Internet server using an over the air OTA connection Using a Cable Connection Notes To transfer data between your phone and computer you must install the software included with the Motorola Original data kit See the data kit user s guide for more information You can synchronize data between your phone and external device with BVRP mobile PhoneTools software an accessor...

Страница 117: ...SB cable to connect your phone to the external device Plug the cable into the USB connector port on your phone as shown Plug the other end of the cable into the USB port on the device Note Not all devices are compatible with a cable connection Check your computer or hand held device to determine the type of cable you need Tap Sync in the main screen then tap USB cable Your phone notifies you when ...

Страница 118: ...en tap OTA Your phone attempts to make a sync connection with the sync partner This might take several minutes if there are many entries to synchronize Option Description Paths Locations and names of the folders beneath the URL path where your Address book Cal and Tasks data files are stored on the server Use proxy The IP and Port of the proxy Server URL The URL for the server you can omit http Us...

Страница 119: ...phone to the computer through a Bluetooth connection make sure that your computer supports Bluetooth and has the correct drivers installed To access the Internet through a data call configure the phone modem just as you would a standard computer modem 1 Tap Modem in the main screen to display the modem setup screen 2 Tap Use to select USB or Bluetooth as your connection method Tip If you use a ser...

Страница 120: ... call arrives and transfers the call to the connected device Use the application running on the device to answer the call 2 When the data transfer is complete end the call from the connected device to close the connection Adjusting Network Settings Your service provider registers your phone to its network In some situations such as using the phone as a modem you may need to change the network regi...

Страница 121: ... Search setup to open the network search setup menu Network search frequency Band options Network search Type options Option Description 900 1800 900 1800 MHz bands common in Europe and Asia 1900 1900 MHz bands common in North and South America Automatic Scan for networks in all frequency bands Option Description Automatic Scan for networks automatically based on priority Manual View a list of all...

Страница 122: ... a network Setting Preferred Networks You can create a preferred networks list so that the phone searches for networks by your preference Tap Pref networks to display the preferred networks list Your home network is always the first entry in the list Other network entries are sorted by preference Option Description Slow Slowest network search and repeat rate Medium Medium search repeat Fast Fast s...

Страница 123: ...ager application makes it easy for you to create personal folders to store and manage your files and applications Tap File Mgr in the main screen to open the file manager Your phone lists the available storage devices such as Phone memory and an optional removable SD Card or MMC memory card Tap a storage device to display the root directory for the device Option Description Rearrange Move the entr...

Страница 124: ...dit menu can include the following options MyCamera Stores photos you take with your phone s Camera MyVoice Stores voice records you create with the Recorder application Option Description Open with Specify the application your phone should use to open the file files only Copy or Cut Copy or cut the file or folder to the clipboard Tap then tap Paste to paste the clipboard contents in the current f...

Страница 125: ...der 4 Tap Done to save the folder Viewing To change the way your files and folders are displayed tap and select List or Thumbnail Sorting To change the way your files and folders are sorted tap and select Sort by You can sort files or folders by Name Size Time or Type Share Send the file to another phone computer or hand held device files only Properties Display information about the file or folde...

Страница 126: ...ilename to open the file Tap and hold the filename to display the file path If the file is not found tap Cancel to return to the file manager screen or tap Again to try another search Using a Removable Memory Card You can use an optional removable memory card with your phone to store and retrieve multimedia objects such as photos videos and MP3 music files To install a memory card see page 19 Tap ...

Страница 127: ... Search for a file or folder on the storage device Thumbnail List View storage device contents in a text based List or graphic icon Thumbnail format Sort by Change the way files and folders are sorted Paste Paste the clipboard contents at the current location Delete all Delete all storage device contents Format Format the storage device Repair Repair the storage device Properties Display informati...

Страница 128: ...ction operates in 2 modes name instruction mode and digit mode The default operating mode is name instruction When you speak the command Open Digit Dial or Open Dial Pad your phone switches to digit mode so you can speak the phone number you want to dial Notes When your phone switches to digit mode the phone prompts you to Please say digits or go back and then sounds a beep Your phone does not pro...

Страница 129: ...er Open Digit Dial Open Dial Pad Puts your phone in digit mode to dial a phone number Your phone displays the phone keypad prompts you to Please say digits or go back and then sounds a beep Press and hold the camera key and speak the phone number you want to dial Release the camera key when you finish speaking Your phone recites the recognized number and displays the number on the keypad If the nu...

Страница 130: ... Mandarin and Cantonese only Check Missed Calls Your phone recites the number and time of missed calls you have received and recites the name or number of each caller Missed calls that you have returned are excluded from the number Check Time Your phone recites the current time Check Battery Your phone recites the percentage of battery power remaining Check Signal Your phone recites the signal str...

Страница 131: ...ges are limited to English and Chinese only To set your phone to prompt you to speak a phone number you want to dial 1 Tap Setup in the main screen then tap Voice Command 2 Set Digit Prompt to On to activate the audible digit prompt function 3 Tap Done to save your setting Press and hold the camera key then speak the voice instruction Open Digit Dial to put your phone in digit mode When the phone ...

Страница 132: ...endar in the main screen to schedule or review calendar events Month View The calendar initially displays a calendar for the month shown at right Tap or to display the previous or next month An indicator in the lower right corner of the date box indicates that one or more events are scheduled for the day Tap the date box to display the day s events Tap an event to display event details Month Frida...

Страница 133: ...indicates a full day event Tap the day to display the day s events Tap an event to display event details Day View Tap a day in the month or week view to display the day s events as shown at right Alternatively you can tap the Month button in the bottom button bar then select Day to display the highlighted day Tap or to display the previous or next day Tap an event to display event details Week Wee...

Страница 134: ...an event to display event details Adding a New Event Note You must create an event to use the reminder alarm Your phone must be turned on for the reminder alarm to sound 1 Tap Calendar in the main screen to open the calendar 2 Tap the day to which you want to add an event Your phone lists the day s events 3 Tap to open the new event editor shown at right Cancel 2004 OK Jun Jun Feb Apr May Mar S S ...

Страница 135: ...wn the scroll bar to display additional fields 4 When you are finished editing information tap Done to store the event Deleting an Event 1 Tap the event to display event details 2 Tap then tap Delete Event 3 Tap OK to confirm the deletion Alternatively to delete an event tap and hold the event title then select Delete from the pop up menu Dismissing an Event Reminder When you set a reminder alarm ...

Страница 136: ...minder snooze period 1 Tap Calendar in the main screen to open the calendar 2 Tap then tap Setup 3 Tap a field to change its setting Pull down the scroll bar to display additional fields 4 When you are finished changing settings tap Done to store your settings Sharing Event Information You can share calendar events with others by sending the data as a vCalendar entry to another phone computer or h...

Страница 137: ...dar entry For more information about using a Bluetooth wireless connection see page 37 Tasks You can create and review a checklist of tasks you need to perform and set your phone to notify you when tasks come due Adding a New Task 1 Tap Tasks in the main screen to display the task list 2 Tap to open the new task editor 3 Tap the direct line in a field to enter task details or tap to select an opti...

Страница 138: ...utton in the bottom button bar You can choose to display All tasks Uncheck Due or Done tasks Tap to perform various operations on the task list Note Pad You can write and store notes on your phone 1 Tap Note Pad in the main screen to open the note pad editor 2 Tap to select a text entry mode and enter the information you want to record 3 When you are finished entering information tap Done 4 Enter ...

Страница 139: ...nu shown at right tap to adjust settings for the selected tool tap the color picker in the upper right corner of the drawing pad editor to set a drawing color tap 100 and select a zoom factor to zoom in out on the drawing canvas To edit an existing picture tap tap Open then select the picture you want to open Use the drawing tools to edit the picture Tip Tap and hold a selected area on the picture...

Страница 140: ...Tap Done to save the picture Option Description New Open a blank canvas to create a new picture Undo or Redo Undo or redo the last drawing operation Open Open an existing picture Share Share the picture Insert stamp Insert another image into the picture Select all Select all picture elements Choose canvas Select the drawing canvas size Delete Delete the picture ...

Страница 141: ...larm time Set the desired time then tap OK to store it 4 Tap Snooze to set the snooze period 5 Tap Done to store your settings When the alarm expires your phone displays an alarm reminder and sounds an alert Tap Snooze to turn off the event reminder for a short period of time The alarm sounds again when the snooze period expires Tap Cancel to turn off the alarm When you select Alarm when power off...

Страница 142: ... list Select a new city then tap OK to store it Alternatively tap a time zone in the time zone chart to display a list of cities in that time zone Select a new city then tap OK to store it You can reset the time and date for a listed city Tap the city icon preceding the city name then tap the time and or date field to change it Tap OK to save your changes To add a new city to the city list tap the...

Страница 143: ...ng state and federal laws regarding privacy and recording of conversations 1 Tap Recorder in the main screen to activate the recorder shown at right 2 Tap to start recording 3 Speak into the phone 4 Tap to stop recording The voice record is automatically saved to the MyVoice folder on your phone 5 To play back the voice record you just made tap To stop playback tap ...

Страница 144: ... Open to play it Tip The voice record name identifies the date and time when the file was recorded The recording date and time is also displayed when you play the voice record Changing the Voice Record Storage Location 1 Tap tap Setup then tap the folder tree icon in the Location field 2 Select a folder then tap OK to set it as the new storage location 3 Tap Done to save the new storage location ...

Страница 145: ...n the main screen to display the calculator shown at right Tap the numeric and calculation keys to perform a calculation Tap to calculate the result Tap C to clear the calculation Tap to clear the last entry one digit at a time when performing a calculation Tap to return to the main screen ...

Страница 146: ...iption Change the entry s sign positive negative M Store the sum of the current calculation result and the stored number MS Clear the stored number and store the current calculation result MR Display the stored number MC Clear the stored number Insert decimal point Divide x Multiply Subtract Add ...

Страница 147: ...y in the main screen then tap PIN On or Off to activate or deactivate the feature 2 Enter your SIM card PIN1 code when prompted and then tap OK to submit your code and save your setting Unblock the SIM Card PIN Code If you enter an incorrect SIM card PIN code 3 times in a row your SIM card is disabled and your phone displays SIM Blocked You must enter a PIN unblocking key PUK code which you can ob...

Страница 148: ...correct SIM card PIN2 code 3 times in a row your phone s SIM PIN2 protected features are disabled and your phone displays SIM Blocked when you try to use a PIN2 feature You must enter a PIN2 unblocking key PUK2 code which you can obtain from your service provider ...

Страница 149: ...cked out or not visible during a micro browser session your phone is using a standard CSD voice channel connection The type of network connection your phone uses depends on your service provider s network Your network connection charges may vary depending on the type of connection used Starting a Micro Browser Session Tap Browser in the main screen to launch the micro browser Your phone displays t...

Страница 150: ...arious micro browser operations The micro browser menu can include the following options Option Description Favourites Display a list of your favorite Web based sites and add a new site to the list Go to site Enter a Web address URL to go to a Web site Security Adjust micro browser security settings Profile setting Select a browser profile setting to use to connect to the Internet Browser setup Ad...

Страница 151: ... content you can choose to discard it or purchase it and install it on your phone Notes Call charges apply during download sessions Your phone may now allow you to perform some operations rename view details on purchased or predefined multimedia content stored on your phone Usually you cannot forward predefined or purchased multimedia content to other phone users Some games might make your phone v...

Страница 152: ...reen tap the profile you want to use then tap Connect to connect to the Internet using the selected profile Creating a New Profile To create a new network connection profile you must enter the following configuration settings If necessary contact your service provider to obtain the following information Option Description Profile name Enter the profile name GPRS setting APN GPRS access point name ...

Страница 153: ...in number Phone number to use to set up a CSD connection User name User name for CSD connection Password Password for CSD connection Re type password Re enter password for CSD connection Baud rate Connection speed for CSD connection Line type Line type modem or ISDN for CSD connection Timeout Time at which the phone exits the micro browser application when no keypress activity is detected DNS serv...

Страница 154: ...ished entering information tap OK to store the profile Tip Tap to exit without storing the profile Setting the Default Profile The default network connection profile is marked with the network icon To set a new default profile tap and hold the profile then select Set as default from the popup menu Games and Applications Your phone may contain Java games or applications that add features and functi...

Страница 155: ... scroll through a text page or option list Tap an option to select it Tap at any time to return to the previous screen Some screens may contain text fields where you must provide information in order to use a service or feature Tap the field and enter text in the usual way For more information about the STK applications available on your SIM card contact your service provider Radio You can use you...

Страница 156: ...Tuning a Station Tap or to step down or up to the next frequency setting Tap or to search and set the previous or next active FM station Using Preset Channels Tap to assign a channel number to the current tuned station Tap or to select the previous or next channel Adjusting Radio Settings Tap the volume slider to adjust the radio volume Alternatively you can press the volume keys to adjust radio v...

Страница 157: ...reo sound Sending and Receiving Calls With the Radio On Your phone rings or vibrates as usual to notify you of an incoming call message or other event You can answer the call or ignore the call and continue listening to the radio If you answer the call tap End as usual to end the call and resume the FM broadcast You do not have to turn off the radio to make outgoing calls The radio is muted automa...

Страница 158: ...1 segment showing If it does not recharge your battery see page 23 Do you have a valid SIM card inserted in your phone If necessary turn off your phone and make sure that you have inserted a valid SIM card see page 18 Does the handset have a signal Do you see in the display The signal strength indicator should have at least 1 segment showing If it does not move to an area with a stronger signal to...

Страница 159: ...ropping your phone getting it wet or using a non Motorola battery or battery charger can damage the phone The phone s limited warranty does not cover liquid damage or damage caused from using non Motorola accessories Was a non Motorola battery or battery charger used Problem Solution My phone was stolen To whom should I report this Report a stolen phone to the police and to your service provider t...

Страница 160: ...be incorrectly inserted Check the SIM card to make sure that it is inserted properly see page 18 The display says SIM Blocked How do I unblock my SIM card Call your service provider the company that sends you your monthly wireless service bill to obtain the PIN unblocking key PUK code see page 147 The display says Enter Unlock Code How do I unlock my phone Enter the factory preset unlock code 1234...

Страница 161: ... name of your service provider before making a call I cannot send receive calls Make sure that you have a phone signal the signal strength indicator should have at least 1 segment showing Avoid electrical or radio interference and obstructions such as bridges parking garages or tall buildings Your phone also may have the call barring feature turned on If you know the call barring password you can ...

Страница 162: ...others on my phone While on a call press the upper volume key Your phone display should show the volume increasing Also make sure that your phone s earpiece is not blocked by its carrying case How do I see the calls I sent or received To see the most recent calls you dialed or received 1 Tap Recent in the main screen 2 Tap Answered calls Missed calls or Dialled calls 3 Tap an entry to display call...

Страница 163: ...y didn t last as long as I expected What can I do to extend battery life Your battery s performance is affected by charge time feature use temperature changes backlight use and other factors For tips on extending battery life see page 20 I am unable to create a voice record Try moving to a quieter location to make your voice recording Hold the phone about 4 inches 10 centimeters from your mouth an...

Страница 164: ... Not Available You may be in an area without service or you may be connected to a network that does not support Internet access I launched the micro browser but the display says Server Not Responding Try again in a few minutes The servers may be temporarily busy Problem Solution ...

Страница 165: ...conducted in accordance with CENELEC2 testing procedures using standard operating positions with the phone transmitting at its highest certified power level in all tested frequency bands Although the SAR is determined at the highest certified power level the actual SAR of the phone while operating can be well below the maximum value This is because the phone is designed to operate at multiple powe...

Страница 166: ...es used by the public is 2 0 watts kilogram W kg averaged over ten grams of tissue The limit incorporates a substantial margin for safety to give additional protection for the public and to account for any variations in measurements 2 CENELEC is a European Union standards body 3 Additional related information includes the Motorola testing protocol assessment procedure and measurement uncertainty r...

Страница 167: ... distributed or reproduced in any manner to the extent allowed by law Furthermore the purchase of the Motorola products shall not be deemed to grant either directly or by implication estoppel or otherwise any license under the copyrights patents or patent applications of Motorola or any third party software provider except for the normal non exclusive royalty free license to use that arises by ope...

Страница 168: ... alarm clock 141 alert defined 54 setting 54 turning off 25 26 61 volume setting 102 animation downloading 75 sending 31 wallpaper 55 answered calls list 64 106 answering a call 26 114 applications purchasing 151 using 154 appointments See calendar automatic redial 60 B backlight 57 barring calls 109 battery charging 23 extending battery life 20 57 58 installing 22 level indicator 43 Bluetooth 3 3...

Страница 169: ... 50 hold 65 international access code 62 missed calls 64 106 mute 65 received calls list 106 receiving 26 recent calls 106 ring style 54 ring tone setting 55 storing 106 timing 111 transferring 67 call cost information 112 113 Call Failed Number Busy message 60 call meters 111 call timers 111 caller ID 60 calling line identification See caller ID camera illustration 2 recording a video 2 28 taking...

Страница 170: ...iverting calls 107 drafts folder 75 76 drawing pad 139 E earpiece volume 25 email copying 88 89 inbox setup 89 moving 88 89 reading 88 89 receiving 88 sending 86 emergency number 62 end key 25 26 ending a call 25 26 Enter Unlock Code message 51 extension number dialing 63 F fast dial 96 file manager 123 fixed dial 109 FM Stereo Radio Headset 155 forwarding calls 107 4 way navigation key 44 G game ...

Страница 171: ...ssaging See IM international access code 62 Internet network connection settings 152 J Java applications 154 K key camera 2 28 center select button 45 end 25 26 4 way navigation 44 game 45 lock 27 power 24 send 25 26 volume control 25 37 156 L language setting 102 line changing 59 lock phone 27 51 SIM card 147 lock key 27 Low Battery message 43 M main screen contents 46 defined 41 master clear 104...

Страница 172: ...ns 154 network connection settings 152 using 149 missed calls list 64 106 MMC card 19 117 123 126 MMS See message modem 119 multimedia message receiving 35 72 sending 3 31 multimedia messaging service See message music playing 3 36 sending 31 mute 65 my telephone number 27 53 N network settings 120 note pad 138 number storing in address book 94 storing your number 53 viewing your number 27 O objec...

Страница 173: ...urning on off 24 unlock code 50 unlocking 24 51 phone number active line changing 59 international access code 62 redialing 59 storing in address book 94 storing your number 53 viewing your number 27 phone theme 3 55 phonebook capacity checking 100 picture ID 60 photo downloading 75 picture ID 60 sending 31 taking 2 28 wallpaper 55 picture downloading 75 sending 31 wallpaper 55 picture ID 60 PIN c...

Страница 174: ... setting 102 ringer volume setting 102 S SD card 19 117 123 126 security code changing 50 default 50 forgetting 52 send key 25 26 short message service See message signal strength indicator 43 silent alert setting 54 SIM Blocked message 24 147 148 SIM card applications 155 defined 18 installing 18 locking 147 PIN code entry 24 PIN code changing 50 PIN2 code changing 50 precautions 18 SIM Blocked m...

Страница 175: ...er storing in address book 94 storing your number 53 viewing your number 27 text entering 47 theme 3 55 time setting 54 touchscreen calibrating 103 input settings 103 volume setting 102 transfer a call 67 trash folder 76 travel charger 23 turbo dial 64 U unblocking the SIM card 147 unlock phone 27 51 SIM card 147 unlock code bypassing 52 changing 50 default 50 51 52 entering 24 51 77 V vCalendar 1...

Страница 176: ...176 downloading 75 voice command 131 voice instruction 128 voice records 143 voicemail 63 volume keys 25 37 156 volume setting 25 102 W wallpaper 55 Web pages 149 world time 142 ...

Отзывы: