background image

June 22, 2006

6864242V01

2-10

General Radio Operations

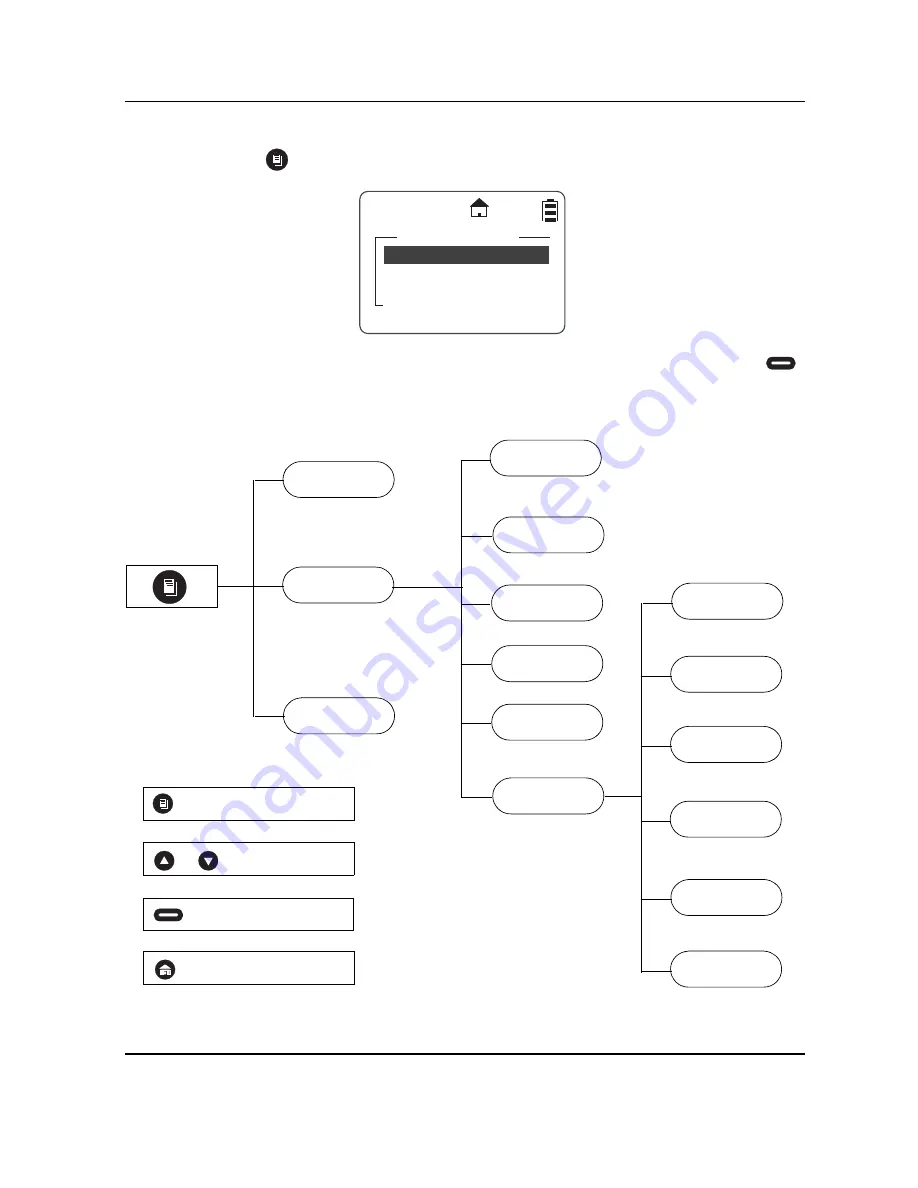
: Accessing the Main Menu

Accessing the Main Menu

1.

Press 

 to access the Main Menu. The Main Menu appears.

2.

Scroll through the available menu options. Highlight the desired menu option and press 


under 

Select

.

Main Menu Navigation Chart

Main Menu

Recent Calls

Settings

My Info

Select

Back

Recent Calls

Main Menu

Settings

My Info

Display

VibraCall

Clock/Alarm

Volume

Advanced

Scroll List

Call Forward

Remote Disable*

Remote Monitor*

Remote Time*

to enter main menu


or 

 to scroll through list


 to select display option


 to exit main menu

* Menus only appear on the DTR2450 radio when Manager Mode is enabled.

Scan

Ambient 

Noise

Содержание DTR2430

Страница 1: ...2450 Title Page DTR Series DTR2430 DTR2450 User Guide Publication Number 6866242V01 ...

Страница 2: ...herwise any license under the copyrights patents or patent applications of Motorola except for the normal non exclusive license to use that arises by operation of law in the sale of a product Document Copyrights No duplication or distribution of this document or any portion thereof shall take place without the express written permission of Motorola No part of this manual may be reproduced distribu...

Страница 3: ...lster 1 8 Mini Keyboard 1 8 Attaching the Mini Keyboard to the Radio 1 8 Disconnecting the Mini Keyboard from Your Radio 1 8 Entering Text with the Mini Keyboard 1 9 Yellow Lock Key Functionality 1 9 Green Lock Key Functionality 1 9 CAPS Key Functionality 1 9 Standard Yellow Function Green Function 1 10 Using Mini Keyboard Key Shortcuts 1 11 Extended Character Set 1 11 Accent Marks 1 11 Other Spec...

Страница 4: ...19 Chapter 3 Advanced Radio Operations 3 1 Accessing the Advanced Menu 3 1 Managing Your Scroll List 3 1 Enabling Scan 3 2 Enabling Call Forwarding 3 2 Remote Disabling DTR2450 Models Only 3 3 Remote Monitoring DTR2450 Models Only 3 4 Remote Time DTR2450 Models Only 3 4 Chapter 4 Radio Programming 4 1 Program Menu Navigation Chart 4 1 Entering Programming Mode 4 2 My Info 4 2 Adding Contacts 4 3 C...

Страница 5: ...4 9 Scan Lists 4 9 Reset Defaults 4 10 Chapter 5 Cloning Mode 5 1 Entering Cloning Mode 5 1 Adding Deleting a Contact 5 1 Reset All Contacts 5 3 Chapter 6 Troubleshooting 6 1 Chapter 7 Motorola Warranty 7 1 Warranty Information 7 1 What Is Not Covered By Warranty 7 1 INDEX I 1 ...

Страница 6: ...iv Table of Contents March 30 2006 6864242V01 Notes ...

Страница 7: ...on and maintenance of your DTR Series radio Notations Used in This Manual Throughout the text in this publication you will notice the use of WARNINGS Cautions and Notes These notations are used to emphasize that safety hazards exist and the care that must be taken or observed WARNING An operational procedure practice or condition etc which may result in injury or death if not carefully observed CA...

Страница 8: ...p Scan Up to 5 per channel Up to 5 per channel PrivateGroups Available Up to 10 Up to 20 PrivateCall Yes Yes SMS Messaging 10 Quick Notes 15 available 10 Quick Notes 25 available Vibracall Yes Yes Clock Alarm Yes Yes Scroll List Yes Yes Call Forwarding Yes Yes Remote Disable Receive Only Yes Remote Monitor Receive Only Yes Remote Time Receive Only Yes Battery Life 14 5 Hours 5 5 90 19 Hours 5 5 90...

Страница 9: ...k Connect audio accessories Volume Controls Push to Talk PTT Option Keys Home Key Power Button Menu Key Navigation Keys Use to scroll menu settings Plug in Charging Use to select display options Use to exit the current menu and return to the idle screen Button Speaker Microphone and Connect Data Accessories ...

Страница 10: ... appear only when your radio is engaged in certain activities or when you have activated certain features Home The private or group contact shown is on your home channel PublicGroup The contact selected is a PublicGroup PrivateGroup The contact selected is a PrivateGroup Scan The radio is scanning PublicGroups on your current channel Call Forward Your radio is set to forward calls Alarm The alarm ...

Страница 11: ...andby standard duty cycle NNTN4655 Li Ion Up to 19 Hours SNN5706 Li Ion Up to 14 5 Hours Battery life is determined by several factors Among the more critical are the regular overcharge of batteries and the average depth of discharge with each cycle Typically the greater the overcharge and the deeper the average discharge the fewer cycles a battery will last For example a battery which is overchar...

Страница 12: ...mately 1 3 hours and battery gauge will show all segments and stop flashing when fully charged Charging using the Drop in Charging Tray NOTE Use of the Drop in Charging Tray is recommended for daily use 1 Place the charging tray on a flat surface 2 Connect the plug in charger and drop in charging tray by inserting the plug into the rear of the drop in charging tray 3 Plug the charger into an AC ou...

Страница 13: ...ry is charging and solid green when charging is complete Battery Meter The battery meter in the upper right corner of the radio display shows how much battery power is remaining Attaching the Battery 1 If the battery door is already in place slide the lock tab to the left to unlock the battery latch Push down on the latch and lift the battery door off the radio 2 Insert the battery as shown below ...

Страница 14: ... mini keyboard allows you to customize Private and Group names write text messages and create modify stored text messages Attaching the Mini Keyboard to the Radio When the mini keyboard is attached to your radio the Device Attached message is displayed 1 Insert the mini keyboard s connector with the arrow facing up into your radio s accessory connector 2 Fold the mini keyboard over the front of yo...

Страница 15: ...key again to unlock the yellow mode and revert back to the default white mode 4 Press the Green key to cancel the yellow mode and enter the green mode 5 Press the CAPS key to cancel the yellow mode and enter the CAPS mode Green Lock Key Functionality 1 Press the Green key once The next key pressed displays the Green character on that key The keyboard will then return to the default keys as if the ...

Страница 16: ...on Mini Keyboard Standard Yellow Function Green Function Standard Yellow Function Green Function Q 1 APOSTROPHE W 2 E 3 R 4 ACCENT T 5 Y 6 U 7 I 8 O 9 P 0 A S D F UP ARROW G DOWN ARROW H LEFT ARROW J RIGHT ARROW K L Z X _ Å C ß V Þ B Æ N I M ...

Страница 17: ...in the table above If your radio displays a language other than English you must press the right arrow after a single quote or for the character to appear Radio Key Action Keyboard Equivalent Left Option Chooses current left display option Left Option Key Right Option Chooses current right display option Right Option Key Accent Example Description Keystrokes å acute accent for letters a e i o u y ...

Страница 18: ...d 1100mAh SNN5706 and Extended 1500mAh NNTN4655 Have a spare battery available ready for when you need it Both standard and high capacity batteries are available Drop in Charger Tray 00215 for use with Chargers RPN4043 and RPN4044 Enables you to fully recharge your DTR radio Standard Charger RPN4043 3 hour charge time and Rapid Charger RPN4044 1 hour charge time are available Accent Example Descri...

Страница 19: ... text messages and access programming options using the radio keyboard whilst on the move Remote Speaker Microphone 00115 Lapel or collar mounted combined speaker microphone with PTT switch allows hands on radio operation without removing radio from belt or carry case VOX Headset With Swivel Microphone 00117 and Lightweight Headset 00168 Comfortable lightweight headsets help to eliminate backgroun...

Страница 20: ...June 21 2006 6864242V01 1 14 Introduction Accessories ...

Страница 21: ... or Name current Scroll list setting time date and the available Option key selections If the radio has been assigned a unique Unit Name the name will display rather than the Unit ID for both the radio and any Contacts Press and hold to turn the radio off Adjusting the Speaker Volume The Volume Control buttons are located on the upper left side of the radio To adjust the speaker volume press the u...

Страница 22: ...reen appears with the first contact highlighted in the list 2 Scroll to highlight the desired contact 3 To view the contact press under View for Group contacts or press and press under View for Private contacts The display changes and shows the contact group number or name the ID number and the channel number NOTE For PrivateGroup contacts members of the group are viewed by pressing under Membr JO...

Страница 23: ... in your group Requires adding all members to your Contact List then cloning the group over the air to member radios Offers a higher level of privacy than a PublicGroup Receiving a Call When a call is received the radio chirps and the display shows the call type and transmitting caller s user ID or name Making a Call 1 Choose a contact from your Scroll List Contacts or Recent Call List 2 Press and...

Страница 24: ...erted 1 Highlight the Private Name ID in Contacts or Recent Calls 2 Press under Alert Ready to Alert appears on the display 3 Press the PTT button until Alert Successful appears on the display NOTE If the alert is not successful the radio you are trying to reach is either in a call on another channel has the radio turned off or is out of range Receiving a Call Alert When you receive a call alert y...

Страница 25: ...If you are in a menu when the message is received you will need to exit and read it from the Inbox 2 If the message fills more than one screen scroll to read the entire message 3 To delete the message press and press under Delete To Dismiss the Message Notification Press under Back to read the message at a later time This icon appears on the display reminding you that you have an unread message Re...

Страница 26: ... to the radio the Write Mesg option appears on the display Refer to Composing a Message Using the mini keyboard 3 Scroll to highlight a reply message and press under Select to select the reply mes sage The Compose Msg screen appears 4 To change the Contact you are sending to press under Change This will return you to the Contact List Scroll to select the correct Contact and press under Select 5 To...

Страница 27: ...is accessory can also be used to write new messages from User Mode 1 Press under Mesgs The message inbox is displayed 2 Highlight Send Mesg and press under Select 3 The Send Message screen appears NOTE If the mini keyboard is connected to the radio the Write Mesg option appears on the display Refer to Composing a Message Using the mini keyboard 4 Scroll to select the message you want to send JOE S...

Страница 28: ...iew If the message fills more than one screen scroll to read it 8 Press under Send to send the message Composing a Message Using the Mini Keyboard The mini keyboard can be used to type either new messages or replies 1 From the Send Message screen highlight the Write Mesg option and press under Select 2 The Compose Msg screen appears 3 To change the Contact you are sending to press under Change Thi...

Страница 29: ...lay shows a confirmation that the message was sent Deleting a Message 1 From the idle screen press under Mesgs to enter the Message Inbox 2 Scroll to select a message for deletion 3 After selecting a message press The Inbox displays the delete selections If only the one message is to be deleted highlight Delete and press under Select 4 If all messages in the Inbox are to be deleted highlight Delet...

Страница 30: ...on and press under Select Main Menu Navigation Chart Main Menu Recent Calls Settings My Info Select Back Recent Calls Main Menu Settings My Info Display VibraCall Clock Alarm Volume Advanced Scroll List Call Forward Remote Disable Remote Monitor Remote Time to enter main menu or to scroll through list to select display option to exit main menu Menus only appear on the DTR2450 radio when Manager Mo...

Страница 31: ...all was received pointing left or initiated pointing right 2 Scroll to show call details for the selected call These include Group Name if applicable User Name and ID time date and length of call Continuing scroll moves you to the next recent call 3 Press under Back to access the previous screen Alerting a Recent Caller NOTE Only Private contacts can be alerted 1 Scroll to select a recent call fro...

Страница 32: ...lls have been deleted and then returns to the Recent Calls list Settings The Settings menu allows you to adjust personal settings that include Display VibraCall Clock Alarm Volume and Advanced The Advance features are for managing your Scroll List Scan List Call Forwarding Remote Disable Remote Monitor and Remote Time Refer to Chapter 3 Advanced Radio Operations to operate the Advance features Fro...

Страница 33: ...se or to adjust the Contrast as necessary and then press under OK to return to the previous menu Setting the Backlight 1 From the Display menu scroll to highlight Backlight and press under Change The Backlight screen appears The presently selected value will have a check mark on the left side 2 Scroll to highlight the desired value You can set the backlight time to Off 5 10 20 30 or 90 seconds 3 P...

Страница 34: ...ent selection 2 Scroll to highlight the desired selection 3 Press under Select to save the selection and return to the previous menu NOTE When turning vibrate on the radio will briefly vibrate and appears on the display Clock and Alarm Your radio requires that the current time and date be set in order to fully utilize the digital features This can be set manually or by using the Remote Time featur...

Страница 35: ...ed setting 5 After completing the time setting press under Done to complete the setting and to return to the previous menu Setting the Date 1 From the Clock Alarm menu scroll to highlight Date and press under Change The Date screen is displayed 2 Scroll to select the desired Month NOTE Press and hold or to fast scroll 3 Press under to move to the day and scroll to select the day 4 Press under to m...

Страница 36: ...he left of On or Off indicates the present selection 2 Scroll to select the desired condition and press under Select The display returns to the Set Alarm menu with the new selection indicated NOTE When the Alarm is set to On the icon appears on the display 3 Scroll to highlight Time and press under Done The alarm time is set using the same procedure as for setting the Time 4 Scroll to select the d...

Страница 37: ...rm feature which is overridden by VibraCall From the Settings menu scroll to highlight Volume and press under Select The Volume menu appears NOTE Highlighting any of the volume choices and pressing the Volume Control keys automatically adjusts the volume levels NOTE Pressing the Volume Control keys while not in the Volume menu only sets the Speaker Volume Setting the Ringer Volume 1 From the Volum...

Страница 38: ...ad and press under Change The Key pad screen appears 2 Use the Volume Control keys to adjust the Keypad Volume as necessary and then press the Ok Option key to save the selection and return to the previous menu Setting Ambient Noise Level The microphone sensitivity of DTR Series radios can be adjusted to accommodate varying levels of background noise The radios internal microphones and their acces...

Страница 39: ...My Info screen displays your Unit Name ID and Channel From the Main Menu scroll to highlight My Info and press under Select NOTE The Unit Name defaults to Unit ID unless it is customized in programming mode using the mini keyboard My Info Joe Smith 17179869143 Channel 1 Back ...

Страница 40: ...June 22 2006 6864242V01 2 20 General Radio Operations My Info Notes ...

Страница 41: ...ontact on your channel or any PublicGroup contact can be added to the Scroll List Removing them does not remove them from contacts 1 From the Advanced menu scroll to highlight Scroll List and press under Select The Scroll List screen appears NOTE A next to the left of the Group Private contact indicates that the Group Private contact is already in the Scroll List If the highlight is on a selected ...

Страница 42: ...them can then choose to transmit to the third party by simply pressing the PTT button NOTE Your radio must be on and within range to use this feature while you are away 1 From the Advance menu scroll to highlight Call Forwarding and press under Select The Call Forwarding screen appears 2 Scroll to highlight Forwarding and press under Change The Forwarding screen appears 3 Scroll to select the desi...

Страница 43: ...menu scroll to highlight Remote Disable and press under Select The Remote Disable screen appears 2 Scroll to highlight a radio name from the list Press under either Enable or Disable The screen changes to confirm the selection NOTE To cancel out of Remote Disable press and press under Select 3 To enable or disable the selected radio press under either Yes or No Once the radio is disabled the displ...

Страница 44: ...o from the list to monitor and press under Select The screen changes to show the radio s status Remote Time DTR2450 Models Only Remote Time synchronizes the date and time to all other radios on your channel Any receiving radio must have the transmitting radio User ID in their contact list to accept the time date update NOTE Radios must be turned on and within range to receive this broadcast messag...

Страница 45: ...nu Text Messaging Settings Display VibraCall Clock Alarm Volume Advanced Call Forward Reset Defaults Manager Mode See All Groups Language or to scroll through list to select display option to exit Program menu DTR2450 radio only Radio History Ambient Noise Scroll List Scan Lists ...

Страница 46: ...cess to modify and add contacts update existing and add new quick notes and access manager features DTR2450 only such as Remote Disable and Remote Monitoring A mini keyboard is used to enter text into contacts and to modify saved text messages Entering Programming Mode The following key sequence must be performed to enter the programming mode 1 Hold down and press the PTT button three times 2 Pres...

Страница 47: ...roll to select Type and press under Change The Type screen appears NOTE A next to an selection indicates the present selection 2 Scroll to select either a Private call type PrivateGroup call type or PublicGroup call type to add to the Contact List Press under Select 3 The display returns to the previous screen with the new call Type entered Office Security Select Back Contacts New Contact Channel ...

Страница 48: ...adios on the same TalkGroup should be set up on the same channel 2 Scroll to select a channel and press under Select The display returns to the previous screen with the new Channel entered Unit Name Unit ID is transmitted with all voice and text messages Programming a unique unit name to an ID will cause the radio to recognize any incoming calls from that user or group and display their unit name ...

Страница 49: ...om your contact list Press under Change to select another Group ID Since the default GroupID is dependent upon the contact list of all radios being the same it is recommended to clone PrivateGroups to other radios Entering a Home Group Number Private Calls Only If a Home Group is selected for your radio then it will return to that Group after 30 seconds of inactivity This ensures that any transmis...

Страница 50: ...ring Group Members PrivateGroup Only 1 Scroll to select Group Members and press under Change The Group Members screen appears NOTE A next to the left of the Group Member indicates that those members are already part of the TalkGroup assigned If the highlight is on a checked item the left changes to Remov Pressing under Remov removes the check mark If no check mark is present the entry has not been...

Страница 51: ...returns to the previous screen with the new Ringer entered 4 Press under Save to store the new contact after all entries for the new contact have been completed A confirmation screen appears confirming the saved contact 5 Press to exit Programming mode and return to the Main Menu Press under Reset Text Messaging NOTE Entering or changing the Quick Notes requires the use of the mini keyboard which ...

Страница 52: ...e screen appears NOTE A next to a selection indicates the present selection 7 Scroll to select On and press under Select The display returns to the Advanced menu Settings The settings for Display VibraCall Clock Alarm Volume Scroll List and Call Forward can also be utilized through Programming Mode Refer to Chapters 2 and 3 Radio History Radio History maintains a running clock of the amount of tim...

Страница 53: ...elect Settings and press under Select 2 Scroll to select Advanced and press under Select See All Groups The See All Groups feature displays all PrivateGroup contacts in the Contacts List of User Mode not just those that the radio is a member of This allows a user to monitor and talk to these PrivateGroup contacts However they will not be scanned unless the user is added to the PrivateGroup contact...

Страница 54: ...June 22 2006 6864242V01 4 10 Radio Programming Settings Reset Defaults This menu allows you to reset the radio to factory defaults deleting all contacts and changed settings ...

Страница 55: ...hese menus are used to add or remove a contact from a Private contact or PrivateGroup contact over the air This feature is used primarily for fleet maintenance When adding deleting a contact to a PrivateGroup contact the radio attempts to contact all radios within that PrivateGroup and notifies any radios that did not receive the update 1 From the Clone menu scroll to select Send Contact Press und...

Страница 56: ...ect to select the contact to be added 6 Scroll to select To 7 Press under Change 8 Scroll to the contact to receive the new contact 9 Press under Select to select the contact Joe Smith Receiving Security Select Back Contacts Add Joe Smith Change To Invalid Prgm Remote Add C Joe Smith Receiving Security Select Back Contacts Add Joe Smith Change Send Contact To Security Prgm ...

Страница 57: ...vateGroup the display shows each target radio individually If cloning was successful both the source and targets radios indicated Programming Successful If over the cloning to a PrivateGroup fails the radio displays the failed clone list The user can attempt cloning again to any members of this list Reset All Contacts This key sequence deletes all contacts in the radio This is useful for radio pro...

Страница 58: ...June 22 2006 6864242V01 5 4 Cloning Mode Reset All Contacts Notes ...

Страница 59: ...adios have been properly programmed Recharge or replace battery Poor audio quality Radios are too close together They must be at least 5 feet apart Radios are too far apart or obstacles are interfering with transmission Low batteries Recharge or replace batteries Extreme operating temperatures affect battery life Cannot see all PrivateGroups in Contact List Manager Mode must be enabled to see Priv...

Страница 60: ...April 3 2006 6864242V01 6 2 Troubleshooting Notes ...

Страница 61: ...ot Covered By The Warranty Defects or damage resulting from use of the Product in other than its normal and customary manner or by not following the instructions in this user manual Defects or damage from misuse accident or neglect Defects of damage from improper testing operation maintenance adjustment or any alteration or modification of any kind Breakage or damage to aerials unless caused direc...

Страница 62: ...March 28 2006 6864242V01 7 2 Motorola Warranty Warranty Information Notes ...

Страница 63: ...er Type Private Calls Only 4 7 A Unit ID Private Calls Only 4 5 Call Type 4 3 Channel 4 4 Group Members PrivateGroup Only 4 6 Selecting a Group ID 4 5 Selecting Group Only 4 6 Unit Name 4 4 Adding Contacts 4 3 Adjusting the Default Speaker Volume 2 18 Display Contrast 2 13 Speaker Volume 2 1 Alarm 2 16 Alerts 2 4 Alerting a Recent Caller 2 11 Receiving an Alert 2 4 Sending an Alert 2 4 Ambient Noi...

Страница 64: ...g Mode 5 1 Resetting All Contacts 5 3 Composing a Message Using the Mini Keyboard 2 8 Contact List 2 2 Contacts Adding 4 3 Contrast Adjusting 2 13 D Date Setting 2 15 Deleting A Message 2 9 Recent Calls 2 12 Disconnecting the Mini Keyboard from Your Radio 1 8 Display Menu 2 13 Display Options 1 5 Drop in Charging Tray Charging 1 6 E F Enabling Call Forwarding 3 2 Scan 3 2 Entering A Home Group Num...

Страница 65: ...Key 1 5 Messaging Composing a Message using the Mini Keyboard 2 8 Delete a Message 2 9 Reading from the Inbox 2 5 Receiving a Message 2 5 Replying to a Received Message 2 6 Sending a Text Message 2 7 Mini Keyboard Accent Marks 1 11 Attaching to the Radio 1 8 CAPS Key Functionality 1 9 Disconnecting from your Radio 1 8 Entering Text 1 9 Extended Character Set 1 11 Green Lock Key Functionality 1 9 K...

Страница 66: ...ions Alerting a Recent Caller 2 11 Deleting Recent Calls 2 12 Viewing a Recent Call 2 11 Recent Calls 2 11 Remote Disabling 3 3 Remote Monitoring 3 4 Remote Time 3 4 Replying to a Received Message 2 6 Reset All Contacts 5 3 Reset Defaults 4 10 Ringer Volume 2 17 S Scan Lists 4 9 Scroll List 3 1 See All Groups 4 9 Selecting A Call Type 4 3 A Channel 4 4 A Group ID 4 5 A Home Group Number Private Ca...

Страница 67: ... Standard Yellow Function Green Function 1 10 Status Icons 1 4 Swivel Belt Holster 1 8 T Text Area 1 4 Text Messaging 4 7 Time Setting 2 15 Troubleshooting 6 1 Turning Your Radio On or Off 2 1 Types of Calls 2 3 U V Unit Name 4 4 Using Mini Keyboard Key Shortcuts 1 11 Using the Cloning Cable 5 1 VibraCall 2 14 Viewing a Contact 2 2 Recent Call 2 11 Volume Keypad 2 18 Ringer 2 17 Speaker Adjusting ...

Страница 68: ...March 30 2006 6864242V01 I 6 INDEX ...

Отзывы: