© 1998 Motorola, Inc.
Issue 1.0
19
Cellular Subscriber Sector
DISASSEMBLY
StarTAC 160 (GSM)
Disassembly
Introduction
To perform most repairs, the unit must be
disassembled in order to gain access to the
various internal components. Reasonable
care should be taken in order to avoid
damaging or stressing the housing and
internal components. Motorola recommends
the use of a properly grounded high imped-
ance conductive wrist strap while
performing any of these procedures.
CAUTION
Many of the integrated circuit devices
used in this equipment are vulnerable to
damage from static charges. An anti-
static wrist band, connected to an anti-
static (conductive) work surface, must be
worn during all phases of disassembly,
repair, and reassembly.
Recommended Tools
The following tools are recommended for
use during the disassembly and reassembly
of the StarTAC.
• Anti-Static Mat Kit (RPX-4307A); includes:
— Anti-Static Mat 66-80387A959
— Ground Cord 66-80387A989
— Wrist Band 42-80385A59
• Plastic Prying Tool SLN7223A
• Antenna Tool SYN5233A
• Dental Pick
• Tweezers
• Housing prying tool SYN5367A
• Adjustable torque driver. Tohnichi
RTD24Z or equivalent
Transceiver Disassembly
Refer to the disassembly instructions and
photo sequence on the following pages.
NOTE
Service personnel should be familiar with
all of the following information before
attempting unit disassembly.
Содержание cd 160
Страница 7: ...viii Issue 1 0 2 6 98 StarTAC 160 GSM ...
Страница 9: ...2 Issue 1 0 2 6 98 StarTAC 160 GSM ...
Страница 13: ...6 Issue 1 0 2 6 98 StarTAC 160 GSM ...
Страница 17: ...10 Issue 1 0 2 6 98 StarTAC 160 GSM ...
Страница 25: ...18 Issue 1 0 2 6 98 StarTAC 160 GSM ...
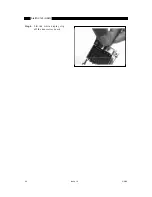
Страница 31: ...24 Issue 1 0 2 6 98 StarTAC 160 GSM Step 4 Lift the white display clip off the transceiver board ...
Страница 65: ...58 Issue 1 0 2 6 98 StarTAC 160 GSM Figure 27 StarTAC Parts Illustration ...
Страница 67: ...60 Issue 1 0 2 6 98 StarTAC 160 GSM ...
Страница 75: ...68 2 6 98 ...


