background image

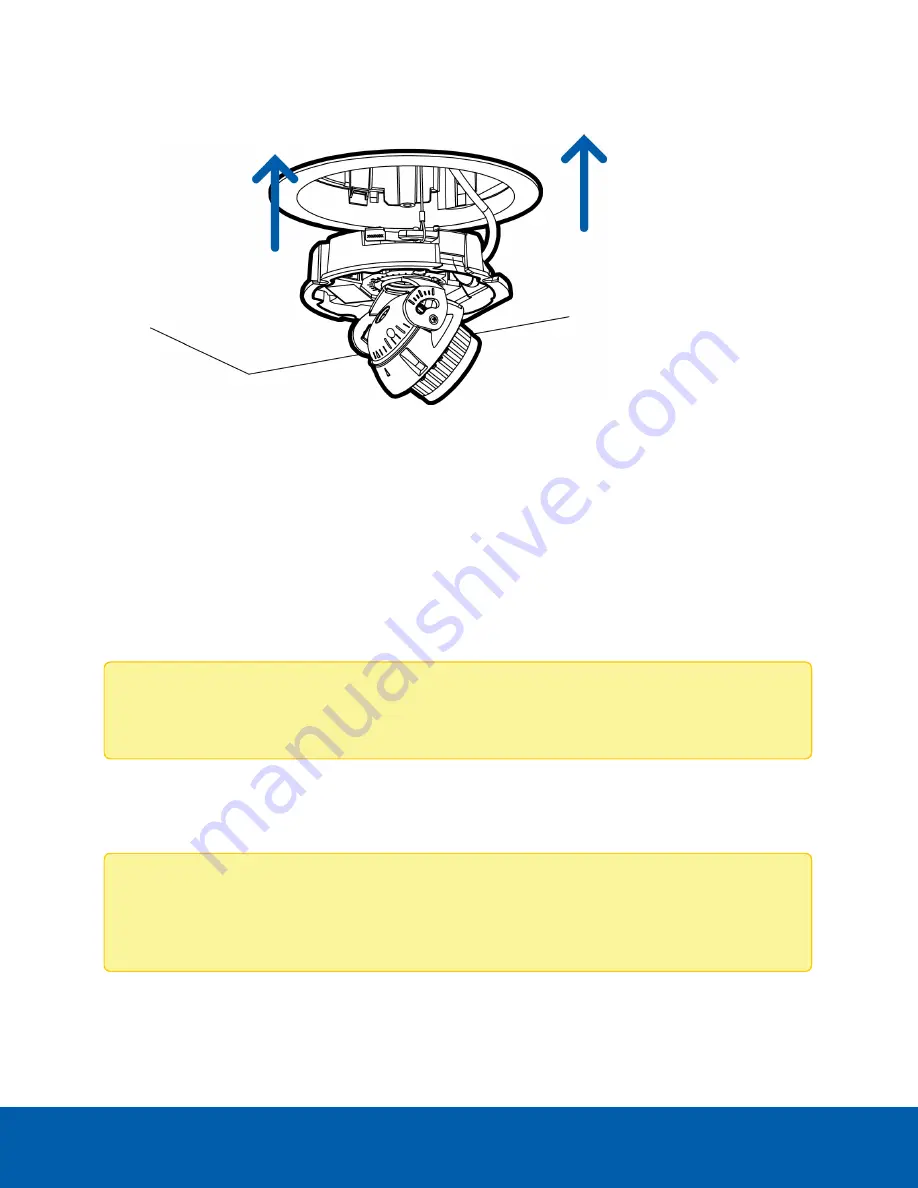
5. Align the orange arrow on the camera base to the orange arrow on the mounting adapter, then press

the camera base into the mounting adapter. The camera base clicks into place and is held securely.

(Optional) Using the USB Wi-Fi Adapter

If you have a USB Wi-Fi Adapter (H4-AC-WIFI), attach it to the camera's micro USB port to access the
camera's mobile web interface.

After you connect to the Wi-Fi signal broadcast by the adapter, you can access the mobile web interface
from any mobile device using the following address:

http://camera.lan

For more information about configuring the camera from the mobile web interface see

Avigilon USB Wi-Fi

Adapter System User Guide

.

Note:

The camera will reserve the 10.11.22.32/28 subnet for internal use while the USB Wi-Fi

Adapter is plugged in.

Assigning an IP Address

The device automatically obtains an IP address when it is connected to a network.

Note:

If the device cannot obtain an IP address from a DHCP server, it will use Zero Configuration

Networking (Zeroconf) to choose an IP address. When set using Zeroconf, the IP address is in the
169.254.0.0/16 subnet.

The IP address settings can be changed using one of the following methods:

(Optional) Using the USB Wi-Fi Adapter

13

Содержание Avigilon H4SL-D

Страница 1: ...Installation Guide Avigilon H4 SL Dome Camera Models with In Ceiling Mounting Adapter H4SL D H4SL DO plus H4SL MT DCIL ...

Страница 2: ... or LPS rated 48 VDC 4W min l The H4SL DO product is intended to be supplied by Power over Ethernet PoE that is a Limited Power Source or LPS rated 48 VDC 7W min l Any external power supply connected to this product may only be connected to another Avigilon product of the same model series External power connections must be properly insulated l Do not connect directly to mains power for any reason...

Страница 3: ... or more of the following measures l Reorient or relocate the receiving antenna l Increase the separation between the equipment and the receiver l Connect the equipment into an outlet on a circuit different from that to which the receiver is connected l Consult the dealer or an experienced radio TV technician for help Changes or modifications made to this equipment not expressly approved by Avigil...

Страница 4: ...n trademark patent or other intellectual property rights of Avigilon Corporation or its licensors Disclaimer This document has been compiled and published using product descriptions and specifications available at the time of publication The contents of this document and the specifications of the products discussed herein are subject to change without notice Avigilon Corporation reserves the right...

Страница 5: ...e to the Mounting Adapter 11 Optional Using the USB Wi Fi Adapter 13 Assigning an IP Address 13 Accessing the Live Video Stream 14 Aiming the Dome Camera 14 Optional Configuring microSD Card Storage 16 Installing the Dome Cover 17 Zooming and Focusing the Dome Camera 17 Configuring the Camera 17 For More Information 18 Connection Status LED Indicator 19 Removing the Dome Camera from the Mounting A...

Страница 6: ...apter Used to mount the dome camera to a wall ceiling or electrical box 2 Dome cover Vandal resistant dome cover Only available on H4SL DO models 3 Tamper resistant screws Star shaped captive screws to fix the dome cover to the base Overview 1 ...

Страница 7: ...era module during installation 2 Lanyard Connects to the lanyard anchor on the camera base 3 Clamps Manually adjustable clamps for securing the dome camera to the ceiling 4 Clamp retainer Used to hold the clamps together before installation Adapter View 2 ...

Страница 8: ... for camera operation 2 Lanyard anchor The safety lanyard attaches to the anchor to prevent the camera from falling during installation 3 Vent Vent to allow moisture vapor to escape the sealed housing and equalize pressure Only available on H4SL DO models Camera Base Bottom View 3 ...

Страница 9: ...ion and image data transmission also occur over this connection 3 Connection status LED indicator Provides information about device operation For more information see Connection Status LED Indicator on page 19 4 Link LED indicator Indicates if there is an active connection in the Ethernet port 5 microSD card slot Accepts a microSD card for onboard storage For more information see Optional Configur...

Страница 10: ...rew Provides a locking mechanism for the image tilt adjustment 3 Pan lock latch Provides a locking mechanism for the image pan adjustment 4 Micro USB port Accepts a micro USB to USB adapter Only required when using the Avigilon USB Wi Fi Adapter 5 Serial number tag Device information product serial number and part number label Camera Base Rear View 5 ...

Страница 11: ...Mounting template sticker l 4 screws and anchors for solid walls l Surface mount adapter l Side conduit cover l Avigilon H4 SL Dome Camera Outdoor model H4SL DO o RJ 45 grommet piercing cap o T20 Pin In star shaped driver o Provided accessories that are not required for this installation l Mounting template sticker l 4 screws and anchors for solid walls l Surface mount adapter l Side conduit cover...

Страница 12: ... the dome cover to the camera base Inserting Cables through the Sealing Grommet Always use the provided sealing grommet to prevent dust and debris from entering the camera 1 Remove the sealing grommet from the camera base 2 Push the Ethernet cable through the grommet If you are installing the indoor model H4SL D you should be able to simply push the cable crimped or uncrimped through the grommet b...

Страница 13: ...re that the orientation of the cable and grommet matches the one shown in the image Using the In Ceiling Mounting Adapter If the dome camera needs to be installed into a ceiling you can discard the surface mount adapter that is provided with the dome camera and use the in ceiling mounting adapter instead H4SL MT DCIL Note The maximum supported ceiling thickness is 32 mm 1 25 Using the In Ceiling M...

Страница 14: ...plate to cut an entry hole for the camera into the ceiling 2 Insert the in ceiling mounting adapter into the entry hole then pull the sealing grommet with the required cables through the adapter Using the In Ceiling Mounting Adapter 9 ...

Страница 15: ...3 Pull off the clamp retainer holding the clamps in place 4 Push the orange clamp handles up so that the metal arms extend outside the mounting adapter Using the In Ceiling Mounting Adapter 10 ...

Страница 16: ...inch the clamp down until the clamp is secured 6 Repeat the previous step on the other side Make sure both clamps are level and horizontal Installing the Camera Base to the Mounting Adapter After you install the mounting adapter mount the camera base to the adapter Installing the Camera Base to the Mounting Adapter 11 ...

Страница 17: ...n the camera base 3 Install the grommet into the cable entry hole on the camera base Make sure the grommet flange is securely seated on the inside and outside of the cable entry hole 4 Connect the cable to the Ethernet port The Link LED will turn on once a network link has been established Installing the Camera Base to the Mounting Adapter 12 ...

Страница 18: ...owing address http camera lan For more information about configuring the camera from the mobile web interface see Avigilon USB Wi Fi Adapter System User Guide Note The camera will reserve the 10 11 22 32 28 subnet for internal use while the USB Wi Fi Adapter is plugged in Assigning an IP Address The device automatically obtains an IP address when it is connected to a network Note If the device can...

Страница 19: ... using one of the following methods l The mobile web interface using the USB Wifi Adapter For more information see Optional Using the USB Wi Fi Adapter on the previous page l Web browser interface http camera IP address l Network Video Management software application for example the Avigilon Control Center software Note The default device username is administrator with no password Aiming the Dome ...

Страница 20: ...2 Loosen the tilt lock thumb screw to tilt the lens 3 Adjust the tilt angle of the camera as needed Aiming the Dome Camera 15 ...

Страница 21: ...ings Optional Configuring microSD Card Storage To use the camera s SD card storage feature you must insert a microSD card into the card slot It is recommended that the microSD card have a write speed of class 10 or better If the microSD card does not meet the recommended write speed the recording performance may suffer and result in the loss of frames or footage 1 Insert a microSD card into the ca...

Страница 22: ... or the Avigilon Control Center software use the camera s Image and Display settings to zoom and focus the camera a Use the zoom buttons to zoom the camera in or out b Click Auto Focus to focus the lens c Use the focus near and far buttons to manually adjust the focus Configuring the Camera Once installed use one of the following methods to configure the camera l If you have the USB Wifi Adapter y...

Страница 23: ...Avigilon High Definition H4 and H5 IP Camera Web Interface User Guide For More Information Additional information about setting up and using the device is available in the following guides l Avigilon Control Center Client User Guide l Web Interface User Guide Avigilon High Definition H4 and H5 IP Cameras l Avigilon USB Wi Fi Adapter System User Guide l Avigilon Camera Configuration Tool User Guide...

Страница 24: ...tempting to obtain an IP address Discoverable Two short flashes every second Obtained an IP address but not connected to the Network Video Management software Upgrading Firmware Two short flashes and one long flash every second Updating the firmware Connected On Connected to the Network Video Management software or an ACC Server The default connected setting can be changed to Off using the camera ...

Страница 25: ...ocate the small orange arrows that point at the camera housing clips 3 Insert a flat head screwdriver or grommet piercing cap against one of the camera housing clips 4 Lever one side of the camera base out of the clip 5 Lift the camera base out of the adapter Removing the Dome Camera from the Mounting Adapter 20 ...

Страница 26: ...n to reset the device The firmware revert button is shown in the following diagram 1 Ensure the device is powered on 2 Using a straightened paperclip or similar tool gently press and hold the firmware revert button 3 Release the button after three seconds CAUTION Do not apply excessive force Inserting the tool too far may damage the camera Resetting to Factory Default Settings 21 ...

Страница 27: ...n H4 and H5 IP Camera Web Interface User Guide 1 Locate and make note of the MAC Address MAC listed on the Serial Number Tag for reference 2 Open a Command Prompt window and enter the following commands a arp s New Camera IP Address Camera MAC Address For example arp s 192 168 1 10 00 18 85 12 45 78 b ping l 123 t New Camera IP Address For example ping l 123 t 192 168 1 10 3 Reboot the camera 4 Cl...

Страница 28: ...r access log 802 1x port based authentication Streaming Protocols IPv4 HTTP HTTPS SOAP DNS NTP RTSP RTCP RTP TCP UDP IGMP ICMP DHCP Zeroconf ARP RTP UDP RTP UDP multicast RTP RTSP TCP RTP RTSP HTTP TCP RTP RTSP HTTPS TCP HTTP Mechanical dome camera and mounting adapter Dimensions L x W x H 174 mm x 174 mm x 162 mm 6 9 x 6 9 x 6 4 Installed profile from ceiling 174 mm x 174 mm x 66 mm 6 9 x 6 9 x 2...

Страница 29: ...F H4SL DO 30 C to 60 C 22 F to 140 F Storage Temperature 10 C to 70 C 14 F to 158 F Humidity 0 95 non condensing Certifications Certifications UL cUL CE ROHS WEEE RCM EAC KC Safety UL 60950 1 CSA 60950 1 IEC EN 60950 1 IEC 62471 Environmental H4SL DO only IK10 Impact Rating Meets IEC 60529 IP66 Weather Rating IEC UL CSA 60950 22 Electromagnetic Emissions FCC Part 15 Subpart B Class B EN 55022 Clas...

Страница 30: ...KN 32 Electromagnetic Immunity EN 55024 EN 61000 6 1 EN 50130 4 KN 35 Specifications 25 ...

Страница 31: ... Avigilon warranty terms for this product are provided at avigilon com warranty Warranty service and technical support can be obtained by contacting Avigilon Technical Support avigilon com contact us Limited Warranty and TechnicalSupport 26 ...

Отзывы: