background image

10

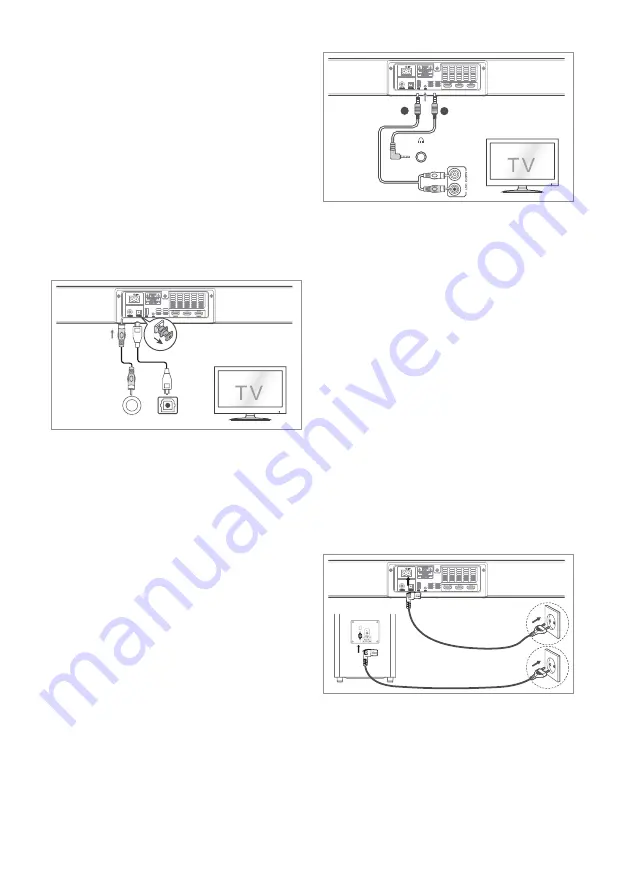
1.   Use an HDMI cable to connect the 

soundbar's 

HDMI OUT (ARC)

  socket 

to the TV’s HDMI IN socket.

2.  Use an HDMI cable to connect the 

soundbar's 

HDMI IN (1 or 2)

 socket 

to your external devices (e.g. games 
consoles, DVD players and blu ray).

6.3 

Use the OPTICAL Socket

Remove the protective cap of the 

OPTICAL

 socket, then connect an 

OPTICAL cable (not included) to the 
TV’s OPTICAL OUT socket and the 

OPTICAL 

socket on the unit.

HDMI 1    HDMI 2

HDMI OUT

.

.

.

HDMI IN


HDMI OUT (ARC)

HDMI ARC


or

56:/)'2

)5'>/'2

.KGJVNUTK

A

B

HDMI OUT (ARC)

6.4 

Use the COAXIAL Socket

• 

You also can use the COAXIAL cable 
(not included) to connect the TV's 
COAXIAL OUT socket and COAXIAL 
socket on the unit.

Tip: 

The unit may not be able to 

decode all digital audio formats from 
the input source. In this case, the 
unit will mute. This is NOT a defect. 
Ensure that the audio setting of the 
input source (e.g. TV, game console, 
DVD player, etc.) is set to 

PCM

 or


Dolby Digital

 (Refer to the user 

manual of the input source device for 
its audio setting details) with HDMI / 
OPTICAl / COAXIAL input.

6.5 

Use the AUX Socket

A.  Use a RCA to 3.5mm audio cable (not 

included) to connect the TV’s audio 
output sockets to the 

AUX 

socket on 

the unit.

HDMI 1    HDMI 2

HDMI OUT

.

.

.

HDMI IN


HDMI OUT (ARC)

HDMI ARC


or

56:/)'2

)5'>/'2

.KGJVNUTK

A

B

HDMI OUT (ARC)

B.  Use a 3.5mm to 3.5mm audio cable 

(included) to connect the TV’s or 
external audio device headphone 
socket to the 

AUX 

socket on the unit.

6.6 

Connect Power

•  

Risk of product damage! 

Ensure 

t h a t   t h e   p o w e r   s u p p l y   v o l t a g e 
corresponds to the voltage printed 
on the back or the underside of the 
unit.

•   Before connecting the AC power 

cord, ensure you have completed all 
other connections.

• Soundbar

Connect the mains cable to the 

AC~


Socket of the main unit and then into 
a mains socket.

• Subwoofer

Connect the mains cable to the 

AC~


Socket of the Subwoofer and then 
into a mains socket.

HDMI 1    HDMI 2

HDMI OUT

.

.

.

HDMI IN


HDMI OUT (ARC)

HDMI ARC


or

56:/)'2

)5'>/'2

.KGJVNUTK

A

B

HDMI OUT (ARC)

Содержание amphisoundX MT250-ASB31

Страница 1: ......

Страница 2: ...L Socket 10 6 4 Use the COAXIAL Socket 10 6 5 Use the AUX Socket 10 6 6 Connect Power 10 7 Pair up with the subwoofer 11 7 1 Automatic pairing 11 7 2 Manual pairing 11 8 Basic Operation 11 8 1 Standby ON 11 8 2 Automatic Power Off Function 11 8 3 Select Modes 11 8 4 Adjust the Bass Treble Level 12 8 5 Turn the Surround Sound ON OFF 12 8 6 Select Equalizer EQ Effect 12 8 7 Adjust the Volume 12 8 8 ...

Страница 3: ...lame sources such as lighted candles should be placed on the apparatus 20 Batteries should be recycled or disposed of as per state and local guidelines 21 The use of apparatus in moderate climates 1 Important Safety Instructions The lightning flash with arrowhead symbol within an equilateral triangle is intended to alert the user to the presence of uninsulated dangerous voltage within the product ...

Страница 4: ...e finish Use a clean dry or slightly damp cloth When removing the power plug from the wall outlet always pull directly on the plug never yank on the cord Changes or modifications to this unit not expressly approved by the party responsible for compliance will void the user s authority to operate the equipment The rating label is pasted on the bottom or back of the equipment Battery usage CAUTION T...

Страница 5: ...e without notice Images illustrations and drawings shown on this User Manual are for reference only actual product may vary in appearance HDMI Cable AUX Cable Soundbar Wireless Subwoofer Wall Bracket Wall Mounting Screw Remote Control AAA Batteries x 2 AC Power Cord x 2 ...

Страница 6: ...OL VOL buttons Increase decrease the volume level 7 AC Socket 8 COAXIAL Socket 9 OPTICAL Socket 10 USB Socket Insert the USB device to play music 11 AUX Socket Connect to an external audio device 12 HDMI OUT ARC Socket Connect to a TV via HDMI cable 13 HDMI IN 1 2 Sockets Connect to a TV via HDMI cable 3 2 Wireless Subwoofer 1 AC Socket Connect to power 2 PAIR button Press activate the pairing fun...

Страница 7: ...nerate infrared rays or if other remote control devices using infra red rays are used near the unit it may operate incorrectly Conversely the other products may operate incorrectly 4 2 Replace the Remote Control Battery 1 Press and slide the back cover to open the battery compartment of the remote control 2 Insert two AAA size batteries Make sure the and ends of the batteries match the and ends in...

Страница 8: ...ting 1 Drill 4 parallel holes Ø 5 5 6 mm each according to wall type in the wall The distance between the holes should be 870 mm 2 Firmly fix 1 dowel into each hole in the wall if necessary Tighten the wall mount brackets on the wall with screws and screwdriver not included Make sure that they are securely installed 3 Remove the screws at the back of the unit Install the wall mounting screws into ...

Страница 9: ...s require the HDMI input or picture settings to be set for HDR content reception For further setup details on HDR display please refer to the instruction manual of your TV Method 1 ARC Audio Return Channel The ARC Audio Return Channel function allows you to send audio from your ARC compliant TV to your sound bar through a single HDMI connection To enjoy the ARC function please ensure your TV is bo...

Страница 10: ... setting of the input source e g TV game console DVD player etc is set to PCM or Dolby Digital Refer to the user manual of the input source device for its audio setting details with HDMI OPTICAl COAXIAL input 6 5 Use the AUX Socket A Use a RCA to 3 5mm audio cable not included to connect the TV s audio output sockets to the AUX socket on the unit 56 2 5 2 KGJVNUTK A B B Use a 3 5mm to 3 5mm audio ...

Страница 11: ...the subwoofer and the soundbar If the wireless connection fails again check if there is a conflict or strong interference e g interference from an electronic device around the location Remove these conflicts or strong interferences and repeat the above procedures If the main unit is not connected with the subwoofer and it is in ON mode the unit s POWER indicator will flash 8 Basic Operation 8 1 St...

Страница 12: ...ote control to select the desired mode The selected mode will show on the display 3 Operate your audio device directly for playback features 4 Press the VOL button to adjust the volume to your desired level Tip The unit may not be able to decode all digital audio formats from the input source In this case the unit will mute This is NOT a defect Ensure that the audio setting of the input source e g...

Страница 13: ...nel shows BT 4 Play music from the connected Bluetooth device To disconnect the Bluetooth function you can Switch to another function on the unit Disable the function from your Bluetooth device The Bluetooth device will be disconnected from the unit after the Disconnected voice prompt Press and hold the or BT button on the remote control Tips Enter 0000 for the password if necessary If no other Bl...

Страница 14: ...o sound Make sure that the unit is not muted Press MUTE or VOL VOL button to resume normal listening Press button on the unit or on the remote control to switch the soundbar to standby mode Then press the button again to switch the soundbar on Unplug both the soundbar and the subwoofer from the mains socket then plug them again Switch on the soundbar Ensure the audio setting of the input source e ...

Страница 15: ... s external input signal level is too low the unit will be turned off automatically in 15 minutes Please increase the volume level of your external device The subwoofer is idle or the indicator of subwoofer do not light up Please unplug power cord from the mains sockect and plug it in again after 4 minutes to reset the subwoofer 13 Specifications 13 1 Soundbar Power Supply AC100 240V 50 60Hz Power...

Страница 16: ...25 W 0 5 W Standby Impedance 3 Ω Frequency Response 40Hz 120Hz Dimension WxHxD 240 x 420 x 240 mm Net weight 5 5 kg 13 4 Amplifier RMS Output Power Total 240 W Main Unit 30W 30W 60W Subwoofer 120W 13 5 Remote Control Distance Angle 6m 30 Battery type AAA 1 5V x 2 Specification subject to change without prior notice Measured under specific conditions ...

Страница 17: ...17 ...

Страница 18: ......

Отзывы: