background image

7A

7B

7A

7B

CMD

SET

SEL

5s

CMD

SET

SEL

CMD

SET

SEL

CMD

SET

SEL

CMD

SET

SEL

5s

CMD

SET

SEL

CMD

SET

SEL

CMD

SET

SEL

EN

EN

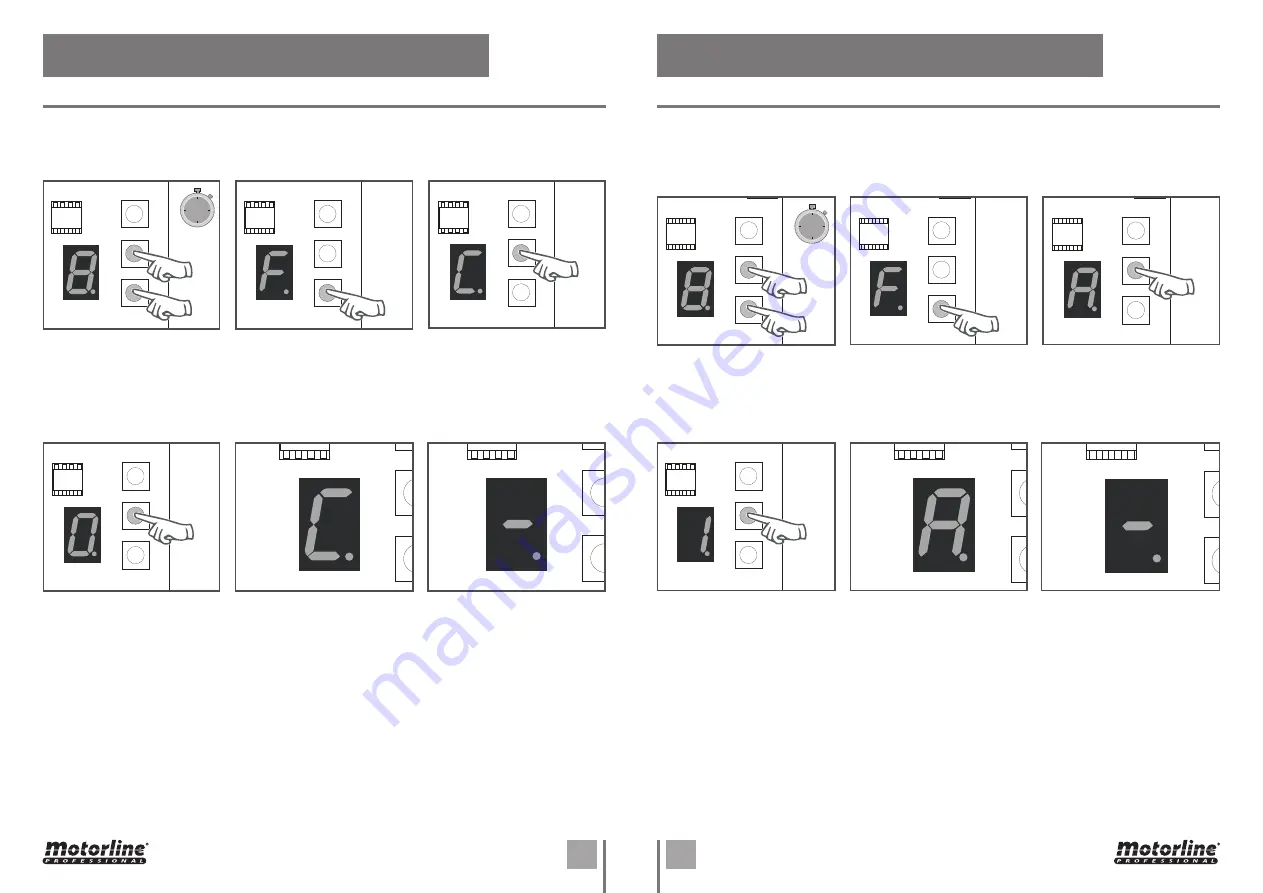
Option 0 disables the automatic closing, and the gate will close only if it receives an order 

from a configured device. 

Any option between 1 and 9, multiplied by 5, sets the automatic closing time, the minimum 

is 5 seconds (number 1) and the maximum is 45 seconds (number 9).

1 •

 Press the 

SEL

 and 

SET


buttons simultaneously 

for 5 sec. to access the 

programming menu.

4 •

 Use the 

SEL

 button to put 

on the desired option. Press 

the 

SET

 button once to save 

this option.

2 •

 The display will show F.

Press the 

SEL

 button as 

many times as necessary 

until the display shows 

A

3 •

 Press the 

SET

 button to 

access the submenu.

5 •

 The display will show 

A


and the configuration was 

successful.

6 •

 To exit the programming 

mode wait 10 sec. until (–) 

appears.

05. FUNCTIONS

PROGRAMMING AUTOMATIC CLOSING  

When photocells enabled, if any obstacle interrupt them (if the door is closing), the door will 

reverse the direction.

0 - Disable  |  1 - Enable

1 •

 Press the 

SEL

 and 

SET


buttons simultaneously 

for 5 sec. to access the 

programming menu.

4 •

 The display will show 

(disabled), 1 (enable). 

Use 

the 

SEL

 key to select the 

desired option and press 

SET

 to confirm. 

2 •

 The display will show 

F

.

Press the 

SEL

 button as 

many times as necessary 

until the display shows 

C

.

5 •

 The display shows 

C


and the configuration is 

successful.

3 •

 Press the 

SET

 button to 

access the submenu.

6 •

 To exit the programming 

mode wait 10 sec. until (–) 

appears.

ENABLE/DISABLE SAFETY PHOTOCELLS

05. FUNCTIONS

Содержание MC61BR

Страница 1: ...v5 1 REV 08 2019 MC61BR MC61BR EN INSTALLER AND USER S MANUAL ...

Страница 2: ...cycling systems This marking on the product or literature indicates that the product and electronic accessories eg Charger USB cable electronic material controls etc should not be disposed of as other household waste at the end of its useful life To avoid possible harm to the environment or human health resulting from the uncontrolled disposal of waste separate these items from other types of wast...

Страница 3: ...ns with experienced in terms of usage of the product in a safe manner and who understands the risks and dangers involved Children shouldn t play with the product or opening devices to avoid the motorized door or gate from being triggered involuntarily WARNINGS FOR TECHNICIANS Before beginning the installation procedures make sure that you have all the devices and materials necessary to complete th...

Страница 4: ...iresanyrepairormodification unlocktheautomatism turn off the power and do not use it until all safety conditions have been met In the event of tripping of circuits breakers of fuse failure locate the malfunction and solve it before resetting the circuit breaker or replacing the fuse If the malfunction is not repairable by consult this manual contact a technician Keep the operation area of the moto...

Страница 5: ...C 24v OV OV 24v RGB R G B RG B R G OV RG B R G OV 12V RG B R G OV RG B R G OV 12V 12V RG B R G OV RG B R G OV v DV COM NC 12 24V DV 12 24V DV COM NC 12 24V DV 12 24V EN 02 CONNECTIONS SCHEME COMPONENTS CONNECTION TO THE CONTROL BOARD Battery 12V Barrier Module 12V Photocells Key selector Limit switch OPEN CLOSE Without safety band With safety band Battery 12V Barrier Module 12V Safety band 8k2 LED...

Страница 6: ... a 55 C Incorporated Radio Receiver 433 92 Mhz Accepted codestype Rolling Code Central dimensions 99x104 5 mm Fuse 8A Erase remote controls Press CMD for 8 seconds during this time the LED display point will stay ON After this time LED display point will flash twice and all codes have been deleted from memory FUNCTION S BOARD 05 FUNCTIONS The control board MC61BR has a menu that allows access to a...

Страница 7: ...G COURSE PROGRAMMING 1 Press the SEL and SET buttons simultaneously for 5 sec to access the programming menu 4 Press the SET button once to save this option 2 The display will show F Press SET button to access the submenu 5 The display will show F and the configuration is successfully done 3 The display will show a value between 1 and 9 indicating the currently configured level Use SEL button to c...

Страница 8: ...lay shows A 3 Press the SET button to access the submenu 5 The display will show A and the configuration was successful 6 To exit the programming mode wait 10 sec until appears 05 FUNCTIONS PROGRAMMING AUTOMATIC CLOSING When photocells enabled if any obstacle interrupt them if the door is closing the door will reverse the direction 0 Disable 1 Enable 1 Press the SEL and SET buttons simultaneously ...

Страница 9: ...mpletely open it will close If pressing during the closure the gate reverses direction it will open When disabled you can control the opening or closing of the gate whenever you want and their behavior is open stop close stop open stop for each time you press a remote control key 1 Enabled This function makes the control board ignore all the orders sent by configured devices during the course of o...

Страница 10: ...how b and the configuration was successful 3 Press the SET button to access the submenu 6 To exit the programming mode wait 10 sec until appears ENABLE DISABLE FOLLOW ME 05 FUNCTIONS The deceleration reduce the motor speed in the final part of the course opening or closing Without deceleration select the value 0 Minimum deceleration 1 second Maximum deceleration 9 seconds 1 Press the SEL and SET b...

Страница 11: ... technical services for diagnosis Barrier opens but doesn t close 1 Check if there is any obstacle in front of the photocells 2 Make sure if the photocells are working Put your hand in front and check that the relay makes the same noise 3 Check if any of the control devices of the barrier are jammed and sending permanent signal to control unit Barrier opened but didn t close again Consult a qualif...

Отзывы: