background image

SAFETY

8

model no. 009-5097-2 / contact us 

1-888-942-6686

CAUTION

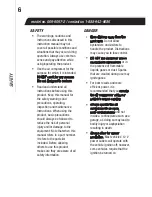
Do not wear watches, rings, 
bracelets or loose clothing 
when using the tool. These can 
get caught in the moving parts, 
resulting in damage to the tool 
and/or serious injury. 

Maintain proper footing at all 
times in order to ensure correct 
balance.

Do not overload the tool. Allow 
the tool to operate at its 
optimum speed for maximum 
efficiency.

Do not use a tool that is leaking, 
with missing or damaged parts, 
or that requires repairs. Verify 
that all screws are securely 
tightened.

Keep your work area clean and 
ventilated. Cluttered benches 
and dark areas increase the 
possibility of personal injury or 
property damage.

Allow air compressor to cool 
down for 10 minutes, after each 
10 minutes of continuous 
operation.

After using the air compressor, 
turn off the power supply.

The air compressor is not a toy. 
Handle it with caution.

DO NOT carry the air 
compressor by the air hose or 
power cord, as doing so may 
lead to damage.

DO NOT leave the air 
compressor unattended while in 
operation.

DO NOT overinflate. Please 
follow the manufacturer’s 
instructions for the item you are 
inflating.

DO NOT operate the air 
compressor in wet or damp 
areas.

Operate the air compressor only 
with the attachments and 
accessories that are included.

This air compressor is not 
designed to fill air tanks or air 
shocks.

Содержание 009-5097-2

Страница 1: ...INSTRUCTION MANUAL model no 009 5097 2 DUAL POWER AIR COMPRESSOR IMPORTANT Please read this manual carefully before using this tool and keep it for future reference...

Страница 2: ...maintenance advice Keep this instruction manual for future use Should this product be passed on to a third party this instruction manual must be included This MotoMaster product carries a three year...

Страница 3: ...follow them while using this product TABLE OF CONTENTS Specifications 4 Safety 5 Introduction 5 Safety 6 Danger 6 Warning 7 Caution 8 Know Your Air Compressor 9 Preparation 9 Key Parts Diagram 11 Par...

Страница 4: ...DC 12 V For use with 12 V DC power outlet only NOTE This unit is equipped with fuse protection If at some point the air compressor fails to operate when using the 12 V DC power method check the fuse...

Страница 5: ...ates to PROTECTING PERSONAL SAFETY and PREVENTING EQUIPMENT PROBLEMS It is very important to read this manual carefully and understand it thoroughly before using the product The symbols listed below a...

Страница 6: ...refers to a part number it refers to the parts list included Before allowing others to use this product make sure they are aware of all safety information DANGER Keep children away from the work area...

Страница 7: ...ny ash residue or debris A dirty 12 V power outlet can cause the air compressor and power cord to overheat Overheating can cause damage to your air compressor vehicle and could cause bodily harm or in...

Страница 8: ...lated Cluttered benches and dark areas increase the possibility of personal injury or property damage Allow air compressor to cool down for 10 minutes after each 10 minutes of continuous operation Aft...

Страница 9: ...increase the risk of electric shock DO NOT use in the presence of flammable gases or liquids Use only a two wire extension cord that has a two blade plug and a two slot receptacle that will accept th...

Страница 10: ...ulated product is marked with the words Double insulation or Double insulated The double insulation symbol may also be marked on the product Store unused equipment When not in use tools must be stored...

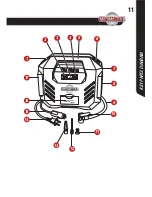
Страница 11: ...KEY PARTS DIAGRAM 11 32 0 ACCESSORY COMPARTMENT 1 2 3 4 5 6 7 8 9 10 11 12 13 14 15 16 17...

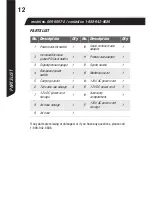
Страница 12: ...h 1 10 Quick connect valve adaptor 1 2 Increase decrease preset PSI level button 1 11 Presta valve adaptor 1 3 Digital pressure gauge 1 12 Sports needle 1 4 Run pause power switch 1 13 Mattress nozzle...

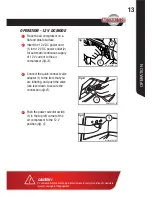
Страница 13: ...Connect the quick connect valve adaptor 1 to the item that you are inflating and push the valve lock lever down to secure the connection fig B Push the power selector switch 1 in the top left corner...

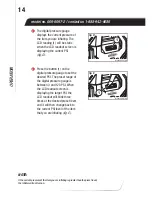
Страница 14: ...auge to set the desired PSI The preset range of the digital pressure gauge is between 3 and 120 PSI When the LCD readout screen is displaying the target PSI the LCD readout will blink three times at t...

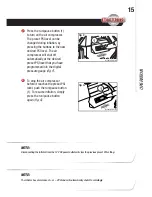
Страница 15: ...t you have programmed into the digital pressure gauge fig F To stop the air compressor before it reaches the preset PSI level push the run pause button 1 To resume inflation simply press the run pause...

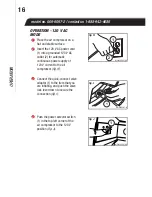
Страница 16: ...for automatic continuous power supply of 120 V current to the air compressor fig H Connect the quick connect valve adaptor 1 to the item that you are inflating and push the valve lock lever down to se...

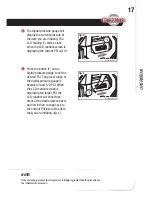
Страница 17: ...ed PSI The preset range of the digital pressure gauge is between 3 and 120 PSI When the LCD readout screen is displaying the target PSI the LCD readout will blink three times at the desired preset lev...

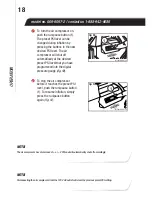
Страница 18: ...reset PSI level that you have programmed into the digital pressure gauge fig M To stop the air compressor before it reaches the preset PSI level push the run pause button 1 To resume inflation simply...

Страница 19: ...er DO NOT allow moisture or water to get into the interior moving parts Unplug the cord and disconnect from the power supply when the tool is not in use and store the unused tool to prevent rust The t...

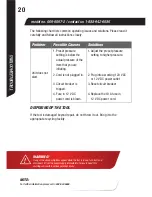
Страница 20: ...is below the actual pressure of the item that you are inflating 2 Cord is not plugged in 3 Circuit breaker is tripped 4 Fuse in 12 V DC power cord is blown 1 Adjust the preset pressure setting to hig...

Отзывы: