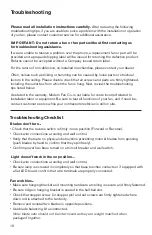
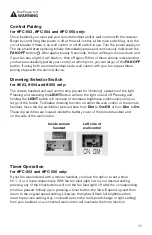
Most Modern Fan Lapa LAP Series Скачать руководство пользователя страница 6

5

WARNING

See Page 2

POWER OFF

Circuit Breaker

Using screws provided with junction box, securely 

attach hanging bracket to ceiling junction box. 
Junction box must be visibly marked as “Acceptable 
for Fan Support.” It is recommended that the flat 

washers and lock washers from the hardware pack 

be used for added security.

stopper screw

Remove the stopper screw and loosen the

set screw on the fan collar. Set the stopper

screw aside for Step 5.

3

set screw

set screw

Remove stopper pin and half ball from small

down rod by loosening set screw on half ball.  

Set parts aside for reinstallation in Step 7.

4

stopper pin

Slide fan canopy over down rod and carefully rest

on top of fan body.

6

stopper pin

Reinstall half ball on end of down rod. Be sure 

that stopper pin is inserted through down 

rod and seated in half ball. Tighten set screw 

against down rod.

7

set screw

Run fan wires through selected down rod.

Reinstall stopper screw from Step 3 and firmly

tighten set screw on fan collar against down rod.
Note:

 If ceiling height allows, using a longer down

rod will increase airflow and efficiency.

5

canopy

Содержание Lapa LAP Series

Страница 1: ...uct versions and configurations and the associated installation steps If your fan or parts of your fan do not appear to match what is included here please contact customer service for guidance and sup...

Страница 2: ...Installation Instructions and Owners Manual Customer Service Monday Friday 8am 4pm PST tel 888 588 3267 Safety Instructions and Warnings 2 Fan Installation 4 Control Installation and Wiring 8 Trouble...

Страница 3: ...ble for Fan Support and use mounting screws provided with the outlet box Note Most outlet boxes commonly used for light fixtures are not acceptable for fan support and may need to be replaced Consult...

Страница 4: ...l must be grounded using the attached green wire After making wire connections the wires should be spread apart with the grounded conductor and the equipment grounding conductor on one side of the out...

Страница 5: ...carton 4 Instructions Tools Needed A stepladder phillips head screwdriver and a wire stripper fan body blades optional control hardware package bottom cap balancing kit half ball canopy down rods Opt...

Страница 6: ...crew set screw Remove stopper pin and half ball from small down rod by loosening set screw on half ball Set parts aside for reinstallation in Step 7 4 stopper pin Slide fan canopy over down rod and ca...

Страница 7: ...slotted channel in the half ball 8 channel and ridge Remove set screws on the sides of the hanging bracket Lift canopy to ceiling With holes in side of canopy aligned with set screw holes on hanging...

Страница 8: ...page 4 then follow steps a through c below 12 Your fan is reversible for summer and winter operation The reverse switch is located on the top of the fan body The LEFT position is for summer and the RI...

Страница 9: ...igned for independent operation of a fan and light using only one circuit two wires Provides three speeds and full range dimming or on off switching and wires into wall box Includes wall control switc...

Страница 10: ...t Black to motor Blue to light Fan Control FC 003 004 005 Wiring Diagram Green ground White neutral motor Black motor White Black Blue light Fan Receiving Unit Green ground connect ground wire to grou...

Страница 11: ...for 003 004 and 005 only With fan suspended from ceiling and with power off at breaker box make wire connections as shown below Receiving Unit Placement The receiving unit sits in the hanging bracket...

Страница 12: ...light Pressing and releasing the LIGHT button will turn the light on and off Pressing and holding the LIGHT button will increase or decrease brightness continuously until you let go of the button To...

Страница 13: ...matched when packaged together Please read all installation instructions carefully After reviewing the following troubleshooting tips if you are unable to solve a problem with the installation or oper...

Страница 14: ...oval and re attachment can sometimes remedy such resonant vibrational noise Fan or light not responding to hand held remote or wall mounted RF signal Check that all wire connections are secure and mad...

Страница 15: ...eterioration or oxidizing effects of salt or other corrosive elements A Damp Location rating is not an assurance of finish durability Preventative measures should be taken dependent on the environment...

Страница 16: ...his warranty only covers the replacement or repair of ceiling fan or parts as specified above and does not cover any other costs incurred related to installation labor or equipment or shipping of fan...

Страница 17: ...V2020 08 The Modern Fan Company Inc 709 Washington Street Ashland Oregon 97520 tel 888 588 3267 fax 541 482 8418 info modernfan com modernfan com...

Отзывы: