background image

4

4

4

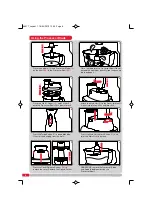
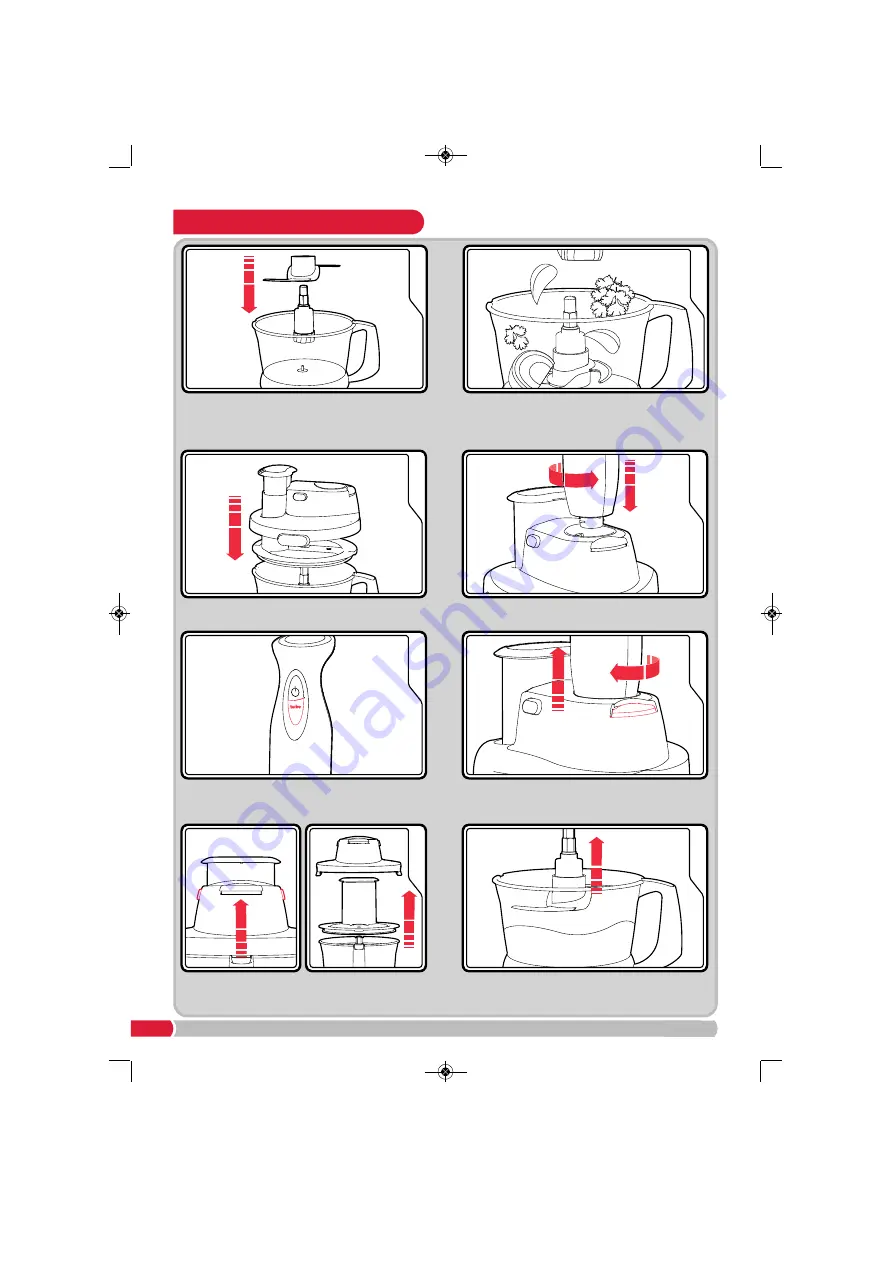
Attach the Main Unit 

(1) 

to the Cover, twist until

it locks into place with an audible click.  

3

Place the Lid 

(9)

, Cover 

(12)

, and Pusher 

(7)

onto the Processor Bowl. Push down to lock.  

2

Place the food into the Processor Bowl. Do not
exceed the maximum quantity (see the quantity
table on page 6.)

1

Place the Spindle 

(15) 

and Processor Blade 

(18)

on the Shaft 

(16) 

in the Processor Bowl 

(14)

5

5

Press the Turbo Button 

(3) 

to begin blending.

When finished unplug from the mains. 

6

6

Press the Main Unit Unlock Button 

(11) 

and

twist the Main Unit to remove. 

8

CAREFULLY

remove the Processor Blade

and Spindle before emptying the 
Processor Bowl.   

7

7

Press the Cover Release Buttons 

(10)

to 

remove the cover. Remove the Lid and Pusher. 

Using the Processor Blade

48917_Layout 1  16/04/2012  15:34  Page 4

Содержание Accents 48917

Страница 1: ... only 48917 www facebook com morphyrichardsuk www twitter com loveyourmorphy www morphyrichards co uk blog For competitions product hints and tips and more join us at Upon registration with Morphy Richards UK ROI only Hand Blender Work Centre Please read and keep these instructions for future use 48917_Layout 1 16 04 2012 15 34 Page 1 ...

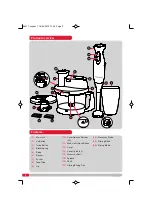
Страница 2: ...11 Main Unit Unlock Button 12 Cover 13 Cover Catch x2 14 Processor Bowl 15 Spindle 16 Shaft 17 Grating Slicing Disc 18 Processor Blade 19 Grating Blade 20 Slicing Blade 6 8 7 1 2 3 4 10 11 14 13 15 17 18 19 20 12 16 5 9 1 2 3 8 7 4 1 3 1 7 1 9 0 1 1 1 6 4 2 1 8 1 9 1 20 2 5 1 6 1 5 Product overview 48917_Layout 1 16 04 2012 15 34 Page 2 ...

Страница 3: ...se continuously for more than 1 minute Allow to cool down for a minimum of 5 minutes before further use Do not use the Blending Leg 4 continuously for more than 10 seconds when lifted out of food The processor attachment can only be used with the Turbo Button 3 Using a lower setting may cause irreparable damage to the motor Turbo Button Usage Using the Blending Leg Thank you for your recent purcha...

Страница 4: ...e 6 1 Place the Spindle 15 and Processor Blade 18 on the Shaft 16 in the Processor Bowl 14 5 5 Press the Turbo Button 3 to begin blending When finished unplug from the mains 6 6 Press the Main Unit Unlock Button 11 and twist the Main Unit to remove 8 CAREFULLY remove the Processor Blade and Spindle before emptying the Processor Bowl 7 7 Press the Cover Release Buttons 10 to remove the cover Remove...

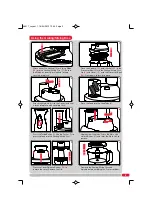
Страница 5: ...r Slicing Blade 20 into the Grating Slicing Disc 17 Ensure the Blade is correctly located and locked securely into place 5 5 Press the Turbo Button 3 Use the Pusher 7 to press the food into the Grating Slicing Disc 6 6 Unplug from the mains Press the Main Unit Unlock Button 11 and twist the Main Unit to remove 8 Remove the Grating Slicing Disc and Spindle before emptying the Processor Bowl 7 7 Pre...

Страница 6: ... soft foods like cooked vegetables and for use in soups and baby food The Blending Leg is not suitable for grinding hard items such as coffee beans ice nuts meat or hard vegetables raw potatoes raw carrots etc Processor Blade 18 The Processor Blade is suitable for chopping nuts vegetables herbs boiled eggs meat and dried bread The Processor Blade is not suitable for grinding hard objects such as c...

Страница 7: ...e 20 in hot soapy water Dry throughly before use Clean the Main Unit 1 or Cover 12 with a damp cloth and dry all the parts thoroughly WARNING Never immerse the Main Unit or Cover in water or any other liquid Do not immerse the Main Unit or Cover in water The Beaker 6 Chopping Bowl Grating Blade and Slicing Blade are dishwasher safe No other parts are dishwasher safe Helpline If you are having a pr...

Страница 8: ...hysical sensory or mental capabilities or lack of experience and knowledge unless they have been given supervision or instruction concerning the use of the appliance by a person responsible for their safety Children Children do not understand the dangers associated with operating electrical appliances Never allow children to use this appliance Children should be supervised to ensure that they do n...

Страница 9: ...9 Notes 48917_Layout 1 16 04 2012 15 34 Page 9 ...

Страница 10: ...10 Notes 48917_Layout 1 16 04 2012 15 34 Page 10 ...

Страница 11: ...11 Notes 48917_Layout 1 16 04 2012 15 34 Page 11 ...

Страница 12: ... the 1 year guarantee period the guarantee on the new item will be calculated from original purchase date Therefore it is vital to retain your original till receipt or invoice to indicate the date of initial purchase To qualify for the 1 year guarantee the appliance must have been used according to the instructions supplied For example crumb trays should have been emptied regularly Morphy Richards...

Отзывы: