

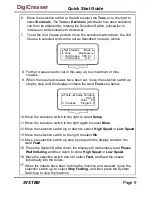
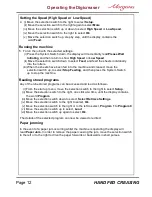


Page 17
SYSTEM
Perforating
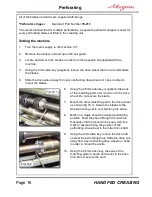
11.
Mount the other anvil ensuring that they have matched on the drive hub. Secure the
anvil to the hub ensuring not to over tighten grub screw as shown in fig 16.2.
12.
Slide the drive hub towards the perforating drive wheel until there is a clearance
of 0.5mm.
13.
To prevent damage to the blades or the anvils, do not force the drive wheel against
the hub.
14.
Fix the perforator stripper adjacent to the drive wheel and blade as shown.
15.
Operate the machine and test the perforations for form.
It is important that the drive hubs are arranged evenly across the width of the paper
in order to reduce the risk of jamming.
For multiple perforations repeat the above procedure.
Always remove blades and anvils once the perforating operation has been
completed to avoid marking on digital or delicate media.
5
2
1
3
4
FIG 17.1
Fig 17.1
1
4
2
5
3
demonstrates a typical set-up for perforating sheets.
Perforating drive wheel with mounted blades
Drive hub with mounted anvils
Perforator stripper
Standard drive hub
Standard drive wheel
DigiCreaser
Содержание DigiCreaser
Страница 5: ...Page 5 SYSTEM BLANK PAGE DigiCreaser ...
Страница 29: ...Page 29 SYSTEM DigiCreaser ...


