66
Genuine OEM Parts 1.800.233.4823 www.morganolsonparts.com
67
USPS 2 Ton Delivery Vehicle 2016 - 2018 Models
CONFIDENTIAL
NOT
FOR DISTRIBUTION
CONFIDENTIAL
NOT
FOR DISTRIBUTION
CONFIDENTIAL
NOT
FOR DISTRIBUTION
CONFIDENTIAL
NOT
FOR DISTRIBUTION
5” Color Monitor
Backup Camera System User Manual
4
MONITOR BUTTONS
i
NOTE: The monitor buttons do not function while the vehicle is in reverse.
The vehicle must be running and in park/neutral/drive to use the buttons.
It is recommended that the buttons are ONLY used in park/neutral.
POWER ON/OFF
Powers on the monitor and displays the Camera 1 channel by default.
LIGHT SENSOR (LEFT)
POWER LED (RIGHT)
Used to adjust screen brightness automatically.
Green when ON, Red when OFF
+/- VOLUME/MENU SETTING ADJUST BUTTONS
Adjusts the monitor sound volume by default.
Adjusts menu settings (e.g. brightness, contrast) according the menu setting selected
MENU SETTING AND PAGE TOGGLE
Brings up the monitor settings menu. Press the button again to scroll through the various
settings and to access the camera settings menu page (see following page).
5
MENU SETTINGS SCREEN 1:
"MONITOR DIM MODE SETTINGS / MONITOR BRIGHT MODE SETTINGS"
Press the menu button (see preceding page) to access this menu. Press the menu button again to
scroll through the settings:
•
BRIGHTNESS
Press +/- to adjust the brightness.
•
CONTRAST
Press +/- to adjust the contrast
•
COLOR
Press +/- to adjust the color saturation
•
TINT
Press +/- to adjust the color tint/hue.
•
LANGUAGE
Press +/- to select the menu language.
•
RESET
Press or - to reset all menu settings to factory default.
MENU SETTINGS SCREEN 2:
"CAMERA SETTINGS"
Keep pressing the menu button to access page 2 of the settings:
•
CAM - HORIZONTAL
Press +/- to flip the Camera image horizontally.
•
CAM - VERTICAL
Press +/- to flip the Camera image vertically.
•
DIMMING
Press +/- to choose between "bright", "dim" and "auto". Choosing
auto will allow the monitor to brighten and dim according to the amount of ambient light in the
cabin.
•
SCALE
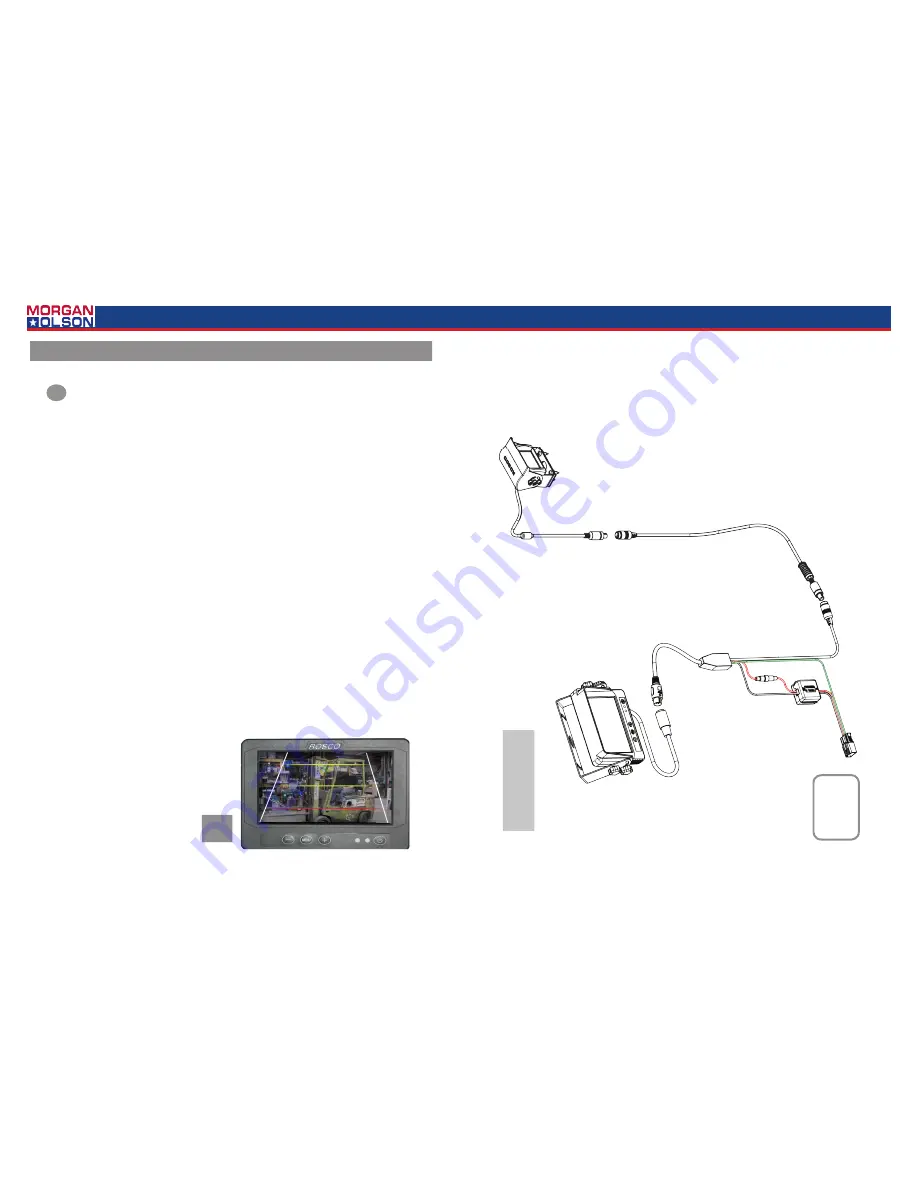
Press +/- to toggle the scale grid ON or OFF. If ON, the scale grid will appear when
the driver shifts the vehicle into reverse in order to assist with distance perception.
•
ADJUST SCALE
Press + or - to begin adjusting the dimensions of the scale grid. Press - to
switch between the vertical features of the scale and the horizontal "rungs". Press + to change
the width, height, etc of the various features. Press MENU to save the settings and exit. See
figure 1 for an example of the scale grid.
MENU SETTINGS SUMMARY
i
NOTE: The monitor buttons do not function while the vehicle is in reverse. The
settings can only be adjusted when the vehicle is running in park/neutral/drive.
It is recommended that the buttons are ONLY used in park/neutral.
fig 1
5” Color Monitor
Backup Camera System User Manual
6
BACKUP CAMER
A SYSTE
M
Wiring Diagram
BLACK: Gr
ound
RED WIRE: Ignition
GREEN WIRE: Reverse
CAMERA CONNECTION
STSM214/PHAR
MONITOR POWER HARNESS
STSU1004 U-BRACKET
4 PIN CONNECTION
13-PIN DIN FEMALE
13-PIN DIN MALE
7
4-PIN DIN MALE
STSC141
STSH214 CAMERA EXTENSION CABLE
4-PIN DIN MALE
BACK-UP CAMERA & MONITOR


