


▒▓
Monitor Series
Vital signs Monitor instruction Manual
- 16 -
4.2 Connect the Power Cables
Connection procedure of the AC power cable:
Make sure the AC power supply complies with following specification: 100-230 (VAC), 50/60
(Hz). Ensure that the AC outlet is properly grounded.
⑴
Apply the power cable provided with the monitor. Plug the power cable into the power
socket on the rear panel .
⑵
Connect the other end of the power cable to a grounded 3-line power output.
NOTE
"
Connect the power cable to the jack special for hospital usage.
"
The battery needs to be charged after transportation or storage. If the power
supply is not properly connected before turning on the monitor, it may not work
properly because of insufficient power. Connect the main power supply to charge
the battery.
4.3 Power on the Monitor
After the probe is connected to its input cables, turn the monitor on by momentary pressure
on the front-panel POWER button for 3 seconds. As audible beep feedback after pressing,
the monitor is initiated.
NOTE
"
Check for all the functions that may be used to monitor and make sure that the
monitor is in good status.
"
The battery must be recharged to the full electricity after the battery low indicator
appears.
"
It is suggested to recharge the battery to the full electricity after each use of
monitoring so as to reserve sufficient power in battery.
WARNING
If any sign of damage is detected, do not use it on any patient. Contact the
biomedical engineer in the hospital or the distributor immediately.
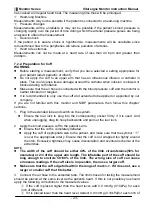
4.4 Connect with Patient Sensors
Connect the probe to the monitor (refer to 7.1 of chapter 7).
4.5 Check the recorder
If your monitor is equipped with a recorder, open the recorder door to check if paper is
properly installed in the output slot. If no papers present, do not press “ PRINT” function
button.