background image


6


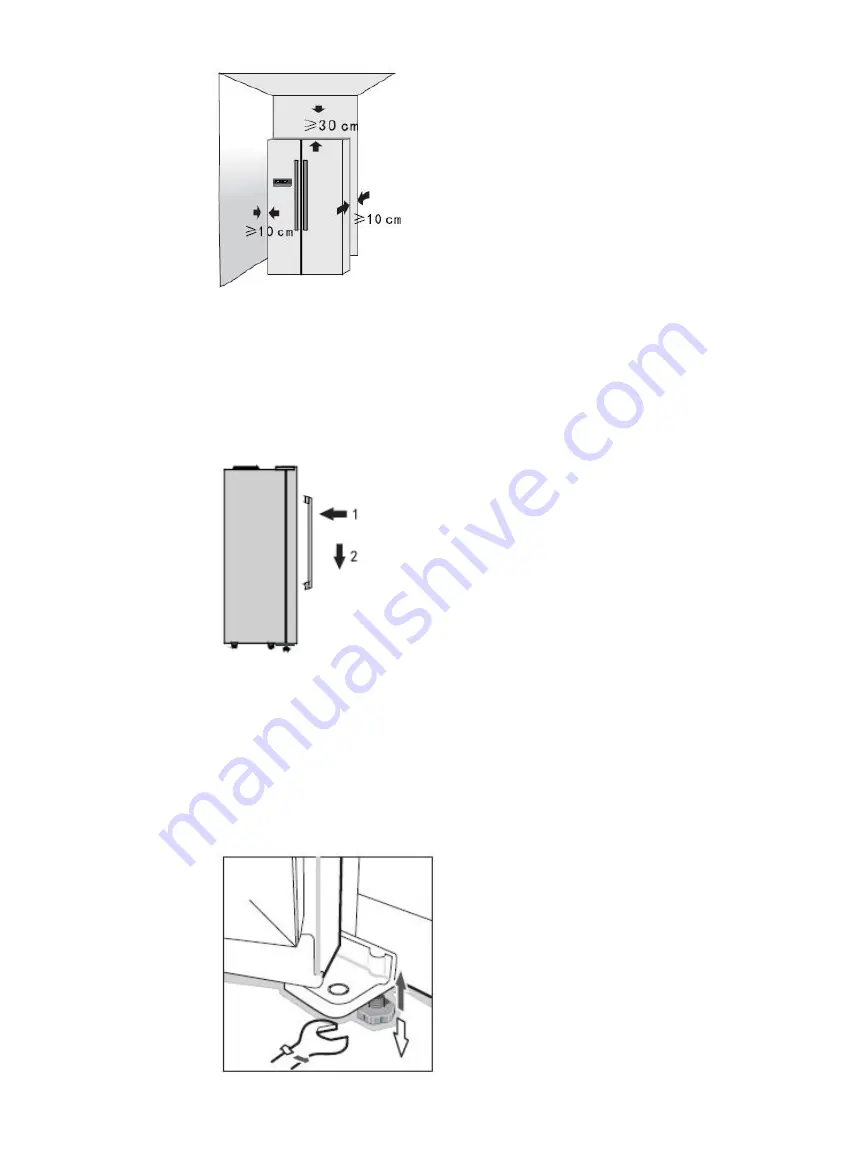
  Install the door handles as follows:


Please note that the illustration shows a short handle, however the same 
principal applies to the long door handles. Simply line the handle up with the  
pre-drilled fixing holes on the door. 


  Adjust the feet as follows: 


To install, locate each handle 
into the holes on the door (1) 
and then slide the handle in a 
downwards direction to lock in 
place (2). 
 
To remove the handle, reverse 
the above procedure. 

Содержание M603DDAP

Страница 1: ...A SIDE BY SIDE FRIDGE FREEZER Picture shown for indicative purposes only model supplied may differ Please read these instructions carefully before attempting to install or use this appliance It is ad...

Страница 2: ...reference Included is some important safety information in addition to guidelines and recommendations that will enable you to take full advantage of all the functions available This quality appliance...

Страница 3: ...2...

Страница 4: ...Rack 2 Twist Ice Maker 3 Freezer Compartment Light 4 Freezer Shelf 5 Freezer Storage Box 6 Fridge Compartment Light 7 Fridge Shelf 8 Fridge Storage Box Cover 9 Fridge Storage Box 10 Fridge Door Rack...

Страница 5: ...4 CONTENTS Section 1 Installation Section 2 Safety Advice Section 3 Operating the Appliance Section 4 Maintenance...

Страница 6: ...direct sunlight Do not position next to a cooker or other sources of heat i e radiator This appliance should not be sited in a cold atmosphere i e garage or shed Doing so may cause the freezer unit to...

Страница 7: ...ipal applies to the long door handles Simply line the handle up with the pre drilled fixing holes on the door Adjust the feet as follows To install locate each handle into the holes on the door 1 and...

Страница 8: ...ked flames or sources of ignition and ventilate the room in which the appliance is situated Do not damage the refrigerant circuit The appliance is not intended for use by persons including children wi...

Страница 9: ...erature Control The temperature control panel LED is located on the outer face of the freezer door The LED has two display modes Standard and Energy Saving When initially connected to the power supply...

Страница 10: ...he temperature of the Fridge compartment will be automatically set at 5 C This is the normal temperature setting for a fridge however you can change the setting between 0 C and 6 C as follows 3 2 3 Su...

Страница 11: ...fresh foods items have been added The facility will switch off automatically when the compartment temperature has stabilized 3 2 6 Door Open Warning Should you inadvertently leave either of the doors...

Страница 12: ...al Operating Sounds You may hear faint gurgling or bubbling sounds when the refrigerant is pumped to the cooling system and through the coils or tubing at the rear of the appliance When the compressor...

Страница 13: ...t perishable foods those with a short shelf life such as cooked meats in the coldest part of the fridge The Salad Crisper Box is the warmest part of your fridge and should be used for vegetables salad...

Страница 14: ...ting Your new appliance is Frost Free and will under normal circumstances defrost automatically However should ice build up in the freezer exceed 3 5mm empty the contents and switch off the appliance...

Страница 15: ...een opened frequently if yes allow the interior temperature to recover Check that the Thermostat Control s has not been set to maximum There is excessive frost ice build up Ensure that the doors have...

Страница 16: ...15 Appliance Dimensions...

Страница 17: ...disposed of correctly you will help prevent potential negative consequences for the environment and human health which could otherwise be caused by inappropriate waste handling of this product The sym...

Отзывы: