MONSTERMOUNT MB-1003 Скачать руководство пользователя страница 5

ENG

5

STEP 2

Attaching the Mount to the Display

IMPORTANT!

 Use extra care during this part of the installation. If possible, 

avoid placing your display facedown as it may damage the viewing surface.

NOTE:

 This mount comes with a selection of different screw diameters and 

lengths to accommodate a wide variety of display models. Not all of the hard-
ware in the kit will be used. If you cannot find the appropriate screw size in the 
kit provided, consult the manufacturer of your display for more information.

1. Determine the correct length of screw to use by examining the back of your 
display:

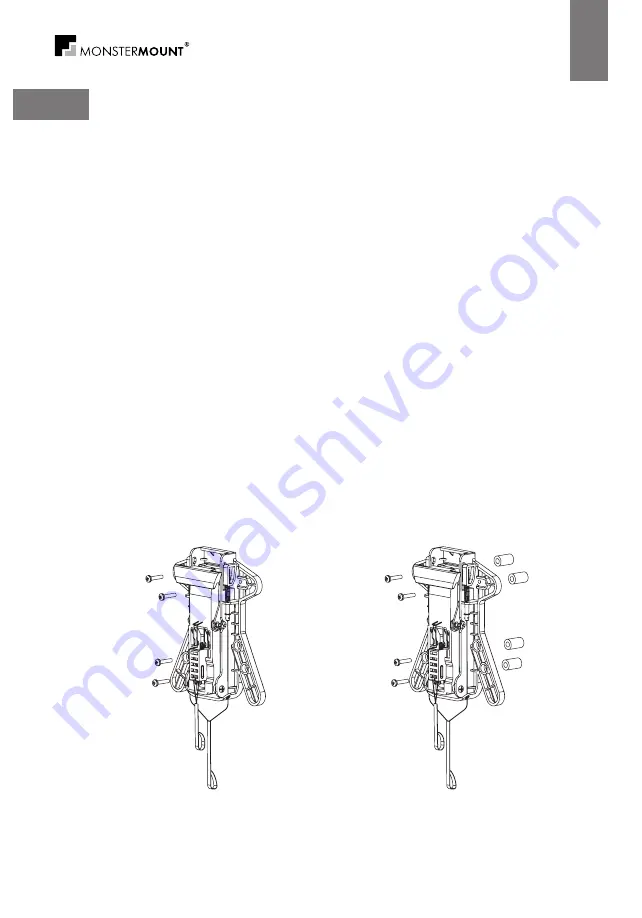
a) If the back of your display is flat and the mounting holes are flush with the 
surface, you will use the M4 x 12 screws (C) from the hardware kit.

b) If the back of your display is curved, has a protrusion, or if the mounting 
holes are recessed, you will need to use the M4 x 20 screws (D) and may also 
need to use the spacers (E).

2. Attach the display plate to the back of your display using the screws identi-
fied in step 1. If you are using the M4 x 20 screws on a display with a curved or 
recessed back, you may also need to use the spacers (E) (see Fig. 5). However, 
you should only use a spacer if necessary. 

NOTE:

 If the holes of the mount do not line up with the holes on your display, 

check to make sure that your display is VESA compatible. This mount can only 
be used with displays that are VESA 75 or VESA 100 compatible. Consult the 
manufacturer of your display for more information.

Fig. 5

For displays 

with flat backs

For displays 

with curved or 

recessed backs

Содержание MB-1003

Страница 1: ...MB 1003 Installation instructions Руководство пользователя LCD Wall Mount Кронштейн для LCD ...

Страница 2: ... 3 Safety gear and proper tools must be used Failure to do so can result in prop erty damage and or serious injury A minimum of two people are required for this installation Do not attempt to install this mount alone under any circumstance 4 Follow all instructions and recommendations regarding adequate ventilation and suitable locations for mounting your display Consult the owner s manual for you...

Страница 3: ...enter NOTE You must use the center of the stud to avoid cracking or splitting the wood during installation 2 Place the wall plate against the wall over the marked stud Make sure it is level 3 Mark the two locations for securing the wall plate and set the wall plate aside see Fig 1 4 Drill a 3 mm 1 8 pilot hole at each marked location 5 Place the wall plate back against the wall and attach it using...

Страница 4: ...l an 8 mm 5 16 hole at each marked location Remove any excess dust from the holes 4 Insert a concrete anchor B into each hole so that it is flush with the concrete surface see Fig 4 A hammer can be used to lightly tap the anchors into place if necessary NOTE If the concrete wall is covered by a layer of plaster or drywall the con crete anchor must pass completely through the layer to rest flush wi...

Страница 5: ...surface you will use the M4 x 12 screws C from the hardware kit b If the back of your display is curved has a protrusion or if the mounting holes are recessed you will need to use the M4 x 20 screws D and may also need to use the spacers E 2 Attach the display plate to the back of your display using the screws identi fied in step 1 If you are using the M4 x 20 screws on a display with a curved or ...

Страница 6: ...n the locked position at all times to prevent the display from being accidentally lifted from the wall plate Operation and Adjustment 1 To adjust the tilt angle hold the display firmly in place while pulling down on the white cord Carefully allow the display to move to the lowest position before releasing the cord The display can be left in the lowest position or pushed into one of three additiona...

Страница 7: ...e made only upon purchase receipt presentation 3 Warranty is not valid in case of the unit was assembled not in accordance with installation instructions repair or modification was done by companies without Monster Mount authorization defect appeared due to fire flood lightning deforming cleaning extremely high temperature solvent acids wrong use or careless terms the products have been lost damag...

Страница 8: ......

Страница 9: ...умента и или попытка установки одним человеком может привести к порче имущества и травмам 4 Следуйте всем инструкциям и рекомендациям в отношении необходи мой вентиляции и подходящего месторасположения для установки Вашего дисплея Обращайтесь к Руководству пользователя Вашего дис плея для получения большей информации Технические характеристики Размер дисплея 38 69 см 15 27 Расстояние от стены 4 0 ...

Страница 10: ...оцессе установки придерживайтесь центра направля ющей чтобы избежать растрескивания а также последующего разруше ния дерева гипсокартона 2 Поместите настенную панель на выбранное Вами место и выровняйте ее 3 Отметьте точками два места предназначенные для крепления крон штейна на стену см рис 1 и отложите настенную часть кронштейна в сторону 4 Просверлите отверстия диаметром 3 мм 1 8 в каждом отмеч...

Страница 11: ...ом отмеченном ранее месте Удалите всю пыль из отверстий 4 Вставьте в каждое отверстие дюбель для бетонной кирпичной стены B так чтобы он не выступал из стены см рис 4 При необходимости используйте молоток для того чтобы вбить дюбели в стену Примечание Если бетонная кирпичная стена покрыта слоем штукатур ки или гипсокартона дюбели должны проходить насквозь через обли цовку чтобы в конечном счете ср...

Страница 12: ...установки Вам понадобятся винты M4x12 C b В случае если задняя поверхность Вашего дисплея изогнутая имеет выступ или крепежные отверстия утоплены в корпус Вам необходимо использовать винты M4x20 D а также возможно понадобятся про ставки E 2 Приложите крепежную пластину к задней части дисплея и прикрепите ее с помощью винтов ранее определенных Вами в пункте 1 Если Вы используете винты M4 x 20 на ди...

Страница 13: ...ок Внимание Предохранительный механизм должен постоянно находиться в заблокированном положении чтобы предотвратить случайное отсоеди нение дисплея от настенной панели Эксплуатация и регулировка 1 Для регулировки угла наклона дисплея потяните за белый шнур одно временно удерживая Ваш дисплей на месте Не отпуская шнур осторож но переместите дисплей в самое низкое положение Ваш дисплей может оставать...

Страница 14: ...РУС 14 ...

Страница 15: ...варного чека подтверждающего факт про дажи 3 Гарантия не действует если изделие использовалось или устанавливалось с отступ лениями от инструкции по установке и эксплуатации если в ремонте или модификации изделия участвовали фирмы не имеющие с оответствующей авторизации произво дителя если повреждение возникло вследствие чрезвычайных обсто ятельств как то пожар наводнение удар молнии деформи рующа...

Страница 16: ...MB 1003 ...

Отзывы: