background image

The unboxing

The box of

accessories

The fans

The power supply The storage (1/2) The motherboard The graphic card

With spreader

Without spreader

The storage (2/2)

The cable 

management

The fanless

optimization

The dust

The motherboard

26

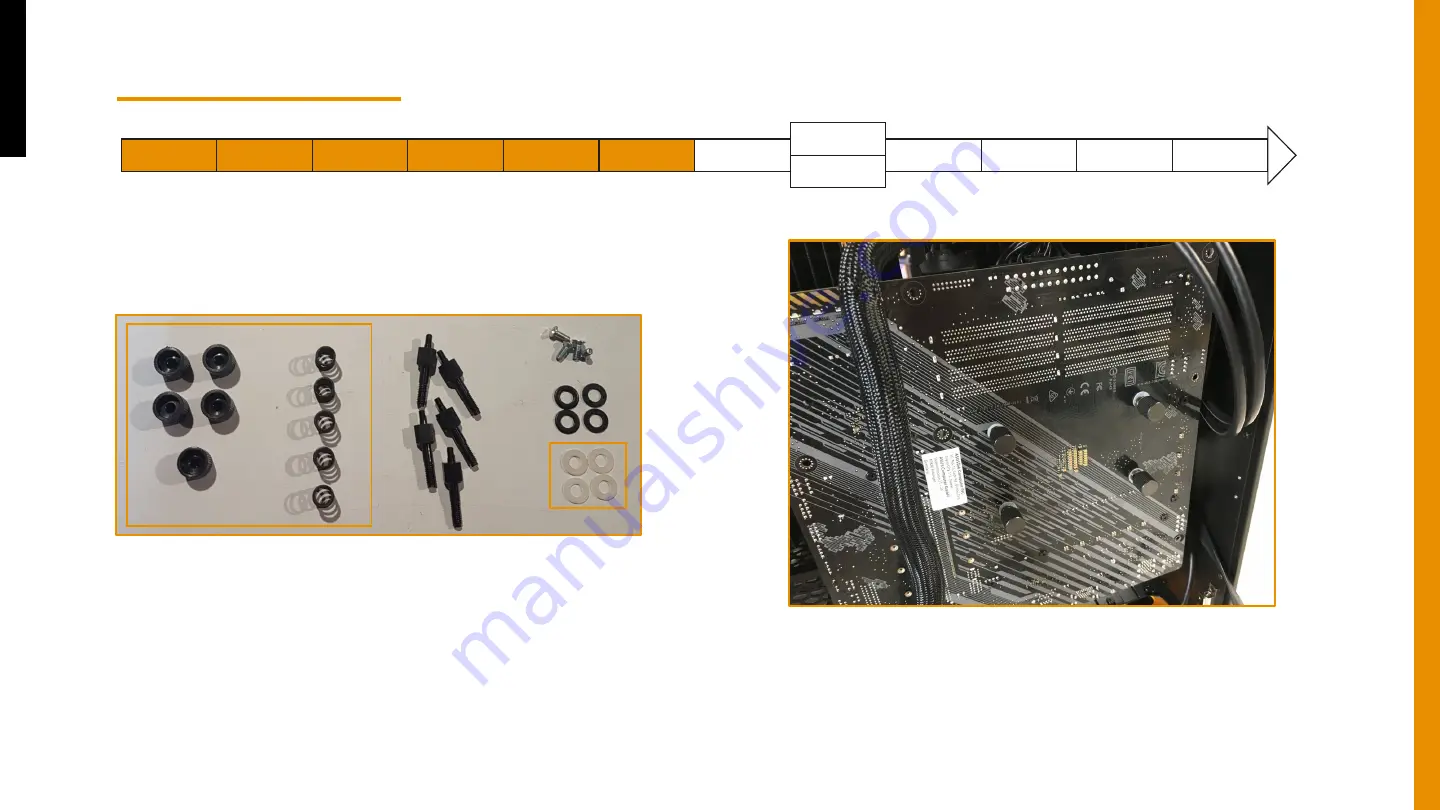
12.Screw tight the motherboard with the screws 

available in the bag « CPU ». Place first the spacers, 

then the springs and finally the thumbnuts. 

Содержание The Beast

Страница 1: ...MonsterLabo The Beast USER MANUAL 1 ...

Страница 2: ...s bracelets or watch that could scratch the case during the unboxing and the assembly Test the components you plan to assemble into your Beast before starting their assembly Never lift your Beast by the side panels Keep the shipping boxes And of course read carefully the user manual before beginning with the assembly process Thank you for choosing The Beast Enjoy the silence MLTeam ...

Страница 3: ...3 GPU side The right side ...

Страница 4: ... p10 The fans p15 The power supply p19 The storage 1 2 p20 The motherboard p21 The graphic card p27 with spreader p28 without spreader p34 The storage 2 2 p41 The cable management p43 The fanless optimization p45 The dust p48 Table of content ...

Страница 5: ...oxing The box of accessories The fans The power supply The storage 1 2 The motherboard The graphic card With spreader Without spreader The storage 2 2 The cable management The fanless optimization The dust 2 Open the box by the bottom and remove the protective foam ...

Страница 6: ...ide panels you can place a towel or any protective fabric The unboxing The box of accessories The fans The power supply The storage 1 2 The motherboard The graphic card With spreader Without spreader The storage 2 2 The cable management The fanless optimization The dust 4 Keep the inner box horizontally ...

Страница 7: ...x of accessories The fans The power supply The storage 1 2 The motherboard The graphic card With spreader Without spreader The storage 2 2 The cable management The fanless optimization The dust 6 Fold the bottom flaps outwards and carefully move the box vertically ...

Страница 8: ...with a cutter to avoid scratches The unboxing The box of accessories The fans The power supply The storage 1 2 The motherboard The graphic card With spreader Without spreader The storage 2 2 The cable management The fanless optimization The dust Never lift the case by the side panels only by the bottom parts the feet ...

Страница 9: ...g on the side panels tempered glasses or aluminum side panels Be careful the sides panel are not symmetrical The unboxing The box of accessories The fans The power supply The storage 1 2 The motherboard The graphic card With spreader Without spreader The storage 2 2 The cable management The fanless optimization The dust 10 Take off the box of accessories placed into your case Picture to come ...

Страница 10: ...st The box of accessories 10 If you bought a The Beast Accessories package this is the content of the box of accessories For those who ordered a Only The Beast your box of accessories only contains the little bags of screws for each component and accessory The box of accessories might be different depending on the cooler for your graphic card and the additional accessories you bought in addition t...

Страница 11: ...The dust The box of accessories 11 Kit for the graphic card No spreader Kit of taped heatsinks for memories and or VRMs VRMs machined heatsink Large Small or both if compatible with your graphic card thermal interfaces included Kit GPU NSP 4 spacers 5 black screws 4 plastic washers 4 metallic washers 4 grey screws 5 spacers 5 springs 5 thumbnuts Bracket for your graphic card many brackets are avai...

Страница 12: ...The graphic card With spreader Without spreader The storage 2 2 The cable management The fanless optimization The dust The box of accessories 12 Kit for the graphic card Spreader Spreader many references are available Kit GPU SP 4 grey screws 10 black screws 10 plastic washers Thermal interfaces ...

Страница 13: ...orage 2 2 The cable management The fanless optimization The dust The box of accessories 13 Kit for the assembly spare parts Screws for the extended cables back panel Screws for the power supply Spare Spare Screws for the SSDs HDDs Screws for the storage support Cable clamps for the cable management Protective pads for the bottom of the case Wrench ...

Страница 14: ...ard With spreader Without spreader The storage 2 2 The cable management The fanless optimization The dust The box of accessories 14 Kit for the CPU Bracket for the CPU AMD and Intel Both of them share the same assembly Kit CPU 5 thumbnuts 5 springs 5 thumb screws 5 screws 4 metallic washers 4 plastic washers ...

Страница 15: ...thout spreader The storage 2 2 The cable management The fanless optimization The dust The fans 15 If you plan to use fans they are the first components that should be mounted If you don t plan to use fans simply go to the section The power supply If you re not very sure about what to do read our section The fanless optimization ...

Страница 16: ...d With spreader Without spreader The storage 2 2 The cable management The fanless optimization The dust The fans 16 1 Remove the aesthetic top panel and remove the mesh The top fans Picture to come 2 Screw the 4x fans adapters 3D printed from the bag FAN onto the fans You only need to use 2x adaptater per fan ...

Страница 17: ... on the side dedicated to the motherboard 4 Close the top of the case with the mesh and the aesthetic panel The unboxing The box of accessories The fans The power supply The storage 1 2 The motherboard The graphic card With spreader Without spreader The storage 2 2 The cable management The fanless optimization The dust The fans 17 The top fans ...

Страница 18: ...wer supply The storage 1 2 The motherboard The graphic card With spreader Without spreader The storage 2 2 The cable management The fanless optimization The dust The fans 18 The bottom fans 2 Put the 140mm fans into the slots for 120mm ask the team for longer adapters Keep in mind the cables should be placed on the side dedicated to the motherboard ...

Страница 19: ...ard The graphic card With spreader Without spreader The storage 2 2 The cable management The fanless optimization The dust 1 Place your power supply into the case in its dedicated slot The power supply 19 2 Screw the power supply with the dedicated screws from the bag ASSY Do not wire it yet ...

Страница 20: ...he motherboard The graphic card With spreader Without spreader The storage 2 2 The cable management The fanless optimization The dust 1 Take the SSD HDD support available in the box of accessories The storage 1 2 20 2 Screw the support with the screws x4 available in the bag ASSY ...

Страница 21: ...ion The dust 1 Prepare your motherboard Place the processor and the memories on your motherboard 2 Prewire all the cables for the power SATA M2 fans front panel extension etc Refer to the user manual provided with your motheboard to find the right locations The motherboard 21 3 Use the NVMe cooler if you have a M2 drive Simply remove the protective film and place the cooler on the M2 Picture to co...

Страница 22: ...e 2 2 The cable management The fanless optimization The dust 4 Place the case horizontally on the desk table remove the protective film on the CPU cooler and mount the bracket Intel or AMD onto the cooler The motherboard 22 5 Mount the screws available in the bag CPU The assembly is the same for AMD and Intel processors except for TR4 pictures to come ...

Страница 23: ...he cable management The fanless optimization The dust 6 Use the screws available in the bag CPU for your bracket Place the spacers first the screws then The motherboard 23 7 Since your case is placed horizontally you can also put the protective pads provided in the bag ASSY on the feet of the case in order to prevent your desk from scratching Picture to come ...

Страница 24: ... card With spreader Without spreader The storage 2 2 The cable management The fanless optimization The dust 8 Connect the cables of the front panel on the motherboard Refer to the user manual provided with your motheboard to find the right locations The motherboard 24 9 Connect the riser on the motherboard ...

Страница 25: ...upply The storage 1 2 The motherboard The graphic card With spreader Without spreader The storage 2 2 The cable management The fanless optimization The dust 10 Put some thermal grease on the processor The motherboard 25 11 Place the motherboard on the cooler ...

Страница 26: ...therboard The graphic card With spreader Without spreader The storage 2 2 The cable management The fanless optimization The dust The motherboard 26 12 Screw tight the motherboard with the screws available in the bag CPU Place first the spacers then the springs and finally the thumbnuts ...

Страница 27: ... card 27 1 Prepare your graphic card by removing the cooler and if necessary the backplate The backplate should not be in contact with the top of the case not with the heatsink Please refer to our video The Beast EP03 at 4 00 for a detailed view of the process 2 Connect the PWM adapter if you plan to use fans refer to the user manual of your graphic card to find the right location 3 Clean up the c...

Страница 28: ... 2 2 The cable management The fanless optimization The dust 4 If you have a spreader remove the adhesive film on the cooler block You can place the case horizontally for easier assembly The graphic card 28 5 Put some thermal grease on the two bracket plates you can use a brush to spread the grease 6 Place the spreader onto the cooler block With spreader ...

Страница 29: ... storage 1 2 The motherboard The graphic card With spreader Without spreader The storage 2 2 The cable management The fanless optimization The dust The graphic card 29 7 Screw the spreader on the cooler block with the screws available in the bag GPU SP With spreader ...

Страница 30: ... provided with your spreader please refer to the user manuals provided by EKWB With spreader Spreader 001 RTX 2080 Ti User Manual Spreader 002 RTX 2070 2080 2080 Ti User Manual Spreader 003 RTX 3080 3080 Ti 3090 TUF User Manual Spreader 004 RTX 3080 3080 Ti 3090 XC3 User Manual Spreader 006 RTX 3080 3080 Ti 3090 Trinity User Manual Spreader 007 RTX 3080 3080 Ti 3090 Strix User Manual Spreader 008 ...

Страница 31: ...The motherboard The graphic card With spreader Without spreader The storage 2 2 The cable management The fanless optimization The dust The graphic card 31 9 Put some thermal grease on the chip of the card With spreader 10 Place the graphic card onto the cooler block and spreader ...

Страница 32: ... spreader Without spreader The storage 2 2 The cable management The fanless optimization The dust The graphic card 32 11 Make sure the contact between the spreader and the graphic card is good With spreader 12 Screw the graphic card with the screws available in the bag GPU SP Place the spacers first then the screws ...

Страница 33: ... storage 1 2 The motherboard The graphic card With spreader Without spreader The storage 2 2 The cable management The fanless optimization The dust The graphic card 33 13 Connect the riser on the graphic card With spreader 14 Plug the power cables on the graphic card ...

Страница 34: ...2 The cable management The fanless optimization The dust The graphic card 34 4 If you do not have a spreader remove the adhesive film on the GPU cooler block You can place the case horizontally for easier assembly Without spreader 5 Mount the 4 screws provided in the bag GPU NSP Be careful to place the bracket on the correct side See the shape of the holes ...

Страница 35: ... 35 6 Check the position of the screws by placing your bracket onto your graphic card It will be helpful before placing the other parts You can mark their position with a pen if needed Be sure to leave enough space for the riser as well as for the taped heatsinks on the memories Without spreader 7 Assemble the metallic washers and the spacers Mount tight if necessary you can use a wrench to grimp ...

Страница 36: ...erboard The graphic card With spreader Without spreader The storage 2 2 The cable management The fanless optimization The dust The graphic card 36 8 Screw the bracket onto the cooler block with the dedicated screws available in the bag GPU NSP Without spreader 9 Prewire the graphic card ...

Страница 37: ... dust The graphic card 37 10 Assemble the thermal tapes and the VRM machined heatsinks 1 or 2 depending on your graphic card on the card Use the screws provided with the VRMs machined heatsinks Different spacers are available and can be used to adjust the height depending on your PCB Without spreader 11 Place the taped heatsinks on the memories by removing the protective adhesive on the thermal in...

Страница 38: ...he motherboard The graphic card With spreader Without spreader The storage 2 2 The cable management The fanless optimization The dust The graphic card 38 12 Put some thermal grease on the chip Without spreader 13 Mount the graphic card onto the cooler and place the plastic spacers ...

Страница 39: ...e 1 2 The motherboard The graphic card With spreader Without spreader The storage 2 2 The cable management The fanless optimization The dust The graphic card 39 14 Mount the thread adapters Stop screwing when you can see the long screws Without spreader 15 Place the springs ...

Страница 40: ...card With spreader Without spreader The storage 2 2 The cable management The fanless optimization The dust The graphic card 40 16 Mount the nuts tight up Screw until you can t screw anymore We recommend to tighten up all of them at the very end once they are all placed Without spreader 17 Connect the riser ...

Страница 41: ...nagement The fanless optimization The dust The storage 2 2 41 1 Remove the screw on the support for SSD HDD each part can handle 2x SSDs or 1x HDD 2 Place your storage on the support and screw it with the screws provided in the bag ASSY Place your storage like in the example here Prewire your storage The support should be already assembled into the case see The storage ...

Страница 42: ...motherboard The graphic card With spreader Without spreader The storage 2 2 The cable management The fanless optimization The dust 42 3 Screw the storage and its dedicated part onto the main support The support should be already assembled into the case see The storage The storage 2 2 ...

Страница 43: ...h spreader Without spreader The storage 2 2 The cable management The fanless optimization The dust The cable management 43 1 Connect all the cables to the power supply Carefully check that all of them are correctly plugged 2 Connect all the extended cables to the front panels Use the screws provided in the bag ASSY ...

Страница 44: ...n The LEDs on the front of the case will let you know if the PC is running 5 Everything is working well You can close the PC with the side panels Congratulations you made it The cable management The unboxing The box of accessories The fans The power supply The storage 1 2 The motherboard The graphic card With spreader Without spreader The storage 2 2 The cable management The fanless optimization T...

Страница 45: ...guration requires an optimization of the voltage and the power of the components The first reason is that reducing the voltage of the processor and or the graphic card and so the power supply will avoid having coil whine Indeed having a fanless PC is great until you hear this annoying noise from your components Whatever the components the coil whine is more common with low and mid range mostly wit...

Страница 46: ...lightly affect the performances of your configuration In most of the applications you won t even notice the difference between 5 10 loss depending on your card and the parameters Several tests are available in the videos below as well as in an article you can find following this link Many other videos can be found online More power doesn t mean more performances and a RTX 3070 at 220W will better ...

Страница 47: ...nagement The fanless optimization The dust 47 How to optimize your setup Many tutorials are available online and you will only need to download MSI AfterBurner for free We selected two tutorials below EN and FR and the team remains available to help you in this process Contact us by email at info monsterlabo com or join us on our Discord channel The fanless optimization ...

Страница 48: ...e it needs to be sucked at 2 5m s minimum while the natural airflow into the case is at 1m s This natural airflow will also avoid dust that could come from the top of the case the dust can t be scattered Of course if the case is not used for several months dust will get into the case The use of fans as with any other case will allow dust to gather into your case because of the blades that can suck...

Страница 49: ...49 www monsterlabo com info monsterlabo com ...

Отзывы: