6
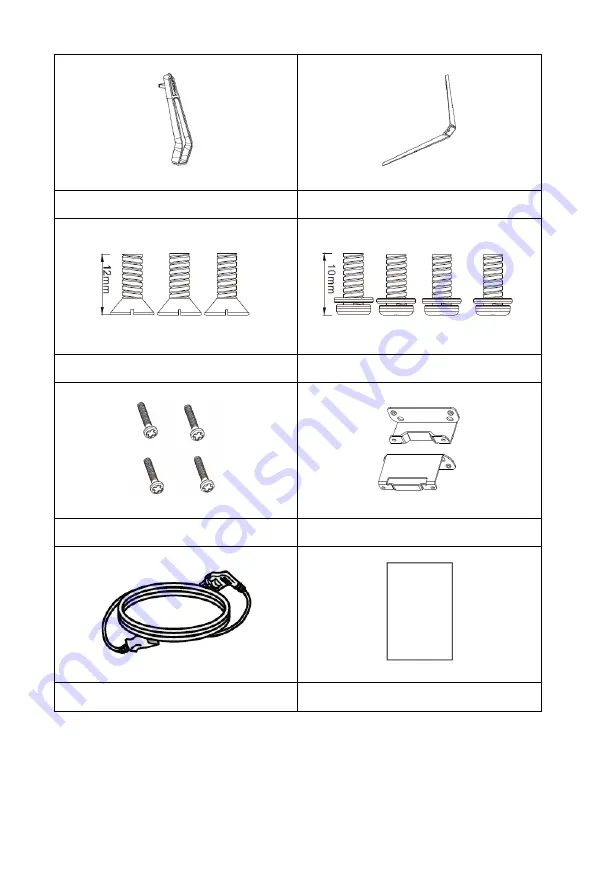
1x Stand Stem
1x Stand Base
3x K-Head Screws (M4x12)
4x P-Head Screws (M4x10)
4x Wall Mount Screws (Installed)
2x Wall Mount Adapters
1x AC Power Cord
1x User's Manual
Страница 1: ...35 UWQHD 100Hz Zero G Gaming Monitor P N 38035 User s Manual...
Страница 2: ...ICE 5 PACKAGE CONTENTS 5 PRODUCT OVERVIEW 7 Controls 7 Connections 8 INSTALLING THE STAND 8 REMOVING THE STAND 9 USING A WALL OR DESK MOUNT 10 OSD MENU MAP 10 TROUBLESHOOTING 14 TECHNICAL SUPPORT 15 S...
Страница 3: ...subject the product to extreme force shock or fluctuations in temperature or humidity Do not expose this device to excessively high temperatures Do not place it in on or near a heat source such as a...
Страница 4: ...ay for a long period of time Doing so could cause burn in of the image It is recommended to use a variable desktop background and to use a screen saver to prevent burn in Alternatively ensure that the...
Страница 5: ...econd to none If you have any problem with your order please give us an opportunity to make it right You can contact a Monoprice Customer Service representative through the Live Chat link on our websi...
Страница 6: ...6 1x Stand Stem 1x Stand Base 3x K Head Screws M4x12 4x P Head Screws M4x10 4x Wall Mount Screws Installed 2x Wall Mount Adapters 1x AC Power Cord 1x User s Manual...
Страница 7: ...the UP button to toggle the FPS gaming crosshairs in the middle of the screen on or off and to cycle through the four different crosshair styles 4 EXIT If a submenu in the OSD menu is displayed press...
Страница 8: ...powered speakers etc 9 DISPLAYPORT DisplayPort 1 2a video input 10 HDMI 1 HDMI 2 0 video input 11 HDMI 2 HDMI 1 4 video input 12 HDMI 3 HDMI 1 4 video input INSTALLING THE STAND Perform the following...
Страница 9: ...f the entire Stand Assembly insert the Stand Plate into the back of the monitor until it clicks into place Ensure that it is securely attached to the monitor 6 Remove the monitor with the attached Sta...
Страница 10: ...section above If the included stand was not installed press the Button on the rear of the monitor then remove the Stand Plate 3 Remove the four Screws revealed by the removal of the Stand Plate as sho...
Страница 11: ...Mode Standard Photo Movie Game FPS RTS Sets the picture mode Color Temperature Warm Cool User Sets the color temperature Low Blue Light 0 100 Sets the level of blue light filtering Hue 0 100 Adjusts t...
Страница 12: ...1 1 Auto Sets the screen aspect ratio LedMode Normal Off Flicker Adjusts the LED effects Multi Window Multi Window Off PIP Mode PBP 2Win Sets the multi window mode Sub Win2 Input DP HDMI 1 HDMI 2 HDMI...
Страница 13: ...rall transparency opacity of the OSD menu OSD Time Out 5 100 Sets the amount of time of inactivity before the OSD menu automatically closes OSD Rotation Normal 90 180 270 Rotates the orientation of th...
Страница 14: ...away Q4 There is color bleeding distortion or other unusual effects A4 Check the video cable connection Connect to another video source for comparison Inspect the condition of the ports on the monito...
Страница 15: ...mode etc Q11 The image position or size is incorrect A11 Check the settings in the monitor s OSD menu and PC display settings TECHNICAL SUPPORT Monoprice is pleased to provide free live online techni...
Страница 16: ...nt Size 100 x 100 AMD FreeSync Version 1 0 AMD FreeSync Refresh Rates HDMI 2 0 48 100 Hz HDMI 1 4 48 65 Hz DisplayPort 1 2 48 100 Hz Aspect Ratio 21 9 Viewing Angles H V 178 178 Backlight LED Default...
Страница 17: ...ed operation Modifying the equipment without Monoprice s authorization may result in the equipment no longer complying with FCC requirements for Class B digital devices In that event your right to use...
Страница 18: ...est conforme la norme NMB 003 du Canada HDMI the HDMI Logo and High Definition Multimedia Interface are trademarks or registered trademarks of HDMI Licensing LLC in the United States and other countri...