background image

I

NSTALLATION

 P

REPARATION

8

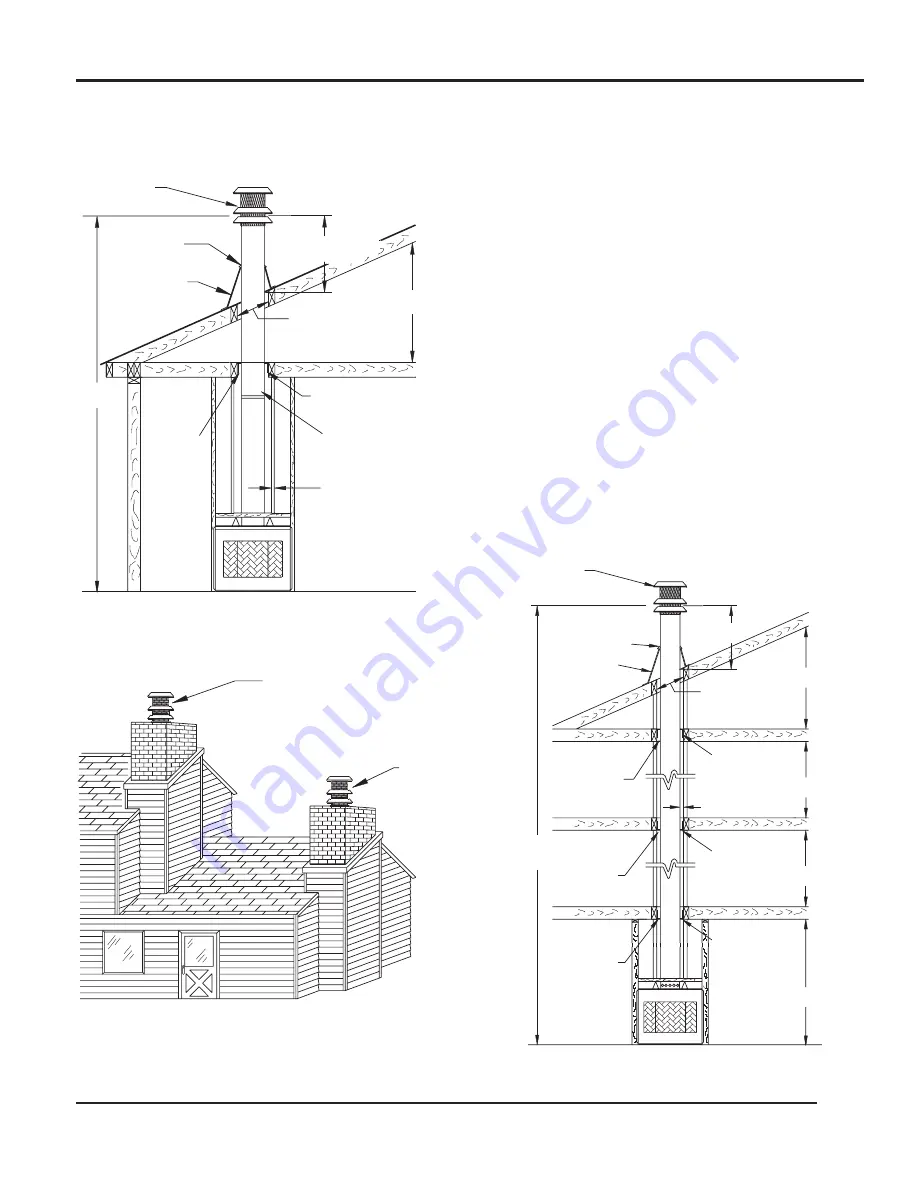
MULTIPLE STORY INSTALLATION

MULTIPLE STORY INSTALLATION

ATTIC SPACE

ATTIC SPACE

SINGLE STORY INSTALLATION WITH

SINGLE STORY INSTALLATION WITH

   POOR 
LOCATION

PREFERRED 
 LOCATION

2" MIN. CLEARANCE 

2" MIN. CLEARANCE 
TO COMBUSTIBLES

TO COMBUSTIBLES

"L" SERIES CHIMNEY COMPONENTS

"L" SERIES CHIMNEY COMPONENTS

FIRESTOP SPACER

FIRESTOP SPACER
LF-FS-2 (2" AIR SPACE

LF-FS-2 (2" AIR SPACE
CLEARANCE TO 

CLEARANCE TO 
COMBUSTIBLES

COMBUSTIBLES

17" SQUARE

17" SQUARE
OPENING

OPENING
IN JOIST

IN JOIST


18 FT MIN.

18 FT MIN.

SEE TABLE 1 FOR

SEE TABLE 1 FOR
ROOF OPENING

ROOF OPENING
SIZE

SIZE

3 FT. MIN. OR 2' ABOVE

3 FT. MIN. OR 2' ABOVE
ANY POINT WITHIN 10'

ANY POINT WITHIN 10'

ATTIC SPACE

ATTIC SPACE

FLUE OUTLET HEIGHT

FLUE OUTLET HEIGHT

STORM COLLAR

STORM COLLAR

FLASHING

FLASHING
(612 OR 1212)

(612 OR 1212)

LC CHIMNEY CAP

LC CHIMNEY CAP

FIRESTOP SPACER

FIRESTOP SPACER
LF-FS-2 (2" AIR SPACE

LF-FS-2 (2" AIR SPACE
CLEARANCE TO 

CLEARANCE TO 
COMBUSTIBLES)

COMBUSTIBLES)

17" SQUARE

17" SQUARE
OPENING IN

OPENING IN
JOIST

JOIST

17" SQUARE

17" SQUARE
OPENING IN

OPENING IN
JOIST

JOIST

(612 OR 1212)

(612 OR 1212)

FLUE OUTLET HEIGHT

FLUE OUTLET HEIGHT

2" CLEARANCE TO

2" CLEARANCE TO
COMBUSTIBLES (MIN.)

COMBUSTIBLES (MIN.)

3 FT. MIN.

3 FT. MIN.

HEIGHT - 86 FT. CHIMNEY

HEIGHT - 86 FT. CHIMNEY

MAX. INSTALLATION

MAX. INSTALLATION

SECOND FLOOR AREA

SECOND FLOOR AREA

FIRST FLOOR AREA

FIRST FLOOR AREA

THIRD FLOOR AREA

THIRD FLOOR AREA

ATTIC SPACE

ATTIC SPACE

MODEL LC

MODEL LC
CHIMNEY CAP

CHIMNEY CAP

STORM COLLAR

STORM COLLAR
(INCLUDED WITH CAP)

(INCLUDED WITH CAP)

FLASHING

FLASHING

17" SQUARE

17" SQUARE
OPENING IN

OPENING IN
JOIST

JOIST

SEE TABLE 1 FOR

SEE TABLE 1 FOR
ROOF OPENING SIZE

ROOF OPENING SIZE

FIRESTOP SPACER

FIRESTOP SPACER
LF-FS-2 (2" AIR SPACE 

LF-FS-2 (2" AIR SPACE 
CLEARANCE TO 

CLEARANCE TO 
COMBUSTIBLES

COMBUSTIBLES

FIRESTOP SPACER

FIRESTOP SPACER
LF-FS-2 (2" AIR SPACE

LF-FS-2 (2" AIR SPACE
CLEARANCE TO 

CLEARANCE TO 
COMBUSTIBLES)

COMBUSTIBLES)

F

IGURE

 7

F

IGURE

 8

F

IGURE

 9

53D9037. Rev 1 03/03

Содержание Radiant Wood Burning HWB800HB

Страница 1: ...HWB800HB MODEL RESIDENTIAL FIREPLACE INSTALLATION OPERATION AND MAINTENANCE MANUAL THIS FIREPLACE IS LISTED BY OMNI TEST LABORATORIES FOR USE WITH L SERIES CHIMNEY SYSTEM COMPONENTS 53D9037 Rev 1 03 03 ...

Страница 2: ...lure to install operate and maintain this or any other factory built fireplace properly can result in a house fire or other occurrences that could cause deaths injuries and property damages It is very important that the persons installing and or supervising the installation of this fireplace have appropriate skills in using the tools and techniques required and reading and comprehension skills suf...

Страница 3: ...s INTENDED PRODUCT USAGE The fireplace is designed to sit directly on a combustible floor The fireplace must be installed with clearances to combustible building materials specified in this manual Only parts manufactured by Monessen Hearth Systems and labeled for use with the fireplace should be used in the installation of this fireplace except for special roof flashings that may be fabricated loc...

Страница 4: ...lose the damper When the fireplace is not in use the damper should be closed to prevent cold air form entering the chimney as well as preventing warm air in the room from escaping up the chimney NOTE It is normal for a small amount of smoke to be released from the upper portion of the fireplace the first few times you use your new fireplace This results from an oil residue on the metal Open a door...

Страница 5: ...EL LC CHIMNEY CAP ROOF FLASHING ROOF FLASHING MODEL 612 MODEL 612 CAUTION CAUTION DO NOT RESTRICT SIDE AIR DO NOT RESTRICT SIDE AIR INLET VENTS WITH SURROUND INLET VENTS WITH SURROUND OR TRIM MATERIALS OR TRIM MATERIALS GALVANIZED METAL STRIP GALVANIZED METAL STRIP NAIL TO FRAMING MEMBERS NAIL TO FRAMING MEMBERS SB6000 SB6000 FIREPLACE MODEL FIREPLACE MODEL FLEXIBLE DUCT TYPE FLEXIBLE DUCT TYPE FP...

Страница 6: ... SERIES CHIMNEY SECTIONS 47 5 8 47 5 8 47 47 L48 L48 35 5 8 35 5 8 35 35 17 5 8 17 5 8 17 17 11 5 8 11 5 8 11 11 L18 L18 L36 L36 L12 L12 L18 L18 L18 L18 34 5 8 34 5 8 34 LINEAR GAIN 34 LINEAR GAIN L18 L18 L36 L36 52 LINEAR GAIN 52 LINEAR GAIN 52 5 8 52 5 8 L36 L36 L36 L36 70 5 8 70 5 8 70 LINEAR GAIN 70 LINEAR GAIN 13 O D 13 O D OUTER PIPE OUTER PIPE 11 I D FLUE 11 I D FLUE 4 1 2 4 1 2 4 1 2 4 1 2...

Страница 7: ...lls and some suggested fireplace locations When selecting a location choose one that is away from frequently opened doors central heat outlets or returns or other places where air movements may disturb the airflow around the fireplace Air turbulence near the fireplace may cause smoke to spill out of the fireplace opening 6 FIGURE 4 FIGURE 5 FULL PROJECTION FULL PROJECTION FLUSH FLUSH CORNER CORNER...

Страница 8: ...ted as shown by Figure 6 Failure to insulate the fireplace form outside temperatures will cause heat loss through and around the fireplace INSTALLATION PREPARATION 7 FIGURE 6 53D9037 Rev 1 03 03 8 0 8 0 LEVEL LEVEL SOLID SOLID SURFACE SURFACE FIRESTOP SPACER FIRESTOP SPACER SEE NOTES SEE NOTES JOIST INSULATE SAME JOIST INSULATE SAME AS CEILING AS CEILING NOTES NOTES 1 MODEL LF FS 2 FIRESTOP 1 MODE...

Страница 9: ...R SPACE LF FS 2 2 AIR SPACE CLEARANCE TO CLEARANCE TO COMBUSTIBLES COMBUSTIBLES 17 SQUARE 17 SQUARE OPENING IN OPENING IN JOIST JOIST 17 SQUARE 17 SQUARE OPENING IN OPENING IN JOIST JOIST 612 OR 1212 612 OR 1212 FLUE OUTLET HEIGHT FLUE OUTLET HEIGHT 2 CLEARANCE TO 2 CLEARANCE TO COMBUSTIBLES MIN COMBUSTIBLES MIN 3 FT MIN 3 FT MIN HEIGHT 86 FT CHIMNEY HEIGHT 86 FT CHIMNEY MAX INSTALLATION MAX INSTA...

Страница 10: ... floor must be constructed with rigid insulation which floor must be constructed with rigid insulation which has a minimum R value of 1 16 or a K value of has a minimum R value of 1 16 or a K value of 0 43 The insulation must be covered with a 0 43 The insulation must be covered with a non combustible covering such as a tile stone non combustible covering such as a tile stone marble or a piece of ...

Страница 11: ...s Example K 86 multiplied by 1 2 50 K 43 R The material thickness divided by K Example R 1 2 50 divided by 43 R 1 16 FLOOR PROTECTION With either type hearth extension minor shifting of the supporting floor or expansion and contraction may eventually cause a crack to develop between the hearth extension and the face of the fireplace To help prevent the crack from developing the hearth extension ma...

Страница 12: ...t each ceiling or floor level 17 inch firestop spacer One required at each ceiling or floor level 6 12 12 12 pitch flashing for contemporary installation 6 12 12 12 pitch flashing for contemporary installation 0 6 12 pitch flashing for contemporary installation 0 6 12 pitch flashing for contemporary installation Round telescoping chimney cap For use with flat chase top terminations Round telescopi...

Страница 13: ...he fireplace and chimney CHIMNEY INSTALLATION In order to assure safe and satisfactory performance of the fireplace it is very important to properly install the chimney This is an important part of the installation and the sections of this manual pertaining to chimney installation should be reviewed very thoroughly For your safety some of the important things to remember in regard to chimneys are ...

Страница 14: ...acer should be installed at the floor level of the attic You must have joists or headers on all four sides of the spacer and use a minimum of four 8 penney nails to secure the spacer 3 To install the L series chimney sections insert the male end of the flue the smallest diameter pipe into the flue outlet of the fireplace and press down until the snap locks engage Continue the process adding the ch...

Страница 15: ... FIRESTOP SPACER AT FLOOR LEVELS INSTALLATION OF FIRESTOP SPACER AT ATTIC LEVEL INSTALLATION OF FIRESTOP SPACER AT ATTIC LEVEL FLUE PIPE FLUE PIPE FLUE PIPE FLUE PIPE FIRESTOP SPACER FIRESTOP SPACER FLOOR JOIST FLOOR JOIST HEADER HEADER CHIMNEY SECTION CHIMNEY SECTION INLET AIR PIPE INLET AIR PIPE FIRESTOP SPACER FIRESTOP SPACER CHIMNEY SECTION CHIMNEY SECTION CEILING JOIST CEILING JOIST INLET AIR...

Страница 16: ...ATION SEQUENCE 1 Determine the location and amount of offset required then select the combinations of chimney sections and elbows required from the offset chart Refer to Page 18 2 Install the first LE30 elbow by placing the extended flue into the mating part of the fireplace or chimney section Push down until the outside or inlet air duct of the elbow overlaps and the snaps lock the elbow into the...

Страница 17: ... SPACER FIRESTOP SPACER DIAGONAL DIAGONAL CHIMNEY CHIMNEY ENCLOSURE ENCLOSURE RISE RISE C L FIRESTOP FIRESTOP SPACER SPACER 2 AIR SPACE 2 AIR SPACE CLEARANCE TO CLEARANCE TO COMBUSTIBLES COMBUSTIBLES SUPPORT STRAPS SUPPORT STRAPS DIAGONAL CHIMNEY DIAGONAL CHIMNEY ENCLOSURE ENCLOSURE OFFSET MAX 10 OFFSET MAX 10 DIAGONAL CHIMNEY ENCLOSURE DIAGONAL CHIMNEY ENCLOSURE FASTEN ALL SUPPORT FASTEN ALL SUPP...

Страница 18: ...the flashing over the chimney Adjust the chimney to assure that the proper minimum clearances are maintained 5 Nail the flashing securely in place with eight nails 6 Seal the crack between the top of the flashing and the chimney with mastic Leave some excess mastic at this area to be used in step eight NOTE Use pliers and wear gloves when performing step seven to minimize the danger of cutting you...

Страница 19: ...S 4 0 0 1 0 1 1 0 1 1 0 2 1 0 2 1 0 2 1 3 2 1 3 2 1 3 2 4 3 2 4 3 2 4 3 5 4 3 5 4 3 5 4 6 5 4 6 5 4 6 5 7 6 5 7 6 5 7 6 8 3 1 0 0 1 0 0 2 0 1 2 0 1 3 0 2 3 1 2 0 1 3 0 2 3 1 2 0 1 3 0 2 3 1 2 0 1 3 0 2 3 1 2 0 1 3 0 2 3 1 2 0 1 3 0 2 3 1 2 0 1 1 2 0 1 0 1 0 1 0 1 0 1 0 1 0 1 0 1 0 1 0 1 0 1 0 1 0 1 0 1 0 1 0 1 0 1 0 1 0 1 0 1 0 1 0 1 0 0 0 1 0 1 0 1 0 1 0 1 0 1 0 1 0 2 0 0 1 0 0 1 0 0 0 0 0 0 0 0 ...

Страница 20: ...ction of flue pipe and lower it down until the 3 cap legs rest on the top edge of the outer telescope pipe Secure legs of cap to the telescope with screws provided 7 Check all parts of the chimney and chimney cap to assure that no parts have been damaged or bent during installation and that all parts have been installed properly NOTE The metal used for the chimney and chimney cap has a rust protec...

Страница 21: ... OUTSIDE AIR STARTING COLLAR TO LEFT SIDE OF FIREPLACE WITH COLLAR TO LEFT SIDE OF FIREPLACE WITH FOUR SHEET METAL SCREWS PROVIDED FOUR SHEET METAL SCREWS PROVIDED NOTE THE STARTING COLLAR EXTENDS NOTE THE STARTING COLLAR EXTENDS THROUGH THE OUTER FIREPLACE JACKET THROUGH THE OUTER FIREPLACE JACKET AND WILL SEAL AGAINST THE FIREBOX AND WILL SEAL AGAINST THE FIREBOX WALL WHEN SECURED AS INDICATED W...

Страница 22: ...o be accidentally blocked in any manner The assembly should be located above the snow line to prevent blockage by snow accumulation 3 The combustion air inlet assembly should never be mounted in a garage or storage area where combustible fumes such as gasoline might be drawn into the fireplace 4 Combustion air can be drawn form the crawl space under a house when an adequate supply of air is provid...

Страница 23: ...of the wall to which the AK 4 inlet air vent will be attached The duct may be cut with a standard pocket knife use FP 4 U duct for maximum efficiency and safety Do not use a combustible duct Always use UL Listed Class 0 or 1 duct material 5 If the duct is the insulated type push the insulation back from one end of the duct approximately two inches 6 Slip the exposed end of the duct over the starti...

Страница 24: ...A Z21 11 2 are to be installed in this fireplace WARNING Do not operate an unvented gas log set in this fireplace with the chimney removed The installer of the fireplace and gas appliance must describe the operation of the fireplace and appliance to the people who will be operating them and leave all instruction manuals with the operator of the appliance 2 An approved gas shut off valve must be lo...

Страница 25: ...r overlap the sides of the fireplace face Seal the face of the fireplace to the surrounding wall with non combustible caulk or trim materials to prevent cold air leakage around the fireplace The trim should not block or restrict in any way the flow of air into the side air inlets in the face of the fireplace Be sure to provide the required floor protection as described in a preceding section of th...

Страница 26: ...T DO NOT RESTRICT SIDE AIR INLETS SIDE AIR INLETS 2 1 2 2 1 2 REF REF EXTEND LINE FROM OPPOSITE EXTEND LINE FROM OPPOSITE REAR CORNER OF FIREBOX REAR CORNER OF FIREBOX PAST INSIDE OPENING OF THE PAST INSIDE OPENING OF THE FRONT FACE SIDE PANEL FRONT FACE SIDE PANEL OUTLINE OF OUTLINE OF FIREPLACE FIREPLACE FIREBRICK FIREBRICK TOP EDGE OF FIREPLA OP EDGE OF FIREPLACE CE COMB COMBUSTIBLE MANTEL USTI...

Страница 27: ...r wood goes a long way Start your fire with a mixture of softwood and hardwood then add some fruit or nut wood for nostalgic aroma Since most woods will not burn well when freshly cut the wood you purchase should be reasonably dry The sizes you buy are dictated by the size of your fireplace Purchase logs that will fit when laid across your grate and ask that the larger heavier logs be split Kindli...

Страница 28: ...ss doors close them DO NOT LEAVE CHILDREN OR PHYSICALLY OR MENTALLY HANDICAPPED OR SENILE PERSONS ALONE WITH A BURNING FIREPLACE You ll need a minimum of three logs preferably four to make a good fire Add kindling and new logs as needed to rekindle a dying fire New logs should be added at the rear grate after raking the coals toward the front DO NOT OVERFIRE THE FIREPLACE Overfire conditions may b...

Страница 29: ...sote buildup has occurred If creosote has accumulated it should be removed to reduce the risk of a chimney fire The chimney cap can be removed for inspection maintenance and cleaning by removing three screws from the support legs and lifting upward When the fireplace is first in use inspect the chimney frequently and clean the chimney any time an accumulation is observed on the flue walls The freq...

Страница 30: ... of the fireplace 4 Do insulate the exterior walls surrounding the fireplace to prevent excessive heat loss from the fireplace 5 Do trim the face of the fireplace only with noncombustible materials 6 Do attach the noncombustible face trim material firmly to the face of the fireplace 7 Do block in or fasten the fireplace to prevent the possibility of the fireplace shifting out of position 8 Do encl...

Страница 31: ... gases or pressurized containers near the fireplace 16 Don t neglect to instruct all responsible persons in the proper and safe operation of the fireplace 17 Don t fail to instruct all persons especially children and elderly persons concerning the hazards of improper operation and unauthorized tampering with the fireplace 18 Don t use this fireplace to burn paper cardboard or other debris 19 Don t...

Страница 32: ...GHT FIRE BRICK BACK ASSEMBLY FIRE BRICK BACK ASSEMBLY HANDLE DAMPER HANDLE DAMPER FIRE BRICK RT SIDE ASSEMBLY FIRE BRICK RT SIDE ASSEMBLY HEARTH REFRACTORY HEARTH REFRACTORY KEY NO NO 1 2 3 4 5 6 7 8 9 10 31 PARTS DIAGRAM AND LIST FIGURE 27 All repair part orders should be placed through your local dealer To ensure prompt and accurate service please provide the following information when placing a...

Страница 33: ...32 NOTES 53D9037 Rev 1 03 03 ...

Страница 34: ...mponents Cracks in ceramic and castable parts that do not affect safe operation We do not warrant this fireplace to be in compliance with your local building code Building codes vary greatly throughout the country and you should determine whether your local building code contains restrictions on the use of this fireplace before you purchase it Blowers or fans which are warranted separately Heat lo...

Страница 35: ... 1 Contact the nearest dealer If you cannot locate your dealer call or write Monessen Hearth Systems as indicated below 2 If you do not receive satisfactory service from the dealer within a reasonable time write Monessen Hearth Systems and include the date you purchased your fireplace or component its serial number and details of the problem you are having Technical Service Department 2813 W Mall ...

Страница 36: ...ATTENTION APPLIANCE INSTALLER PLEASE RETURN THESE OPERATING AND INSTALLATION INSTRUCTIONS TO THE CONSUMER 53D9037 REV 1 03 03 ...

Отзывы: