background image

Hand Crimp Tool for Pitch SPOX Crimp Terminals 

Doc. No: 6382819HM 

Release Date: 04-25-17 

UNCONTROLLED COPY


Page 3 of 7 

Revision: D 

Revision Date: 01-08-19 

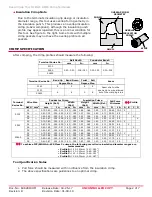
WIRE 

PUNCH 

TERMINAL 

WIRE STOP 

BLADE 

Figure 2 

Figure 3 

WIRE 

INSULATION 

PUNCH 

WIRE STOP 

BLADE 

CONDUCTOR 

PUNCH 

LOCATOR 

TERMINAL 

INSULATION ANVIL 

CONDUCTOR ANVIL 

Notes 


1.


This tool should only be used for the terminals and wire gauges specified on this sheet. 

2.


This tool is not adjustable for crimp height; however, crimp force is adjustable (See instructions 
above). Variations in tools, terminals, wire stranding and insulation types may affect crimp 
height. 

3.


This tool is intended for standard conductor sizes. It may not give a good insulation crimp 
support for all insulation sizes. 

4.


Molex does not repair hand tools (see warranty above). The replacement parts listed are the 
only parts available for repair. If the handles or crimp tooling are damaged or worn, a new tool 
must be purchased. 

5.


Pull force should be used as the final criterion for an acceptable crimp. Pull force is measured 
with no influence from the insulation crimp. The insulation should be stripped long (1/2”) so 
that the insulation grips on the terminal do not grip the wire insulation or the conductor. Refer 
to Molex Quality Crimping Handbook 63800-0029 for additional information on crimping and 
crimp testing. 

6.


Molex does not certify crimp hand tools. 


OPERATION 

 
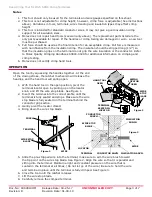
Open the tool by squeezing the handles together. At the end 
of the closing stroke, the ratchet mechanism will release the 
handles, and the hand tool will spring open. 
 

1.


With the hand tool in the open position, pivot the 
terminal locator open by pulling up on the locator 
knob, and lift the wire stop blade. See Figure 1. 

2.


Insert the terminal into the correct profile until the 
terminal is fully seated and stops. Make sure the wire 
stop blade is fully seated on the terminal behind the 
conductor grip section. 

3.


Gently pivot the locator closed. 

4.


Bring down the wire stop blade. 


5.


Slide the pre-stripped wire into the terminal; make sure to aim the wire brush toward 
the tip point on the wire stop blade. See Figure 2. Align the wire so that it is parallel and 
sitting into the terminal. Maintain a light and constant pressure on the wire that is 
seated in the terminal at all times. (Do not let go of the wire.) Be sure to hold the wire 
and terminal in place until the terminal is fully crimped. See Figure 3. 

6.


Close the tool until the ratchet releases. 

7.


Lift the wire stop blade. 

8.


Carefully remove the crimped terminal. 

TERMINAL 

SEATED IN 

LOCATOR 

SWING 

LOCATOR 

OPEN 

Figure 1 

HAND TOOL 

OPEN 

WIRE 

STOP 

BLADE 

Содержание 63828-1900

Страница 1: ...nt as indicated on page 2 This tool is RoHS compliant SCOPE Products 2 50mm 098 Pitch SPOX Wire to Board and Wire to Wire Crimp Terminal 22 28 AWG Terminal Series No Terminal Order No Wire Size 2 Insulation Diameter Strip Length Loose Piece 1 Reel AWG mm mm In mm In 5103 08 70 0057 08 70 0056 39 00 0188 22 28 1 15 1 90 045 075 2 60 3 20 102 126 08 70 0059 08 70 0058 39 00 0387 39 00 0189 08 700 05...

Страница 2: ...ht Ref Width Ref AWG mm2 mm In mm In mm In mm In N Lb A B C D 5103 22 0 73 0 80 029 031 1 40 055 1 68 066 1 80 071 44 48 10 0 X 24 0 67 0 74 026 029 1 40 055 1 57 062 1 80 071 28 91 6 5 X 26 0 63 0 69 025 027 1 40 055 1 42 056 1 50 059 17 79 4 0 X 28 0 61 0 67 024 026 1 40 055 1 42 056 1 50 059 11 12 2 5 X 5263 22 0 73 0 80 029 031 1 40 055 1 68 066 1 80 071 44 48 10 0 X 24 0 67 0 74 026 029 1 40 ...

Страница 3: ...re insulation or the conductor Refer to Molex Quality Crimping Handbook 63800 0029 for additional information on crimping and crimp testing 6 Molex does not certify crimp hand tools OPERATION Open the tool by squeezing the handles together At the end of the closing stroke the ratchet mechanism will release the handles and the hand tool will spring open 1 With the hand tool in the open position piv...

Страница 4: ... correct position See Figure 5 5 Gently pivot the locator open without disturbing the location 6 Hold the locator firmly in place and slowly tighten the M4 BHCS MAINTENANCE It is recommended that each operator of the tool be made aware of and responsible for the following maintenance steps 1 Remove dust moisture and other contaminants with a clean brush or a soft lint free cloth 2 Do not use any a...

Страница 5: ...iod of 30 days Should such a defect occur Molex will repair or exchange the tool free of charge This repair or exchange will not be applicable to altered misused or damaged tools This tool is designed for hand use only Any clamping fixturing or use of handle extensions voids this warranty CAUTION Repetitive use of this tool should be avoided CAUTIONS 1 Manually powered hand tools are intended for ...

Страница 6: ...his tool It may cause severe injury CAUTION Wear safety glasses when operating or serving this tool The chart below shows all applications for this modular crimp head Tool Order No Tool Description Adapter Order No Adapter Description Figure No 63816 0000 Hand Crimp Frame Short 6 63816 0050 Hand Crimp Frame Long 6 63816 0270 Battery Power Tool 110 V 63816 0600 Battery Power Crimp Adapter 7 63816 0...

Страница 7: ...ty 1 63828 1970 Modular Crimp Head 1 2 63816 0000 Hand Crimp Frame Short 1 3 63828 1975 Locator 1 4 63816 0001 Locking Pin 2 5 63600 0525 Handle Spring 1 6 63600 0520 Crimping Spring 2 Application Tooling Support Phone 402 458 TOOL 8665 E Mail applicationtooling molex com Website www molex com applicationtooling Molex is a registered trademark of Molex LLC in the United States of America and may b...

Отзывы: