QPix 420 Colony Picking System User Guide
90
5031496 G
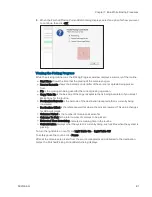
Viewing the Settings Summary
The Settings Summary window contains a full summary of the picking routine settings.
Review the summary details to make sure that the settings and options are configured correctly
for the picking routine. If you must make changes, click Back until you return to the window
where the changes can be made.
To print the summary, click Print.
To run the picking routine, click Next.
Changing the Picking Head
The Change Head window reminds you which picking head must be loaded, based on the
Setting Summary routine you configured, and provides you an opportunity to change the head.
The head is housed in a unique actuator system that permits easy exchange and set-up of the
head.
Although it is possible to manually move the actuator assembly, you should use the software to
safely move the actuator into position to remove or install the head.
WARNING! PINCH HAZARD.
The actuator assembly has moving parts that can
cause pinch injuries if it is moved manually. To prevent pinch injuries, use the software
Change Head process to safely move the actuator.
To change the picking head:
1. Click Move to Load Position to move the picking head arm to the loading position.
2. When the message displays, make sure that the bed is clear of obstructions and that the
door is closed, and then click OK to move the actuator into position near the front of the
instrument.
3. Open the front door.
4. Install the picking head.
To remove an installed head, unscrew and remove the thumbscrew and washer on the
left that secures the head to the actuator assembly. Then, grab the handle on the right
and slide the head out of the actuator.
Before storing the head, or whenever it needs cleaning, wipe the exterior of the head
with a cloth using 70% ethanol. To store the head, slide it into its metal cover with the
pins facing inward and then secure it in place with the thumbscrew and washer.
To install a head, hold the head by its handle with the pins pointing down and then slide
the head into the actuator assembly from the right. Then, attach the thumbscrew and
washer on the left and hand tighten the thumbscrew to secure the head to the actuator.
5. Close the front door.
6. Click Move to Park Position to move the picking head arm to the run ready park position.
7. When the message displays, make sure that the bed is clear of obstructions and that the
door is closed, and then click OK to home the actuator to its starting position.
8. To run the picking routine, click Next.
Содержание QPix 420
Страница 1: ...5031496 G August 2022 QPix 420 Colony Picking System User Guide...
Страница 6: ...QPix 420 Colony Picking System User Guide 6 5031496 G...
Страница 20: ...QPix 420 Colony Picking System User Guide 20 5031496 G...
Страница 30: ...QPix 420 Colony Picking System User Guide 30 5031496 G...
Страница 38: ...QPix 420 Colony Picking System User Guide 38 5031496 G...
Страница 62: ...QPix 420 Colony Picking System User Guide 62 5031496 G...
Страница 138: ...QPix 420 Colony Picking System User Guide 138 5031496 G...
Страница 156: ...QPix 420 Colony Picking System User Guide 156 5031496 G...
Страница 186: ...QPix 420 Colony Picking System User Guide 186 5031496 G...
Страница 194: ...QPix 420 Colony Picking System User Guide 194 5031496 G...
Страница 210: ...QPix 420 Colony Picking System User Guide 210 5031496 G...
Страница 214: ...QPix 420 Colony Picking System User Guide 214 5031496 G...
Страница 218: ...QPix 420 Colony Picking System User Guide 218 5031496 G...
Страница 222: ...QPix 420 Colony Picking System User Guide 222 5031496 G...
Страница 224: ...QPix 420 Colony Picking System User Guide 224 5031496 G...


