8
INSTALLATION
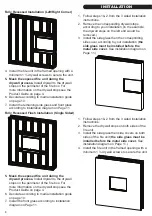
Fully Recessed Installation (Left/Right Corner)
Fully Recessed Flush Installation (Single Sided)
4. Install the
fi
re unit in the framed opening with a
minimum 1 ¼ drywall screws to secure the unit.
5. Mask the exposed
fi
re unit during the
drywall process.
Install drywall to the drywall
stops on the perimeter of the
fi
re box. For
more information on the drywall stops see the
Product Guide on page 4.
6. Decorate according to media installation guide
on page 10.
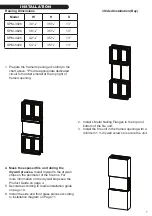
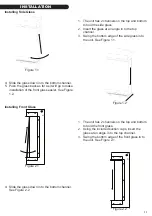
7. Install the remaining side glass and front glass
according to installation diagram on Page 11.
1. Follow steps 1 & 2 from the 3 sided installation
instructions.
2. Remove the drywall stops on both sides of the
fi
re unit.
3. Install the side glass then side covers on both
sides of the
fi
re unit (
the side glass must be
installed before the metal side cover.
See
installation diagram on Page 11.)
4. Install the
fi
re unit in the framed opening with a
minimum 1 ¼ drywall screws to secure the unit.
5. Mask the exposed
fi
re unit during the
drywall process.
Install drywall to the drywall
stops on the perimeter of the
fi
re box. For
more information on the drywall stops see the
Product Guide on page 4.
6. Decorate according to media installation guide
on page 10.
7. Install the front glass according to installation
diagram on Page 11.
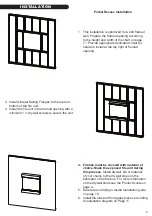
1. Follow steps 1 & 2 from the 3 sided installation
instructions.
2. Remove the corresponding drywall stops
according to your installation (in the example,
the drywall stops on the left end would be
removed.)
3. Install the side glass then the corresponding
side cover according to your installation (
the
side glass must be installed before the
metal side cover.
See installation diagram on
Page 11.)
Содержание Sedona Pro multi Series
Страница 18: ...18 MAINTENANCE NOTES ...
Страница 20: ...20 2019 www modernflames com Please dispose of properly V1 ...


