background image

English  16 


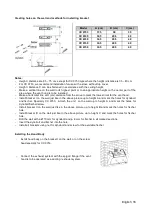
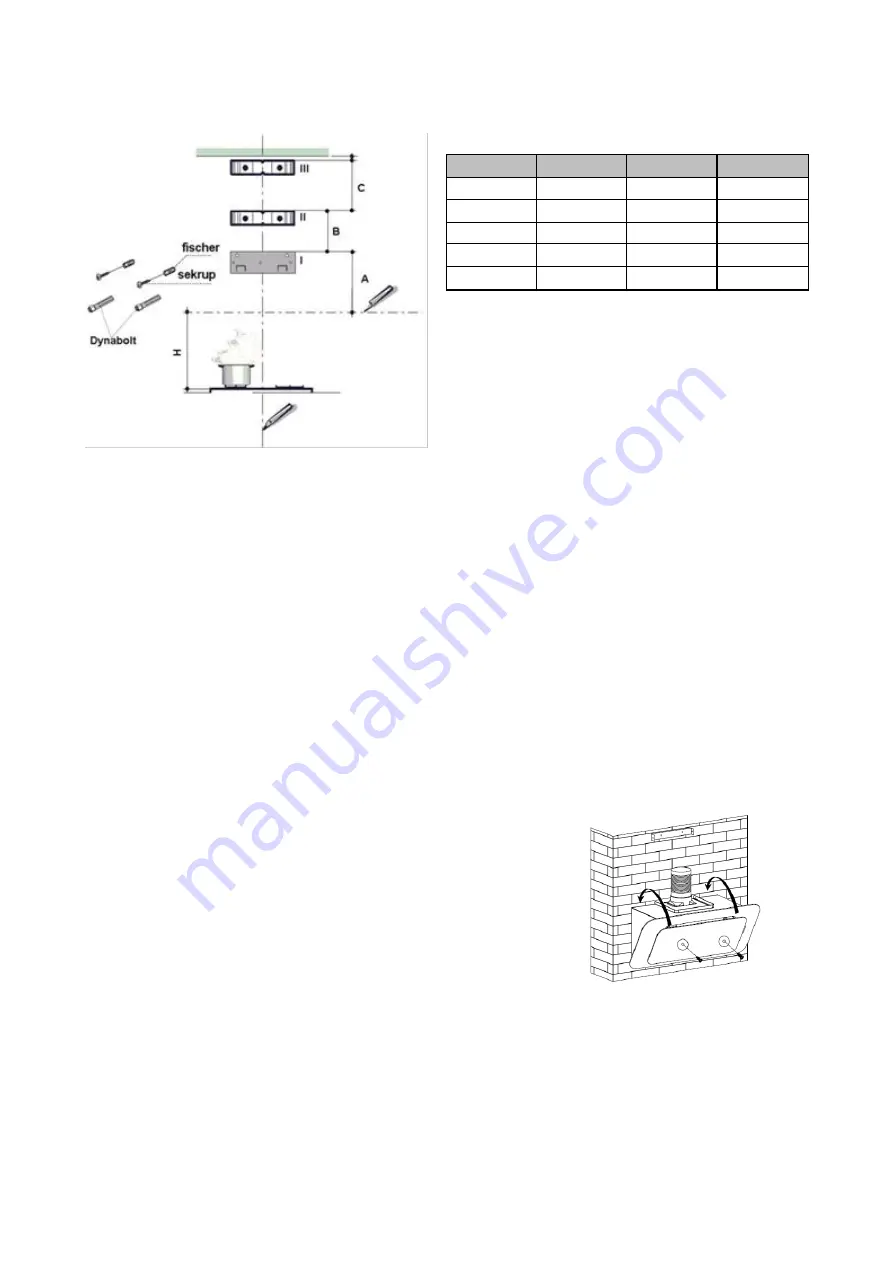
Creating holes on the wall and methods for installing bracket 


Model 

A (cm ) 

B (cm ) 

C (cm ) 

CX 9753 

37.5 

39 

39 

CX 9330 

34.5 

20.5 

49 

CX 6330 

34.5 

20.5 

49 

CX 9150 

34.5 

20.5 

49 

CX 6150 

34.5 

20.5 

49 


Note s: 


Height / distance are 65 

– 75 cm, except for CX 9753 type where the height / distance is 35 – 40 cm.  

For CX 9753, we recommend installation for use  with a stove without top cover.   

Height / Distance C can be shortened in accordance  with the ceiling height.  

Make a  vertical line on the wall to its highest point  or to an appropriate height  on the center  part of the 
area where the  vent hood is to be installed  

Make a horizontal line at H (cm) distance from the sto ve to mark the lowest limit for the  vent hood.   

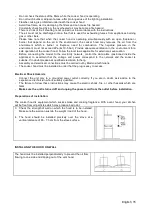
Install bracket I  on t he  wall just like in the above  picture  up to height A and mark the holes for  dynabolt 
and  fischer.  Specially  CX  9753,    Attach  the  unit    on  the  wall  up  to  height  A  and  mark  the  holes  for 
dynabolt/fischer/screw.   

Install  bracket II  on the  wall just like in the  above picture  up to  height B  and mark the holes  for  fischer 
hole.  

Install bracket  III  on the  wall just like in the above  picture up to height C  and mark the  holes for  fischer 
hole.  

Drill the  wall with a  Ø 10 mm for dy nabolt and 

ϕ

 8 mm  for  fischer in all marked sections.  

Insert the dynabolt and fischer into the hole.   

Install all brackets using nut for dynabolt and screw for the available fischer.   


Installing the Hood Body 


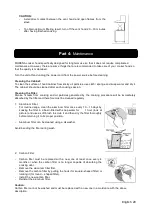
Install hood body on the bracket I on the  wall, or on the screw 
head specially for CX 9753.   


Connect the exhaust system with the spigot / flange if the  vent 
hood is to be operated as a ducting / exhaust system.  


Содержание CX 6150

Страница 1: ...Bahasa Indonesia 0 2016 ...

Страница 2: ...n rinci sehingga memudahkan Anda dalam menggunakan dan memanfaatkannya Agar produk ini dapat berfungsi normal dalam jangka waktu yang panjang kami sangat merekomendasikan agar buku ini tidak saja menjadi pegangan Anda sebagai pembeli namun juga sebagai panduan bagi siapa saja yang menggunakan dan mengoperasikannya sehingga keaweta n dan kualitas fungsionalnya lebih tahan lama Buku ini sangat disar...

Страница 3: ...R ISI HLM Kata Pengantar 1 Bagian 1 Nama nama Bagian 3 Bagian 2 Instalasi 3 Bagian 3 Cara Penggunaan 6 Bagian 4 Pemeliharaan 9 Bagian 5 Masalah Solusinya 10 Bagian 6 Spesifikasi 11 NOMOR 20 DJ ILMEA MG V 2000 728 ILMEA IX 2003 ...

Страница 4: ...innya Tudung hisap harus dibersihkan secara berkala agar daya kerjanya tetap terjaga Bersihkan tudung hisap sesuai petunjuk yang ada dalam buku ini dan hindarkan unit dari bahaya terbakar Dilarang memanggang langsung pada kompor gas Jagalah sirkulasi ruang dapur tetap baik Sebelum menghubungkan unit dengan sumber listrik pastikan kabel listrik dalam kondisi yang baik Jika terjadi kerusakan pada ka...

Страница 5: ...oker hood Ikuti peraturan setempat yang berlaku untuk evakuasi udara luar Sebelum menghubungkan unit dengan jaringan listrik periksa rating label terletak didalam unit untuk memastikan bahwa tegangan dan daya sesuai dengan tegangan dan daya dari sumber dan soket listrik Jika Anda ragu silakan menghubungi teknisi untuk bantuan Perakitan dan sambungan listrik harus dilakukan oleh teknisi Modena Pada...

Страница 6: ...a ketinggian A dan beri tanda untuk membuat lubang dynabolt dan fischer Khusus CX 9753 pasang tempelkan unit pada dinding hi ngga ketinggian A dan beri tanda untuk membuat lubang dynabolt baut sekrup Pasang bracket II pada dinding seperti pada gambar di atas hingga ketinggian B dan beri tanda untuk membuat lubang fischer Pasang bracket III pada dinding seperti pada gambar di atas hingga ketinggian...

Страница 7: ... apartemen 3 Penggunaan tudung hisap dengan sistim ducting sebaiknya pada ruangan yang terbuka dengan sistem sirkulasi udara yang baik Sistim RE CIRCULATING Pada versi ini tudung hisap bekerja dengan menghisap asap aroma masakan yang kemudian akan disaring melalui filter aluminium dan karbon filter secara berturut turut Asap yang telah disaring tersebut akan dialirkan kembali ke ruangan Beberapa h...

Страница 8: ... sedang Untuk menggunakan motor kecepatan tinggi Untuk mematikan dan menyalakan lampu TOMBOL ELEKTRONIK DISPLAY Untuk menyalakan dan mematikan tudung hisap Untuk mengatur kecepatan motor Rendah Sedang Tinggi Untuk mengaktifkan Shut off timer setelah 9 menit motor akan berhenti bekerja secara otomatis Untuk menyalakan dan mematikan lampu TOMBOL SENTUH ...

Страница 9: ...h 01 b Sentuh tombol sekali lagi tampilan layar akan menunjukkan dua digit terakhir akan berkedip yang menunjukkan pengaturan menit Kemudian atur dengan menekan menyentuh untuk menaikkan atau tombol untuk menurunkan Digit terbesar untuk jam adalah 59 Fungsi tidak akan bekerja jika melebihi 59 dan fungsi tidak akan bekerja jika telah mencapai batas bawah 00 Variabel angka untuk setiap kali tekan ad...

Страница 10: ...n baskom bak selama 1 jam lihat gambar dan gunakan sikat yang halus untuk membersihkannya kemudian keringkan filter sampai benar benar kering sebelum memasangnya kembali Filter aluminium dapat dicuci di dalam dishwasher Jangan membengkokkan filter pada saat mencucinya 2 Karbon Filter Karbon filter harus diganti dengan yang baru paling tidak setiap 4 bulan pemakaian atau jika karbon filter sudah ti...

Страница 11: ...adaan aktif Jarak tudung hisap dengan kompor terlalu dekat Sirkulasi udara tidak berjalan dengan baik Hubungi Service Center MODENA Lampu menyala tapi kipas tidak berfungsi Kipas macet Matikan unit dan perbaikan harus Hubungi Service Center MODENA Motor rusak Lampu dan kipas tidak menyala Bola lampu putus terbakar Ganti bola lampu dengan daya yang sesuai Kabel listrik lepas atau belum terpasang Hu...

Страница 12: ... 9150 CX 6150 Jenis Chimney Wall Chimney Wall Bahan kabinet Stainless Stainless Warna panel muka Stainless Stainless Jumlah motor 1 Turbo 1 Turbo Lampu 2 LED 2 LED Variasi kecepatan hisap 3 3 Ionizer Germinator Ya Ya Jenis filter Cassette Aluminum Carbon Vit C Cassette Aluminum Carbon Vit C Kontrol Push button Push button Tegangan listrik 220 240V 50Hz 220 240V 50Hz Daya listrik motor 190 W 190 W ...

Страница 13: ......

Страница 14: ...on in this manual to facilitate the users In order for this product to perform normally for an extended period of time we highly recommend not only the buyer to hold onto this manual but also those who wish to operate the product optimally to maintain its service period and quality This manual is recommended for use by anyone who operates this product We also provide a customer care service for MO...

Страница 15: ...English 13 CONTENTS PAGE Introduction 12 Part 1 Name of Parts 14 Part 2 Installation 14 Part 3 How to Use 17 Part 4 Maintenance 20 Part 5 Problem Solving 21 Part 6 Specification 22 ...

Страница 16: ...eep it away from the danger of being burnt No direct grilling on a gas stove Keep your kitchen remains good circulation Before connecting the unit to a power source make sure the power cord is in good shape If there is damage to the power cord the replacement must be performed by qualified personnel or contact the MODENA Service Center for replacement process The room should have good ventilation ...

Страница 17: ...work control the data plate positioned inside the appliance to ascertain that the voltage and power correspond to the network and the socket is suitable If in doubt please ask qualified electrician for help Assembly and electrical connections must be carried out by Modena technicians The cooker hood must be installed in order that the plug is easy to access Electrical Shock Hazards Connect the uni...

Страница 18: ...Install bracket I on the wall just like in the above picture up to height A and mark the holes for dynabolt and fischer Specially CX 9753 Attach the unit on the wall up to height A and mark the holes for dynabolt fischer screw Install bracket II on the wall just like in the above picture up to height B and mark the holes for fischer hole Install bracket III on the wall just like in the above pictu...

Страница 19: ...m 3 Hood with ducting system should be used in an open air room with good air circulation RECIRCULATING system In this version the vent hood sucks the smoke cooking odor and filters it through an aluminum filter and carbon filter The filtered smoke is then recirculated into the room This system is used if the premise renders it impossible to install a ducting system Several things which must be en...

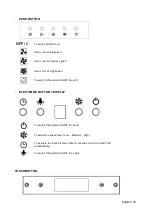
Страница 20: ...Use motor at high speed To switch ON and switch OFF the light ELECTRONIC BUTTON DISPLAY To switch ON and switch OFF the hood To adjust the speed level Low Medium High To activate the Shut off timer After 9 minuttes motor will switch off automatically To switch ON and switch OFF the Lamp TOUCH BUTTON ...

Страница 21: ...ot working when will not work if it has reached the lower limit of 00 The Variabel of numeric when every touch is 01 b Touch the button one more around 2 until 5 seconds the display will show the last two digits will blink which indicates for setting the minute Then adjust with touch the button to increase or the button for decrease The largest digit for minute is 59 and not working when exceeded ...

Страница 22: ... cooking procedure will be immediately absorbed by the filter and therefore must be cleaned regularly 1 Aluminium Filter For routine usage clean the aluminum filter once every 10 15 days by soaking the filter in a basin filled with soap water for 1 hour look at picture and use a soft brush to scrub it and then dry the filter thoroughly before returning it to its proper position Aluminum filter can...

Страница 23: ...e aluminum filter dry it and place it back on the vent hood Dirty carbon filter Replace the carbon filter foam with a new one Motor stop working after a while Safety thermal regulator is active The vent hood is installed too close to the stove Air circulation is not optimal Contact MODENA Service Center Light on but fan does not work The fan blade is jammed Switch of the unit and Contact MODENA Se...

Страница 24: ...mm 895x400x 770 1150 900x500x 580 1060 600x500x 580 1060 MODEL CX 9150 CX 6150 Hood type Chimney Wall Chimney Wall Cabinet Material Stainless Stainless Color of Front Panel Stainless Stainless Motor 1 Turbo 1 Turbo Lamp 2 LED 2 LED Speed 3 3 Ionizer Ya Ya Jenis filter Cassette Aluminum Carbon Vit C Cassette Aluminum Carbon Vit C Control type Push button Push button Voltage 220 240V 50Hz 220 240V 5...

Страница 25: ......

Отзывы: