


20
12. Receiver connection
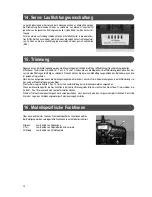
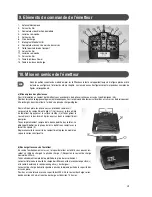
a) Assignment of the receiver outputs
The provided receiver has been prepared for the connection of JR or reverse-polar-
ity protected Futaba connectors.
When you connect servos, speed controllers or electrical switching components,
you must always make sure that the polarity of the individual servo connectors is
correct.
The connector with the pulse line (yellow, white or orange depending on the servo
manufacturer) must always be connected to the upper pin contact.
The connector with the negative line (black or brown depending on the servo manu-
facturer) must be connected to the lower pin contact.
The connector with the positive line (red) must be connected to the middle pin con-
tact.
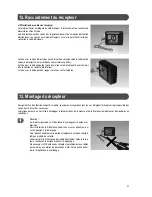
13. Installing the receiver
In order to ensure safe operation of the model, make sure the receiver is not exposed to blows, impacts, or vibration.
It is a proven method to wrap up the receiver in foamed material and to fix it inside the model using rubber bands.
Caution!
The receiver is equipped with an aerial wire of a specific length.
For this reason, you must not roll up the wire, form it into a loop, or cut
it off.
This would significantly reduce the range and pose a considerable
safety risk.
Install the aerial coming from the receiver on the outside of the model.
Attach it in a straight line on the tail unit.
Do not install the aerial wire parallel to live cables or metal push rods.
This could shield off the signal and thus cause reception losses.
Содержание MC50
Страница 50: ...47 ...