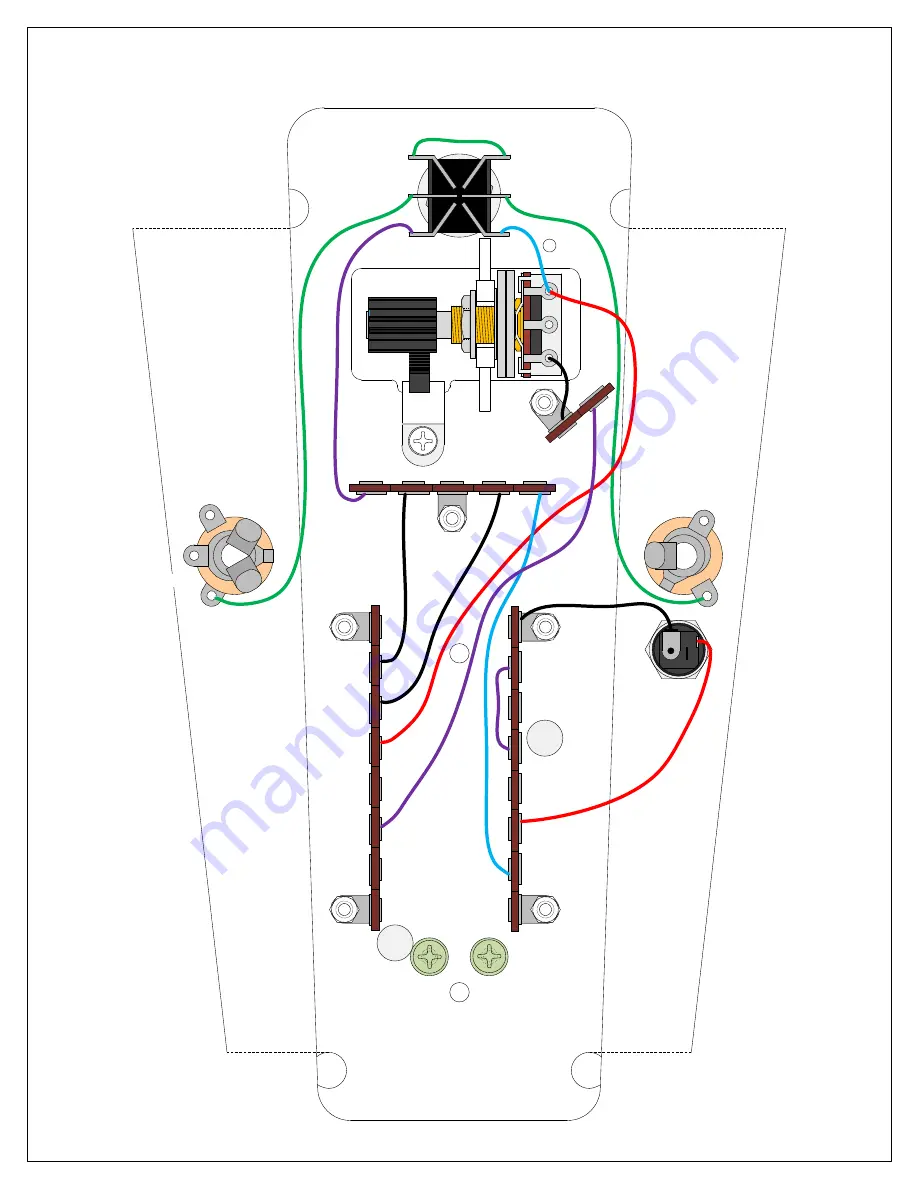
Output Jack
Input Jack
DRAWING 2
RING LUG
TIP LUG
DC Power
Jack
GROUND LUG
TIP
LUG
GROUND
INSIDE VIEW OF THE BASE ENCLOSURE
1
2
3
4
5
6
17
18
20
21
22
23
7
8
19
9
10
11
12
13
14
15
16
Страница 1: ...d the long life potentiometer manufactured specifically for use in wah pedals is included to provide years of smooth quiet operation Point to point construction allows advanced kit builders to easily...
Страница 2: ...Allen Wrench to tighten the tension adjustment screw 12 mm Wrench to fasten the wah pot in its mounting bracket Contact Cement or other adhesive to secure the tread and pedal bumpers TABLE OF CONTENT...
Страница 3: ...in 1 Rear Bumper 1 Front Bumpers 2 Bottom Cover 1 Wah Base 1 Treadle 1 Rubber Tread 1 Mounting Screws 2 M4 x 0 70 L 16 mm Rack Assembly Parts Rack 1 Small Screw 1 M3 x 0 5 L 12 mm Hex Nut 1 M3 x 0 5 S...
Страница 4: ...H Terminal Strip with 8 Terminals P 0802H 2 Terminal Strip with 2 Terminals P 0201H 1 Terminal Strip with 5 Terminals P 0501H 1 DPDT Foot Switch P H498 1 Battery Clip S H155 1 4 Screws 3 8 long S HS44...
Страница 5: ...k red gold 1K R A1D5K 1 1 5k Resistor W brown green red gold 1 5K R A10K 1 10k Resistor W brown black orange gold 10K R A22K 1 22k Resistor W red red orange gold 22K R A33K 1 33k Resistor W orange ora...
Страница 6: ...e a good solder joint Take your time with each connection and make sure that all components are connected and will remain connected if your project is bumped or shaken Bend the component lead or wire...
Страница 7: ...er holders at the toe end This will cushion the footswitch when turning the pedal on and off Front Bumper Holders Remove the backing from the rear bumper and mount it in the hole on top of the holder...
Страница 8: ...w with your fingers until its head is flush with the back of the L bracket Do NOT tighten this screw yet Slide the bearing pin out and set it aside The pillow block is now aligned for final assembly B...
Страница 9: ...f the adjustment screw with a 5 mm Allen wrench so that the treadle stays in place when you remove your foot and so that it suits your playing preference Base Assembly Looking at the inside surface of...
Страница 10: ...terminal 4 to pot lug 3 Do NOT solder the pot connection yet 8 Strip and tin a 1 piece of wire and connect pot lug 3 to footswitch lug 6 Now solder the pot connection 9 Strip and tin a 4 piece of wir...
Страница 11: ...f the wire and crimp it around the terminal with needle nose pliers 5 Connect the 33K resistor to terminals 20 and 21 6 Connect the 4 7 F cap and 100K resistor to terminals 19 and 21 Make sure the neg...
Страница 12: ...the full counter clockwise position If you measure the electrical resistance between pot lugs 1 and 2 with an ohm meter at this setting you should be measuring the pot s minimum resistance i e close t...
Страница 13: ...ay foam block Place the bottom cover over the base and attach the base using the feet and their mounting screws Fixing a Squeaky Wah If you find that your wah pedal is squeaking when you rock the trea...
Страница 14: ...Output Jack Input Jack DRAWING 1 RING LUG TIP LUG DC Power Jack GROUND LUG TIP LUG GROUND LUG INSIDE VIEW OF THE BASE ENCLOSURE 14...
Страница 15: ...ut Jack Input Jack DRAWING 2 RING LUG TIP LUG DC Power Jack GROUND LUG TIP LUG GROUND LUG INSIDE VIEW OF THE BASE ENCLOSURE 1 2 3 4 5 6 1 2 3 17 18 20 21 22 23 1 2 3 4 5 6 7 8 19 9 10 11 12 13 14 15 1...
Страница 16: ...GROUND LUG TIP LUG GROUND LUG INSIDE VIEW OF THE BASE ENCLOSURE 1 2 3 4 5 6 1 2 3 17 18 20 21 22 23 1 2 3 4 5 7 8 19 9 10 11 12 14 15 16 22 33K 4 7 F35V 68K 103K 400V 1 5K 103K 400V 470K 470K 1K 10K...