MobileDemand xTablet T1400 Скачать руководство пользователя страница 23


xTablet T1400 Users Guide


Getting Sta

rte

d


Auto Screen Rotation or Lock Screen Rotation for Windows 8.1 

Windows 8.1 has the ability to rotate the screen when you physically rotate the tablet.  However 
the UI aspect resolution is not always desirable switching from Portrait to Landscape position on 
your screen.   Here are instructions on how to enable or disable this Windows feature. 

Option 1

 – Right click on the desktop and chose Screen Resolution 


To Allow – Uncheck the box that states “Allow the screen to auto-rotate” 


To Disable – Check the box that states “Allow the screen to auto-rotate” 
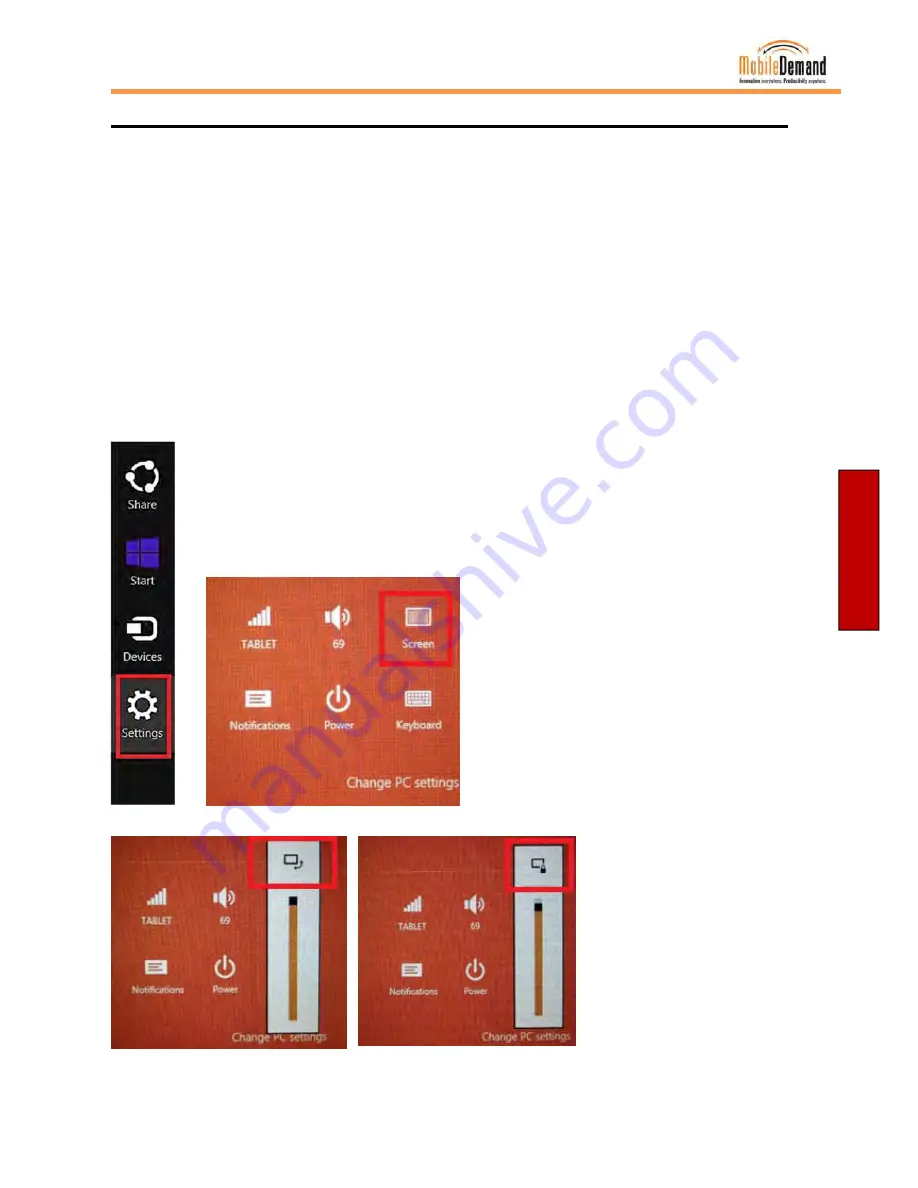
 

Option 2

 – Swipe the right side of the tablet screen to bring up the Windows 8.1 Charms Bar.  

Now click Settings. 


Once in Settings, Click Screen 


Just above the brightness 
control, there will be this small 
icon.    

Click it to show this, and you will 
enable Auto-Rotate, 

Click it again, it will show a lock 
and this will disable Auto-
Rotate. 


19 

Содержание xTablet T1400

Страница 1: ...ase read these instructions carefully before using this product and save this manual for future use Read Me First Getting Started Troubleshooting Useful Information MobileDemand xTablet T1400 User s Guide ...

Страница 2: ...sponsibility for errors or omissions or for damages resulting from the use of information contained in this document or from the use of programs and source code that may accompany it In no event shall the publisher and the author be liable for any loss of profit or any other comm ercial damage caused or alleged to have been caused directly or indirectly by this document 2009 2014 MobileDemand LC P...

Страница 3: ... 1 Enable Disable 19 Auto Screen Rotate Windows 7 Enable Disable 20 Tech Tip Windows 8 1 Password required on wake 24 Tech Tip Windows 10 Password required on wake 25 High Resolution Screen Scaling 26 High Resolution Screen Scaling Win 10 27 High Resolution Screen Scaling Win 8 1 WIn7 28 Changing screen resolution in Win 10 29 Changing screen resolution in Win 8 1 Win 7 31 Setting up the Barcode S...

Страница 4: ...anual for future use Read Me First Getting Started Troubleshooting Appendix Useful Information General Product Safety 61 Handling and Maintenance 62 General Guideline 62 Cleaning Guideline 62 Touchscreen Guideline 62 Regulatory Safety Statements 63 Copyright 64 Contact information 64 ...

Страница 5: ...er tells you step by step how to get the computer up and running You will find instructions for the following procedures Unpacking Description of Parts First Time Operations Turning On Off Unpacking Check and identify the supplied accessories xTablet T1400 with Screen Protector Standard Long Life or Extra Long Life Battery Power Adapter Power Cord Capacitive Stylus and Tether Briefcase Handle 1 ...

Страница 6: ...ed in Power Blue Tablet is ON No light Tablet is OFF 3 Touch Screen Display and multi touch act as one of the inputs 4 Fn1 Button Programmable function key configured by HotTab Utility Default Web Browser 5 Menu Button HotTab Quick Access 6 Power Button Turns on off tablet No Item Description 7 I O Cover Protects I O ports 8 Micro HDMI HDMI output to external HDMI display 9 LAN RS232 Adapter port ...

Страница 7: ...xTablet T1400 Users Guide Getting Started Front Buttons Front LED Indicators Docking Contacts Expansion Port 3 Rear Buttons Battery Lock ...

Страница 8: ...2 signals 20 Fn2 Button Programmable function key configured by HotTab Utility Default camera 21 Volume Buttons Volume Control increase volume decrease volume 22 Battery Lock Lock the battery in place once battery is inserted Not spring loaded 23 Battery Latch Spring loaded slider that latches the battery in 24 Stylus Holder Stylus holder with tether slot 25 LTE Module SIM card slot Service window...

Страница 9: ...the battery compartment until you hear the latch click 6 Make sure the edges of the battery are flat against the housing once fully inserted Then move the D rings back into place Removing the Battery Pack 1 Disconnect any cords connected to the computer 2 Turn the xTablet T1400 over back facing up 3 Rotate the D Rings so they are out of the way for the battery to be removed 4 Locate the Battery Lo...

Страница 10: ...p battery level is at Low please charge the tablet with AC Power until the Backup battery level is at Medium or High and do not remove the main battery a If you need to swap in this situation then shut down the tablet and then swap with a fully charged battery which will then begin charging your backup battery Note If you have used the xTablet T1400 for several hours and then put it to sleep for s...

Страница 11: ...damage the xTablet T1400 and the Battery Perform the following to connect the xTablet T1400 to AC Power 1 On the side of the xTablet T1400 lift the I O protective cover by pulling on the latch 2 Plug the DC cord of the AC adapter into the Power Jack of the xTablet T1400 3 Plug the AC power cord into the AC adapter 4 Finally Plug the AC power cord into the electrical outlet When the AC Adapter is c...

Страница 12: ...connecting the AC adapter o Pressing the power switch o Touching the tablet buttons screen or external keyboard mouse Turning Off Turning Off Your Device It is important to properly shut down your xTablet T1600 to avoid the loss of unsaved data To shut down your xTablet T1600 do the following On Windows 10 1 On the Start screen tap the Windows Logo in the bottom left corner of the screen 2 Tap Pow...

Страница 13: ...e power source if necessary Note The computer will forcibly be turned off if the power switch is pressed and held for six seconds or longer Leaving the tablet in sleep for several days on low batteries could cause the T1400 to drain all power in the main pack and backup battery which will turn off the tablet losing unsaved work and date time settings 9 ...

Страница 14: ... a regular keyboard 2 When powering on the tablet Press the Fn1 key on the front of the tablet How to Enter the BIOS To enter the BIOS follow these steps 1 Turn on the tablet 2 Start pressing the Fn1 key repeatedly right away 3 Chose BIOS Menu from the Boot Options 4 Once in the BIOS use these keys to navigate the BIOS menu a Fn2 ESCAPE b Home button and volume Right Arrow c Home button and volume...

Страница 15: ... Red Tablet Unplugged Running none none Blinking Red HotTab Operation HotTab provides quick access to the tablet s functions and features such as turning on off WiFi Bluetooth GPS programming function keys and changing power management As Windows starts up HotTab starts and runs in the background To display the HotTab control utility press the Menu Button located on the front panel OR launch the H...

Страница 16: ...talled on the tablet Short Cut Menu To store a new shortcut 1 Tap on button of any empty slot 2 An on screen file browser will appear 3 Browse to find the desired application to have shortcut 4 Click Open to save the shortcut To remove an saved shortcut 1 Tap on the button of any saved slot to remove 2 Shortcut will be removed and once again show Empty to indicate slot is empty Tap on the button w...

Страница 17: ... default is the front Fn1 Button To change use the setting menu This Hot Tab menu option allows users take a picture or record a video Before use make sure the Camera is turned on under Devices menu option The Camera user interface will take up the entire screen as shown below 13 ...

Страница 18: ...ll always flash LED will automatically flash in low light 4 Resolution Pictures will be saved at resolution of 640 x 480 Pictures will be saved at resolution of 1024 x 768 Pictures will be saved at resolution of 1600 x 1200 Pictures will be saved at resolution of 2592 x 1944 5 Exit Exits the Camera and hides the HotTab Utility 6 Picture Video Mode Switch Switches between picture taking and video r...

Страница 19: ...enabled White Bluetooth is disabled Orange Camera is enabled White Camera is disabled Orange Enables Front LED indicators White Disables Front LED indicators Orange Barcode Reader is enabled Reading will need to be triggered manually thru Fn button White Barcode Reader is disabled Orange RFID Reader is enabled Reading will occur without trigger White RFID Reader is disabled Orange When clicked the...

Страница 20: ...tages 0 to 100 Backup Battery The backup battery used for battery hot swapping displays its state in text with the following meanings Status Description High Backup battery is fully charged and can be used for hot swapping Medium Backup battery level is intermediate but can be used for hot swapping Low Backup battery level is low and hot swapping is not recommended Battery Charge Time The Battery ...

Страница 21: ...etting Started Function Key Mapping The function key mapping menu option allows user to change the physical function buttons Fn1 and Fn2 Users can change what application will be launched with short press or long press of keys 17 ...

Страница 22: ...Portrait to Landscape position on your screen Here are instructions on how to enable or disable this Windows feature Swipe the right side of the tablet screen to bring up the Windows 10 Action Center You will see several menu items to enable and disable items One of them being Rotation Lock If it is highlighted Rotation Lock is enabled and the screen will not rotate Screen Rotation Disabled 18 Scr...

Страница 23: ...ble this Windows feature Option 1 Right click on the desktop and chose Screen Resolution To Allow Uncheck the box that states Allow the screen to auto rotate To Disable Check the box that states Allow the screen to auto rotate Option 2 Swipe the right side of the tablet screen to bring up the Windows 8 1 Charms Bar Now click Settings Once in Settings Click Screen Just above the brightness control ...

Страница 24: ...steps to enable and disable the auto screen rotation Note This does not apply to Windows 8 1 To Enable the Screen Rotation 1 Click on Start Then click Control Panel 2 Click the Location and Other Sensors 3 You will see this Sensor listed It needs to be enabled for the screen rotation to work 20 ...

Страница 25: ... prompted to restart 6 Restart 7 Once restarted the screen rotation will work 8 If screen rotation doesn t work after this then the HotTab application will need to be configured to allow auto screen rotation HotTab Configuration 1 Click the Home key to the left of the main power button 2 The HotTab menu will come up 21 ...

Страница 26: ...To enable the Auto Rotation press the Auto Rotation menu item and it will turn Orange This means it is enabled 4 If you want to lock in a particular orientation then do not enable Auto Rotation but rather press the orientation you desire to use 22 ...

Страница 27: ...t Auto Rotation the screen will rotate to match the position of the tablet To Disable Auto Rotation 1 As shown above disable the Auto Rotation setting in Hot Tab 2 Another alternative is to disable the sensor in the Control Panel as shown in the above steps 23 ...

Страница 28: ... for a password This causes users extra time to put in a password In Desktop Mode press and hold your finger on the Windows Start Logo in the bottom left corner of the tablet Select the Control Panel Once in Control Panel select User Accounts Select Reset Security Policies Now your settings will take affect that you have set in Power Management for the Password not being required on wake from slee...

Страница 29: ... I wake my tablet from sleep Press and hold your finger on the Windows Start Logo in the bottom left corner of the tablet A menu will come up choose Control Panel Select Power Options Once in Power Options choose Require a password on wakeup Click on the Change Settings that are currently unavailable 25 ...

Страница 30: ...Display scaling is the recommended method because it has the effect of adjusting user interface without having to move away from the optimal resolution setting at 1920 x 1200 This section will explain how you can adjust the built in windows display scaling setting and resolution setting Note xTablet T1400 is shipped with display scaling set at Larger 150 We recommend the users set the scaling to t...

Страница 31: ...p for 3 seconds and release to bring up the context menu and select Screen resolution option as shown below 2 Select Display Settings 3 Use the slider to move it to the far right to adjust your size to 125 4 Scroll down and click Apply 5 You will be prompted to sign out you can sign out now or sign out later 6 The changes will not take effect until you sign out and sign back in 27 ...

Страница 32: ...context menu and select Screen resolution option as shown below 8 A Screen Resolution Window will show up Select the Make text and other items larger or smaller option in the window as shown below 9 A Display window will show up Under Change the size of all items section change the scaling option to Medium 125 or any other desired display scaling and hit Apply to save changes as shown below 28 ...

Страница 33: ...Windows to see the changed display scaling already being applied Changing screen resolution setting in Windows 10 Alternatively instead of changing the display scaling setting user may choose to change the overall resolution setting to make screen elements bigger 1 Tap and hold anywhere on the desktop for 3 seconds and release to bring up the context menu and select Display Settings option as show...

Страница 34: ...2 The Customize your display settings will come up To change the resolution you would click on the Advanced display settings 30 ...

Страница 35: ...hanging screen resolution setting in Windows 8 1 Windows 7 Alternatively instead of changing the display scaling setting user may choose to change the overall resolution setting to make screen elements bigger 1 Tap and hold anywhere on the desktop for 3 seconds and release to bring up the context menu and select Screen resolution option as shown below 31 ...

Страница 36: ...ill show up to ask the user if the applied resolution is usable 4 If the new resolution is the desired display setting hit Keep changes and continue to next step If the new resolution is not desirable hit Revert and select a different resolution to change to and start again from step 2 5 The user may now use the device with the new resolution setting 32 ...

Страница 37: ...ot functioning correctly please go through the following steps starting with opening Windows Run the HotTab icon on the desktop Make sure BarCode is Orange hit the X to exit menu Or press the HotTab button Select Devices Make sure BarCode is Orange hit the X to exit this HotTab section Run the HotTab by clicking on the HOME button and this time select Setting 33 ...

Страница 38: ...Then select Function 2 Then Select Short Press 34 ...

Страница 39: ...Barcode Go to driver s folder C Drivers Folder Barcode MDScanner and run the MDScanWizard exe This wizard will launch Verify Intermec is the Scanner Type Verify the COM port is 15 Verify Use ISCP Packet Mode is selected Verify Start with Windows All Users is selected Click on Next 35 ...

Страница 40: ...sh Make sure you see this on the toolbar You will have to wait for the MDScanWizard application to start and go down to the toolbar There are two barcodes that need to be scanned to place the scanner in PULSE mode and to put in a 5 second timeout Print out the barcodes and scan them in The two codes to scan are in an XPS document included in the directory Test the scanner 36 ...

Страница 41: ...ressing Menu Button located on the front panel OR Launching HotTab Utility application 2 Tap on Device button 3 Check the status color of the RFID icon Item Status Color Description Orange RFID Reader is enabled Reading will occur without trigger White RFID Reader is disabled 4 If the RFID Reader feature is disabled white tap on the RFID icon to enable it Orange 37 ...

Страница 42: ...read and shown on the indexed field How to setup RFID Reader To setup the built in HF RFID Reader perform the following scenarios 1 Open HotTab utility by pressing Menu Button located on the front panel OR Launching HotTab Utility application 2 Tap on Device RFID Setting and the setting utility will show up as below 38 ...

Страница 43: ...r is AUTO SCAN Under this setting the RFID Reader will always be ready to scan tags 1 When the RFID tag is detected from RFID antenna the data will be read automatically 2 User can define the RFID scanning frequency from the drop down menu shown as below The frequency can be from 1 second to 9 seconds 39 ...

Страница 44: ...Single Scan User can also define the RFID Reader scanning as SINGLE SCAN Under this setting the RFID Reader will be triggered only when the user clicks on Send Note The RFID scanner Antenna is located here on the back side of the tablet The reading distance is 1 2 40 ...

Страница 45: ...er can type in this field to define the characters BEFORE the data scanned After the characters are typed click on Set to save the settings Suffix User can type in this field to define the characters AFTER the data scanned After the characters are typed click on Set to save the settings 41 ...

Страница 46: ...ning Data Output Display data on UI This option is to copy the scanned data to another UI in this PC Emulate keyboard input The default setting for Data Output is EMULATE KEYBOARD INPUT Under this setting the HF RFID Reader will simulate the scanning behavior as a keyboard input and automatically paste the data scanned to the field where the cursor index 42 ...

Страница 47: ...er Guide Read Me First RFID Output Setting The default setting for built in HF RFID Reader is to READ UID only For some applications user might need to read or write further block data the drop down menu under this section can do this change 43 ...

Страница 48: ...er the icon is on your desktop You must set up the Skylight application before you can use your mobile broadband network To do so perform the following steps Step 1 Verify that WWAN Mode is enabled Step 2 Start the Skylight application Step 3 Choose your Carrier in the Skylight application Step 4 Inserting your SIMM card Step 5 Connecting to the carrier Step 6 Set up xTablet GPS You do not need a ...

Страница 49: ...pens and the icon appears in the Windows notification area for example Note If you do not see the icon click the arrow next to the notification area to view additional icons Step Three Choose your carrier in the Skylight application Before you can use the mobile broadband installed on your tablet you need to set up the Skylight application with the information about your mobile broadband network c...

Страница 50: ...Tablet T1400 User Guide Read Me First 2 Click on Network Operator and you will be presented with a drop down list of carriers 3 Select your carrier from the list of carriers 4 You should choose Generic for T Mobile in the USA 46 ...

Страница 51: ... hit OK 6 The firmware will be updated 7 This progress message will show down at the lower right hand corner of Windows This will come up once the firmware on your LTE module has been updated to your carrier This is letting you know it is ok to connect Make sure you read below about instructions on how to add your 3FF Micro SIM from your carrier to the xTablet T1400 47 ...

Страница 52: ... number to your business account Then follow the steps below to insert the SIM into the system c AT T You will need to purchase a 3FF Micro SIM from AT T and associate the SIM number to your business account Then follow the steps below to insert the SIM into the system d T Mobile You will need to purchase a 3FF Micro SIM from T Mobile and associate the SIM number to your business account Then foll...

Страница 53: ...xTablet T1400 Users Guide xTablet T1400 User Guide Read Me First 6 Insert the Micro SIM Card as shown 7 Gently press the Micro SIM into the slot with your finger 49 ...

Страница 54: ...ers Guide xTablet T1400 User Guide Read Me First 8 Once the Micro SIM is fully seated you will feel it click and lock into place 9 Remove Antenna cable from retaining socket and retaining screw from threaded insert 50 ...

Страница 55: ...xTablet T1400 Users Guide xTablet T1400 User Guide Read Me First 10 Install LTE Module the slot 11 Secure in place with retaining screw 51 ...

Страница 56: ... Guide xTablet T1400 User Guide Read Me First 12 Connect Antenna cable to antenna port labeled Main Take care to route cable so that it will not be pinched in the seals for the access hatch 13 Replace LTE Module cover 52 ...

Страница 57: ...ion in the back ground 4 You are now connected to your carrier To disconnect from your carrier press Disconnect 5 Note about Carrier Activation When switching from one carrier to another the automatic activation may not come up because the software is under the impression the GOBI module is already activated Follow these steps if you want to run the Automatic Activation Wizard manually with your c...

Страница 58: ...xTablet T1400 Users Guide xTablet T1400 User Guide Read Me First Mechanical Drawings Front view of the xTablet T1400 54 ...

Страница 59: ...xTablet T1400 Users Guide xTablet T1400 User Guide Read Me First Side view of the xTablet T1400 55 ...

Страница 60: ...ounting Kit Dual Pack Charger Two slot charger to charge any of the three different battery packs Two chargers can be daisy chained together Utilizes the same power supply as the one that is shipped with the tablet Large Stylus Kit Larger and more rugged stylus for intensive use Rugged metal mesh tip 5 5 stylus 16 tether Side stylus holder 2 Point Shoulder Strap 2 Point shoulder strap provides ano...

Страница 61: ...adapter is properly connected If running on battery power the battery may be depleted charge the battery Wireless LAN signal quality is poor The xTablet T1400 may be out of range Move the xTablet T1400 closer to the access point or another wireless LAN device associated with it Check if your surroundings have interferences such as microwave ovens cordless phones Move the xTablet T1400 away from ob...

Страница 62: ...rference such as microwave ovens cordless phones Move the xTablet T1400 away from objects causing interference No sound is produced Adjust volume of the xTablet T1400 by pressing on the volume rocker If using an external audio device make sure that the cable is properly connected I cannot project the xTablet T1400 display to another monitor Make sure the HDMI driver is installed Make sure the outp...

Страница 63: ...C Settings control panel grouped under Hardware and Sound if you are using the category view Click the Setup button under the Configure your pen and touch displays section The screen will turn white and display a message that says Touch this screen to identify it as the touchscreen If this is not the Tablet PC screen press enter to move to the next screen Follow the instructions and touch the tabl...

Страница 64: ...g the device do not place the battery pack together with articles that may contact electricity Do Not Drop or Apply Strong Pressure to the Battery Electrolyte leakage generation of heat ignition or rupture of battery may occur Do Not Charge the Battery Other Than with the Products Specified In This Manual If the battery is not charged using one of the specified products and methods electrolyte lea...

Страница 65: ...erted into your outlet consult an electrician to replace your obsolete outlet Protect the power cord from being crushed or pinched particularly in the area of the plugs any receptacles used and the point of exit from the apparatus Do not break off the ground pin of the power cord Use only accessories specified by the manufacturer Use only with its transport carriage stand tripod console or table s...

Страница 66: ...other software that prevents the power management from working Cleaning Guideline Use a soft cloth moistened with water or a non alkaline detergent to wipe the exterior of the product Gently wipe the display with a soft lint free cloth Do not use alcohol or detergent on the product Touchscreen Guideline Use your finger or the stylus on the display Using sharp or metallic object may cause scratches...

Страница 67: ...vice may not cause interference and 2 this device must accept any interference including interference that may cause undesired operation of the device Canada avis d Industry Canada IC Cet appareil numérique de classe B est conforme aux normes canadiennes ICES 003 et RSS 210 Son fonctionnement est soumis aux deux conditions suivantes 1 cet appareil ne doit pas causer d interférence et 2 cet apparei...

Страница 68: ...014 All rights reserved No part of this user manual may be transmitted stored in a retrieval system or translated into any language or computer language in any form or by any means without the prior written permission of the manufacturer Information is subject to change without prior notice ...

Отзывы: