background image


xTablet T1600 User Guide  

39 

R

e

a

d

 M

e

 F

ir

s

Making Connections


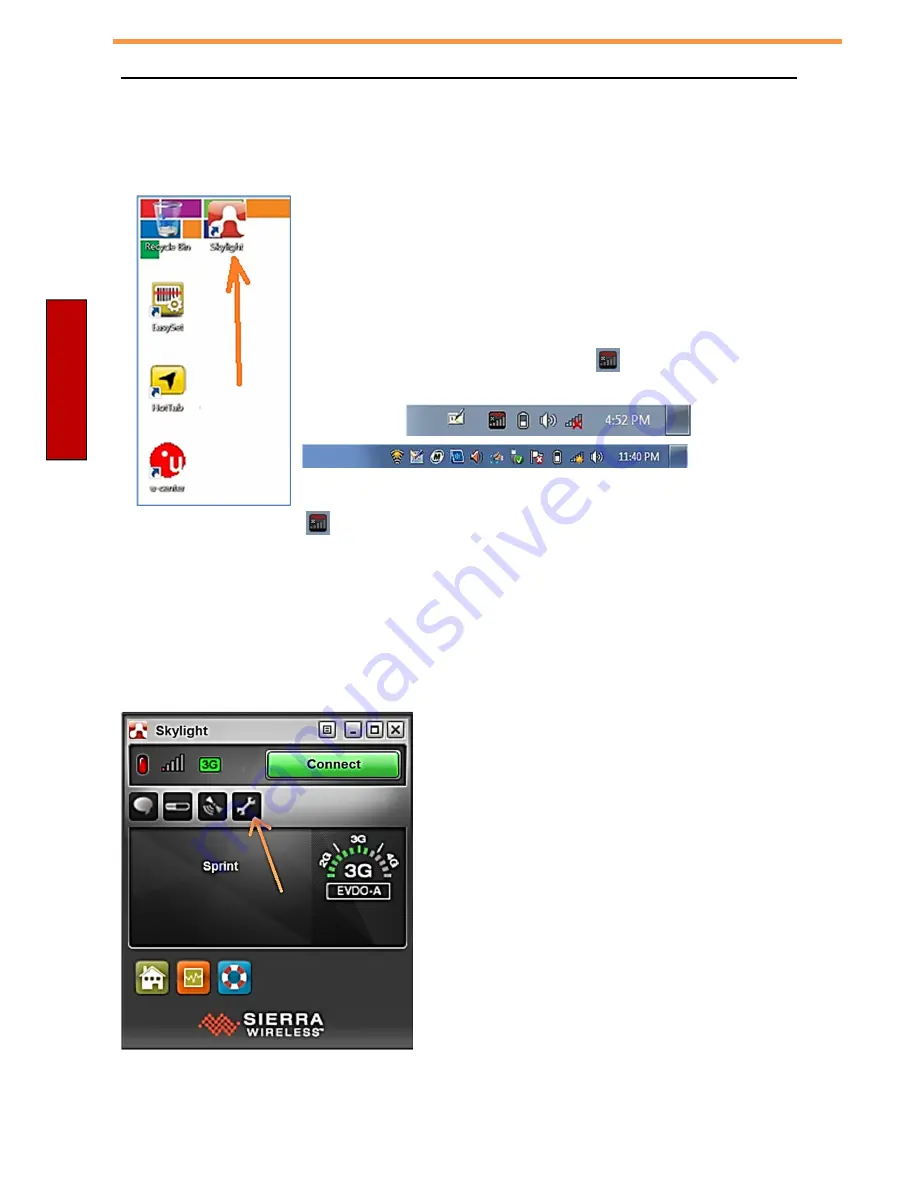
Step One: Start the Skylight application 


You start the Skylight application from the icon on the Desktop of Windows. 
To start the Skylight application


1.  Tap Start > Desktop – Skylight 


The Skylight application window opens and the 

 icon appears in the Windows 

notification area, for example: 


      Note: If you do not see the 

 icon, click the arrow next to the notification area to view additional icons.


Step Two: Choose your carrier in the Skylight application 


Before you can use the mobile broadband installed on your tablet, you need to set up the Skylight application with 
the information about your


mobile broadband network carrier.  


1.  In the Skylight application Window, click on the icon of the wrench.


Содержание T1600

Страница 1: ...xTablet T1600 User Guide 1 Read Me First MobileDemand xTablet T1600 Rugged xTablet T1600 User s Guide ...

Страница 2: ...he use of information contained in this document or from the use of programs and source code that may accompany it In no event shall the publisher and the author be liable for any loss of profit or any other commercial damage caused or alleged to have been caused directly or indirectly by this document 2009 2014 MobileDemand LC Products that are referred to in this document may be either trademark...

Страница 3: ...r Device 13 OPERATING YOUR xTabletT1600 14 USING THE QUICK MENU 14 Quick Menu Overview 14 Configuring the SETUP Menu Settings 17 Configuring Programmable Buttons 18 Configuring External WWAN Antenna Switching 19 Configuring the Light Sensor Settings 20 Configuring the External GPS Antenna Switching 21 Useful Information 22 Boot Menu 22 How to Enter the BIOS 22 CTRL ALT DEL for Windows 7 Login to a...

Страница 4: ...ing 49 Accessories 49 APPENDIX 51 COPYRIGHT 51 SAFETY Information 51 Precaution on Battery Pack 52 General Product Safety 53 Handling and Maintenance 54 General Guideline 54 Cleaning Guideline 54 Touchscreen Guideline 55 REGULATORY Safety STATEMENTS 56 Federal Communications Commission Statement 56 Canada Industry Canada IC Notices 56 802 11 Radio Precaution Statement 56 RF exposure warning 56 Can...

Страница 5: ...users with maximum mobile computing experience in a wide range of working environments Before you begin using your xTablet T1600 read this chapter to familiarize yourself with the main components installed in the system Package Contents If any of following items is damaged please contact MobileDemand Tablet AC adapter Power cord Stylus Pen Briefcase Handle X strap ...

Страница 6: ...nce 3 Ambient light sensor Use to detect the current level of visible light in the surrounding environment 4 Microphone Capture audio 5 Scanner or Camera button The button functionality can be assigned via Quick Menu Scanner button Press to trigger the Barcode scan function if the barcode scanner is enabled Camera button Press to take a picture 6 Home key Tap to return to the Start screen Windows ...

Страница 7: ...des 2 Camera LED flash Provides additional lighting when taking pictures in low light 3 Rear camera 5MP pictures with auto focus 4 Battery compartment Single battery pack 5 Battery latch release button Press and hold the button to unlock and slide to unlatch the battery latch and remove battery 6 Speaker Audio output ...

Страница 8: ... and data between your xTablet T1600 and other SD compatible devices The card reader supports SD Secure Digital SDXC SDHC Mini SD with adapter Micro SD with adapter 4 Mini SIM card slot Use to insert a Mini SIM card for LTE activation if ordered with LTE Left View No Item Description 1 Power button Press to turn your xTablet T1600 on or off 2 Volume buttons Press to adjust the volume level 3 Kensi...

Страница 9: ...a particular function of the xTablet T1600 is active Icon Item Description Power The power icon is solid green when the system is running When the system is in sleep mode the icon blinks RF Blue antenna icon shows that radio WLAN WWAN or Bluetooth communications are enabled Battery Battery icon Green when battery is fully charged 95 or above Orange when battery is charging Flashing orange charging...

Страница 10: ... Slide the battery latch to the lock position to secure the battery Charging the Battery The Lithium ion battery is not fully charged when shipped To charge the battery follow the steps below 1 Install the battery to your xTablet T1600 See procedures above 2 Connect the AC adapter to the DC in jack of your xTablet T1600 3 Connect the AC adapter to the power cord 4 Plug the power cord to an electri...

Страница 11: ...recommend you to replace your battery pack after 18 to 24 months of usage Removing the Battery To remove the battery follow the steps below 1 Connect to power or shut down the tablet prior to battery removal 2 Press and hold the battery latch release button to slide the battery latch to the unlock position 2 Remove the battery out of the battery compartment ...

Страница 12: ...pter to the DC in jack of your xTablet T1600 2 Connect the AC adapter to the power cord 3 Plug the power cord to an electrical outlet Using Battery Power 1 Install a charged battery in the battery compartment 2 Remove the AC adapter if plugged Your xTablet T1600 will automatically use the battery power NOTE If your xTablet T1600 is connected to an electrical outlet and the battery is installed you...

Страница 13: ...important to properly shut down your xTablet T1600 to avoid the loss of unsaved data To shut down your xTablet T1600 do the following On Windows 8 1 On the Start screen swipe in from the right edge of the screen then tap Settings 2 Tap Power Shut down On Windows 7 Click Start Shut down Wait for your xTablet T1600 to turn off power completely before removing the power source if necessary ...

Страница 14: ... In Apps view tap Quick Menu You can also access the Quick menu on the task bar On Windows 7 Tap the arrow on the task bar to display hidden icons Then tap the Quick Menu icon Quick Menu Overview Windows 8 Windows 7 Icon Item Description Airplane mode Tap the icon to enable disable airplane mode NOTE When the Airplane mode is enabled the wireless network WLAN and WWAN Bluetooth and GPS will be aut...

Страница 15: ...y Bluetooth Tap the icon to enable disable the Bluetooth function GPS Tap the icon to enable disable the GPS function Windows 8 only Auto rotate Tap the icon to enable disable the Auto Rotate screen function Setup Tap the respective tab to set P key Barcode Camera key light sensor external GPS antenna and external WWAN antenna settings For details refer to Configuring the SETUP Menu Settings Infor...

Страница 16: ... on screen keyboard OSK exe Windows 7 only Mobility center Tap the icon to adjust brightness screen orientation volume external display battery status sync wireless network and presentation settings Barcode Tap the icon to enable disable the Barcode function NOTE If the icon is gray i e this indicates the current function is disabled ...

Страница 17: ...xTablet T1600 User Guide 17 Read Me First Operating Your xTablet T1600 Configuring the SETUP Menu Settings b c a d a Programmable Button b External GPS Antenna c Light Sensor d External WWAN Antenna ...

Страница 18: ... the device is not installed with a barcode scanner the Function button can be set as the shutter button when using the Camera To assign an application to the Program button do the following I Tap the folder icon to set up an application for the Program button II Select the desired application and tap Open ...

Страница 19: ...able disable the device to automatically switch to the external WWAN antenna when it is affixed on a docking station Dock with external WWAN antenna The device will be automatically switched to the external WWAN antenna when docking Dock without external WWAN antenna The device will NOT be automatically switched to the external WWAN antenna when docking ...

Страница 20: ...on settings To change settings Customize the illumination range according to the ambient lighting enter the desired value in the first and second data box As an example in the above illustration Outdoor 5000 500 lux Indoor 500 50 lux Low Light 50 0 lux Adjust the brightness level according to the ambient light tap or to adjust the setting 0 10 Save all settings tap Apply Enable the automatic light...

Страница 21: ...ng External GPS Antenna Switching Tap on Dock with external GPS antenna The device will be automatically switched to the external GPS antenna when docking Tap on Dock without external GPS antenna The device will NOT be automatically switched to the external GPS antenna when docking ...

Страница 22: ...e How to Enter the BIOS To enter the BIOS follow these steps 1 Connect a Keyboard to the tablet 2 Turn on the tablet 3 Start pressing the DELETE key repeatedly right away 4 The tablet will come up into the BIOS menu How to CTRL ALT DEL for Windows 7 Login We are working on this with our engineering team to resolve this Until then you will have to use a wired wireless or Bluetooth keyboard 1 Press ...

Страница 23: ... sleep it still asks for a password This causes users extra time to put in a password In Desktop Mode press and hold your finger on the Windows Start Logo in the bottom left corner of the tablet Select the Control Panel Once in Control Panel select User Accounts Select Reset Security Policies Now your settings will take affect that you have set in Power Management for the Password not being requir...

Страница 24: ...se it has the effect of adjusting user interface without having to move away from the optimal resolution setting at 1366 x 768 This section will explain how you can adjust the built in windows display scaling setting and resolution setting Note Before proceeding to change the scaling option make sure any opened document is saved then close and all running applications are closed before proceeding ...

Страница 25: ...he window as shown below 3 A Display window will show up Under Change the size of all items section change the scaling option to Medium 125 or any other desired display scaling and hit Apply to save changes as shown below 4 A prompt may show up to ask if you want to sign out to apply the scaling change Hit Sign out Now to apply changes as shown below ...

Страница 26: ...pplied Changing screen resolution setting Alternatively instead of changing the display scaling setting user may choose to change the overall resolution setting to make screen elements bigger 1 Tap and hold anywhere on the desktop for 3 seconds and release to bring up the context menu and select Screen resolution option as shown below ...

Страница 27: ...play Settings prompt will show up to ask the user if the applied resolution is usable 4 If the new resolution is the desired display setting hit Keep changes and continue to next step If the new resolution is not desirable hit Revert and select a different resolution to change to and start again from step 2 5 The user may now use the device with the new resolution setting ...

Страница 28: ...are two ways to launch the application Double click on the desktop Tap Start All Programs Camera Application searching Take Photos Press the Record button to capture the pictures View Photos Press the Forward or Backward button to view the recorded photos Press the Play button to switch to Playback mode In Playback mode press the Preview button to switch back to Camera mode ...

Страница 29: ...he current photo Record GPS Coordinates Geotagging is the GPS signal status located on the top right corner of the window If GPS coordinates are not able to be received the last coordinates would be used instead GPS status indicator GPS device is working properly GPS device is not available Searching for GPS signals To use an external USB GPS device 1 Press the Setup button to enter the Setup menu...

Страница 30: ... you can select the camera is available and ready to use the camera is not available Press the button after you have chosen the desired camera Resolution There are four resolution options that you can select If the Camera does not support these four resolutions a Change Resolution Error message will appear on the screen Press the button to exit Native maximum resolution ...

Страница 31: ...0 is equipped with the GPS module The camera logs the GPS position accurately if photos are taken outdoors Flash When capturing photos under the low light tap ON to turn on the LED Flash NOTE The effective flash range is 50cm Idle Timing There are five Idle Timing options that you can select Press the button after you have chosen the desired time NOTE When the system is left idle for a certain per...

Страница 32: ...ces to maximize the use of your xTablet T1600 Installing the Memory Card Your xTablet T1600 supports different types of memory cards to provide faster data transfer Supported types SDHC SDXC To insert a memory card 1 Push down and pull to open the I O port cover 2 Push the memory card into the memory card slot until it clicks into place ...

Страница 33: ...n and pull to open the I O port cover 2 Push a valid SIM card into the SIM card slot until it clicks into place Connecting the Microphone Headset Your xTablet T1600 is equipped with audio combo jack that enables you to use the headset or microphone Connect a headset by opening the I O port cover and plug the stereo headphone cable into the audio combo jack Connect to a microphone by opening the I ...

Страница 34: ...600 to other USB devices such as a mouse keyboard digital camera printer or an external hard disk drive 1 Push down and pull to open the I O door 2 Connect one end of the USB cable to the USB port of your device 3 Connect the other end of the cable to the USB device if necessary NOTE The USB cables are not included ...

Страница 35: ...vice follow the steps below 1 Open the Quick menu 2 Tap the Bluetooth icon to turn on the Bluetooth function 3 Tap the arrow on the task bar to display hidden icons 4 Tap the Bluetooth icon 5 Tap Add a Device The system starts scanning for Bluetooth devices and displays the available devices NOTE If the device that you want to add does not appear on the screen please check to see if the device is ...

Страница 36: ...ce then tap Next to continue 7 Tap Close to complete the pairing NOTE The PIN you enter for pairing on the xTablet T1600 must be the same PIN entered on the Bluetooth device Once a pairing has been created connecting to that device again will no longer require entering the PIN ...

Страница 37: ...unction 3 Tap the wireless network icon on the task bar 4 Available wireless network connections are displayed Tap the desired wireless network 5 Tap Connect Some networks require a network security key or a password TIP Check Connect automatically box to automatically connect to this network when it is available 6 Enter the network security key 7 Tap OK 8 After the connection is established you c...

Страница 38: ...ionality with the MobileDemand xTablet T1600 Thank you for purchasing your MobileDemand xTablet T1600 with the mobile broadband GOBI module To use mobile broadband network connections with your MobileDemand xTablet T1600 you use the Sierra Wireless Skylight application called Skylight The Skylight application is already installed on your computer the icon is on your desktop You must set up the Sky...

Страница 39: ...pens and the icon appears in the Windows notification area for example Note If you do not see the icon click the arrow next to the notification area to view additional icons Step Two Choose your carrier in the Skylight application Before you can use the mobile broadband installed on your tablet you need to set up the Skylight application with the information about your mobile broadband network car...

Страница 40: ...uide Read Me First Making Connections 2 Click on Network Operator and you will be presented with a drop down list of carriers 3 Select your carrier from the list of carriers 4 You should choose Generic for T Mobile in the USA ...

Страница 41: ... OK 6 The firmware will be updated 7 This progress message will show down at the lower right hand corner of Windows 8 This will come up once the firmware on your LTE module has been updated to your carrier This is letting you know it is ok to connect Make sure you read below about instructions on how to add your Standard Size SIM from your carrier to the xTablet T1600 ...

Страница 42: ...d associate the SIM number to your business account Then follow the steps below to insert the SIM into the system c AT T You will need to purchase a Standard Size SIM from AT T and associate the SIM number to your business account Then follow the steps below to insert the SIM into the system d T Mobile You will need to purchase a Standard Size SIM from T Mobile and associate the SIM number to your...

Страница 43: ... Read Me First Making Connections 6 Insert the SIM as shown 7 The SIM will go in and snap into place 8 Press on the SIM until you hear it snap into place 9 To remove the SIM press on it and it will unlock and pop out of the slot ...

Страница 44: ...ion in the back ground 4 You are now connected to your carrier To disconnect from your carrier press Disconnect 5 Note about Carrier Activation When switching from one carrier to another the automatic activation may not come up because the software is under the impression the GOBI module is already activated Follow these steps if you want to run the Automatic Activation Wizard manually with your c...

Страница 45: ...ting up the Barcode Scanner This configuration should be completed prior to shipment If for some reason scanning is not functioning correctly please go through the following these steps 1 Open up File Explorer and navigate to the T1600 Driver Folder and the MDScanner directory ...

Страница 46: ...ting up the Barcode Scanner 2 Right click on the file MDScanDriver and select Properties 3 Click on Change settings for all users 4 Then click the Set the Run this program as an administrator Click OK Do the same steps to the MDScanWizard exe file ...

Страница 47: ...7 Read Me First Setting up the Barcode Scanner 5 Open up the Quick Menu and verify that the Barcode device is enabled 6 Open up the Quick Menu and verify that the barcode Trigger is enabled 7 The scanner should now be functional ...

Страница 48: ...one that is shipped with the tablet Vehicle Dock Safe storage charging and communications while operating a vehicle 4 USB Ethernet RS232 Built in power converter up to 36VDC Other power converters up to 100VDC WWAN Antenna GPS Antenna Optional Keyboard Mounting Kit Large Stylus Kit Larger and more rugged stylus for intensive use Rugged metal mesh tip 5 5 stylus 16 tether Side stylus holder 2 Point...

Страница 49: ...re the AC adapter is properly connected If running on battery power the battery may be depleted charge the battery Wireless LAN signal quality is poor The xTablet T1600 may be out of range Move the xTablet T1600 closer to the access point or another wireless LAN device associated with it Check if your surroundings have interferences such as microwave ovens cordless phones Move the xTablet T1600 aw...

Страница 50: ...the xTablet T1600 by adjusting the volume on the toolbar by clicking on the speaker icon If using an external audio device make sure that the cable is properly connected Barcode scanner does not emit light and does not seem to work Make sure the Barcode scanner software is running by checking for the MDScanner utility down on the toolbar by the clock Barcode Scanner emits light but does not read b...

Страница 51: ... into any language or computer language in any form or by any means without the prior written permission of the manufacturer Information is subject to change without prior notice Safety Information Follow and adhere to all warnings and instructions in this manual For your safety please read all safety and operating instructions before using the product Keep this manual for future reference ...

Страница 52: ......

Страница 53: ...essure to the Battery Electrolyte leakage generation of heat ignition or rupture of battery may occur Do Not Charge the Battery Other Than with the Products Specified In This Manual If the battery is not charged using one of the specified products and methods electrolyte leakage generation of heat ignition or rupture may result When the Battery Pack Has Deteriorated Replace It with a New Battery C...

Страница 54: ...ur outlet consult an electrician to replace your obsolete outlet Protect the power cord from being crushed or pinched particularly in the area of the plugs any receptacles used and the point of exit from the apparatus Do not break off the ground pin of the power cord Use only accessories specified by the manufacturer Use only with its transport carriage stand tripod console or table specified by t...

Страница 55: ...eavy objects on top of the xTablet T1600 as this may damage the display The screen surface can be scratched Do not use paper towels to clean the display It is best to use a touch screen cleaning cloth Avoid touching it with a pen or pencil To maximize the life of the backlight in the display allow backlight to automatically turn off as a result of power management Avoid using a screen saver or oth...

Страница 56: ...sticking to it Not using a soft cloth may cause damage to the special protective coating on the touchscreen surface To clean off hard to remove dirt blow some steam on the particular area and gently wipe away using a soft cloth Do not use excessive force on the display Avoid placing objects on top of the display as this may cause the glass to break When there is a noticeable discrepancy in the ope...

Страница 57: ......

Страница 58: ... interférence et 2 cet appareil doit accepter toute interférence notamment les interférences qui peuvent affecter son fonctionnement Informations concernant l exposition aux fréquences radio RF La puissance de sortie émise par l appareil de sans fil est inférieure à la limite d exposition aux fréquences radio d Industry Canada IC Utilisez l appareil de sans fil de façon à minimiser les contacts hu...

Страница 59: ...ACT LOCAL ENVIRONMENTAL AGENCIES FOR INFORMATION ON RECYCLING AND DISPOSAL PLANS IN YOUR AREA ANNEX IV Symbol for the marking of electrical and electronic equipment The symbol indicating separate collection for electrical and electronic equipment consists of the crossed out wheeled bin as shown below The symbol must be printed visibly legibly and indelibly 57 ...

Страница 60: ...us damage to its housing and components Do not cover the device or block the air ventilation holes of the device with any other objects Do not use any sharp object to tap on the display screen Do not expose the device to direct sunlight and dusty environments Keep the device away from excessive heat and humidity Keep liquids away from the device Keep the device away from any magnetic emitting devi...

Страница 61: ...n off the device properly and unplug the AC adapter before cleaning Wipe the device with a clean dry cloth Do not use abrasive cleaners to clean the device Do not attempt to disassemble or repair this device Doing so will void the warranty 59 ...

Отзывы: