10
**see navigation owner’s manual
DISPLAY AUDIO SYSTEM (continued) AND NAVIGATION SYSTEM (if equipped)
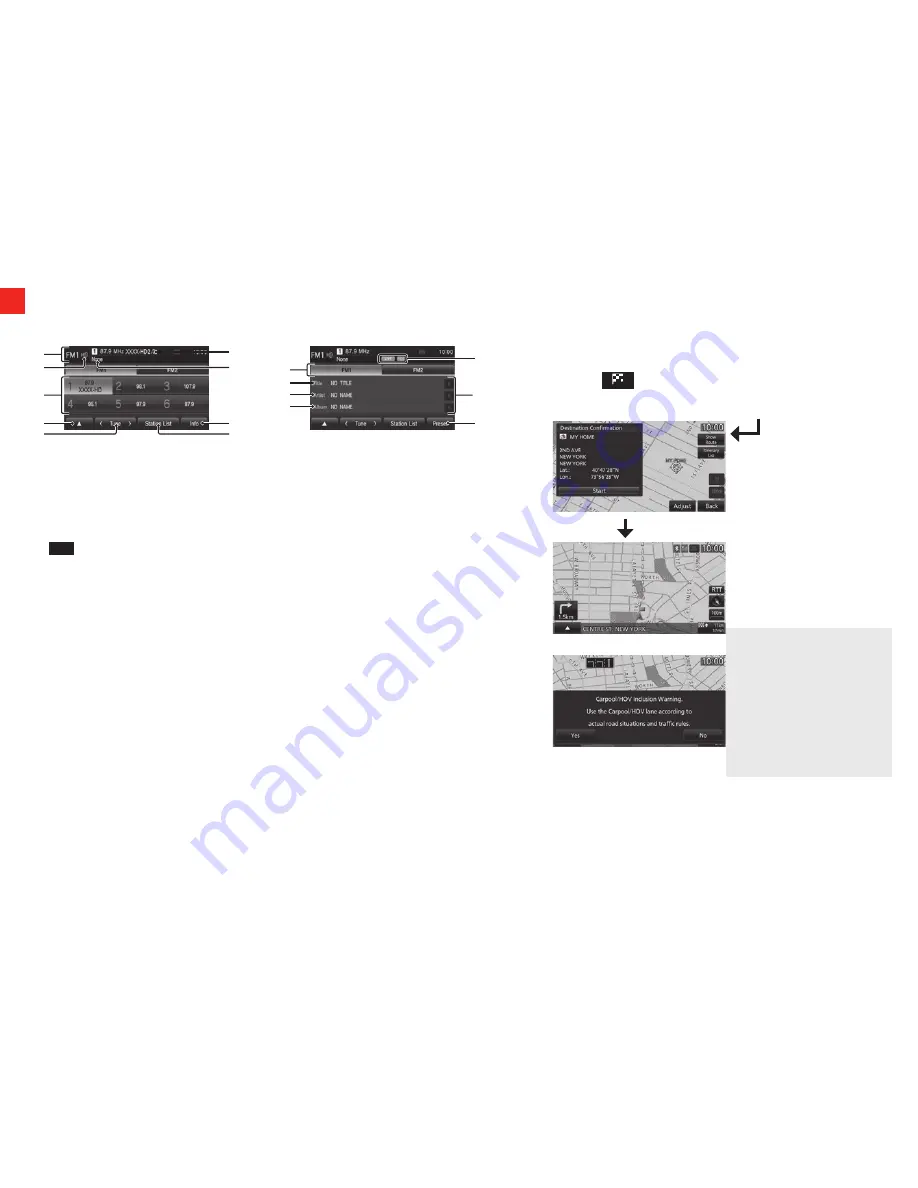
fm Radio broadcast information screen (Display audio system only)
3)
4)
1)
8)
6)
5)
2)
9)
7)
10)
16)
11),12)
13)
14)
17)
15)
1. Source plate - Displays the name of the currently selected source, preset channel
number, reception frequency, and station name.
2. HD Radio
TM
indicator - Displayed during digital sound output.
3. Preset switch - allows you to register your favorite broadcast stations.
touch and hold the switch for the desired preset channel number until you hear
the “beep”. this registers the broadcast station currently being received.
**
→
“Register Your Favorite Broadcast Stations”
4.
- touching it displays the sub-menu. the
Scan, Radio Setting, Sound
Control
settings can be made.
5. <TUNE> - Used to change the frequency. touching and holding until you hear the
“beep” starts automatic station selection (seek).
**
→
“Starting the Seek”
6. SSN - Displays the ssn (short station name) that is currently being received.
if there is a sub-channel, “the received channel number/total number of sub-
channels” is displayed.
7. PTY - Displays the PtY (Program type) being received.
8. Info - switches to information display.
9. Station List - Displays a list of the stations that can be received.
**
→
“Search for Broadcast Stations from the Station List”
10. FM1, FM2 - allows you to register your favorite 6 stations for each band.
11. Title - Displays the acquired title name.
12. Radio Text - During analog reception, “title” changes to “Radio text”, and the
acquired radio text is displayed. the “artist” and “album” are not displayed.
13. Artist - Displays the acquired artist name.
14. Album - Displays the acquired album name.
15. Indicator - LIVE: live event broadcasts are displayed as they are received.
RBDS: RbDs data is displayed as it is received.
16. Switch page - if the title, artist name, and album title cannot fit in one page, the
display can be switched to Page 2 and beyond.
17. Preset - switches to preset display.
**see Display audio owner’s manual.
search for a location (navigation system only)**
Way Points – once you have set a destination, you can enter
additional stops along the way called way Points.
Saving Addresses - to save an address, first enter the address into
the system. then touch
Address Book
and confirm location to be
stored. touch
Set to Address Book
to complete.
Set Your Home as the Destination
You can set your pre-registered home as the destination.
1. Press the key.
this displays the destination menu.
2. Touch Go Home. this displays the guidance start screen.
3. Touch Start.
the search for the route
with your home as the
destination is complete and
route guidance
starts.
NOTE
• If a route using the HOV lane
is in the search result with
set conditions, a message
confirms the use of the hoV
lane is displayed.
Yes:
search for a hoV lane
route.
No:
search for a non-hoV
lane route.
Содержание 2015 Lancer series
Страница 1: ...Owner s Handbook 2014 LANCER SERIES...
Страница 5: ...3 6 4 3 7 9 Inside glove box 11 10...
Страница 16: ...5 13 www mitsubishicars com 2014 LANCER SERIES...


