


EN-25
Viewing computer images (continued)
Setting the aspect ratio
You can change the aspect ratio of the input video signal (or the ratio of width to height of the image). Change the
setting according to the type of the screen to be used or your preference.
How to change the settings:
With the remote control:
1. Press the ASPECT button.
t &WFSZUJNFUIF"41&$5CVUUPOJTQSFTTFEUIFBTQFDUNPEFDIBOHFTGSPN/03."- '6--UP/03."-
to NORMAL (4:3), to 16:9, to REAL, to FULL, and back to NORMAL (FULL).
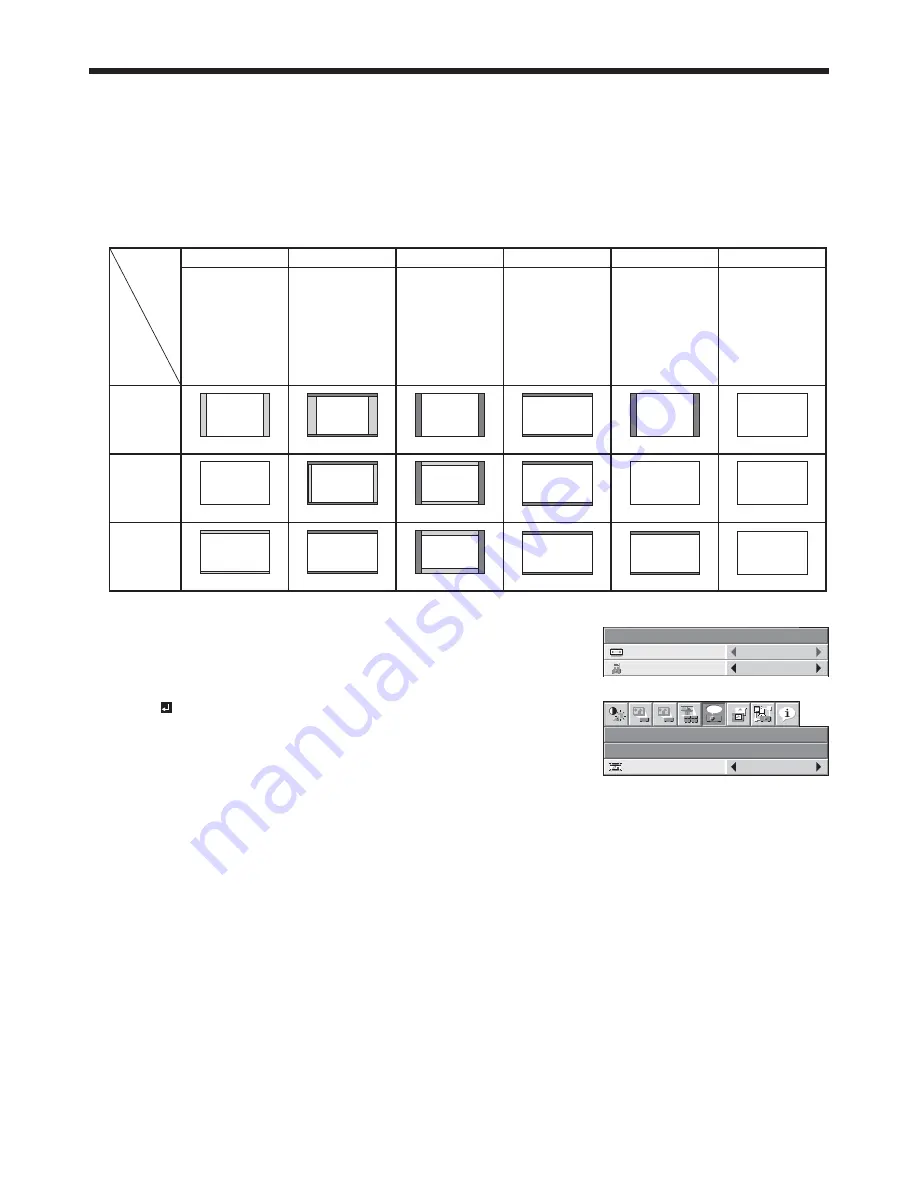
t 5IFGPMMPXJOHUBCMFTIPXTUIFJNBHFEJTQMBZQBUUFSOTEFQFOEJOHPOUIFTFUUJOHT
UXGA signal
1600 x 1200
(4:3)
WUXGA signal
1920 x 1200
(16:10)
1080p signal
1920 x 1080
(16:9)
16:10
NORMAL (FULL)
Input signal
Setting
NORMAL (16:9)
NORMAL (4:3)
16:9
REAL
FULL
Input video signal is
displayed at the max
height (1200 pixels) or
max width (1920
pixels) of the panel
while its aspect ratio
is maintained.
Select this setting
when using a 16:9
screen.
Select this setting
when using a 4:3
screen.
Regardless of the type
of input signal, image
is displayed at 16:9
aspect ratio (1920 x
1080 pixels). Select to
expand squeezed (or
horizontally
compressed) images
such as DVD images
to 16:9.
Input video signal is
displayed at its
original pixel size.
(When the pixel size is
larger than the panel
size, only the center
part of the image is
displayed.)
Regardless of the type
of input signal, image
is displayed at the full
panel size (1920 x
1200 pixels).
4:3
1600 x 1200
16:9
1920 x 1080
16:10
1440 x 1080
1728 x 1080
16:9
1920 x 1080
4:3
4:3
1600 x 1200
16:9
1600 x 900
16:9
16:9
1920 x 1080
16:10
16:9
1920 x 1080
16:9
1920 x 1080
16:10
16:10
1920 x 1200
16:10
1920 x 1200
4:3
1600 x 1200
16:10
1920 x 1200
1600 x 1000
1920 x 1080
1920 x 1200
1920 x 1200
With the FEATURE menu:
(See page 32 for menu setting.)
1. Display the FEATURE menu.
2. Select ASPECT by pressing the
or
button.
3. Select your desired aspect ratio by pressing the
or
button.
When 16:9 is selected with the FEATURE menu, you can select whether
or not to display signals at 16:9 depending on their type using the following
procedures.
4. Press the ENTER button.
5. Select a setting for the item MODE by pressing the
or
button.
t "--4*(/"-4
All signals are always displayed at 16:9 irrespective of their type.
t 7*%&00/-:
Signals supplied from video devices only are displayed at 16:9.
To cancel the menu:
6. Press the MENU button.
Important:
t *GZPVDIBOHFUIFBTQFDUSBUJPUP3&"-PS'6--XIJMFEJTQMBZJOHJNBHFTPOBTDSFFOXJUIUIFBTQFDU
ratio set to NORMAL (4:3), images appear partly off screen.
t *OTVDIDBTFTBTXIFOZPVLFFQEJTQMBZJOHJNBHFTJOUIFNPEFGPSBMPOHUJNFBOEUIFODIBOHFUIFNPEFUP
FULL, the masking areas may remain as afterimage around the displayed image. Consult your dealer in this case.
t 8IFOUIFJOQVUWJEFPTJHOBMJTJOUFSSVQUFEXJUI/03."- PS/03."- TFMFDUFEUIFJNBHFUVSOTCMVF
and appears partly off screen. In this case, set BACK COLOR in the INSTALLATION 2 menu to BLACK.
FEATURE
ASPECT
PROJECTOR ID
NORMAL (FULL)
ALL
FEATURE
ASPECT – 16:9
1
2
opt.
MODE
ALL SIGNALS
1
2


