background image

8

5. Maintenance 

CAUTION

Do not apply water directly onto the refrigerator.

This may result in malfunction, power leakage or fire.

The drain pan becomes dirty very easily and if not cleaned regularly, produces bad odours. Get into the habit

of cleaning this pan regularly.

Dip a soft cloth into cold or lukewarm water, wring it out well and wipe.

If you do not clean the door gasket (especially the lower part) when it is dirty, the gasket will easily become

damaged. Therefore, keep it clean at all times.

Do not clean with cleanser, acids, benzine, thinner, boiling water, soap powder, chemical cloths or neutral

detergent. These will damage the paint finish and external surfaces of your refrigerator.

When performing maintenance, make absolutely sure that the power plug is first disconnected from the power outlet.

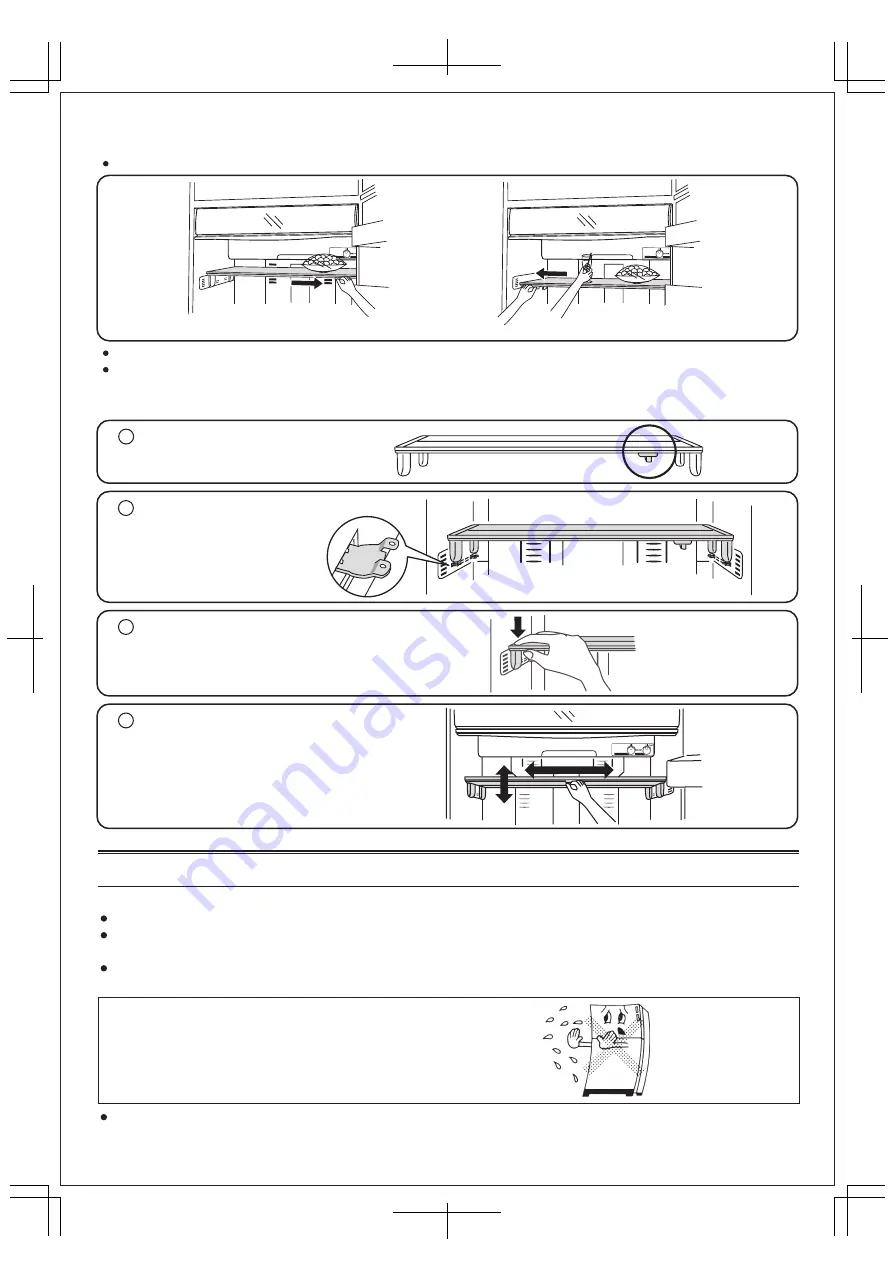
Move the lever on the front of the shelf left or right to adjust the shelf to the desired position.

8. Elevating shelf

Move the lever to the right to raise the shelf.

Move the lever to the left to lower the shelf.

The lever will be difficult to move when heavy items are placed on the shelf.

When the elevating shelf is lowered, one of the shelf supports may come off if the shelf contacts any foods under the shelf.

This is to prevent damaging the foods. If one of the supports comes off, push it back into position from above.

Installation

1  Make sure that the lever is moved

    completely to the right.

2  Make sure that the 4 metal

    stoppers are securely fitted

    into the refrigerator, then

    lightly set the shelf into the

    refrigerator and align the 4

    supports with the 4 stoppers.

3  Push each of the 4 supports, one at a time,

    downward from above. (When the internal

    hooks catch onto the refrigerator, a “click”

    sound will be heard.)

4  Finally, move the lever to the left and right

    and check that the shelf moves up and

    down while remaining level. (If the shelf

    does not remain level, the 4 hooks are

    not securely caught onto the refrigerator.

    Remove the shelf and repeat steps 1 to 4 .)

Содержание MR-508EK Series

Страница 1: ...Be sure to receive your copy of the warranty from the retailer and confirm that the purchase date and retailer name are written on the warranty Store this operating instructions manual and the warranty in a safe place This refrigerator was manufactured for refrigerating and freezing of foods in general households For commercial use please use a commercial refrigerator freezer The principal plastic...

Страница 2: ...maged cords or plugs or loose outlets Using them can result in an electric shock or injury Do not use Remove dust from the electrical plug Not doing so can cause a fire from insulation failure Remove dust Install on a strong level floor and adjust the adjustable legs to fix firmly The refrigerator may move and cause injury Make sure it s level When carrying use the handles made for carrying If oth...

Страница 3: ...nning If it continues to run in an abnormal state it can cause an electrical shock or a fire Pull out the plug If you will not be using the refrigerator for a long period of time after pulling out the electrical plug open the door and let the interior dry out If it is not dried adequately the cooling unit may corrode causing the refrigerant gas to leak which can then cause the danger of ignition o...

Страница 4: ...lass Shelf Elevating Shelf Leveling Legs Bottle Pocket Bottle Stopper Freezer Pocket Door Gasket Egg Rack This illustration shows series models MR 508EKL MR 560EKL Toe Grille Lid Sliding case LED Light Drain Pan Vegetable Case Glass Shelf MR 508EKL 1 PCS MR 560EKL 2 PCS Temperature Control refrigerator compartment Temperature Control freezer compartment Freezer Compartment Shelf Small Freezer Comp...

Страница 5: ...to a mating 3 point grounded receptacle If the installation location does not have a proper 3 point grounding wall receptacle the proper type must be installed The ground point should never be cut or removed If your refrigerator has an ungrounding plug connect the ground wire to the ground connection screw provided at the lower rear side of the refrigerator Corrosion control treatment may be requi...

Страница 6: ...omputer so there is no need to defrost it manually Water produced during defrosting passes through the drainage hose at the rear and collects in the drain pan in the lower rear part of the refrigerator Then it automatically evaporates with heat from the refrigerant pipe which is utilized as a radiator Fig 1 Fig 2 Sliding case Open by pulling the case out Lid CAUTION Before closing the refrigerator...

Страница 7: ...Front Shelf shall be under the rail of the Food Liner 4 Push the Front Shelf back to the rear this creates more space for food storage Rail of Food Liner 2 Press down the Rear Shelf then pull the Front Shelf out which the Front Shelf can be separated from the Rear Shelf If you have a difficulty for pulling the Front Shelf out please press on the edge of the Rear Shelf and pull the edge of the Fron...

Страница 8: ...he desired position 8 Elevating shelf Move the lever to the right to raise the shelf Move the lever to the left to lower the shelf The lever will be difficult to move when heavy items are placed on the shelf When the elevating shelf is lowered one of the shelf supports may come off if the shelf contacts any foods under the shelf This is to prevent damaging the foods If one of the supports comes of...

Страница 9: ...al hooks are released from the refrigerator a click sound will be heard If the supports are not released easily push the internal hooks inward 3 After the 4 supports are released pull out the shelf 1 Push the tray upward while pulling forward the hooks 3 at the back of the shelf with your finger 2 Lift up the back of the tray until the front hooks 4 are released Lift up the tray slowly otherwise i...

Страница 10: ...ccur or refrigerant gas may leak due to corrosion of the cooling unit When transporting When moving the unit when changing the direction of the unit 1 Discard the water ice from the Ice cube box and the Ice tray 2 Use protective gear protective gloves 3 Lay towels under the water discharge outlet and under the back corners of the refrigerator and place a container or tray on the floor that s about...

Страница 11: ...rator and the surfaces immediately beside and above The temperature control dial may not be properly set When the front of the refrigerator cabinet heats up In order to safeguard against condensation there is an anti condensation pipe which heats up the front of the cabinet when actuated When the front of the cabinet is warm this does not indicate a malfunction The more often the door is opened an...

Страница 12: ...liance This appliance is intended to be used in household application only 348 Victoria Road Rydalmere NSW 2116 For more information and support contact www mitsubishielectric com au Call 1300 651 808 SOLE AGENT in Australia MITSUBISHI ELECTRIC AUSTRALIA PTY LTD Incorporated in New South Wales ABN 58 001 215 792 Wellington Office Head Office 1 Parliament Street Lower Hutt PO Box 30772 Phone 04 560...

Отзывы: