background image

14  PROCEDURES BEFORE OPERATION

14.8  Setting Parameters

245

14

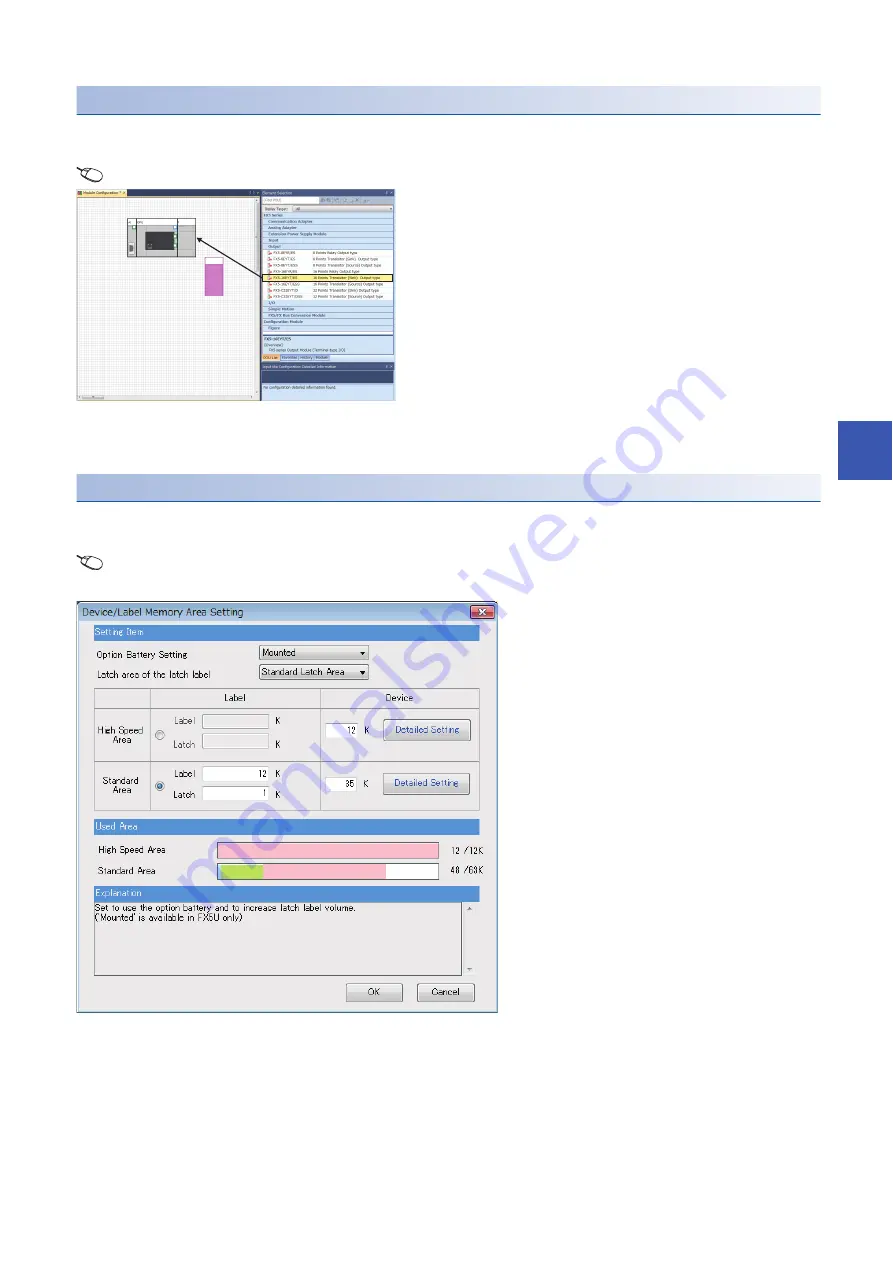
When setting parameters from the Module configuration diagram

"CPU parameter" and "module parameter" can be set from the module configuration diagram. The following shows how to set 
them.

[Navigation] 

 [Module Configuration]

Setting an optional battery using the engineering tool

The following setting is required when the capacity of the latch device/latch label is increased using the optional battery.
Note that the battery does not back up the data when the following setting is not provided.

[Navigation] 

 [Parameter] 

 Module model name 

 [CPU Parameter] 

 [Memory/Device Setting] 

 [Device/Label 

Memory Area Setting] 

 [Detailed Setting] 

 [Device/Label Memory Area Setting] window

Set the option battery setting to "Mounted" in Device/Label Memory Area Setting window.

1.

Drag each module to be used from the parts select 
window to the module configuration diagram with the 
mouse, and place the module to be coupled to the CPU 
module on the diagram.

2.

Select [Edit] 

 [Parameter] 

 [Fix] on the menu bar.

3.

When module labels are prepared in the configured 
modules, the window for adding module labels appears. 
Click the [Yes] button.

4.

Open the parameter editor of each module by double-
clicking the module having parameters that can be set.

5.

Set parameters, and click the [Apply] button to close the 
window.

Содержание MELSEC iQ-F FX5UC Series

Страница 1: ...al Hardware FX5S CPU module FX5UJ CPU module FX5U CPU module FX5UC CPU module Input module Output module Input output module High speed pulse input output module Powered input output module Extension power supply module Connector conversion module ...

Страница 2: ......

Страница 3: ...safe machinery operation in such a case Note that the output current of the 24VDC service power supply varies depending on the model and the absence presence of extension modules If an overload occurs the voltage automatically drops inputs in the programmable controller are disabled and all outputs are turned off External circuits and mechanisms should be designed to ensure safe machinery operatio...

Страница 4: ... a tool or key to open Warning Explosion Hazard Substitution of any component may impair suitability for Class Division 2 Warning Explosion Hazard Do not disconnect equipment while the circuit is live or unless the area is known to be free of ignitable concentrations Do not open the cover of the CPU module and remove the battery unless the area is known to be nonhazardous CAUTION When an inductive...

Страница 5: ...lutions WARNING Make sure to cut off all phases of the power supply externally before attempting installation or wiring work Failure to do so may cause electric shock or damage to the product Use the product within the generic environment specifications described in this manual Never use the product in areas with excessive dust oily smoke conductive dust corrosive gas salt air Cl2 H2S SO2 or NO2 f...

Страница 6: ...ns Make sure to affix the expansion board with tapping screws Tightening torque should follow the specifications in the manual If the screws are tightened outside of the specified torque range poor connections may cause malfunctions Work carefully when using a screwdriver such as installation of the product Failure to do so may cause damage to the product or accidents Connect the extension cables ...

Страница 7: ...ly wire to the terminal block European type in accordance with the following precautions Failure to do so may cause electric shock equipment failures a short circuit wire breakage malfunctions or damage to the product The disposal size of the cable end should follow the dimensions described in the manual Tightening torque should follow the specifications in the manual Twist the ends of stranded wi...

Страница 8: ...ied to terminal blocks power connectors I O connectors communication connectors or communication cables Failure to do so may result in wire damage breakage or programmable controller failure Make sure to observe the following precautions to prevent any damage to the machinery or accidents due to malfunction of the programmable controller caused by abnormal data written to the programmable controll...

Страница 9: ...g so may cause destruction or malfunction of the programmable controller program Use the battery for memory backup in conformance to this manual Use the battery for the specified purpose only Connect the battery correctly Do not charge disassemble heat put in fire short circuit connect reversely solder swallow or burn the battery or apply excessive forces vibration impact drop etc to the battery D...

Страница 10: ...le Battery Do not use the chemicals for cleaning If there is the possibility of touching the programmable controller inside a control panel in maintenance make sure to discharge to avoid the influence of static electricity Since there are risks such as burn injuries please do not touch the surface of the equipment with bare hands when it is operating in an environment which exceeds ambient tempera...

Страница 11: ... dedicated packaging boxes and shock absorbing palettes Failure to do so may cause failures in the programmable controller After transportation verify operation of the programmable controller and check for damage of the mounting part etc When transporting lithium batteries follow required transportation regulations For details on the regulated products refer to this manual The halogens such as flu...

Страница 12: ... le titre ATTENTION peut entraîner des blessures graves Les précautions de ces deux niveaux doivent être observées dans leur intégralité car elles ont trait à la sécurité des personnes et aussi du système Les utilisateurs finaux doivent lire ce manuel et ce dernier doit être conservé à portée de main pour qu il soit possible de s y référer autant que nécessaire AVERTISSEMENT Attire l attention sur...

Страница 13: ...ies sont mises hors service Les circuits et mécanismes externes sont normalement conçus pour garantir un fonctionnement sécurisé des machines dans un tel cas Lorsqu une erreur se produit dans le relais le triac ou le transistor d un circuit de sortie la sortie peut rester activée ou désactivée Si les signaux de sortie peuvent entraîner de graves accidents les circuits et les mécanismes externes so...

Страница 14: ... outil Avertissement Danger d explosion Toute substitution de composant peut compromettre l adéquation d une utilisation en Classe Division 2 Avertissement Danger d explosion Ne pas déconnecter l équipement quand le circuit est sous tension ni avant de d être assuré de l absence d atmosphère inflammable Ne pas ouvrir le couvercle du module CPU et ne pas retirer la batterie avant d avoir vérifié qu...

Страница 15: ... d effectuer une installation ou un câblage Le non respect de cette précaution peut entraîner une électrocution et endommager le produit Lors de l utilisation du produit respecter les spécifications générales concernant l environnement décrites à la Page 82 GENERAL SPECIFICATIONS Ne jamais utiliser le produit dans des zones où il y a une présence excessive de poussière fumée huileuse poussières co...

Страница 16: ...Fixer la carte d extension à l aide de vis taraudeuses Pour le couple de serrage suivre les spécifications indiquées dans le manuel Si la plage de couple spécifiée n est pas respectée pour le serrage des vis vis trop pas assez serrées cela peut entraîner des problèmes de raccordement et des dysfonctionnements La prudence est de rigueur lors de l utilisation d un tournevis pour l installation du pr...

Страница 17: ...on n est pas respectée l utilisateur risque une électrocution et l équipement risque de tomber en panne de subir un court circuit une rupture de câble ou des dysfonctionnements ou d être endommagé La taille de l extrémité du câble à mettre au rebut doit correspondre aux dimensions indiquées à la section relative à la gestion de l extrémité du câble Page 164 Wire end treatment Le couple de serrage ...

Страница 18: ...connecteurs d E S les connecteurs de communication et les câbles de communication ne soient pas soumis à une force excessive Si cette précaution n est pas respectée les câbles risquent d être rompus ou endommagés et l automate programmable risque de ne plus fonctionner Respecter les précautions suivantes afin d éviter tout endommagement des machines ou tout accident dû au dysfonctionnement de l au...

Страница 19: ...liser la batterie pour la sauvegarde de la mémoire conformément à la section relative aux spécifications des performances de la batterie Page 143 BATTERY PERFORMANCE SPECIFICATIONS Utiliser la batterie uniquement aux fins spécifiées Raccorder la batterie correctement Ne pas charger démonter chauffer mettre au feu court circuiter connecter à l envers souder avaler ni brûler la batterie et ne soumet...

Страница 20: ...ur Batterie Ne pas utiliser de produits chimiques pour le nettoyage S il est possible de toucher l automate programmable dans le boîtier de commande lors de l entretien toujours se décharger de l électricité statique pour éviter toute influence Puisqu il existe des risques comme des risques de brûlures ne pas toucher la surface de l équipement à mains nues lorsqu il fonctionne dans un environnemen...

Страница 21: ... Si cette précaution n est pas respectée l automate programmable risque de ne plus fonctionner Après le transport vérifier que l automate programmable fonctionne bien et qu il ne présente aucun dommage au niveau de la pièce à monter etc Lors du transport de batteries au lithium respecter la réglementation applicable à ce transport Pour obtenir des détails sur les produits réglementés se reporter a...

Страница 22: ...is manual may be changed for improvement without notice The information in this manual has been carefully checked and is believed to be accurate however if you have noticed a doubtful point or a doubtful error please contact your local Mitsubishi Electric representative When doing so please provide the manual number given at the end of this manual Item Model FX5S CPU module FX5S 30MR ES FX5S 40MR ...

Страница 23: ...onnected extension devices FX5UC CPU module 46 Modules with restrictions 48 Number of I O points 51 Current consumption 55 2 4 Numbers and Assignment in System 59 Module input output number 59 Module number of extension modules 59 2 5 Precautions 60 Selection of input output type 60 Precautions for operating ambient temperature 60 CHAPTER 3 PART NAMES 62 3 1 CPU Module 62 FX5S CPU module 62 FX5UJ ...

Страница 24: ...External Dimensions 109 CHAPTER 6 I O MODULE PERFORMANCE SPECIFICATIONS 115 6 1 Input Module 115 Extension cable type 115 Extension connector type 117 6 2 Output Module 119 Extension cable type 119 Extension connector type 121 6 3 I O Module 123 Extension cable type 123 Extension connector type 126 6 4 Powered I O Module 129 Extension cable type 129 6 5 High Speed Pulse Input Output Module 132 Ext...

Страница 25: ...dule extension connector type 158 Connection of an extended extension cable and connector conversion adapter 159 Connection of an FX3 extension module 159 CHAPTER 13 WIRING 160 13 1 Wiring Procedure 160 13 2 Preparation of Wiring Components 161 Power cables 161 Connector 162 Screw terminal block 164 European type terminal block 166 Spring clamp terminal block 168 13 3 Grounding 171 13 4 Power Supp...

Страница 26: ...ts 247 Inserting program elements by key input 248 Special relay for low battery voltage 248 14 10 Converting the Program 249 14 11 Saving the Project 249 14 12 Writing Data to the CPU Module 249 14 13 Resetting the CPU Module 250 14 14 Executing the Program 250 14 15 Monitoring the Program 251 CHAPTER 15 TROUBLESHOOTING 253 15 1 Troubleshooting Procedure 253 15 2 Checking with LEDs 253 Checking t...

Страница 27: ...rtification of UL cUL standards 267 Compliance with EC Directive CE marking 267 Compliance with UKCA marking 270 Appendix 3 Precautions for Battery Transportation 271 Control subject product 271 Precautions for transportation 271 Appendix 4 Handling of Batteries and Devices with Built in Batteries in EU Member States 272 Disposal precautions 272 Exportation precautions 272 INDEX 274 REVISIONS 276 ...

Страница 28: ...le built in and the Ethernet module MELSEC iQ F FX5 User s Manual Serial Communication JY997D55901 Describes the N N network Parallel link MC protocol inverter communication non protocol communication and predefined protocol support MELSEC iQ F FX5 User s Manual MODBUS Communication JY997D56101 Describes the MODBUS serial communication and MODBUS TCP communication MELSEC iQ F FX5 User s Manual MEL...

Страница 29: ...module Extended extension cable A generic term for FX5 30EC and FX5 65EC Extension module A generic term for I O modules extension power supply modules and intelligent function modules Extension module extension cable type A generic term for input modules extension cable type output modules extension cable type I O modules extension cable type powered input output modules high speed pulse input ou...

Страница 30: ...FX5 C32ET DS TS and FX5 C32ET DSS TS Input module A generic term for input modules extension cable type and input modules extension connector type Input module extension cable type A generic term for FX5 8EX ES and FX5 16EX ES Input module extension connector type A generic term for FX5 C16EX D FX5 C16EX DS FX5 C32EX D FX5 C32EX DS and FX5 C32EX DS TS Intelligent function module A generic term for...

Страница 31: ...tion module is used this module can maximize the power of extension devices FX5UC CPU module The FX5UC CPU module is compact and easy to use and helps downsize various devices Item FX5S CPU module FX5UJ CPU module FX5U CPU module FX5UC CPU module External appearance Hardware specifications Power supply specifications AC power supply DC power supply Total number of I O points 30 points 40 points 60...

Страница 32: ...elligent function module The intelligent function module is a module that has functions other than input output such as the network and positioning functions For details refer to the user s manual for each module FX5 safety extension module The FX5 safety extension module is used to configure a safety control system For details refer to the following MELSEC iQ F FX5 User s Manual Safety Control Ex...

Страница 33: ...following MELSEC iQ F FX5 User s Manual Analog Control CPU module built in Expansion adapter MELSEC iQ F FX5 User s Manual Serial Communication Extended extension cable The extended extension cable is used to install the FX5 extension module extension cable type at a remote location Connector conversion adapter This connector conversion adapter is used to connect an extended extension cable to an ...

Страница 34: ...g bus conversion modules FX3 extension modules can be connected Ex System configuration with the FX5U CPU module Connector Cable Expansion board Battery Expansion adapter CPU module I O module FX5 intelligent function module FX5 safety extension module Extended extension cable Connector conversion adapter I O module FX5 extension power supply module FX3 intelligent function module Connector conver...

Страница 35: ...l name abbreviation can be checked in the following locations as well No Description Details CPU module category S FX5S CPU module UJ FX5UJ CPU module U FX5U CPU module UC FX5UC CPU module Type category No symbol Extension cable type C Extension connector type Total number of I O points 8 16 24 30 32 40 60 64 80 96 and other applicable numbers of points Module category M CPU module E I O combined ...

Страница 36: ...elay 14 points 10 points FX5UJ 24MR ES 24 points 16 points FX5UJ 40MR ES 36 points 24 points FX5UJ 60MR ES Transistor sink 14 points 10 points FX5UJ 24MT ES 24 points 16 points FX5UJ 40MT ES 36 points 24 points FX5UJ 60MT ES Transistor source 14 points 10 points FX5UJ 24MT ESS 24 points 16 points FX5UJ 40MT ESS 36 points 24 points FX5UJ 60MT ESS FX5U CPU module AC power supply Sink source Relay 16...

Страница 37: ...T D 48 points 48 points FX5UC 96MT D Sink source Relay 16 points 16 points FX5UC 32MR DS TS Transistor sink 16 points 16 points FX5UC 32MT DS TS Transistor source 16 points 16 points FX5UC 32MT DSS FX5UC 32MT DSS TS 32 points 32 points FX5UC 64MT DSS 48 points 48 points FX5UC 96MT DSS Product Power supply specifications Input type Output type Number of input points Number of output points Model ...

Страница 38: ...ints FX5 32ER ES FX5 32ER DS Transistor sink FX5 32ET ES FX5 32ET DS Transistor source FX5 32ET ESS FX5 32ET DSS High speed pulse input output module Sink source Transistor sink 8 points 8 points FX5 16ET ES H Transistor source FX5 16ET ESS H Product Input type Output type Number of input points Number ofoutput points Model If usable by each CPU module FX5S FX5UJ FX5U FX5UC AC DC Input module Sink...

Страница 39: ...ut module FX5 8AD Temperature controller module FX5 4LC Positioning module FX5 20PG P FX5 20PG D Simple motion module FX5 40SSC S FX5 80SSC S Motion module FX5 40SSC G FX5 80SSC G Ethernet module FX5 ENET EtherNet IP module FX5 ENET IP OPC UA module FX5 OPC CC Link IE TSN master local module FX5 CCLGN MS CC Link IE Field Network intelligent device station module FX5 CCLIEF CC Link system master in...

Страница 40: ...communications FX5 232 BD Expansion board for RS 485 communications FX5 485 BD Expansion board for RS 422 communications FX5 422 BD GOT SD memory card module FX5 SDCD Product Model If usable by each CPU module FX5S FX5UJ FX5U FX5UC AC DC Analog I O expansion adapter FX5 4A ADP Analog input expansion adapter FX5 4AD ADP Analog output expansion adapter FX5 4DA ADP RTD temperature sensor input expans...

Страница 41: ...ule cannot communicate with a personal computer via CC Link Product Model If usable by each CPU module FX5S FX5UJ FX5U FX5UC AC DC Extension power supply module FX3U 1PSU 5V Product Model If usable by each CPU module FX5S FX5UJ FX5U FX5UC AC DC Special function block for analog input FX3U 4AD Special function block for analog output FX3U 4DA Temperature control block FX3U 4LC Pulse output block FX...

Страница 42: ...nsion devices FX5S CPU module Page 42 Number of connected extension devices FX5UJ CPU module Page 44 Number of connected extension devices FX5U CPU module Page 46 Number of connected extension devices FX5UC CPU module 2 Modules with restrictions For some modules the number and combinations of modules that can be used in one system are restricted Check the number of connectable modules the combinat...

Страница 43: ...e expansion adapters can be connected The order in which the communication adapters and analog adapters are connected is not restricted 1 The maximum number of connectable expansion adapters does not change when an SD memory card module is used No Item Maximum number of connectable modules Reference Expansion adapter 6 Page 41 Number of connected expansion adapters and expansion board Expansion bo...

Страница 44: ...be connected on the left side of the CPU module One expansion board can be connected to the front face of the CPU module When no expansion board is used a maximum of four expansion adapters can be connected When an expansion board is used a maximum of three expansion adapters can be connected No Item Maximum number of connectable modules Reference Expansion adapter 4 1 Page 42 Number of connected ...

Страница 45: ... supply of the CPU module is used for their input circuits they do not consume the 24VDC service power supply No Restriction The total number of occupied I O points of the extension modules must be within 32 When the first module of the extension modules occupies 32 points only this module one module can be connected In any condition each extension module consumes 200mA generated from the 24VDC se...

Страница 46: ...umber of connected expansion adapters and expansion board A maximum of six expansion adapters can be connected on the left side of the CPU module One expansion board can be connected to the front face of the CPU module No Item Maximum number of connectable modules Reference Expansion adapter 6 Page 44 Number of connected expansion adapters and expansion board Expansion board 1 Extension module 16 ...

Страница 47: ...eight 2 When the modules of extension cable type are connected after the extension power supply modules extension connector type the connector conversion modules cannot be used Number of connected FX3 extension modules A maximum of six FX3 extension modules can be connected on the right side of the bus conversion module When an FX3 extension power supply module is used a maximum of eight FX3 exten...

Страница 48: ...mber of connectable modules is 12 2 Extension power supply modules and connector conversion modules are not included in the number of connected modules Number of connected expansion adapters This section describes the number of connected modules on the left side of the CPU module No Item Maximum number of connectable modules Reference Expansion adapter 6 Page 46 Number of connected expansion adapt...

Страница 49: ...um 15 FX5 intelligent function modules can be connected 1 Maximum number of connectable intelligent function modules is eight 2 When the modules of extension cable type are connected after the extension power supply modules extension connector type the connector conversion modules cannot be used Number of connected FX3 extension modules A maximum of six FX3 extension modules can be connected on th...

Страница 50: ... connectable modules High speed pulse input output module FX5 16ET ES H FX5 16ET ESS H 4 Product Model Maximum number of connectable modules Extension power supply module FX5 C1PS 5V When using an FX5U FX5UC CPU module 2 FX5 1PSU 5V When using an FX5U CPU module 2 When using an FX5UJ CPU module 1 Product Model Maximum number of connectable modules Extension power supply module FX3U 1PSU 5V 2 1 Pro...

Страница 51: ...the following intelligent function modules use the versions specified below FX5 20PG P 1 011 or later FX5 20PG D 1 011 or later FX5 CCLGN MS 1 002 or later FX5 DP M 1 001 or later Conversion module Extended extension cable and connector conversion adapter To connect to a module of extension cable type 1 the connector conversion adapter FX5 CNV BC is required When the bus conversion module is used ...

Страница 52: ...apter FX5 4A ADP When using an FX5S FX5U FX5UC CPU module 2 1 Configurable or not configurable Connection order of expansion adapters Configurable FX5 4A ADP FX5 4DA ADP FX5 4DA ADP FX5 4DA ADP FX5 4DA ADP FX5 4A ADP Not configurable FX5 4DA ADP FX5 4A ADP FX5 4DA ADP Configurable or not configurable Connection order of expansion adapters Configurable FX5 4AD TC ADP FX5 4A ADP FX5 4A ADP FX5 4AD T...

Страница 53: ... Firmware version Number of I O points in the entire system Number of I O points including the number of occupied I O points Number of remote I O points FX5S CPU module No restrictions 80 points maximum 80 points maximum FX5UJ CPU module No restrictions 256 points maximum 256 points maximum 256 points maximum 1 FX5U CPU module FX5UC CPU module 1 110 or higher 512 points maximum 384 points maximum ...

Страница 54: ...ied I O points Example of number of occupied I O points Module Model Number of input points Number of output points Number of I O points Description CPU module FX5UJ 24MR ES 10 points 16 points 14 points 16 points 24 points 32 points The number in brackets is the number of occupied points When calculating the total number of I O points the values in the brackets are used The number of I O points i...

Страница 55: ... details refer to the following MELSEC iQ F FX5 User s Manual CC Link AnyWireASLINK The number of I O points set below is assigned to the remote I O to be used with AnyWireASLINK FX5 ASL M Set with the engineering tool parameters FX3U 128ASL M Set with the rotary switch on the FX3U 128ASL M main body For details refer to the following MELSEC iQ F FX5 User s Manual AnyWireASLINK FX3U 128ASL M User ...

Страница 56: ... M and 256 points of the remote I O points to be used by the FX3U 16CCLM are occupied 512 points 160 points 256 points 96 points Remote I O points that can be used with the FX3U 128ASL M are 96 points or less Ex When the number of I O points is 160 points the FX3U 16CCL M is connected after on the right side of the FX3U 128ASL M and the total number of remote I O points to be used by the FX3U 128A...

Страница 57: ...nput output module based on AC power supply specifications each are equipped with a 24VDC service power supply and can be used as a power supply for the input devices and a 24VDC power supply for the expansion adapters and intelligent function modules 1 However when using the 24VDC service power supply the 24VDC service power supply capacity that can be used by the CPU module and the powered input...

Страница 58: ...sion devices exceeds the power supply capacity of the CPU module Page 57 Current consumption Ex 2 If the power supply capacity of the CPU module is exceeded add a powered input output module or extension power supply module and calculate current consumption again Ex Calculate the current consumption in the ranges powered by the CPU module and by the powered input output module CPU module Power sup...

Страница 59: ...t consumption of expansion adapters and expansion boards is not required When using the expansion adapters that require an external 24VDC power supply prepare the external power supply FX5UJ CPU module Calculation of the current consumption of the 5VDC power supply is not required When supplying the power from a 24VCD service power supply to the expansion adapters FX5 4DA ADP FX5 4A ADP that requi...

Страница 60: ...th a DC power supply apply the 24VDC power supply capacity Module Model Current consumption 5VDC power supply 24VDC power supply Expansion board FX5 232 BD Calculation not required Expansion adapter FX5 232ADP Calculation not required Calculation not required Output module FX5 16EYT ES Calculation not required Calculation not required Input module FX5 16EX ES Calculation not required Calculation n...

Страница 61: ...les safety main module or bus conversion module connected to the CPU module Module numbers are assigned to intelligent function modules in order of distance from the CPU module No 1 No 2 No 16 Products to which module numbers are not assigned Module numbers are not assigned to the following extension devices Ex When the FX5 safety extension modules are not connected Ex When the FX5 safety extensio...

Страница 62: ...an environment with no sudden temperature changes When there are sudden temperature changes because of opening closing of the control panel or other reasons condensation may occur which may cause a fire fault or malfunction Furthermore use an air conditioner in dehumidifier mode to prevent condensation 1 For details on how to check the serial number refer to Page 266 How to Check the Date of Manuf...

Страница 63: ...hen 24VDC service power supply is used for the input circuit of the CPU module 400mA 300mA Supply capacity when external power supply is used for the input circuit of the CPU module 480mA 380mA FX5U 64M E Supply capacity when 24VDC service power supply is used for the input circuit of the CPU module 600mA 300mA Supply capacity when external power supply is used for the input circuit of the CPU mod...

Страница 64: ...ication 5 Peripheral connecting connector cover Cover for protecting the built in USB communication connector and others The built in USB communication connector and RUN STOP RESET switch are located under this cover 6 Expansion board connector cover Cover for protecting the expansion board connector 7 Input display LED Turns on when input is on 8 PWR LED Indicates whether the CPU module is powere...

Страница 65: ...ts the CPU module Hold the switch on the RESET side for approximately 1 second 3 Built in USB communication connector Connector for connection with engineering tool 4 Terminal names The signal names for power supply input and output terminals are shown shows a function grounding terminal 5 Terminal Terminals for power input and output For details on the terminal layout refer to Page 101 Power inpu...

Страница 66: ...certification label Genuine product certification label to prevent counterfeiting 3 Nameplate The product model name manufacturer s serial number power supply specifications and MAC address are shown is a mark that instructs the use of a cable with an appropriate temperature rating 80 or more for wiring 4 DIN rail mounting groove The module can be installed on a DIN46277 rail width 35mm No Name De...

Страница 67: ...ns on when input is on 7 PWR LED Indicates whether the CPU module is powered or not On Powered Off Not powered or hardware error ERR LED Indicates the error status of the CPU module On Error or hardware error Flashing Factory default setting error hardware error or resetting Off Normal operation P RUN LED Indicates the program running status On Normal operation Flashing Paused stopped program mism...

Страница 68: ...is to be removed 4 Built in USB communication connector Connector for connection with engineering tool 5 SD memory card slot Slot for inserting an SD memory card 6 Terminal names The signal names for power supply input and output terminals are shown shows a function grounding terminal 7 Expansion board connector Connector for connecting an expansion board 8 Extension connector Connector for connec...

Страница 69: ...pter to the expansion adapter connector under the cover 2 Genuine product certification label Genuine product certification label to prevent counterfeiting 3 Nameplate The product model name manufacturer s serial number power supply specifications and MAC address are shown 4 DIN rail mounting groove The module can be installed on a DIN46277 rail width 35mm No Name Description 1 CPU module fixing s...

Страница 70: ...U module is receiving data through built in RS 485 communications SD LED Turns on when the CPU module is sending data through built in RS 485 communications SD RD LED Turns on when the CPU module is sending or receiving data through built in Ethernet communications 7 Expansion board connector cover Cover for protecting expansion board connector battery or others Connect the battery under this cove...

Страница 71: ...mory card when the SD memory card is to be removed 5 Built in analog I O terminal block Terminal block for using the built in analog function 6 Terminal names The signal names for power supply input and output terminals are shown shows a function grounding terminal 7 SD memory card slot Slot for inserting an SD memory card 8 Expansion board connector Connector for connecting an expansion board 9 E...

Страница 72: ...pter connector under the cover 2 Genuine product certification label Genuine product certification label to prevent counterfeiting 3 Nameplate The product model name manufacturer s serial number power supply specifications and MAC address are shown 4 DIN rail mounting groove The module can be installed on a DIN46277 rail width 35mm No Name Description 1 CPU module fixing screw hole Screw holes for...

Страница 73: ...s Flashing Battery error Off Normal operation CARD LED Indicates whether an SD memory card can be used or not On Can be used or cannot be removed Flashing In preparation Off Not inserted or can be removed SD RD LED Turns on when the CPU module is sending or receiving data through built in Ethernet communications RD LED Turns on when the CPU module is receiving data through built in RS 485 communic...

Страница 74: ... for operating the CPU module RUN Runs the program STOP Stops the program RESET Resets the CPU module Hold the switch on the RESET side for approximately 1 second No Name Description 1 Expansion adapter connector cover Cover for protecting the expansion adapter connector 2 Extension connector cover Cover for protecting the subsequent extension connector 3 DIN rail mounting groove The module can be...

Страница 75: ...oes not damage the switch or case No Name Description 1 Battery cover Cover for protecting the battery connecting connector 2 Power connector for CPU module Connector for connecting power cables 3 RS 485 terminal resistor selector switch Switch for switching terminal resistance for built in RS 485 communications 4 Terminal names shows a function grounding terminal 3 2 4 1 ...

Страница 76: ...ot On Powered Off Not powered or hardware error 3 Pullout tab They are used when drawing out an extension cable 4 Extension cable Cable connected to extend modules 5 Terminal Terminals for input and output For details on the terminal layout refer to the following Input module Page 115 Input Module Output module Page 119 Output Module I O module Page 123 I O Module 6 Extension connector Connector f...

Страница 77: ... 123 I O Module 5 DISP switch Switches between the display of lower higher numbers of the input display LED or output display LED Lower number F Higher number L 6 Extension connector Connector for connecting the extension connector of an extension module No Name Description 1 Extension connector Connector connected to extend modules 2 PWR POWER LED Indicates whether the input modules output module...

Страница 78: ...over Cover for protecting the extension connector Connect the extension cable of an extension module to the extension connector under the cover 7 Extension connector for preceding module Connector for connecting the supplied extension cable that connects to the preceding module the CPU module side 8 Terminal block mounting screws Gradually loosen the left and right screws alternatingly to remove t...

Страница 79: ...ed Off Not powered or hardware error 3 Pullout tab They are used when drawing out an extension cable 4 Extension cable Cable connected to extend modules 5 Terminal Terminals for input and output For details on the terminal layout refer to Page 132 High Speed Pulse Input Output Module 6 Extension connector Connector for connecting the extension cable of an extension module W 8 83 90 5 1 1 6 3 2 4 W...

Страница 80: ...facturer s serial number and power supply specifications are shown 4 DIN rail mounting groove The module can be installed on a DIN46277 rail width 35mm 5 DIN rail mounting hook Hook for mounting on a DIN rail of DIN46277 width 35mm 6 Power terminal block The signal names for power supply input and output terminals are shown shows a function grounding terminal 7 Extension connector for preceding mo...

Страница 81: ... 5 Extension module connecting hook When connecting an extension module secure it with these hooks 6 Extension module connecting hole An extension module connecting hook is inserted here to fix the module 7 Extension connector cover Cover for protecting the extension connector Connect the extension connector of an extension module to the extension connector under the cover 8 Extension connector fo...

Страница 82: ...g the supplied extension cable that connects to the preceding module the CPU module side 2 Extension connector Connector for connecting the extension connector of an extension module extension connector type No Name Description 1 Extension connector for preceding module Extension connector for connecting to the preceding module the CPU module side 2 Extension connector Connector for connecting the...

Страница 83: ...an be used or cannot be removed Flashing when in preparation Off when the SD memory card is not inserted or can be removed 2 SD memory card disable switch 1 ON side down The SD memory card can be used OFF side up Use of the SD memory card is stopped used only for removal 3 SD memory card slot 4 SD memory card slot cover No Name Description 1 Write protect switch Setting the switch in the lock posi...

Страница 84: ...The programmable controller is assumed to be installed in an environment equivalent to indoor 11 This indicates the section of the power supply to which the equipment is assumed to be connected between the public electrical power distribution network and the machinery within premises Category applies to equipment for which electrical power is supplied from fixed facilities The surge voltage withst...

Страница 85: ...igent function module FX5 safety extension module Between terminals Dielectric withstand voltage Insulation resistance FX5S FX5UJ FX5U FX5UC Between power supply terminal AC power supply and ground terminal 1 5kVAC for one minute 10M or higher by 500VDC insulation resistance tester Between power supply terminal DC power supply and ground terminal 500VAC for one minute Between 24VDC service power s...

Страница 86: ...high speed comparison match interrupt Internal timer interrupt input interruption high speed comparison match interrupt interrupt by modules 2 Command processing time LD X0 84ns 34ns 34ns 3 MOV D0 D1 100ns 34ns 34ns 3 Memory capacity Program capacity 48k steps 96 kbytes flash memory 64k steps 128k steps 1 128 kbytes 256 kbytes flash memory SD memory card Memory card capacity SD SDHC memory card Ma...

Страница 87: ...e capacity capacitor incorporated into the programmable controller When voltage of the large capacity capacitor drops clock data is no longer accurately retained The retention period of a fully charged capacitor electricity conducted across the programmable controller for at least 30 minutes is 10 days ambient temperature 25 How long the capacitor can hold the data depends on the operating ambient...

Страница 88: ...ints 3 Link register W 16 32768 points 3 1024 points 32768 points 3 Link special register SW 16 32768 points 3 1024 points 32768 points 3 Number of system device points Special relay SM 10 10000 points fixed 10000 points 10000 points fixed Special register SD 10 12000 points fixed 12000 points 12000 points fixed Module access device Intelligent function module device 10 Depends on the intelligent ...

Страница 89: ...d upon occurrence of instantaneous power failure for 10ms or less Operation can be continued upon occurrence of instantaneous power failure for 10ms or less When the supply voltage is 200VAC or higher the time can be changed between 10 to 100ms by editing the user program Power fuse 250V 3 15A Time lag fuse FX5U 32M 250V 3 15A Time lag fuse FX5U 64M FX5U 80M 250V 5A Time lag fuse Rush current 30A ...

Страница 90: ...iod of the AC power supply FX5UJ FX5U CPU modules only SD8008 t 1 AC power supply AC detection Approx 3ms SM8000 RUN monitor 1 scan time SM8007 momentary power failure detection SM8008 power failure detected Power failure detection period 10 to 13ms 1 t 0ms to approx 60ms for 100VAC system 0ms to approx 100ms for 200VAC system ...

Страница 91: ...ower failure time 1 Operation can be continued upon occurrence of instantaneous power failure for 5ms or less Power fuse FX5U 32M 250V 3 15A Time lag fuse FX5U 64M FX5U 80M 250V 5A Time lag fuse 125V 3 15A Time lag fuse Rush current FX5U 32M 50A max 0 5ms or less 24VDC FX5U 64M FX5U 80M 65A max 2 0ms or less 24VDC FX5UC 32M 35A max 0 5ms or less 24VDC FX5UC 64M FX5UC 96M 40A max 0 5ms or less 24VD...

Страница 92: ...3k X20 or later 5 6k ON input sensitivity current X0 to X7 3 5mA or more X10 or later 3 0mA or more X0 to X17 3 5mA or more X20 or later 3 0mA or more Off input sensitivity current 1 5mA or less Input response frequency X0 X1 X3 X4 100kHz 2 X2 X5 X6 X7 10kHz FX5U 32M X0 to X5 200kHz 2 X6 to X17 10kHz FX5U 64M FX5U 80M X0 to X7 200kHz 2 X10 to X17 10kHz X20 or later 0 1 0 05kHz FX5UC 32M X0 to X5 2...

Страница 93: ...s or less Off 50 s or less FX5U 64M FX5U 80M X0 to X7 On 2 5 s or less Off 2 5 s or less X10 to X17 On 30 s or less Off 50 s or less X20 or later On 50 s or less Off 150 s or less FX5UC 32M X0 to X5 On 2 5 s or less Off 2 5 s or less X6 to X17 On 30 s or less Off 50 s or less FX5UC 64M FX5UC 96M X0 to X7 On 2 5 s or less Off 2 5 s or less X10 to X17 On 30 s or less Off 50 s or less X20 or later On...

Страница 94: ...ng AC power supply When using 24VDC service power supply When using external power supply Item Circuit configuration diagram Sink input wiring Source input wiring DC power supply 24V N L X S S 0V Fuse 100 to 240VAC Input impedance 24V N L X S S 0V Fuse 100 to 240VAC Input impedance 24V N L X S S 0V Fuse 100 to 240VAC Input impedance 24V N L X S S 0V Fuse 100 to 240VAC Input impedance X S S Fuse 24...

Страница 95: ...g Source input wiring FX5UC MT D FX5UC M DS X COM 1 Fuse 24VDC Photocoupler 1 Input impedance X COM0 1 2 Fuse Photocoupler 24VDC 1 Input impedance 2 For the spring clamp terminal block type the COM0 terminal is the S S terminal X COM0 1 2 Photocoupler Fuse 24VDC 1 Input impedance 2 For the spring clamp terminal block type the COM0 terminal is the S S terminal ...

Страница 96: ...ess if not a CE UL cUL compliant item Max load 2A point The total load current per common terminal should be the following value 3 output points common terminal 6A or less 4 output points common terminal 8A or less For details on the common refer to Page 101 Power input output terminal block 2A point The total load current per common terminal should be the following value 4 output points common te...

Страница 97: ...TIONS 5 4 Output Specifications 95 5 FX5UC CPU module circuit configuration Item Circuit configuration diagram Relay output Y Y COM COM COM COM Load DC power supply Fuse Load AC power supply Fuse A common number is inserted into of COM ...

Страница 98: ... terminal 0 8A or less For details on the common refer to Page 101 Power input output terminal block 0 5A point The total load current per common terminal should be the following value 4 output points common terminal 0 8A or less 8 output points common terminal 1 6A or less For details on the common refer to Page 101 Power input output terminal block Y0 to Y3 0 3A point Y4 or later 0 1A point The ...

Страница 99: ... output wiring Source output wiring Transistor output Item Circuit configuration diagram Sink output wiring Source output wiring Transistor output Y COM Load DC power supply Fuse A common number is inserted into of COM Y V Load DC power supply Fuse A common number is inserted into of V Y COM Load DC power supply Fuse A common number is inserted into of COM Y V Load Fuse DC power supply A common nu...

Страница 100: ...tput load maximum value on a system For 2A output load maximum value on a system Ambient temperature 100 55 35 0 80 55 50 40 47 FX5UJ MR ES 100 55 0 50 FX5UJ MT 55 Derating chart When using 24VDC service power supply and external power supply 24VDC for the input circuit power supply Simultaneous ON ratio Simultaneous ON ratio For 1A output load For 2A output load Ambient temperature Ambient temper...

Страница 101: ...Q F FX5 User s Manual Positioning Control CPU module built in High speed pulse input output module 5 8 Communication Specifications Built in Ethernet communication Refer to the following MELSEC iQ F FX5 User s Manual Ethernet Communication Built in RS 485 communication Refer to the following MELSEC iQ F FX5 User s Manual Serial Communication 100 55 25 20 40 80 70 50 Derating chart Simultaneous ON ...

Страница 102: ...thernet connector Built in RS 485 terminal European type terminal block FX5U CPU module FX5UJ CPU module FX5UC CPU module V V V V2 V1 5 poles Analog input Analog output 8 1 Pin Signal name 1 TXD 2 TXD 3 RXD 4 Not used 5 Not used 6 RXD 7 Not used 8 Not used RDA RXD RDB RXD SDA TXD SDB TXD SG GND 5 poles RDA RXD RDB RXD SDA TXD SDB TXD SG GND 5 poles ...

Страница 103: ...t wire terminals Indication of input terminal Both AC and DC power supply types have the same input terminals however the external input wiring differs from each other One common terminal covers 3 or 4 output points For external wiring refer to Page 175 Input Wiring Indication of output terminals connected to common COM Output points covered by one common terminal are as follows FX5S CPU module FX...

Страница 104: ...17 COM3 X0 S S 0V 24V N L 1 2 3 4 5 6 7 X10 11 12 13 14 15 16 17 Y4 2 3 COM1 1 Y0 COM0 5 6 7 Y10 11 12 COM2 22 X20 24 26 21 23 25 27 13 Y14 15 16 17 V3 X0 S S 0V 24V N L 1 2 3 4 5 6 7 X10 11 12 13 14 15 16 17 Y4 2 3 V1 1 Y0 V0 5 6 7 Y10 11 12 V2 22 X20 24 26 21 23 25 27 13 Y14 15 16 17 COM3 X0 S S 0V 24V N L 1 2 3 4 5 6 7 X10 11 12 13 14 15 16 17 Y4 2 3 COM1 1 Y0 COM0 5 6 7 Y10 11 12 COM2 Y20 21 2...

Страница 105: ... COM0 5 6 7 Y10 11 12 COM2 Y20 21 22 23 COM4 Y24 25 26 27 COM5 Y30 31 32 33 COM6 Y34 35 36 37 COM7 22 X20 24 26 31 33 35 37 32 X30 41 43 42 X40 34 36 45 47 44 46 51 53 52 X50 55 57 54 56 21 23 25 27 13 Y14 15 16 17 V3 X0 S S 0V 24V N L 1 2 3 4 5 6 7 X10 11 12 13 14 15 16 17 Y4 2 3 V1 1 Y0 V0 5 6 7 Y10 11 12 V2 Y20 21 22 23 V4 Y24 25 26 27 V5 Y30 31 32 33 V6 Y34 35 36 37 V7 22 X20 24 26 31 33 35 37...

Страница 106: ...20 21 23 22 24 25 27 26 Y4 Y0 2 1 3 COM0 0V 24V COM1 6 5 Y10 COM2 12 11 Y14 COM3 16 15 17 7 13 3 S S 1 2 X0 N L 4 5 6 7 X10 11 12 13 14 15 16 17 20 21 23 22 24 25 27 26 2 Y0 1 3 V0 0V 24V V1 Y4 6 5 V2 Y10 11 12 V3 Y14 16 15 7 13 17 3 S S 1 2 X0 N L 4 5 6 7 X10 11 12 13 14 15 16 17 X20 21 31 23 27 25 X30 26 22 24 32 33 34 35 36 X40 41 37 42 43 Y0 2 1 3 COM0 0V 24V COM1 Y4 5 Y6 COM2 Y10 12 11 COM3 Y...

Страница 107: ...21 23 COM4 25 26 27 32 Y30 33 34 35 COM5 36 31 37 0V S S 0V 24V N L 24V X0 1 2 3 4 5 6 7 X10 11 12 13 14 22 16 X20 21 15 17 23 24 25 26 27 X30 31 32 33 34 35 36 37 Y4 2 3 V1 1 Y0 V0 5 6 7 Y10 11 12 13 Y14 15 16 17 V2 V3 24 22 Y20 21 23 V4 25 26 27 32 Y30 33 34 35 V5 36 31 37 0V S S 0V 24V N L 24V X0 1 2 3 4 5 6 7 X10 11 12 13 14 22 16 X20 21 15 17 23 24 25 26 27 X30 31 32 33 34 35 36 X40 42 44 46 ...

Страница 108: ...OM3 24 22 Y20 21 23 COM4 25 26 27 32 Y30 33 34 35 COM5 36 31 37 S S X0 1 2 3 4 5 6 7 X10 11 12 13 14 22 16 X20 21 15 17 23 24 25 26 27 X30 31 32 33 34 35 36 37 Y4 2 3 V1 1 Y0 V0 5 6 7 Y10 11 12 13 Y14 15 16 17 V2 V3 24 22 Y20 21 23 V4 25 26 27 32 Y30 33 34 35 V5 36 31 37 S S X0 1 2 3 4 5 6 7 X10 11 12 13 14 22 16 X20 21 15 17 23 24 25 26 27 X30 31 32 33 34 35 36 X40 42 44 46 37 Y4 2 3 COM1 1 Y0 CO...

Страница 109: ...33 Y34 Y35 Y36 Y37 V1 X0 X1 X2 X3 X4 X5 X6 X7 COM0 X10 X11 X12 X13 X14 X15 X16 X17 COM0 Y0 Y1 Y2 Y3 Y4 Y5 Y6 Y7 V0 Y10 Y11 Y12 Y13 Y14 Y15 Y16 Y17 V0 Input Input Notched edge Output Output Notched edge X20 X21 X22 X23 X24 X25 X26 X27 COM X30 X31 X32 X33 X34 X35 X36 X37 COM Y20 Y21 Y22 Y23 Y24 Y25 Y26 Y27 COM1 Y30 Y31 Y32 Y33 Y34 Y35 Y36 Y37 COM1 X0 X1 X2 X3 X4 X5 X6 X7 COM X10 X11 X12 X13 X14 X15 ...

Страница 110: ... X16 X17 S S Y0 Y1 Y2 Y3 Y4 Y5 Y6 Y7 COM0 Y10 Y11 Y12 Y13 Y14 Y15 Y16 Y17 COM0 Input Output X0 X1 X2 X3 X4 X5 X6 X7 S S X10 X11 X12 X13 X14 X15 X16 X17 S S Y0 Y1 Y2 Y3 Y4 Y5 Y6 Y7 V0 Y10 Y11 Y12 Y13 Y14 Y15 Y16 Y17 V0 Input Output X0 X1 X2 X3 X4 X5 X6 X7 S S0 X0 X1 X2 X3 X4 X5 X6 X7 S S0 Y0 Y1 Y2 Y3 Y4 Y5 Y6 Y7 Y0 Y1 Y2 Y3 Y4 Y5 Y6 Y7 COM0 COM0 X10 X11 X12 X13 X14 X15 X16 X17 S S1 X10 X11 X12 X13 ...

Страница 111: ... FX5S 30MR ES FX5S 30MT ES FX5S 30MT ESS 100mm 81mm Approx 0 45kg FX5S 40MR ES FX5S 40MT ES FX5S 40MT ESS 130mm 111mm Approx 0 55kg FX5S 60MR ES FX5S 60MT ES FX5S 60MT ESS 175mm 156mm Approx 0 65kg Model W W1 mounting hole pitch Mass weight FX5S 80MR ES 1 FX5S 80MT ES 1 FX5S 80MT ESS 1 235mm 216mm Approx 0 8kg W1 15 90 W 79 8 2 4 5 mounting hole 82 mounting hole pitch 15 90 W1 W 8 79 4 4 5 mountin...

Страница 112: ...110 5 CPU MODULE PERFORMANCE SPECIFICATIONS 5 10 External Dimensions With an expansion board installed For FX5 SDCD Unit mm For FX5 SDCD and FX5 485 BD Unit mm 15 1 71 4 87 30 5 71 4 101 9 ...

Страница 113: ... 485 BD Unit mm Model W W1 mounting hole pitch Mass weight FX5UJ 24MR ES FX5UJ 24MT ES FX5UJ 24MT ESS 95mm 76mm Approx 0 55kg FX5UJ 40MR ES FX5UJ 40MT ES FX5UJ 40MT ESS 130mm 111mm Approx 0 65kg FX5UJ 60MR ES FX5UJ 60MT ES FX5UJ 60MT ESS 175mm 156mm Approx 0 80kg W1 15 90 W 83 8 2 4 5 mounting hole 82 mounting hole pitch 30 5 71 4 101 9 ...

Страница 114: ...S FX5U 32MT DS FX5U 32MT DSS 150mm 123mm Approx 0 7kg Model W W1 mounting hole pitch Mass weight FX5U 64MR ES FX5U 64MT ES FX5U 64MT ESS FX5U 64MR DS FX5U 64MT DS FX5U 64MT DSS 220mm 193mm Approx 1 0kg FX5U 80MR ES FX5U 80MT ES FX5U 80MT ESS FX5U 80MR DS FX5U 80MT DS FX5U 80MT DSS 285mm 258mm Approx 1 2kg W1 22 90 W 83 8 2 4 5 mounting hole 80 mounting hole pitch W1 22 90 W 83 8 4 4 5 mounting hol...

Страница 115: ...5 CPU MODULE PERFORMANCE SPECIFICATIONS 5 10 External Dimensions 113 5 With an expansion board installed For FX5 485 BD Unit mm 30 5 71 4 101 9 ...

Страница 116: ...inal block type Unit mm Model W Mass weight FX5UC 32MT D FX5UC 32MT DSS 42 1mm Approx 0 2kg FX5UC 64MT D FX5UC 64MT DSS 62 2mm Approx 0 3kg FX5UC 96MT D FX5UC 96MT DSS 82 3mm Approx 0 35kg Model W Mass weight FX5UC 32MT DS TS FX5UC 32MT DSS TS 48 1mm Approx 0 25kg FX5UC 32MR DS TS 68 2mm Approx 0 35kg 90 W 89 1 74 90 W 93 7 74 ...

Страница 117: ... Module Extension cable type 1 Current consumption when external power supply is used for the input circuit Item Specifications FX5 8EX ES FX5 16EX ES Current consumption 5VDC 75mA 100mA 24VDC 50mA 0mA 1 85mA 0mA 1 Mass weight Approx 0 2kg Approx 0 25kg External color Munsell 0 6B7 6 0 2 Input specifications Number of input points 8 points 16 points Connection type Screw terminal block M3 screws I...

Страница 118: ...wiring When using external power supply When using 24VDC service power supply FX5 8EX ES FX5 16EX ES 0V 24V S S X S S CPU module 24VDC Input module 0V 24V S S X S S CPU module 24VDC Input module 0V 24V S S X S S CPU module Input module 0V 24V S S X S S CPU module Input module X 0 S S 1 2 3 X 4 5 6 7 X 0 1 2 3 4 5 7 6 X 0 1 2 3 4 5 6 7 S S Lower number Higher number ...

Страница 119: ...ns Number of input points 16 points 16 points 32 points Connection type Connector Spring clamp terminal block Input type Sink Sink source Sink Sink source Sink source Input signal voltage 24VDC 20 15 Input signal current 4 0mA 24VDC Input impedance 5 6k Input sensitivity current On 3 0mA or more Off 1 5mA or less Input response time On 50 s or less Off 150 s or less Input signal format Input senso...

Страница 120: ... S S X S S CPU module 24VDC Input module 0V 24V S S X S S CPU module Input module 0V 24V S S X S S CPU module Input module X0 X1 X2 X3 X4 X5 X6 X7 COM X0 X1 X2 X3 X4 X5 X6 X7 COM Input Notched edge X0 X1 X2 X3 X4 X5 X6 X7 COM0 X0 X1 X2 X3 X4 X5 X6 X7 COM0 Input Notched edge X0 X1 X2 X3 X4 X5 X6 X7 COM X0 X1 X2 X3 X4 X5 X6 X7 COM X0 X1 X2 X3 X4 X5 X6 X7 COM X0 X1 X2 X3 X4 X5 X6 X7 COM Input Input N...

Страница 121: ...on of output operation LED turns on when output is on Max load 2A point The total load current of resistance loads per common terminal should be the following value 4 output points common terminal 8A or less 8 output points common terminal 8A or less 0 5A point The total load current of resistance loads per common terminal should be the following value 4 output points common terminal 0 8A or less ...

Страница 122: ...EYR ES FX5 8EYT ES FX5 16EYR ES FX5 16EYT ES FX5 8EYT ESS FX5 16EYT ESS Y 0 1 2 3 Y 4 5 6 7 C O M 0 C O M 1 Y 0 2 3 4 5 7 6 Y 0 1 2 3 4 5 6 7 C O M 0 1 C O M 1 Lower number Higher number Y 0 V 0 1 2 3 Y 4 5 6 7 V 1 Y 0 1 2 3 4 5 7 6 Y 0 1 2 3 4 5 6 7 V 0 V 1 Lower number Higher number ...

Страница 123: ...points Connection type Spring clamp terminal block Connector Spring clamp terminal block Connector Spring clamp terminal block Output type Relay Transistor sink output Transistor source output External power supply 30VDC or less 240VAC or less 1 5 30VDC Indication of output operation LED turns on when output is on With FX5 C32EYT D the lower number higher number order is switched with the DISP swi...

Страница 124: ...d edge Y0 Y1 Y2 Y3 Y4 Y5 Y6 Y7 V0 Y0 Y1 Y2 Y3 Y4 Y5 Y6 Y7 V0 Output Notched edge Y0 Y1 Y2 Y3 Y4 Y5 Y6 Y7 COM0 Y0 Y1 Y2 Y3 Y4 Y5 Y6 Y7 COM0 Y0 Y1 Y2 Y3 Y4 Y5 Y6 Y7 COM1 Y0 Y1 Y2 Y3 Y4 Y5 Y6 Y7 COM1 Output Notched edge Lower number Output Higher number Y0 Y1 Y2 Y3 Y4 Y5 Y6 Y7 COM0 Y10 Y11 Y12 Y13 Y14 Y15 Y16 Y17 COM0 Y0 Y1 Y2 Y3 Y4 Y5 Y6 Y7 COM1 Y10 Y11 Y12 Y13 Y14 Y15 Y16 Y17 COM1 Output Output Y0 ...

Страница 125: ... collector transistor Source PNP open collector transistor Indication of input operation LED turns on when input is on Output specifications Number of output points 8 points Connection type Screw terminal block M3 screws Output type Relay Transistor sink output Transistor source output External power supply 30VDC or less 240VAC or less 2 5 30VDC Indication of output operation LED turns on when out...

Страница 126: ...iguration diagram Relay output Item Circuit configuration diagram Sink output wiring Source output wiring Transistor output 0V 24V S S X S S CPU module 24VDC Input module 0V 24V S S X S S CPU module 24VDC Input module 0V 24V S S X S S CPU module Input module 0V 24V S S X S S CPU module Input module Y COM0 Y COM1 Load DC power supply Fuse AC power supply Fuse Y COM0 Y COM1 Load DC power supply Fuse...

Страница 127: ...6 I O MODULE PERFORMANCE SPECIFICATIONS 6 3 I O Module 125 6 Terminal layout FX5 16ER ES FX5 16ET ES FX5 16ET ESS X 0 C O M S S 1 2 3 4 5 7 6 Y 0 1 2 3 4 5 6 7 X 0 S S 1 2 3 4 5 7 6 Y 0 1 2 3 4 5 6 7 V ...

Страница 128: ...nsor form No voltage contact input Sink NPN open collector transistor No voltage contact input Sink NPN open collector transistor Source PNP open collector transistor Indication of input operation LED turns on when input is on With FX5 C32ET D SS the input output is switched with the DISP switch IN OUT Output specifications Number of output points 16 points Connection type Connector Spring clamp t...

Страница 129: ...X5 C32ET DSS FX5 C32ET DS TS FX5 C32ET DSS TS Item Circuit configuration diagram Sink output wiring Source output wiring Transistor output X COM 24VDC Photocoupler X COM 24VDC Photocoupler X COM 24VDC Photocoupler 0V 24V S S X S S CPU module 24VDC Input module 0V 24V S S X S S CPU module 24VDC Input module 0V 24V S S X S S CPU module Input module 0V 24V S S X S S CPU module Input module Y COM0 Y C...

Страница 130: ...M Input Notched edge Output X0 X1 X2 X3 X4 X5 X6 X7 S S X10 X11 X12 X13 X14 X15 X16 X17 S S Y0 Y1 Y2 Y3 Y4 Y5 Y6 Y7 COM0 Y10 Y11 Y12 Y13 Y14 Y15 Y16 Y17 COM0 Input Output X0 X1 X2 X3 X4 X5 X6 X7 COM0 X0 X1 X2 X3 X4 X5 X6 X7 COM0 Y0 Y1 Y2 Y3 Y4 Y5 Y6 Y7 V0 Y0 Y1 Y2 Y3 Y4 Y5 Y6 Y7 V0 Input Notched edge Output X0 X1 X2 X3 X4 X5 X6 X7 S S X10 X11 X12 X13 X14 X15 X16 X17 S S Y0 Y1 Y2 Y3 Y4 Y5 Y6 Y7 V0 ...

Страница 131: ...ce power supply is used for the input circuit of the powered input output module 250mA When external power supply is used for the input circuit of the powered input output module 310mA 24VDC built in power supply capacity 310mA 5VDC built in power supply 965mA Input specifications Number of input points 16 points Connection type Screw terminal block M3 screws Input type Sink source Input signal vo...

Страница 132: ...ints common terminal 1 6A or less 2A point The total load current of resistance loads per common terminal should be the following value 4 output points common terminal 8A or less 8 output points common terminal 8A or less 0 5A point The total load current of resistance loads per common terminal should be the following value 4 output points common terminal 0 8A or less 8 output points common termin...

Страница 133: ...M0 Y COM1 Load DC power supply Fuse AC power supply Fuse Y COM0 Y COM1 Load DC power supply Fuse DC power supply Fuse Y V0 Y V1 Load DC power supply Fuse DC power supply Fuse X0 S S 0V 24V N L 1 2 3 4 5 6 7 X0 1 2 3 4 5 6 7 Y4 2 3 COM1 1 Y0 COM0 5 6 7 Y0 1 2 3 Y4 5 6 7 COM2 COM3 X0 S S 0V 24V N L 1 2 3 4 5 6 7 X0 1 2 3 4 5 6 7 Y4 2 3 V1 1 Y0 V0 5 6 7 Y0 1 2 3 Y4 5 6 7 V2 V3 X0 S S 1 2 3 4 5 6 7 X0...

Страница 134: ... 5 s or less X6 X7 50 s or less Input signal format Input sensor form No voltage contact input Sink NPN open collector transistor Source PNP open collector transistor Indication of input operation LED turns on when input is on Output specifications Number of output points 8 points Connection type Screw terminal block M3 screws Output type Transistor sink output Transistor source output External po...

Страница 135: ... Item Circuit configuration diagram Sink output wiring Source output wiring Transistor output FX5 16ET ES H FX5 16ET ESS H 0V 24V S S X S S CPU module 24VDC Input module 0V 24V S S X S S CPU module 24VDC Input module 0V 24V S S X S S CPU module Input module 0V 24V S S X S S CPU module Input module Y COM0 Y COM1 Load DC power supply Fuse DC power supply Fuse Y V0 Y V1 Load DC power supply Fuse DC p...

Страница 136: ... Input module FX5 8EX ES FX5 16EX ES 40mm Output module FX5 8EYR ES FX5 8EYT ES FX5 8EYT ESS FX5 16EYR ES FX5 16EYT ES FX5 16EYT ESS 40mm I O module FX5 16ER ES FX5 16ET ES FX5 16ET ESS 40mm High speed pulse input output module FX5 16ET ES H FX5 16ET ESS H 40mm W 8 83 90 With the cover removed 80 mounting hole pitch 2 4 5 mounting hole ...

Страница 137: ...Model W Input module FX5 C16EX D FX5 C16EX DS 14 6mm FX5 C32EX D FX5 C32EX DS 20 1mm Output module FX5 C16EYT D FX5 C16EYT DSS 14 6mm FX5 C32EYT D FX5 C32EYT DSS 20 1mm I O module FX5 C32ET D FX5 C32ET DSS 20 1mm Product Model W Input module FX5 C32EX DS TS 20 1mm Output module FX5 C16EYR D TS 30 7mm FX5 C32EYT D TS FX5 C32EYT DSS TS 20 1mm I O module FX5 C32ET DS TS FX5 C32ET DSS TS 20 1mm W 74 1...

Страница 138: ...ernal Dimensions Powered input output module Unit mm Product Model W Powered input output module FX5 32ER ES FX5 32ET ES FX5 32ET ESS FX5 32ER DS FX5 32ET DS FX5 32ET DSS 150mm 90 W 83 8 2 4 5 mounting hole 80 mounting hole pitch 140 mounting hole pitch ...

Страница 139: ...luctuation range 15 10 20 15 Rated frequency 50 60Hz Allowable instantaneous power failure time 1 Operation can be continued upon occurrence of instantaneous power failure for 10ms or less Operation can be continued upon occurrence of instantaneous power failure for 5ms or less Power fuse 250V 3 15A Time lag fuse 125V 3 15A Time lag fuse Rush current 25A max 5ms or less 100VAC 50A max 5ms or less ...

Страница 140: ... Dimensions 7 2 External Dimensions Extension cable type Unit mm Extension connector type Unit mm Product Model Extension power supply module FX5 1PSU 5V Product Model Extension power supply module FX5 C1PS 5V 50 90 83 8 16 2 4 5 mounting hole 80 mounting hole pitch 20 1 74 90 ...

Страница 141: ...e performance specifications of the connector conversion module 8 1 Specifications 8 2 External Dimensions Unit mm Item Specifications FX5 CNV IF FX5 CNV IFC External color Munsell 0 6B7 6 0 2 Munsell 0 6B7 6 0 2 Mass weight Approx 60g Approx 60g FX5 CNV IF FX5 CNV IFC Product Model W Connector conversion module FX5 CNV IF 14 6mm FX5 CNV IFC 14 6mm W 74 90 74 W 90 ...

Страница 142: ...140 8 CONNECTOR CONVERSION MODULE PERFORMANCE SPECIFICATIONS 8 2 External Dimensions MEMO ...

Страница 143: ...PU module or removing the SD memory card while the SD memory card is being accessed may corrupt the data in it Always turn off or reset the CPU module or remove the SD memory card after disabling access to the SD memory card With SM606 SD memory card forced disable instruction and SM607 SD memory card forced disable status flag the SD memory card can be disabled and its usage status can be checked...

Страница 144: ...142 9 SD MEMORY CARD PERFORMANCE SPECIFICATIONS 9 2 Formatting MEMO ...

Страница 145: ...the panel flashes red while the power is on and SM51 SM8005 and SM52 SM8006 turn on The memory can be retained for about one month after the LED turns on However the drop in battery voltage may not be detected immediately Prepare a new battery and replace the battery with the new one promptly Standard life of the FX3U 32BL 5 years at ambient temperature of 25 The life of the battery changes with r...

Страница 146: ...144 10 BATTERY PERFORMANCE SPECIFICATIONS 10 2 Battery Life MEMO ...

Страница 147: ...emory Program capacity setting Set to change program capacity Internal buffer capacity setting Sets the capacity of the area internal buffer used by the system to temporarily store the results of data logging and memory dump processing Device initial value setting Sets the initial values of devices used in the program directly not via the program to the devices Latch function Holds the contents of...

Страница 148: ...ing function Executes positioning operation by using the transistor output of the CPU module or high speed pulse input output module For details refer to MELSEC iQ F FX5 User s Manual Positioning Control CPU module built in High speed pulse input output module Function Description Availability 1 FX5S FX5UJ FX5U FX5UC Built in Ethernet function An Ethernet related functions such as connection with ...

Страница 149: ...al conditions complying with the general specifications Page 82 GENERAL SPECIFICATIONS Installation positions in a control panel To prevent temperature rise do not mount the programmable controller on the floor or ceiling or in the vertical direction Always mount the programmable controller horizontally on the wall as shown in the following figure ...

Страница 150: ...ices and structure Also separate the programmable controller from high voltage lines high voltage devices and power devices when possible Failure to do so may cause fire equipment failures or malfunctions When extension devices are intended to add keep necessary spaces on the left and right sides Configuration in 1 stage layout Configuration in 2 stage layout For product dimensions refer to the ex...

Страница 151: ... installation of the programmable controller using a DIN rail in the control panel additional length of the DIN rail thickness is required For details on the procedures for installing on and detaching from a DIN rail refer to Page 151 Installing on DIN rail Installing directly The programmable controller can be installed directly in the control panel with M4 screws For details on installing direct...

Страница 152: ...ing extension devices Some extension devices must be mounted on the CPU module before the module is installed in the control panel Connect expansion adapters and extension modules extension connector type to the CPU module before mounting the module in the control panel Mount extension modules extension cable type and terminal block in the enclosure after mounting the CPU module in the control pan...

Страница 153: ... and remove the terminal blocks The terminal block of the FX5S CPU module cannot be removed 2 Disconnect the extension cables and the connecting cables When removing the extension cable pull the pullout tab of the extension cable straight up 3 Insert the tip of a flathead screwdriver into the hole of the DIN rail mounting hook B in the right figure This step also applies for the DIN rail mounting ...

Страница 154: ...hes for each module refer to the external dimensions Page 109 External Dimensions Installation of CPU module 1 Make mounting holes on the mounting surface according to the external dimensions diagram 2 Align the CPU module A in the left figure with the holes and secure it with M4 screws B in the left figure For the FX5U 64M 80M there are four screw holes 98 80 2 2 2 2 FX5 232 ADP FX5U 32MT ES FX5 ...

Страница 155: ... rail mounting hook A in the figure of the extension module extension cable type When the DIN rail mounting hook is not pushed in the screw hole is covered and the extension module cannot be mounted This procedure may not be required depending on the model 3 Align the extension module extension cable type B in the figure with the holes and secure it with M4 screws C in the figure 2 A Back side Bac...

Страница 156: ...on board communication board to the CPU module 1 Remove the expansion board connector cover from the front face of the CPU module 2 Connect the communication board to the expansion board connector A in the figure 3 Fix the communication board C in the figure with provided M3 tapping screws B in the figure to the CPU module Tightening torque 0 3 to 0 6N m FX5UJ FX5U FX5UC FX5S 1 Expansion board con...

Страница 157: ...ve the expansion board connector cover from the front face of the CPU module 2 Connect the SD memory card module to the expansion board connector A in the figure Before inserting the SD memory card into the SD memory card module check that the SD memory card stop switch is on the ON side down 1 Remove the expansion board connector cover from the front face of the CPU module 2 Connect the communica...

Страница 158: ...e expansion adapter connector cover A in the right figure 2 Slide the hook for coupling the expansion adapter of the CPU module B in the figure 3 Connect the expansion adapter to the CPU module as shown in the figure 4 Slide the hook for coupling the expansion adapter of the CPU module B in the figure to fix the expansion adapter C in the figure FX5UJ FX5U FX5UC FX5S B 2 2 1 B A B 4 3 3 3 4 B C ...

Страница 159: ... a module supplied together with an extension cable connect the extension cable to the extension module as follows 1 Remove the extension connector cover A in the figure on the right side of the front of the CPU module or powered input output module 2 Connect the extension cable B in the figure from the extension module extension cable type to the extension connector of the CPU module or powered i...

Страница 160: ... extension connector type module to an FX5UJ CPU module system and an FX5U CPU module system 1 Slide the extension module joint levers A in the figure of the existing module left side 2 Remove the extension connector cover B in the figure 3 Connect the extension module as shown in the left figure 4 Slide the extension module joint levers A in the figure of the existing module to fix the extension ...

Страница 161: ...alves as shown in the figure To separate the case use a precision flathead screwdriver Slightly insert the tip of the screwdriver into part A shown in the figure and the hook B in the figure will come off 4 points 2 Connect the extended extension cable C in the figure 3 Connect the extension cable D in the figure 4 Arrange the tabs E in the figure to be outside the case align the upper cover F in ...

Страница 162: ...ge 174 DC power supply wiring 3 Grounding Connect the class D grounded to the terminal Page 171 Grounding 4 Input Wiring Connect sensors and switches to the terminals Page 175 Input Wiring 5 Output Wiring Connect the load to terminals Page 191 Output Wiring 6 Built in analog I O terminal block wiring Connect analog I Os to terminals MELSEC iQ F FX5 User s Manual Analog Control CPU module built in ...

Страница 163: ...e FX5UC MT DSS or the FX5UC 32M DS TS the FX2NC 100BPCB is required separately However the above does not apply when performing crossover wiring The user is requested to order if necessary Classification Application Model Length Product provided with power cable A Power cable for the FX5UC CPU module and extension power supply module FX2NC 100MPCB 1m FX5UC MT D FX5UC MT DSS FX5UC 32M DS TS FX5 C1P...

Страница 164: ...rom the subsequent module to the preceding module Disconnection of the power cable Hold part a on the connecter of the power cable with your fingers and remove the cable in the direction of the arrow Precautions When the power cable is removed by force the cable may break Connector I O connectors Suitable connector commercially available connector Use 20 pin 1 key sockets conforming to MIL C 83503...

Страница 165: ...compliant products are recommended and tool Mitsubishi Electric model Part description Manufactured by DDK Ltd Wire size Crimp tool Manufactured by DDK Ltd FX2C I O CON for flat cables 10 sets Crimp connector FRC2 A020 30S 28 AWG 0 1 1 27 pitch 20 cores 357J 4674D main body 357J 4664N attachment FX2C I O CON S for single wires 5 sets Housing HU 200S2 001 Crimp contact HU 411S 22 AWG 0 3 357J 5538 ...

Страница 166: ...such as adding an external terminal For the time of compliance with the Low Voltage Directive EN IEC 61010 2 201 2018 refer to Page 268 Requirements for Low Voltage Directive LVD compliance Screw location Screw size Tightening torque CPU module Terminal block screw M3 0 5 to 0 8N m Terminal block mounting screws M3 0 4 to 0 5N m I O module Terminal block screw M3 0 5 to 0 8N m Terminal block mount...

Страница 167: ...a detachable terminal block For the FX5UJ FX5U CPU module a terminal block can be removed or attached Removal Loosen the terminal block mounting screws on the left and right sides uniformly and remove the terminal block 3 7 3 7 Terminal screw Solderless terminal 6 8mm or less Terminal 6 8mm or less 3 7 3 7 Terminal screw Solderless terminal 6 8mm or less 6 0mm or more 6 8mm or less Terminal 6 0mm ...

Страница 168: ...with the following specifications Suitable wiring Precautions Do not tighten terminal screws with torque beyond the specified range Doing so may cause failures or malfunctions Product Number of wires connected per terminal Wire size Tightening torque Solid wire Stranded wire Wire ferrule with insulation sleeve Built in analog I O terminal block Terminal block for built in RS 485 communications One...

Страница 169: ...cision screwdriver with a small grip is used the specified tightening torque cannot be obtained Use the following screwdriver or equivalent product grip diameter 25mm to obtain the tightening torque specified above Reference Stripping dimensions of electric wire ends Built in analog I O terminal block built in RS 485 communication terminal block Expansion board expansion adapter Built in analog I ...

Страница 170: ... in the unstable connection to the spring clamp terminal part Depending on the thickness of a wiring sheath used inserting the sheath into an insulation sleeve may be difficult Refer to the external dimensions as a reference to select wires The following table lists wire ferrules and tools used for removing this part compatible with the terminal block Use of items that are not listed in the follow...

Страница 171: ... groove of the lever push up the flathead screwdriver and rotate the lever to the release position and the terminal block can be removed from the module easily After inserting the terminal block check that the lever is at the lock position Precautions When installing the terminal block check that the lever is in the release position If installation is performed while the lever is in the lock posit...

Страница 172: ...able or bar solderless terminal while pushing the open close button with a flathead screwdriver having a tip width of 2 0 to 2 5mm After fully inserting the cable or bar solderless terminal remove the screwdriver Reference Precautions Pull the cable or bar solderless terminal slightly to check that the cable is securely clamped When wiring with the thick electric wire make sure to prevent the cond...

Страница 173: ... wire with thickness of AWG 14 2 or thicker For the FX5UC CPU module use the accessory ground wire Bring the grounding point close to the programmable controller as much as possible so that the ground cable can be shortened Programmable controller Other device Programmable controller Other device Programmable controller Other device Independent grounding best Shared grounding acceptable Common gro...

Страница 174: ...24VDC service power supply of the CPU module and the powered input output module with each other Connect the 0V terminal When using an extension power supply module pull out the power cable and ground wire above the product as shown below When using a safety extension module power on all the modules at the same time If all the modules cannot be powered on simultaneously power them on in the follow...

Страница 175: ... MC MC MC DC AC Expansion adapter CPU module Input module Powered input output module Simple motion module Bus conversion module FX3 analog output module AC power supply 100 to 240V Breaker Power supply input Emergency stop DC power supply Power supply for load connected to programmable controller output Emergency stop operation is in accordance with Design precautions in Safety precautions ...

Страница 176: ...r the modules other than the safety extension module CPU module 1 CPU module and safety extension module When the above condition is not satisfied an error error code 3052H may occur in the safety extension module For details on wiring refer to the following MELSEC iQ F FX5 User s Manual Safety Control 1 The modules other than the safety extension module CPU module are as follows Powered input out...

Страница 177: ...t circuit Description Sink input common Sink input means a DC input signal with current flow from the input X terminal When a device such as a transistor output type sensor is connected NPN open collector transistor output can be used Source input common Source input means a DC input signal with current flow into the input X terminal When a device such as a transistor output type sensor is connect...

Страница 178: ... The input display LED turns on Sink input dedicated type Sink source input common type Sink input Source input When a no voltage contact or NPN open collector transistor output is connected between an input X terminal and the COM terminal and the circuit is closed the input X turns on At this time an LED corresponding to the DISP switch lights up FX5 C16EX D does not have the DISP switch In the s...

Страница 179: ...ut Specifications I O module Page 115 Input Module Change of filter time All input circuits have digital filters and input response time can be added by setting parameters When using this product in an environment with much noise set the digital filter Page 90 Input Specifications Input sensitivity For details on input signal current and input sensitivity current refer to the input specifications ...

Страница 180: ...e input output module X0 to X5 3 9V X6 X7 4 1V Input module 2 4V I O module 2 4V Powered input output module 2 4V Module Parallel resistance Rp Bleeder resistance Rb FX5S CPU module FX5UJ CPU module X0 X1 X3 X4 14k or more 5Rp 14 Rp k or less X2 X5 X6 X7 15k or more 4Rp 15 Rp k or less X10 or later 13k or more 6Rp 13 Rp k or less FX5U CPU module FX5U 32M X0 to X5 14k or more 5Rp 14 Rp k or less X6...

Страница 181: ...ommon FX5S CPU module FX5UJ CPU module FX5U CPU module FX5UC CPU module Example of the FX5UC 32MT DSS Example of the FX5UC 32MT D Example of the FX5UC 32MT DSS X 0V Rp Rb 24V S S Bleeder resistance Programmable controller sink input X 24V Rp Rb S S 0V Bleeder resistance Programmable controller source input FX5UC 32MT DSS X Rp Rb COM Bleeder resistance 24VDC Fuse FX5UC 32MT D X Rp 24V Rb COM Bleede...

Страница 182: ...5 k or less FX5UC 64 FX5UC 96 X0 to X7 7 I 1 5 k or less X10 to X17 7 I 1 5 k or less X20 or later 9 I 1 5 k or less High speed pulse input output module 7 I 1 5 k or less Input module 9 I 1 5 k or less I O module 9 I 1 5 k or less Powered input output module 9 I 1 5 k or less Module Wiring example Sink input common Source input common FX5S CPU module FX5UJ CPU module FX5U CPU module FX5UC CPU mod...

Страница 183: ...ed pair cables for connection cables Ground the shield of each shielded cable only on the CPU module side Connect a 1 5k 1W or more bleeder resistance to the input terminal so that the sum of the load current of the open collector transistor output on the mating device and the input current of the CPU module is 20mA or more 1 FX5S FX5UJ CPU module 50k to 100kHz 2 FX5S FX5UJ CPU module Inputs X0 to...

Страница 184: ...ort circuit the S S and 24V terminals of the CPU module The 24VDC service power supply or external power supply can be used for all inputs X of the CPU module However a user needs to select either one for each CPU module or I O module Both power supplies cannot be used together in the same module X0 S S 0V 24V FX5U 32MT ES N L X1 X0 S S X1 FX5 16EX ES 5V 0V 24V X0 S S X1 FX5 16EX ES 5V 0V 24V 5V 0...

Страница 185: ...CPU module The 24VDC service power supply or external power supply can be used for all inputs X of the CPU module However a user needs to select either one for each CPU module or I O module Both power supplies cannot be used together in the same module X0 S S 0V 24V FX5U 32MT ESS N L X1 X0 S S X1 FX5 16EX ES 5V 0V 24V X0 S S X1 FX5 16EX ES 5V 0V 24V 5V 0V 24V 1 2 0V 24V 3 Fuse Class D grounding gr...

Страница 186: ...o wire proximity switch a bleeder resistance may be required 3 For sink input wiring short circuit the S S and terminals of the CPU module X0 S S FX5U 32MT DS X1 X0 S S X1 FX5 16EX ES 5V 0V 24V X0 S S X1 FX5 16EX ES 5V 0V 24V 5V 0V 24V 1 2 3 Fuse 24VDC Class D grounding grounding resistance 100 or less 3 wire sensor Input impedance 2 wire proximity sensor Input terminal 24VDC 3 wire sensor Input t...

Страница 187: ...witch a bleeder resistance may be required 3 For source input wiring short circuit the S S and terminals of the CPU module X0 S S FX5U 32MT DSS X1 X0 S S X1 FX5 16EX ES 5V 0V 24V X0 S S X1 FX5 16EX ES 5V 0V 24V 5V 0V 24V 1 2 3 Fuse 24VDC Class D grounding grounding resistance 100 or less 3 wire sensor Input terminal Input impedance 2 wire proximity sensor Input terminal 3 wire sensor 24VDC Input t...

Страница 188: ...tance should be 100 or less 2 Handle the power supply circuit properly in accordance with Power Supply Wiring 3 For an input device having a parallel resistance or a two wire proximity switch a bleeder resistance may be required FX5UC 32MT D FX5 C32EX D FX5 16EX ES FX5 CNV IFC COM COM S S 1 2 3 X0 X1 X0 X1 X0 X1 Terminal block Fuse 24VDC Class D grounding 3 wire sensor Input connector Input impeda...

Страница 189: ...erly in accordance with Power Supply Wiring 3 For an input device having a parallel resistance or a two wire proximity switch a bleeder resistance may be required FX5UC 32MT DSS FX5 C32EX DS COM0 X0 X1 COM0 X0 X1 FX5 16EX ES S S 1 2 3 X0 X1 FX5 CNV IFC Terminal block Fuse 24VDC Class D grounding 3 wire sensor Input connector Input impedance Input connector 2 wire sensor Input terminal ...

Страница 190: ... properly in accordance with Power Supply Wiring 3 For an input device having a parallel resistance or a two wire proximity switch a bleeder resistance may be required FX5UC 32MT DSS FX5 C32EX DS COM0 X0 X1 COM0 1 2 3 X0 X1 FX5 CNV IFC FX5 16EX ES S S X0 X1 Terminal block Fuse 24VDC Class D grounding 3 wire sensor Input connector Input impedance Input connector 2 wire sensor Input terminal ...

Страница 191: ... CPU module FX5UC 32MT DSS FX5UC 64MT DSS FX5UC 96MT DSS Input module FX5 C16EX DS FX5 C32EX DS I O module FX5 C32ET DSS 1 COM 3 4 5 6 0 2 7 1 3 0 2 4 5 6 7 COM COM COM COM COM COM COM 7 6 5 4 3 2 1 0 0 1 2 3 4 5 6 7 COM 0 to 7 lower number 0 to 7 higher number Programmable controller input number Vacant terminal 3 wire sensor NPN 24VDC Fuse 1 COM 3 4 5 6 0 2 7 1 3 0 2 4 5 6 7 COM COM COM COM COM ...

Страница 192: ...odule FX5 C32ET D 1 COM 3 4 5 6 0 2 7 1 3 0 2 4 5 6 7 COM COM COM COM COM COM COM 7 6 5 4 3 2 1 0 0 1 2 3 4 5 6 7 COM0 1 0 to 7 lower number 0 to 7 higher number Programmable controller input number Vacant terminal 3 wire sensor PNP 24VDC Fuse 1 3 4 5 6 0 2 7 1 3 0 2 4 5 6 7 24 24 COM1 COM1 COM2 COM2 COM3 COM3 COM4 COM4 10 15 Programmable controller input number 0 to 3 4 to 7 0 to 3 4 to 7 Photoco...

Страница 193: ...load Page 193 Contact protection circuit for inductive loads Some types of inductive loads generate rush current 5 to 15 times the stationary current at activation Note that the rush current does not exceed the current corresponding to the maximum specified resistance load Lamp load Lamp loads generally generate rush current 10 to 15 times the stationary current Note that the rush current does not...

Страница 194: ...lay from when the power is applied to the coil until the output contact is turned on and from when the coil is shut off until the output contact is turned off is approximately10ms Output current At a circuit voltage of 240VAC or less 250VAC or less when the module does not comply with CE UL cUL standards a resistance load of 2A per point or an inductive load of 80VA or less 100VAC or 200VAC can be...

Страница 195: ...s shown below In phase Programmable controller output contacts should be used in an in phase manner FX5S CPU module FX5UJ CPU module and FX5U CPU module FX5UC CPU module DC circuit AC circuit Connect a diode in parallel with the load The diode for commutation must comply with the following specifications Reverse voltage 5 to 10 times the load voltage Forward current Load current or more Connect a ...

Страница 196: ... side of the load power supply The COM terminals are not connected internally Connect V number terminal to the plus side of the load power supply The V terminals are not connected internally Output module extension connector type and I O module extension connector type COM number terminals that are connected to each other inside the programmable controller are prepared For external wiring connect ...

Страница 197: ...der a load of 24VDC 40mA the response time is approx 0 3ms When response performance is required under light loads provide a dummy resistor as shown below to increase the load current Output current Maximum load differs for each module For specifications of each module refer to the following When driving a semiconductor device carefully check the input voltage characteristics of the device Open ci...

Страница 198: ...ation must comply with the following specifications Module Sink output Source output FX5S CPU module FX5UJ CPU module FX5U CPU module FX5UC CPU module Item Standard Reverse voltage 5 to 10 times as high as the load voltage Forward current Load current or larger Module Sink output Source output FX5S CPU module FX5UJ CPU module FX5U CPU module FX5UC CPU module Y COM0 Load Fuse Programmable controlle...

Страница 199: ...rovided for interlocking along with an interlock in the programmable controller program as shown below Sink output type Source output type Interlock Interlock Forward rotation limit Forward rotation limit Forward rotation Forward rotation Reverse rotation Reverse rotation Programmable controller output element Programmable controller output element Reverse rotation limit Reverse rotation limit ...

Страница 200: ...w per one output point However current of four output points should be 0 8A average of 0 2A per one point to suppress temperature rise When a load with a high rush current is frequently turned on or off the mean square current should be 0 2A or less Open circuit leakage current C R absorbers are connected in parallel at the triac output terminal for turning off the triac Thus open circuit leakage ...

Страница 201: ... absorber with voltage rating that is suitable for the output used For other specifications refer to the following Standard Electrostatic capacity Approx 0 1 F Resistance value Approx 100 to 200 Interlock For loads such as forward reverse contactors where a hazardous condition could result if switched on simultaneously an external interlock should be provided for interlocking along with an interlo...

Страница 202: ...d caused by output device breakdown due to load short circuiting 2 represents vacant terminals Y0 COM0 Y7 Y0 COM1 Y7 PL MC MC MC MC 1 1 1 1 Y0 COM0 Y14 COM3 Y4 COM1 2 1 AC power supply 100 to 240V CPU module relay output Fuse Breaker Power supply input Fuse Fuse Emergency stop Output module relay output Fuse DC power supply Load Fuse Load Power supply for load connected to programmable controller ...

Страница 203: ...ant terminals FX5UC 32MR DS TS FX5 C16EYR D TS FX5 CNV IFC Y0 COM0 Y1 COM0 COM0 Y0 Y1 Y2 Y3 FX5 8EYR ES COM1 Y4 Y5 Y6 Y7 Y10 COM1 Y11 COM1 Y10 COM1 Y11 COM1 Y0 COM0 Y1 COM0 1 1 24VDC Load Fuse AC power supply 100 to 240V Load Fuse Load Fuse Load Fuse Load Fuse Load Fuse ...

Страница 204: ...output device breakdown due to load short circuiting 2 represents vacant terminals Y0 COM0 Y7 Y0 COM1 Y7 PL MC MC MC MC 1 1 1 1 Y0 COM0 Y14 COM3 Y4 COM1 2 CPU module transistor output sink AC power supply 100 to 240V Fuse Breaker Load Power supply input Fuse Emergency stop Load Output module transistor output sink Fuse DC power supply Load Fuse Load Power supply for load connected to programmable ...

Страница 205: ... load short circuiting 2 represents vacant terminals Y0 V0 Y7 Y0 V1 Y7 PL MC MC MC MC 1 1 Y0 V0 Y14 V3 Y4 V1 2 CPU module transistor output source AC power supply 100 to 240V Fuse Breaker Load Power supply input Fuse Load Emergency stop Output module transistor output source Fuse DC power supply Load Fuse Load Power supply for load connected to programmable controller output Emergency stop operati...

Страница 206: ... Sink output 1 represents vacant terminals Y0 COM0 Y1 Y2 Y3 Y4 Y5 Y6 Y7 MC1 MC2 MC2 MC1 COM0 Y0 COM0 Y1 Y2 Y3 COM0 FX5UC 32MT D FX5 C32EYT D Y0 Y1 Y2 Y3 FX5 16EYT ES COM0 FX5 CNV IFC 1 5 to 30VDC Load Fuse Fuse Fuse Inductive load Load Fuse Load Fuse ...

Страница 207: ...output 1 represents vacant terminals Y0 COM0 Y1 Y2 Y3 Y4 Y5 Y6 Y7 MC1 MC2 MC2 MC1 COM0 Y0 COM0 Y1 Y2 Y3 COM0 FX5UC 32MT D FX5 C32EYT D Y0 Y1 Y2 Y3 FX5 16EYT ES COM0 FX5 CNV IFC 1 5 to 30VDC Load Fuse Fuse Fuse Inductive load Load Fuse Load Fuse ...

Страница 208: ...d module Model FX5UC CPU module FX5UC 32MT DSS FX5UC 64MT DSS FX5UC 96MT DSS Output module FX5 C16EYT DSS FX5 C32EYT DSS I O module FX5 C32ET DSS 1 3 4 5 6 0 2 7 1 3 0 2 4 5 6 7 7 6 5 4 3 2 1 0 0 1 2 3 4 5 6 7 COM0 MC1 MC2 COM COM COM COM COM COM COM COM 1 0 to 7 lower number 0 to 7 higher number Programmable controller output number Vacant terminal Fuse Fuse Fuse 24VDC 1 3 4 5 6 0 2 7 1 3 0 2 4 5...

Страница 209: ... 96MT DSS Output module FX5 C16EYT D FX5 C32EYT D FX5 C16EYT DSS FX5 C32EYT DSS I O module FX5 C32ET D FX5 C32ET DSS Connected module Model FX5UC CPU module FX5UC 32MT D FX5UC 64MT D FX5UC 96MT D Output module FX5 C16EYT D FX5 C32EYT D I O module FX5 C32ET D 1 3 4 5 6 0 2 7 1 3 0 2 4 5 6 7 24 24 COM1 COM1 COM2 COM2 COM3 COM3 COM4 COM4 0 1 2 3 4 5 6 7 0 1 2 3 4 5 6 7 0 to 7 lower number 0 to 7 high...

Страница 210: ... FX5 C32ET DSS Connected module Model FX5UC CPU module FX5UC 32MT DSS FX5UC 64MT DSS FX5UC 96MT DSS Output module FX5 C16EYT DSS FX5 C32EYT DSS I O module FX5 C32ET DSS 1 3 4 5 6 0 2 7 1 3 0 2 4 5 6 7 24 24 COM1 COM1 COM2 COM2 COM3 COM3 COM4 COM4 0 1 2 3 4 5 6 7 0 1 2 3 4 5 6 7 Programmable controller output number Photocoupler power supply Fuse Fuse 24VDC 1 3 4 5 6 0 2 7 1 3 0 2 4 5 6 7 24 24 COM...

Страница 211: ...5UC 64MT DSS FX5UC 96MT DSS Output module FX5 C16EYT DSS FX5 C32EYT DSS I O module FX5 C32ET DSS 1 3 4 5 6 0 2 7 1 3 0 2 4 5 6 7 24 24 COM1 COM1 COM2 COM2 COM3 COM3 COM4 COM4 0 1 2 3 4 5 6 7 0 1 2 3 4 5 6 7 U U U U A surge absorber is connected to each output Programmable controller output number Photocoupler power supply Fuse Load 24VDC Fuse Fuse Fuse 1 3 4 5 6 0 2 7 1 3 0 2 4 5 6 7 24 24 COM1 CO...

Страница 212: ...d on the assignment of I O numbers for wiring For descriptions of the instructions refer to the following MELSEC iQ F FX5 Programming Manual Instructions Standard Functions Function Blocks Positioning function For wiring examples for the positioning function refer to the following MELSEC iQ F FX5 User s Manual Positioning Control CPU module built in High speed pulse input output module Communicati...

Страница 213: ...e NPN open collector transistor output rotary encoder 1 The grounding resistance should be 100 or less Item Setting details CH to be used CH1 CPU module or CH9 high speed pulse input output module Pulse input mode 1 phase 1 input software External preset input Disable External enable input Disable Operation mode Normal mode 1 5kΩ 1 5kΩ FX5U 32MT ES S S L N 24V 0V 24V 1 0V X0 FX5 16ET ES H FX5U 32M...

Страница 214: ...hase B Phase B Phase Z Phase Z 1 5kΩ 1 5kΩ S S L N 24V 0V 24V 0V X0 FX5U 32MT ESS 1 S S L N 24V 0V 24V 0V X0 S S FX5 16ET ESS H FX5U 32MT ESS 1 Source wiring When using the input of FX5U 32MT ESS When using the input of FX5 16ET ESS H Rotary encoder Rotary encoder 24VDC 24VDC Fuse Fuse Class D grounding Class D grounding Phase A Phase B Phase A Phase Z Phase B Phase Z FX5UC 32MT DSS COM0 0V 24V 1 ...

Страница 215: ...S S X0 Sink wiring When using the input of FX5U 32MT ES When using the input of FX5 16ET ES H Rotary encoder Rotary encoder 24VDC 24VDC Fuse Fuse Class D grounding Class D grounding Phase A Phase B Phase A Phase Z Phase B Phase Z 1 5kΩ 1 5kΩ S S L N 24V 0V 24V 0V X0 FX5U 32MT ESS 1 S S L N 24V 0V 24V 0V S S X0 FX5 16ET ESS H FX5U 32MT ESS 1 Source wiring When using the input of FX5U 32MT ESS When ...

Страница 216: ... CH10 high speed pulse input output module Pulse input mode 2 phase 2 input External preset input Disable External enable input Disable Operation mode Normal mode FX5U 32MT ES S S L N 24V 0V 24V 1 0V X2 X3 FX5 16ET ES H FX5U 32MT ES S S L N 24V 0V 24V 1 0V S S X2 X3 1 5kΩ 1 5kΩ Sink wiring When using the input of FX5U 32MT ES When using the input of FX5 16ET ES H Rotary encoder Rotary encoder 24VD...

Страница 217: ...se B Phase B Phase Z Phase Z FX5U 32MT ESS S S L N 24V 0V 24V 1 0V X2 X3 FX5 16ET ESS H FX5U 32MT ESS S S L N 24V 0V 24V 1 0V S S X2 X3 1 5 kΩ 1 5 kΩ Source wiring When using the input of FX5U 32MT ESS When using the input of FX5 16ET ESS H Rotary encoder Rotary encoder 24VDC 24VDC Fuse Fuse Class D grounding Class D grounding Phase A Phase B Phase A Phase Z Phase B Phase Z FX5UC 32MT DSS 0V 24V 1...

Страница 218: ...5kΩ Sink wiring When using the input of FX5U 32MT ES When using the input of FX5 16ET ES H Rotary encoder Rotary encoder 24VDC 24VDC Fuse Fuse Class D grounding Class D grounding Phase A Phase B Phase A Phase Z Phase B Phase Z FX5U 32MT ESS S S L N 24V 0V 24V 1 0V X2 X3 FX5 16ET ESS H FX5U 32MT ESS S S L N 24V 0V 24V 1 0V S S X2 X3 1 5 kΩ 1 5 kΩ Source wiring When using the input of FX5U 32MT ESS ...

Страница 219: ...nd pulse width measurement function refer to the following MELSEC iQ F FX5 User s Manual Application Wiring example When 24VDC service power supply is used 1 The grounding resistance should be 100 or less S S L N 24V 1 FX5U 32MT ES 0V X0 S S L N 24V 1 FX5 16ET ES H FX5U 32MT ES 0V X0 S S FX5 16ET ESS H FX5U 32MT ESS S S L N 24V 1 0V X0 S S FX5U 32MT ESS S S L N 24V 1 0V X0 1 5kΩ 1 5kΩ 1 5kΩ 1 5kΩ ...

Страница 220: ... 5kΩ 1 5kΩ FX5U 32MT ES FX5U 32MT ESS 1 5kΩ 1 5kΩ FX5 16ET ES H FX5U 32MT ES FX5 16ET ESS H FX5U 32MT ESS In the case of sink wiring Wiring example of FX5U 32MT ES Wiring example of FX5 16ET ES H Fuse Fuse Class D grounding Class D grounding 24VDC 24VDC 3 wire 3 wire In the case of source wiring Wiring example of FX5U 32MT ESS Wiring example of FX5 16ET ESS H Fuse Fuse Class D grounding Class D gr...

Страница 221: ...X5UC 32MT D For FX5 16ET ES H Fuse Fuse 24VDC 24VDC Class D grounding Class D grounding 3 wire 3 wire FX5UC 32MT DSS 1 5 kΩ X0 COM0 1 FX5UC 32MT DSS 1 5 kΩ COM0 1 X0 FX5 CNV IFC FX5 16ET ESS H S S For FX5UC 32MT DSS sink input wiring For FX5 16ET ESS H Fuse Fuse 24VDC 24VDC Class D grounding Class D grounding 3 wire 3 wire FX5UC 32MT DSS 1 5 kΩ X0 COM0 1 FX5UC 32MT DSS 1 5 kΩ COM0 1 X0 FX5 CNV IFC...

Страница 222: ...the input output of the FX5U 32MT ES The example is the wiring for the input output of theFX5UC 32MT D 1 The grounding resistance should be 100 or less DSW SM400 X10 Y10 D100 K1 X10 X11 X12 X13 X15 X14 X16 X17 COM2 Y10 Y11 Y12 Y13 FX5U 32MT ES 1 2 4 8 103 102 101 100 103 102 101 100 S S 0V 24V BCD digital switch 0 1A 50V diode required Sink input Transistor output sink COM X10 X11 X12 X13 X15 X14 ...

Страница 223: ...d be 100 or less X10 X11 X12 X13 X15 X14 X16 X17 V2 Y10 Y11 Y12 Y13 FX5U 32MT ESS 1 2 4 8 103 102 101 100 103 102 101 100 S S 0V 24V BCD digital switch 0 1A 50V diode required Source input Transistor output source COM0 X10 X11 X12 X13 X15 X14 X16 X17 V0 Y10 Y11 Y12 Y13 FX5UC 32MT DSS 1 2 4 8 103 102 101 100 103 102 101 100 V0 1 BCD digital switch 24VDC 0 1A 50V diode required Fuse Class D groundin...

Страница 224: ...Standard Functions Function Blocks Program example Wiring example Sink wiring The example is the wiring for the input output of the FX5U 32MT ES The example is the wiring for the input of the FX5UC 32MT D 1 The grounding resistance should be 100 or less BIN SM400 K2X10 D102 X10 X11 X12 X13 X15 X14 X16 X17 1 2 4 8 1 2 4 8 101 100 FX5U 32MT ES S S 0V 24V Sink input COM X10 X11 X12 X13 X15 X14 X16 X1...

Страница 225: ...MT ESS The example is the wiring for the input of the FX5UC 32MT DSS 1 The grounding resistance should be 100 or less X10 X11 X12 X13 X15 X14 X16 X17 1 2 4 8 1 2 4 8 101 100 FX5U 32MT ESS S S 0V 24V Source input COM0 X10 X11 X12 X13 X15 X14 X16 X17 1 2 4 8 1 2 4 8 101 100 1 FX5UC 32MT DSS Fuse 24VDC Class D grounding Source input ...

Страница 226: ...2 X11 X12 X13 X14 X15 X16 X17 Y10 Y11 Y12 Y13 M30 M31 M32 M33 M34 M35 M36 M37 M40 M41 M42 M43 M44 M45 M46 M47 M50 M51 M52 M53 M54 M55 M56 M57 X11 X13 X15 X17 X12 X14 X16 X11 X13 X15 X17 X12 X14 X16 FX5U 32MT ES S S 0V 24V 0 1A 50V diode required To use inputs X0 to X17 connect pull up resistors 3 3k 0 5W Sink input Transistor output sink COM X10 COM0 X11 X12 X13 X14 X15 X16 X17 Y10 Y11 Y12 Y13 Y14...

Страница 227: ... X11 X13 X15 X17 X12 X14 X16 X11 X13 X15 X17 X12 X14 X16 FX5U 32MT ESS S S 0V 24V 0 1A 50V diode required To use inputs X0 to X17 connect pull down resistors 3 3k 0 5W Source input Transistor output source COM0 X10 V0 X11 X12 X13 X14 X15 X16 X17 Y10 Y11 Y12 Y13 Y14 Y15 Y16 Y17 M30 M31 M32 M33 M34 M35 M36 M37 M40 M41 M42 M43 M44 M45 M46 M47 M50 M51 M52 M53 M54 M55 M56 M57 X11 X13 X15 X17 X12 X14 X1...

Страница 228: ...e output of theFX5UC 32MT D 1 Use a 7 segment display with a latch and a built in BCD decoder SEGL SM400 D100 Y10 K1 103 102 101 100 1 2 4 8 103 102 101 100 1 2 4 Y10 Y11 Y12 Y13 Y14 COM3 Y15 Y16 Y17 8 1 COM2 FX5U 32MT ES Y COM1 Transistor output sink Seven segment display used for sink wiring for transistor output Programmable controller Seven segment with latch Internal circuit Signal Fuse 103 1...

Страница 229: ...0 1 2 4 Y10 Y11 Y12 Y13 Y14 V3 Y15 Y16 Y17 8 1 V2 FX5U 32MT ESS Transistor output source Seven segment display used for source wiring for transistor output Programmable controller Seven segment with latch Internal circuit Signal Fuse 103 102 101 100 1 2 4 8 103 102 101 100 1 2 4 Y10 V0 Y11 Y12 Y13 Y14 Y15 Y16 Y17 8 1 V0 FX5UC 32MT DSS Y V0 Transistor output source Seven segment display used for so...

Страница 230: ...2MT ES The example is the wiring for the output of theFX5UC 32MT D BCD SM400 D100 K2Y10 Y10 Y11 Y12 Y13 Y14 COM3 Y15 Y16 Y17 1 2 4 8 1 2 4 8 8 4 2 1 8 4 2 1 Y COM1 COM2 FX5U 32MT ES Transistor output sink Seven segment display used for sink wiring for transistor output Programmable controller Seven segment with latch Internal circuit Signal Fuse Y10 COM0 Y11 Y12 Y13 Y14 Y15 Y16 Y17 1 2 4 8 1 2 4 8...

Страница 231: ...4 8 1 2 4 8 V2 8 4 2 1 8 4 2 1 Transistor output source Seven segment display used for source wiring for transistor output Programmable controller Seven segment with latch Internal circuit Signal Fuse Y10 V0 Y11 Y12 Y13 Y14 Y15 Y16 Y17 1 2 4 8 1 2 4 8 8 4 2 1 8 4 2 1 V0 FX5UC 32MT DSS Y V0 Transistor output source Seven segment display used for source wiring for transistor output Programmable cont...

Страница 232: ...he power of the programmable controller including extension devices at the same time 6 Connecting a Personal Computer Connect a personal computer that has an engineering tool installed to the CPU module Page 239 Connecting a Personal Computer 7 Initializing the CPU Module Initialize the CPU module using the engineering tool Page 244 Initializing the CPU Module 8 Setting parameters Set system param...

Страница 233: ... should be measured in accordance with the following procedure 1 Remove all input output wires and power supply wires from the programmable controller 2 Connect a crossing wire to each of the programmable controller terminals power supply terminal input terminals and output terminals except the ground terminal For the dielectric withstand voltage of each terminal refer to the general specification...

Страница 234: ...ol FX5U CPU module 1 Turn the power supply off 2 Remove the expansion board connector cover A in the left figure When an expansion board is installed remove it 3 Insert the battery connector B in the left figure of the battery 4 Set the battery inside the lower hook C in the left figure push up the upper hook D in the left figure and then fit the battery in the battery holder E in the left figure ...

Страница 235: ...14 FX5UC CPU module 1 Turn the power supply off 2 Remove the battery cover A in the left figure 3 Push the battery into the battery holder B in the left figure 4 Insert the battery connector C in the left figure of the battery 5 Attach the battery cover A 2 5 C B ...

Страница 236: ...card slot cover 1 2 Check that the SD memory card stop switch of the FX5 SDCD is on the ON side down 3 Ensure that the notched edge of the SD memory card is facing upward and insert it straight into the SD memory card slot After mounting check that the SD memory card is mounted completely When it is mounted incompletely malfunctions may occur because of poor contact 4 Close the SD memory card slot...

Страница 237: ...at the SD memory card is mounted completely When it is mounted incompletely malfunctions may occur because of poor contact 2 The CARD LED 2 blinks until the SD memory card becomes available 3 The CARD LED turns on when the SD memory card is available 4 When the CARD LED does not turn on even though the SD memory card is mounted ensure that SM606 SD memory card forced disable instruction and SM607 ...

Страница 238: ...during the access stop operation and then the LED turns off when the operation is completed 4 Push in the SD memory card once and then pull it out straight Then slide the SD memory card disable switch to the ON side down 5 Close the SD memory card slot cover 1 1 Press the SD memory card disable switch 1 for one second or more to stop access to the SD memory card The CARD LED 2 flashes during the a...

Страница 239: ...g flag is on the CARD LED does not turn off even if the SD memory card disable switch is pressed When the CARD LED does not turn off turn on SM606 instruction of forcibly stop using SD memory card so that the SD memory card cannot be used 14 5 Creating a Project Activate the engineering tool and create a project Project New Procedure Create a program following the procedure below This procedure is...

Страница 240: ...ule Module label is a label where the I O signals and buffer memory areas of a module have already been defined Use of module labels allows programming without being aware of module internal addresses 3 On the Options window select Yes for Use Module Label and click the OK button 4 Click the OK button ...

Страница 241: ...ion Destination Simple Setting Connection window 1 Connect a personal computer to the CPU module using the Ethernet cable 2 Select Online Current Connection Destination on the menubar of the engineering tool 3 Select Ethernet as the direct connection method with the CPU module on the Connection Destination Simple Setting Connection window Click the Communication Test button to check if the connect...

Страница 242: ...Module model name Module Parameter Ethernet Port Basic Settings Own Node Settings 1 Connect a personal computer to the CPU module via a hub No Item Selection item Internal setting Input value 1 Personal computer side I F Ethernet Board 2 programmable controller side I F CPU module Connection via HUB IP Address 192 168 3 250 Response Wait Time 2 seconds Other Station Setting No Specification Check ...

Страница 243: ...in the CPU module From the menu bar of the engineering tool select Online Write to PLC After writing the parameters to the CPU module power off and on or reset the CPU module to enable the parameters 1 On the Connection Destination Simple Setting Connection window select another connection method by clicking the Other Connection Method Open the Specify Connection Destination Window button 2 Select...

Страница 244: ...ification 3 on the Specify Connection Destination Connection window to set Other Station Setting Select an item appropriate to the operating environment 1 Connect a personal computer to the CPU module using the RS 232C cable 1 2 Select Online Current Connection Destination on the menubar of the engineering tool 3 On the Connection Destination Simple Setting Connection window select another connect...

Страница 245: ...s 5 Select RS 232C for the connection method and click the Yes button 6 Click the Connection Test button 2 and check if the personal computer is connected to the CPU module No Item Selection item Internal setting Input value 1 Personal computer side I F Serial USB RS 232C COM Port COM1 Transmission Speed 115 2Kbps 2 programmable controller side I F CPU module CPU mode FX5CPU Other Station Setting ...

Страница 246: ...ule model name CPU Parameter Module parameters of CPU module These parameters are required to execute each built in function of a CPU module Navigation Parameter Module model name Module Parameter Memory card parameters These parameters are required to execute functions that access an SD memory card Navigation Parameter Module model name Memory Card Parameter Module parameters each expansion adapt...

Страница 247: ... Parameter Module model name CPU Parameter Memory Device Setting Device Label Memory Area Setting Detailed Setting Device Label Memory Area Setting window Set the option battery setting to Mounted in Device Label Memory Area Setting window 1 Drag each module to be used from the parts select window to the module configuration diagram with the mouse and place the module to be coupled to the CPU modu...

Страница 248: ... different Labels can be registered on the label editor Navigation Program Scan MAIN ProgPou Local Label Procedure Register the label Start1 in the program example following the procedure below Register other labels in the program example in the same way The class and constant of labels can be set as needed by clicking the Show Details button on the label editor Labels can also be registered while...

Страница 249: ... defined function blocks functions can be found in the POU List 1 in the Element Selection window Narrow down the list using the drop down menu 2 for Display Target and making a selection 1 Select a program element from the Element Selection window and drag and drop 1 it to the desired position in the ladder editor In this example drag and drop LD 1 2 Double click the inserted program element to o...

Страница 250: ...tem which allows constant external monitoring of the battery status using a device such as GOT SM52 SM8005 The special relay turns on when the battery voltage is less than the specified value The special relay turns off when the battery voltage is normal SM51 SM8006 The special relay turns on when the battery voltage is less than the specified value The special relay stays on even when the battery...

Страница 251: ...peration of the CPU module the system parameter file CPU parameter file and program file must be written For the operation of the expansion adapter I O modules and intelligent function modules the module parameter files must be written as well Use of the Select Favorites button enables users to easily select frequently used files such as the system parameter file CPU parameter file and program fil...

Страница 252: ... example of the FX5U CPU module Remote operation The operation status of the CPU module can be changed externally with the RUN STOP RESET switch set to the RUN position The operation status of the CPU module can be set to the PAUSE status Remote operation can be performed by either of the following methods Using contacts MELSEC iQ F FX5 User s Manual Application Using engineering tools GX Works3 O...

Страница 253: ...r the LED status of the CPU module and the scan time No Item Description Icon Meaning 1 Connection status The connection status with the CPU module is displayed Connected with the CPU module Not connected with the CPU module 2 Operating status The operating status of the CPU module in accordance with the RUN STOP RESET switch of the CPU module or the remote operation by the engineering tool is dis...

Страница 254: ...rrent values of word devices and labels ON OFF state display The ON OFF states are displayed on the editor as follows Changing the current value To change the current value select the cell on the ladder editor and press double click the cell or press while the program is being monitored The program can also be monitored on the Device Buffer Memory Batch window of the Watch window GX Works3 Operati...

Страница 255: ...eck the cause of the error and take corrective actions 15 2 Checking with LEDs Check the module status with LEDs as a means to perform the primary diagnosis Checking the PWR LED When the PWR LED turns off check the following items When the PWR LED still does not turn on even after the items shown above are checked there may be a hardware issue Consult your local Mitsubishi Electric representative ...

Страница 256: ...he maximum value SD524 SD525 of the scan time exceeding the scan time monitoring time setting value set by the parameter Check that the input used for input interruption or pulse catch is not being abnormally turned on and off in one scan Check that the frequency of the pulse input to the high speed counter is within the specified range Add some WDT instructions to the program and reset the watchd...

Страница 257: ...unction displays the module configuration and detailed information and error status of each module For the error module identified the module diagnostics can be executed from this window Diagnostics System Monitor Function Action System monitor Displays the module configuration and detailed information and error status of each module Page 255 System monitor Module diagnostics This function diagnos...

Страница 258: ...e error and action to be taken are displayed The incorrect parameter setting and program error location can also be identified by selecting the error and clicking the Error Jump button On the Module Information List tab the LED status and the switch status of the target module can be checked 1 The information of the FX5 SF 8DI4 is integrated and displayed in the module diagnostics window of the FX...

Страница 259: ...information collected before the CPU module is powered off or reset can also be displayed the error cause can be identified based on the errors The displayed information can also be saved in CSV file format Diagnostics System Monitor Event History button Use the event history function to identify the cause of failure that occurred in facilities or devices For details on this function and collected...

Страница 260: ...re the occurrence of the error Continuation errors can be cleared by either of the following methods Using engineering tools Using special relay SM Page 259 Clearing Errors Error status Program execution status Description Required action Major error Stop The module is unable to continue its operation due to a hardware issue Perform troubleshooting If the error still persists consult your local Mi...

Страница 261: ...er memory using the engineering tool is explained below Online Read from PLC 1 Click the Device Memory check box 2 Click Detail 3 Input character strings in Device Data Name and select the devices to back up 4 Select the Buffer Memory Intelligent Module No and input the head module number 5 Click OK and then click Execute to read the data from the programmable controller 15 6 Clearing Errors Only ...

Страница 262: ...ware fault Consult your local Mitsubishi Electric representative Item to check Action Disconnect the external wiring and connect the S S terminal and the 0V terminal or the S S terminal and the 24V terminal Short circuit the 0V terminal or 24V terminal not connected to the S S terminal and the input terminal and check the LED or a peripheral to check that the input turns on When the input turns on...

Страница 263: ... or between the S S terminal and the input terminal Check with the LED or a peripheral whether the input turns on When the input turns on Check that the input device does not have a built in diode or parallel resistance If so refer to the precautions for connecting input devices When the input does not turn on With a tester check that the voltage between the COM terminal and the input terminal or ...

Страница 264: ...here may be a hardware issue Consult your local Mitsubishi Electric representative Item to check Action Check for errors in the CPU module Remove the cause of the error Check that the file is set in the boot file settings of the parameters Set the file in the parameters Check that the file is set in the program file settings of the parameters Check that the file to run is stored in the SD memory c...

Страница 265: ...s User s manuals for each module Item Inspection item Description 1 Ambient environment Operating ambient temperature The temperature in the control panel should be 20 to 55 1 FX5U CPU module FX5UC CPU module The temperature in the control panel should be 0 to 55 FX5UJ CPU module FX5S CPU module Operating ambient humidity The humidity in the control panel should be 5 to 95 RH Working atmosphere Fr...

Страница 266: ... of the memory for the power interruption time 20 sec Battery replacement steps 5 and 6 must be completed within the power interruption time 20 sec When the time taken for battery replacement is longer than the power interruption time the data of the memory may be lost 1 Turn the power supply on 2 Back up the data of the CPU module with the engineering tool 3 Turn the power supply off 4 Remove the...

Страница 267: ...long time has passed since the battery voltage is reduced the data may not be retained by the battery Make sure to back up the data of the CPU module with the engineering tool before battery replacement FX5U CPU module Extract the old battery from the battery holder B in the right figure and disconnect the battery connector C in the right figure FX5UC CPU module Disconnect the battery connector B ...

Страница 268: ...on the module front surface The year and month of production of the product can be checked from the manufacturer s serial number LOT on the front at the bottom of the CPU module Ex FX5U CPU module 5 1 1 0 0 0 1 Nameplate indication example Serial number 1510001 Right side The actual nameplate may be different from the above example in some parts Control number Month example January 1 to 9 January ...

Страница 269: ...D FX5 422 BD GOT FX5 1PSU 5V FX5 CNV BUS from January 1st 2015 FX5UC 32MT D FX5UC 32MT DSS FX5 C32EX D FX5 C32EYT D FX5 C32ET D FX5 C32EX DS FX5 C32EYT DSS FX5 C32ET DSS FX5 4AD ADP FX5 4DA ADP FX5 CNV BUSC FX5 CNV IFC from October 1st 2015 FX5UC 64MT D FX5UC 64MT DSS FX5UC 96MT D FX5UC 96MT DSS FX5 C16EX D FX5 C16EX DS FX5 C16EYT D FX5 C16EYT DSS FX5 C1PS 5V from May 1st 2016 FX5U 32MR DS FX5U 32...

Страница 270: ...shown below wind a ferrite core around it once near the module When not using the peripheral connector during operation close the peripheral connector cover In addition if there is a possibility that the built in Ethernet communication connector may be touched in operation be sure to eliminate the static electricity or attach an Ethernet cap 1 to prevent the influence of static electricity 1 Refer...

Страница 271: ...s However Mitsubishi Electric suggests that if adequate EMC precautions are followed with general good EMC practice for the user s complete control system users should expect normal errors as specified in this manual Sensitive analog cables should not be laid in the same trunking or cable conduit as high voltage cabling Where possible users should run analog cables separately Ground the shield of ...

Страница 272: ...imately 200mm from the terminal block and the connector of the power cable Ferrite core used in test by Mitsubishi Electric E04SR401938 manufactured by SEIWA ELECTRIC MFG CO LTD The FX5 4A ADP requires that the cable used for power supply is 30m or less For 24VDC power supply of the FX5 4A ADP supply power from the AC DC power supply in the same control panel AC DC power supply used in test by Mit...

Страница 273: ...les do not include batteries when shipped from the factory Battery only spare parts and optional parts 1 Weight in packaging Precautions for transportation When transporting the product above follow IATA Dangerous Goods Regulations IMDG Code International Maritime Dangerous Goods Code and domestic transportation regulations in each country For details contact the transportation company to be used ...

Страница 274: ...ve 2006 66 EC Article 20 Information for end users and Annex II Exportation precautions The new EU Battery Directive 2006 66 EC requires the following when marketing or exporting batteries and or devices with built in batteries to EU member states To print the symbol on batteries devices or their packaging To explain the symbol in the manuals of the products Labeling To market or export batteries ...

Страница 275: ...APPX Appendix 4 Handling of Batteries and Devices with Built in Batteries in EU Member States 273 A MEMO ...

Страница 276: ...n connector 66 Extension connector cover 65 G Genuine product certification label 64 I Input display LED 62 Installing directly 149 152 M Memory capacity 84 N Nameplate 64 Number of remote I O points 51 84 O Operation status display LED 71 Output display LED 62 P P RUN LED 62 Peripheral connecting connector cover 62 PWR LED 62 R RD LED 68 RS 485 terminal resistor selector switch 69 RUN STOP RESET ...

Страница 277: ...I 275 MEMO ...

Страница 278: ... 2022 SH NA 082452ENG C Added or modified parts SAFETY PRECAUTIONS GENERIC TERMS AND ABBREVIATIONS Section 2 1 2 2 2 3 2 4 2 5 3 5 5 3 5 4 5 9 6 2 6 3 6 4 6 5 Chapter 11 Section 13 2 13 5 Appendix 2 This manual confers no industrial property rights or any rights of any other kind nor does it confer any patent licenses Mitsubishi Electric Corporation cannot be held responsible for any problems invo...

Страница 279: ...s are required onsite at domestic or overseas location expenses to send an engineer will be solely at the customer s discretion Mitsubishi shall not be held responsible for any re commissioning maintenance or testing on site that involves replacement of the failed module 1 Gratis Warranty Term and Gratis Warranty Range Overseas repairs shall be accepted by Mitsubishi s local overseas FA Center Not...

Страница 280: ...rademarks or trademarks of Anywire Corporation Unicode is either a registered trademark or a trademark of Unicode Inc in the United States and other countries The company names system names and product names mentioned in this manual are either registered trademarks or trademarks of their respective companies In some cases trademark symbols such as or are not specified in this manual SH NA 082452EN...

Страница 281: ......

Страница 282: ... without notice When exported from Japan this manual does not require application to the Ministry of Economy Trade and Industry for service transaction permission HEAD OFFICE TOKYO BUILDING 2 7 3 MARUNOUCHI CHIYODA KU TOKYO 100 8310 JAPAN NAGOYA WORKS 1 14 YADA MINAMI 5 CHOME HIGASHI KU NAGOYA JAPAN ...

Отзывы: