background image


Appendices 

99

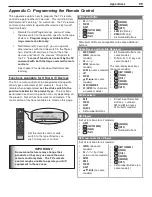
This appendix explains how to program the TV’s remote 
control to operate other A/V devices.  This is distinct from 
NetCommand “Learning.”  To summarize:  the TV’s remote 
control can be made to operate other devices by two dif-
ferent methods:

•  Remote Control Programming:  you must move 

the slide switch to the position specific to the type 
of device.  

Programming is available for the 

large remote control only.

•  NetCommand® “Learning”:  you can operate 

other devices with the slide switch in the 

TV

 posi-

tion.  Position IR emitters in front of the other 
devices and “teach” the  devices’ IR signals to 
the TV.  

“Learned” functions are sent by the TV 

and work with both the large and small remote 
controls.


See chapter 3 for details about NetCommand 
learning.

Functions Available for Other A/V Devices

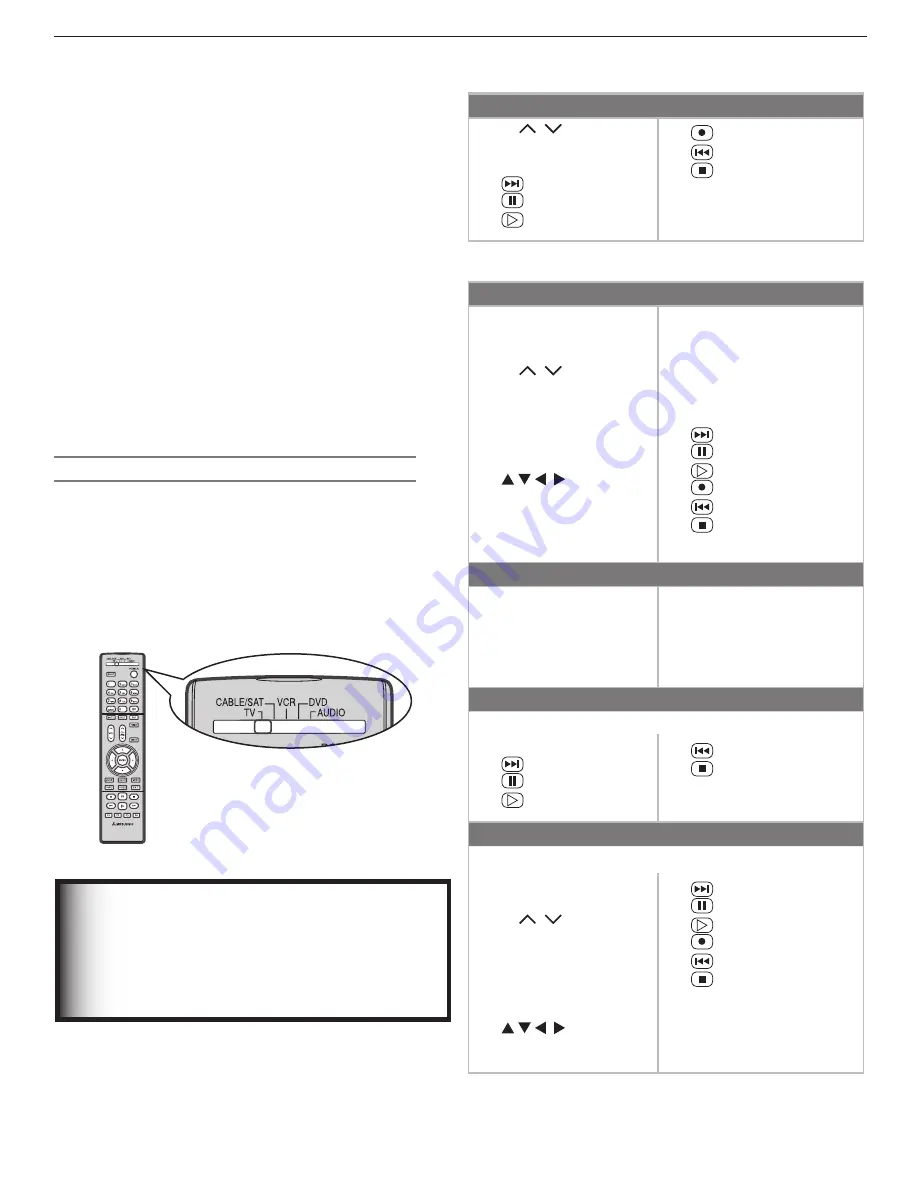
The TV’s remote control can be programmed to operate 
other types and brands of A/V products.  To use the 
remote when programmed, 

set the slide switch to the 

position labelled for the product type

.  The functions 

performed in each switch position can vary depending on 
the product.  Not all functions work for all models.  The 
most common functions available are listed on this page.

IMPORTANT

Some manufacturers may change their 
products or they may use more than one 
remote control system.  The TV’s remote 
control may be unable to operate your A/V 
equipment in these cases.

Set the remote control’s slide 
switch to the type of device you 
wish to program or control.

VCRs and DVRs

• 

CH

   / 

• 

POWER

• 

SLEEP

• 

 (FAST FORWARD)

• 

 (PAUSE)

• 

 (PLAY)

• 

 (RECORD)

• 

 (REVERSE)

• 

 (STOP)

• 

GUIDE 

(DVR only)

• 

MENU 

(DVR only)

• 

0–9

 Number Buttons

Mitsubishi VCRs are compatible with some additional 
buttons.

Cable Boxes and Satellite Receivers

• 

AUDIO (PAGE UP)

• 

CANCEL

 (on some 

models)

• 

CH

   / 

• 

ENTER

 (on some 

models)

• 

GUIDE

 (on some models)

• 

LIST

• 

POWER

• 

        (on some 

models)

• 

VIDEO (PAGE DOWN

• 

QV  

(

ENTER

; for channels 

on some models)

• 

0–9

 Number Buttons (on 

some models)

• 

F1–F4

 (A, B, C, D keys on 

some models)

The record/playback keys 
(on some models):
• 

 (FAST FORWARD)

• 

 (PAUSE)

• 

 (PLAY)

• 

 (RECORD)

• 

 (REVERSE)

• 

 (STOP)

A/V Receivers

• 

MUTE

• 

POWER

• 

SLEEP

• 

VOLUME

• 

0–9

 Number Buttons

•  Direct Input Selection 

buttons:  numbers, 

FAV

 and 

QV

 (on some 

Mitsubishi models)

CD Players

(not all functions for all models)
• 

SLEEP

• 

 (FAST FORWARD)

• 

 (PAUSE)

• 

 (PLAY)

• 

 (REVERSE)

• 

 (STOP)

• 

0–9

 Number Buttons

DVD and Laser Disc Players

(not all functions for all models)

• 

CANCEL

 (on some 

models)

• 

CH

   /   (for track 

skip on some models)

• 

ENTER

• 

MENU

• 

POWER

• 

SLEEP

• 

        (on some 

models)

• 

 (FAST FORWARD)

• 

 (PAUSE)

• 

 (PLAY)

• 

 (RECORD)

• 

 (REVERSE)

• 

 (STOP)

• 

0-9

 Number Buttons (on 

some models)

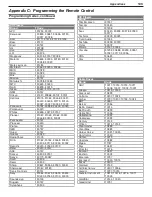
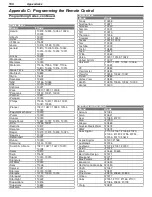
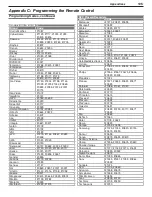
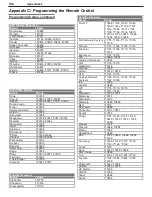
Appendix C:  Programming the Remote Control

Содержание LT-37132

Страница 1: ...rvice mdea com Visit our website at www mitsubishi tv com For information on Demo Mode and System Reset please see the back cover To order replacement or additional remote controls or Owner s Guides visit our website at www mitsuparts com or call 800 553 7278 Guidelines for setting up and using your new widescreen TV start on page 36 ...

Страница 2: ...ce and 2 this device must accept any interference received including interference that may cause undesired operation Note This equipment has been tested and found to comply with the limits for a Class B digital device pursuant to part 15 of the FCC Rules These limits are designed to provide reasonable protection against harmful interference in a residential installation This equipment generates us...

Страница 3: ...widescreen high definition TV We urge you to examine this Owner s Guide to become familiar with the innovative features and operations this unique television offers The very core of our corporate philosophy is to provide our customers with the very best Our development team at Mitsubishi has worked to provide you with a television that defines state of the art with the capability to meet your need...

Страница 4: ...ponent Video 23 Standard Cable Box Satellite Receiver or Other Device with S Video 24 Wall Outlet Cable no cable box 24 Antenna with a Single Lead 25 Antennas with Separate UHF and VHF Leads 25 VCR to an Antenna or Wall Outlet Cable 26 VCR to a Cable Box Audio Video 27 HDMI Device Cable Box Satellite Receiver DVD Player or Other Device 28 DVI Video Device Cable Box Satellite Receiver DVD Player or...

Страница 5: ... Lock by Time 70 V Chip Signal Information 71 TV Ratings 71 Movie Ratings 71 Audio Video Menu 72 Audio Settings 72 Video Settings 74 Chapter 6 NetCommand Functions NetCommand Controlled Devices and the Input Selection Menu 78 NetCommand Controlled Recording 79 Using IEEE 1394 Devices 83 Chapter 7 Using the TV with a Personal Computer Setup 88 Video Adjustments 88 Connecting a Computer to the TV 89...

Страница 6: ...rities or the Electronic Industries Alliance at www eiae org Stand Requirement CAUTION The attached TV stand needs to be used or other authorized optional mounting hardware For wall mounting the authorized hardware is Wall Mount Kit PSM 2031 manufactured by Chief Manufacturing Inc See page 10 for more information Use with other than the authorized accessories may result in making the TV unstable w...

Страница 7: ... mild liquid detergent such as dish washing detergent to the water used to moisten the cloth Rinse with a second cloth moist ened only with water Dry with a third dry soft non abrasive cloth LCD Screen Cleaning DO NOT use any liquid to clean the screen Only use a dry soft cloth Wipe the screen gently with an up and down motion Clean the entire screen evenly not just sections of the screen General ...

Страница 8: ...ith care Quick stops excessive force and uneven surfaces may cause the appliance and cart combination to overturn 7 Ventilation Slots and openings in the cabinet are provided for ventilation and to ensure reliable operation of the TV and to protect it from overheating Do not block these openings or allow them to be obstructed by placing the TV on a bed sofa rug or other similar surface Nor should ...

Страница 9: ... all servicing to qualified service person nel 17 Damage Requiring Service Unplug the TV from the wall outlet and refer servicing to qualified service personnel under the following condi tions a When the power supply cord or plug is damaged b If liquid has been spilled or objects have fallen into the TV c If the TV has been exposed to rain or water d If the TV does not operate normally by followin...

Страница 10: ... objects under or on top of the protective sheet 3 With two people firmly grasping the left and right sides of the TV gently place the TV face down on the protective sheet with the display stand hanging over the edge of the table See the illustration to the right 4 LT 37132 model Disconnect the Power Swivel Cable from the TV only LT 46231 model Skip Step 4 This model does not include the Power Swi...

Страница 11: ...12 Special Features of Your TV 12 TV Front Panel Power Button and Indicators Front Control Panel 14 System Reset Button 14 A V Reset 14 Input 3 A V Jacks 14 TV Indicators 15 Back and Side Panels 16 CableCARD Technology 19 Cable Managment 20 ...

Страница 12: ... realis tic image High Definition Video Inputs Three Component Video Inputs also called Y Pb Pr inputs These inputs receive standard analog video formats of 480i 480p 720p and 1080i high definition signals This provides a high level of flexibility when connecting DVD players recorders cable boxes and satellite receivers Two HDMI Inputs that accept digital 480i 480p 720p 1080i and 1080p video signa...

Страница 13: ...offers a new level of networking that can seamlessly integrate selected older A V products with new and future digital products NetCommand supports IEEE 1394 connections Audio Video Control system AV C 5C copy protection and IR infrared control of selected older products such as VCRs DVD players cable boxes and satellite receivers NetCommand can learn remote control signals directly from many devi...

Страница 14: ...se devices can be controlled by the TV s remote control 8 INPUT 3 JACKS System Reset Button If the TV does not respond to the remote control front panel controls or will not power on off press the SYSTEM RESET button on the front panel with a pointed object such as the point of a pencil or end tip of a paperclip The green LED will flash quickly for about one minute When the green LED stops flashin...

Страница 15: ...oftware from an authorized flash memory device For detailed information see the instructions that accompany the authorized software update Important Do not use unauthorized software at any time Blue TV powered off and auto on timer is set Normal operation TV can be turned on at any time STATUS Indicator LED Color TV Condition Additional Information None Normal TV on or standby condition Normal ope...

Страница 16: ...compatible video game systems Please see Appendix B for signal compatibility K Back Panel 1 Back Panel 2 bottom view Side Panel 1 ANT 1 MAIN ANT 2 AUX Antenna If you are connecting an antenna direct cable without a cable box or are using cable with a CableCARD connect the main antenna or cable source to ANT 1 MAIN ANT 1 MAIN and ANT 2 AUX can each receive both digital and analog over the air chann...

Страница 17: ...en To make recordings from this output the TV must be in normal full screen mode rather than in Split Screen mode From this output you can record audio and video signals from ANT 1 ANT 2 INPUT 1 3 and IEEE 1394 devices Digital signals from ANT 1 ANT 2 and IEEE 1394 devices are converted to analog video and audio signals Some signals cannot be recorded because of copy protection flags in the conten...

Страница 18: ... to the HDMI DVI AUDIO inputs on the TV to receive left and right stereo audio from your DVI device These inputs are HDCP High Bandwidth Digital Copy Pro tection compliant These inputs are certified for proper interoper ability with other products certified by Simplay 10 DIGITAL AUDIO OUTPUT This output sends Dolby Digital or PCM digital audio to your digital A V surround sound receiver Analog aud...

Страница 19: ...xx Press EXIT to exit Sample CableCARD initial screen Record the information before contacting your cable provider To review the information later press MENU and when the Main menu appears press 9 9 9 to re display the screen Note CableCARD requires the TV s Fast Power On setting If you insert a CableCARD the TV will automatically override a Low Power setting and change to the Fast Power On settin...

Страница 20: ...feature see Manual and Power Swivel in Chapter 1 Cable Management The TV comes with one Cable Tie straight shape already attached One additional Cable Tie with a rivet and two Cable Clamps round shape are provided with the TV package The number of cables connected to the TV will determine which cable ties clamps are needed Note After attaching the provided cable tie to the TV insert the rivet into...

Страница 21: ...as with Separate UHF and VHF Leads 25 VCR to an Antenna or Wall Outlet Cable 26 VCR to a Cable Box Audio Video 27 HDMI Device Cable Box Satellite Receiver DVD Player or Other Device 28 DVI Video Device Cable Box Satellite Receiver DVD Player or Other Device 28 DVD Player with Component Video 29 A V Receiver Sound System 29 Older Cable Box 30 Camcorder 30 IEEE 1394 Devices 31 IR Emitter NetCommand ...

Страница 22: ... carry all qualities of signals IEEE 1394 FireWire Digital audio and video Carries compressed digital video and audio as well as device control signals on a single two way cable RF Coaxial Video from antenna or direct cable Analog and digital audio and video Carries audio and video on a single cable Note Only some TV signals are high definition signals To view high definition programming from your c...

Страница 23: ...deo If your cable box or satellite receiver has HDMI or DVI outputs use the connections for HDMI or DVI video devices described later in this chapter Required RCA component video cables left right analog audio cables A coaxial splitter available at most electronic supply stores may be required to complete this installation 1 Connect the cable from the outside cable or satel lite service to CABLE I...

Страница 24: ...eceiver Owner s Guide for cable or dish antenna connections to the receiver K K Figure 2 Connecting a device with S Video Wall Outlet Cable no cable box can be used with a CableCARD It is very important to connect the incoming cable for your primary viewing source to ANT 1 MAIN especially for CableCARD use 1 Connect the primary incoming coaxial lead cable to ANT 1 MAIN on the TV back panel 2 For a...

Страница 25: ...na wires are subject to interference which may adversely affect the performance of the TV We recommend using coaxial antenna cable Antenna with a Single Lead A For an antenna with flat twin leads A 300 ohm to 75 ohm transformer is required This is not included with the TV but is available at most electronics stores A1 For an antenna with flat twin leads connect the 300 ohm twin leads to the 300 oh...

Страница 26: ...o INPUT AUDIO LEFT and AUDIO RIGHT on the TV back panel If your VCR is mono non stereo connect only the white left cable Figure 6 Connecting a VCR to an Antenna or Wall Outlet Cable 5 Connect either an S Video or composite video cable from VIDEO OUT on the VCR back panel to INPUT VIDEO or S VIDEO on the TV back panel Connect only one type of video cable S Video is recommended if available Optional...

Страница 27: ...deo output to the TV s INPUT S VIDEO jack analog stereo audio to the associated AUDIO jacks Figure 7 Connecting a VCR to a cable box K K 6 To use the TV speakers with the VCR connect left white and right red audio cables from AUDIO OUT on the VCR back panel to INPUT AUDIO LEFT and AUDIO RIGHT on the TV back panel If your VCR is mono non stereo connect only the white left cable 7 Connect either an ...

Страница 28: ...e ouput Please review your equipment instructions for DVI connectivity and compatibility K K Figure 9 Connecting a DVI device HDMI Device Cable Box Satellite Receiver DVD Player or Other Device Required HDMI to HDMI cable This is not included with the TV Connect an HDMI cable from the TV back panel to the HDMI device output HDMI devices provide video and audio through this cable so no other connec...

Страница 29: ...ailable in digital format on the DIGITAL AUDIO OUTPUT jack Digital incoming audio is available in analog format on the AVR OUT LEFT RIGHT jacks Usually only one of the following connections is required To connect an analog A V receiver AVR Connect left white and right red audio cables from AVR OUT LEFT RIGHT on the TV back panel to the TV AUDIO INPUT on the A V receiver To connect a digital A V re...

Страница 30: ... the TV back panel 3 Connect one coaxial cable from OUT on the RF split ter to IN on the standard cable box 4 Connect one coaxial cable from OUT on the cable box to ANT 2 AUX on the TV back panel K K Figure 12 Connecting an older cable box Camcorder Required Analog stereo audio cables and either an S Video or composite video cable NOTE For IEEE 1394 camcorders see also later in this chapter under ...

Страница 31: ...e as appropriate for the device Four Pin and 6 Pin Connections There are two different types of connectors used for IEEE 1394 terminals and cables a 4 pin and a 6 pin type Both types send the same digital audio video and control signals but the 6 pin connectors can also supply low voltage electrical power to connected devices This TV uses only 4 pin type connectors A 6 pin connector cannot be conn...

Страница 32: ...d make the faster device the recorder Use IEEE 1394 cables 15 feet or less in length between devices This TV is an IEEE 1394a device It can be used with an IEEE 1394b system when an IEEE 1394a to 1394b convertor is used IEEE 1394b systems are capable of greater distances and multi room applications The TV can recognize a maximum of seven IEEE 1394 devices at any one time IEEE 1394 Camcorders Contr...

Страница 33: ... the sensor and the device s Owner s Guide does not specify the location you can find it by following these steps using the device s remote control a Hold the remote about one half inch from the front of the device Starting from one end of the display window plastic press the POWER button b If the device does not respond move the remote control one inch toward the center and try again c Repeat thi...

Страница 34: ...dio switching works Q The front panel of my A V Receiver AVR is too tall or too convex for the IR emitter signal to reach the remote control sensor of the AVR What can I do A There are several possible solutions Mount the IR Emitter on the top front edge of the AVR over the remote control sensor Use tape to secure it in place Mount the IR Emitter on the underside of the shelf above the AVR if the ...

Страница 35: ... for Setting Up and Using Your New Widescreen TV 36 When You First Power On the TV 38 Using the TV s Setup Menu 38 When You First Connect a Device 41 Initial NetCommand Setup 44 Additional Setup Using the NetCommand Menu 45 ...

Страница 36: ...ted to the program you re watching See TV Signals and Display Formats 2 To use the TV to control recordings through NetCommand see chapter 6 NetCommand Func tions To use the TV Guide On Screen system to control recording see the separate TV Guide On Screen Interactive Program Guide User s Manual Guidelines for Setting Up and Using Your New Widescreen TV 3 To understand use of the Input Selection m...

Страница 37: ...ol Point the TV s remote at this sensor for best results The IR Learning sensor on the front control panel is used for NetCommand learning Be sure to open the front control panel cover before point ing the remote control of input device like a DVD player at the IR Learning sensor See TV Front Panel Power Button and Indicators in chapter 1 for more information Turning the TV On or Off To turn the T...

Страница 38: ...ings and the Audio Settings section Then refer to either SAP analog signal or Language digital signal Memorize Channels Setup Menu For ANT 1 MAIN and ANT 2 AUX The memorization process performs two scans of all pos sible channels on the selected ANT input Analog chan nels are scanned first then the process is repeated for digital channels Channel memorization may take up to 15 minutes to complete ...

Страница 39: ...me the time change occurs you must open this menu and set the TV s clock ahead or back If you have selected Auto for Clock Setting the TV s clock adjusts automatically to daylight savings time Setting the Clock Automatically Select the Time Zone and the Daylight Savings DST options for your state Press to select Applies or Ignore You may then tune to a channel on ANT 1 or ANT 2 that uses Extended ...

Страница 40: ...m listings Need faster power on Wish to turn off the TV while making a NetCommand controlled recording Wish to schedule future NetCommand controlled recordings for a time when the TV will be off Setup Menu continued Note CableCARD and TV Guide On Screen re quire the Fast Power On setting If you insert a CableCARD or activate TV Guide On Screen the TV will automatically override a Low Power setting...

Страница 41: ... the remote controls for the TV and the current device More About Auto Input Sensing Be careful to choose a different name for each input You can change the input name at a later time using the Input Name menu If you disconnect a device and then later connect a different device to the vacated jack use the Input Name menu to update the device name If you want the device under NetCommand control you...

Страница 42: ...n the TV position The IR Learning feature of NetCommand allows the TV to learn the remote control signals for your A V devices NetCommand can control IEEE 1394 devices by sending control signals over a FireWire cable You can choose the level of NetCommand control for your home theater Limited Setup Perform a limited setup if you Want NetCommand to control only a few devices such as the TV a playba...

Страница 43: ...V Guide On Screen is enabled A V Receiver Cable Sat DVD VCR Learning Screen Check Box Name Function Name on TV Remote X X X Power Power On or Power On Off POWER X X X Power Off Power Off POWER X Volume Up Volume Up VOL X Volume Down Volume Down VOL X Mute Mute MUTE X Input 1 4 AVR Input Select Automatic when device is selected X X Channel Up Channel Scan Up CH X X Channel Down Channel Scan Down CH...

Страница 44: ...on menu see chapter 5 TV Menu Settings Change the order of icons in the Input Selection menu see chapter 5 TV Menu Settings To open the NetCommand menu press MENU to first open the Main menu highlight the NetCommand icon and press ENTER See figure 10 Figure 10 Additional NetCommand setup options are accessible through the NetCommand menu NetCommand Learn button Name you select for the device Figur...

Страница 45: ...e the following table and notes for the preferred connection combinations If One Source Is The Other Source Can Be Ant 1 Air Ant 2 Air Cable Box Cable Card N A Ant 1 Channels via Cable N A Ant 2 Channels via Cable N A Note Inputs to TV Guide On Screen can include only one over the air source and only one cable source TV Guide On Screen listings can be downloaded from An over the air antenna or dir...

Страница 46: ...ts There are two parts to this setup Part 1 Learn IR codes to control A V receiver switching to the specified A V receiver audio inputs Part 2 Tell the TV where connected devices send audio Because the TV s Auto Input Sensing feature never detects audio connections the TV does not know that an A V receiver is connected until you perform this procedure The sample setup shown in figure 14 illustrate...

Страница 47: ...tions described Press ENTER to set the letter and move the highlight to the next letter To delete a letter highlight it and press CANCEL or press to insert a blank space underscore character To return the highlight to the first character repeatedly press CANCEL To return to the default name highlight the first character and press CANCEL A V Receiver Audio Inputs Text boxes for you to enter the nam...

Страница 48: ...MENU and open the NetCommand menu 4 Highlight the text box under AV RECEIVER SETUP 5 Press to move through the list to TV This is the list of A V receiver inputs you named in the AV Receiver AVR Learn screen see figure 15 The TV setting here indicates that audio out from the TV DIGITAL AUDIO OUT or AUDIO OUT LEFT RIGHT is sent to the A V receiver s TV AUDIO input Audio from ANT 1 and ANT 2 and IEE...

Страница 49: ...TV Operation and Features Remote Control 50 Choosing a Program Source 52 ChannelView Channel Listings 52 Status Display 53 Split Screen 54 TV Signals and Picture Formats 56 Manual and Power Swivel 58 4 ...

Страница 50: ...played swivels the TV thirty degrees left or right Swivel is not available in Split Screen mode 16 ENTER Selects a channel number or menu item 17 GUIDE Displays or removes ChannelView channel listing for ANT 1 and ANT 2 With the TV Guide On Screen system enabled launches TV Guide On Screen Dis plays DVD disc or top menu for a NetCommand con trolled DVD player 18 INFO Displays an on screen summary ...

Страница 51: ... seconds of inactivity the message box will disappear Remote Control continued Resetting the Remote Control Full Size Remote Control Only If the slide switch is set to TV and the TV does not respond properly do the following to reset the remote control 1 Press and hold POWER for several seconds until the button blinks twice and goes off 2 Release the POWER button 3 Press keys 0 0 9 3 5 The POWER b...

Страница 52: ...o section name is displayed if you entered a name in the Channel menu No program information is displayed for analog channels Note If limited data is shown or no program data ap pears it is because the broadcaster is not sending the information This is not a defect of your TV Using ChannelView Feature Instructions View listings while viewing ANT 1 or ANT 2 Press GUIDE Scan through memorized channe...

Страница 53: ...2 9 Day and Time 10 Sleep Timer remaining time 11 Split Screen picture source and channel 12 Audio Mute on 13 Program name if provided by TV Guide On Screen Digital Program 1 Digital Major and Sub Channel Number 2 Digital Channel Name if broadcast or provided by TV Guide On Screen 3 Signal Type Being Received Possible SD 4 3 SD 16 9 HD 4 Screen Format in Use Possible SD 4 3 Standard Expand Zoom St...

Страница 54: ... as the sub picture see figure 6 3 Press ENTER to make the change Grayed out input icons are unavailable as Split Screen sources or with the current source Change sub picture channel when the input source is ANT 1 ANT 2 or a NetCommand controlled cable box or satellite receiver Press to make the sub picture the sound source then press CH Freeze or unfreeze the sub picture Press PAUSE Press again t...

Страница 55: ...ve only one size 16 9 Main Picture 16 9 Main Picture 16 9 Main Picture 16 9 Main Picture 16 9 Main Picture 16 9 Main Picture 4 3 Sub Picture 4 3 Sub Picture 4 3 Sub Picture 4 3 Main Picture 4 3 Main Picture 4 3 Main Picture 16 9 Sub Picture 16 9 Sub Picture 16 9 Sub Picture 4 3 Main Picture 4 3 Main Picture 4 3 Main Picture 4 3 Sub Picture 4 3 Sub Picture 4 3 Sub Picture 16 9 Sub Picture 16 9 Sub ...

Страница 56: ...als from digital channels and IEEE 1394 devices These signals are always 16 9 widescreen TV Picture Format Definitions Standard This is the full screen format HDTV signals use this format This format is useful for displaying Anamorphic DVDs that have 1 78 1 or 1 85 1 aspect ratios Anamorphic DVDs that have a 2 35 1 aspect ratio are displayed with black bars at the top and bottom but show the entir...

Страница 57: ...Chapter 4 TV Operation and Features 57 TV Picture Formats See descriptions on the preceding page ...

Страница 58: ... LT 37132 1 Be sure no menu or slider such as the Volume slider is displayed 2 Press the or buttons to swivel the TV thirty degrees left or right Note Power Swivel is not available while the TV is in Split Screen mode Alternate Method 1 Press VIDEO once Swivel will appear on screen 2 Press the or buttons to swivel the TV thirty degrees left or right IMPORTANT When viewing a NetCommand controlled d...

Страница 59: ...enu 63 Channel Menu 64 Captions Menu 66 Parental Lock Menu 68 Setting a Pass Code 68 Lock TV by Time and Front Panel Lock 68 Rating Menus 68 Bypassing the Ratings Lock and Lock by Time 70 V Chip Signal Information 71 TV Ratings 71 Movie Ratings 71 Audio Video Menu 72 Audio Settings 72 Video Settings 74 ...

Страница 60: ...ext color is yellow On screen instructions shown in the message line at the bottom of the menu provide feature selection and adjustment information Some on screen menu options must be set before other options are available Remote Control Buttons The following buttons on the remote control help you navigate within the system Key Function 1 MENU Display or close the Main menu or move back one menu s...

Страница 61: ...u Record Set up a NetCommand controlled recording View a list of scheduled recordings Set the default digital recording device Select anamorphic or cropped format for analog recordings See chapter 6 NetCommand Functions for use of the Record menu Main Menu Press MENU on the remote control to open the Main menu figure 1 See below for an overview of the options available through the Main menu Figure...

Страница 62: ... to the TV inputs that appear in the Input Selection menu See figures 3 and 4 The current viewing device and any unused inputs appear grayed out and unselectable in the Input Name menu Icon for the Input Name menu Icon for the Icon Order menu Figure 3 The Input Name menu and Icon Order menu are accessible through the NetCommand menu Figure 4 Input Name menu To rename an input 1 If you are currentl...

Страница 63: ... for the disconnected HDMI input 2 Press to select Off 3 Press MENU to return to the NetCommand menu or press EXIT to close all menus Icon Order Menu no NetCommand setup required The Icon Order menu allows you to rearrange the device icons that appear in the Input Selection menu Change the sequence to put frequently used icons at the start of the list See figures 3 and 5 To change the icon order 1...

Страница 64: ...in the Channel box To Add a New Digital Channel 1 In the channel menu enter the physical channel number in the Channel box including the sub channel number press CANCEL and then enter the sub channel number If no sub channel is specified press CANCEL and 1 2 Press ENTER to tune to the channel 3 Highlight the Added radio button to add the channel to memory Name Analog channels from ANT 1 and ANT 2 ...

Страница 65: ...pass the menu and use only the remote control Using FAV Channels Viewing FAV Banks 1 Press the FAV key Wait for the TV to tune to a channel in the current FAV bank 2 Press the FAV key repeatedly to cycle through the channels available in the current FAV bank Changing FAV Banks 1 Press the FAV key Wait for the TV to tune to a channel in the current FAV bank 2 When tuning is complete and while the T...

Страница 66: ...hoose to display the background color as either black or gray behind the text Digital Captions The following display options are available for digital sources Captions 1 6 Sent by broadcaster On if Mute Closed captions are displayed when audio is muted When selected press MUTE on the TV remote control to turn captioning on off Caption 1 Off No closed captions Note For digital programs if the broad...

Страница 67: ...ite font makes an easy to read combination Use care when selecting custom colors Your choice may affect the readability of captions IMPORTANT The content of captions is determined by the broadcaster If your captions show strange characters misspellings or odd grammar it is not a malfunction of the TV Opacity Font You can customize the visibility of your fonts using the fol lowing settings Transluc...

Страница 68: ...k the TV by time 1 Press to select On or Off for Lock by Time 2 Press to move to the Lock Time box a With the hour number highlighted in yellow press repeatedly to change the hour and associ ated AM PM indicator You can also just press and hold to change the hour b Press ENTER to move the highlight to the minutes c With the minutes number highlighted in yellow press repeatedly to change the minute...

Страница 69: ...k menu 8 To set the time of day for these restrictions to be in effect press to move to the Start box To make the rating restrictions active twenty four hours a day set Start and Stop to the same time To set the time a With the hour number highlighted in yellow press repeatedly to change the hour You can also just press and hold to change the hour b Press ENTER to move the highlight to the minutes...

Страница 70: ...e to the Rating box 6 Press to select the program rating level you want to block 7 Press ENTER to add a check mark to indicate blocking is in effect for the rating When a rating shows a check mark press ENTER to remove the check mark and allow programs with this rating 8 Repeat steps 3 through 7 for each additional rating system you would like to set up 9 Press MENU to return to the Parental Lock ...

Страница 71: ...ategory listing rated TV PG are also blocked V Chip Signal Information V Chip ratings let you control the types of programming that can be viewed on the TV V Chip ratings are displayed when you change the channel or press INFO on the remote control V CHIP EXCEPTIONS V Chip blocking is ineffective for programs viewed on devices connected to component or HDMI inputs Many of these devices however hav...

Страница 72: ...e as used with the Off setting Film Mode is not effective for high definition signals TV Speakers This selection turns the TV s internal speakers on or off Select Off When sending the sound through a separate sound system or surround sound A V receiver If your A V receiver is under NetCommand control Note To prevent damage from a sudden increase in vol ume turn the TV volume down low before chang ...

Страница 73: ...gnal is broadcast the letters SAP are displayed when you tune to the channel Mono Reduces background noise Use when receiving a weak stereo audio signal All audio is played mono with this setting Listen To is not available for 1394 devices or devices con nected to the INPUT COMPONENT and HDMI jacks Digital Only Audio Settings You can set digital only audio settings while viewing either analog or d...

Страница 74: ...djust the red to green ratio Sharpness Provides a slider to adjust the detail and clarity Color Temperature Bright Natural Brilliant Allows you to adjust how white is displayed Low White images have a warm cast This adjustment is an average and can vary due to ambient room lighting video scene brightness and the TV s age Natural Color Temp at the low setting displays video at the 6500K industry st...

Страница 75: ...icture will look when DeepField Imager is on right side or when it is off left side SharpEdge When On is selected special edge sharpness enhancements are applied to the vertical edges of images Personal Computer Video Settings Video settings available for images from a personal com puter are Contrast Brightness PerfectColor The adjustment screen displays without the vertical color bars when used f...

Страница 76: ......

Страница 77: ...6 NetCommand Functions NetCommand Controlled Devices and the Input Selection Menu 78 NetCommand Controlled Recording 79 Using IEEE 1394 Devices 83 ...

Страница 78: ...olled devices See the chart in chapter 3 TV Setup to review device functions you can learn for the device Further information on some func tions is included here The Input Selection Menu and NetCommand Power Devices On Off First learn the power key s for the device Press INPUT to display the Input Selection menu If you press POWER without first displaying the Input Selection menu the TV will turn ...

Страница 79: ...fy when to start the recording Start Time a With the hour highlighted in gold characters press to select the hour including AM or PM Press ENTER to move the highlight to the minutes b With the minutes highlighted press to select the minutes Day Use to select a day of the week 5 Select Add and press ENTER to add the recording to the Record List A confirmation message will be displayed if your selec...

Страница 80: ...sting to indicate the program will be recorded You can schedule a maximum of 32 recordings 7 Press EXIT to close the menu Confirm the Recording Setup 1 Press RECORD to open the Record menu NetCommand Controlled Recording continued 2 Press GUIDE to open the Record List figure 2 and view all scheduled recordings Press CH to page quickly through the list 3 Verify that the program you wish to record a...

Страница 81: ... Material When attempting to record copy protected material the record functions of the NetCommand and IEEE 1394 systems may be prevented or stopped If you have a program that was originally tagged Record Once NetCommand will change the tag to Record No More on the new recording VCR Recording Setting Up Analog VCR Recordings with TV Guide On Screen When setting up a recording using TV Guide On Scr...

Страница 82: ...ORD to start record ing You will need to stop the recording manually at the end of the program NetCommand Controlled Recording continued Restrictions for Traditional VCRs with NetCommand and TV Guide On Screen Controlled Recording Your VCR must be connected directly to the MONITOR OUTPUT VIDEO and LEFT RIGHT audio outputs The VCR must be set manually to Line Input Display the Input Selection menu ...

Страница 83: ...nal Type TV Input Can be recorded Digital channels includ ing high definition channels ANT 1 ANT 2 Digital signals including high definition signals IEEE 1394 devices Cannot be recorded Analog channels ANT 1 ANT 2 Analog signals INPUT 1 3 COMPONENT inputs Digital signals HDMI 1 and 2 PC DVI Summary of signal inputs and recording to an IEEE 1394 digital VCR or A V disc Switching Between Analog and ...

Страница 84: ...R QV Last Channel Recall EXIT Exit menus displays Exit menus displays Exit menus displays ENTER Enter or select Enter or select Enter or select CANCEL Cancel function Delete recording from Track List Cancel function or counter reset GUIDE Digital channel guide may need to press twice Display Track List Up down left right Skip to beginning or end of program Up down in track list Skip Backwards 12 s...

Страница 85: ... AC power source Experience a power outage or power fluctuation Remember that you can safely turn off TV power using the POWER button without affecting the reten tion period To Copy a Track to Another IEEE 1394 Device 1 Press INPUT on the remote control and press to select the source A V disc Press ENTER to open the Track List 2 Press or to select a track Then press ENTER to start playback 3 Press...

Страница 86: ...86 Chapter 6 NetCommand Functions 86 Chapter 6 NetCommand Functions ...

Страница 87: ...Using the TV with a Personal Computer Setup 88 Video Adjustments 88 Connecting a Computer to the TV 89 Adjusting Image Resolution 91 Computer Display Formats 92 7 ...

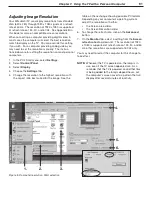
Страница 88: ...ange the resolution of the computer image The goal is to maximize the computer resolution while maintaining a suitable aspect ratio for the image See the explanation later in this chapter 4 Perform TV video adjustments Press VIDEO repeat edly to cycle through the video adjustment options The following additional adjustments are available for computer video Auto Position Press ENTER to automaticall...

Страница 89: ...io cables from the computer s AUDIO OUT to PC DVI AUDIO on the TV back panel K K Figure 3 Connecting a personal computer with an HDMI monitor output Connecting a Computer to the TV Computer with DVI Digital Monitor Output Required DVI to DVI cable stereo audio cables If the computer s audio output is a single mini jack a mini audio to RCA male Y adapter cable is also required 1 Connect the DVI to ...

Страница 90: ...PORTANT To use this connection you must first select the Analog setting in the PC DVI box of the NetCommand menu See the Setup section for more 1 Connect the computer s PC MONITOR OUTPUT to PC DVI on the TV back panel Use either a VGA to DVI monitor cable or a VGA computer cable with a VGA DVI adapter 2 Connect the left white and right red audio cables from the computer s analog audio ouput to PC ...

Страница 91: ...ings 2 Select Control Panel 3 Select Display 4 Choose the Settings tab 5 Change the resolution to the highest resolution with the aspect ratio best suited for the image See the NOTE Whenever the TV is powered on the lamp is in use even if the TV screen appears dark As a reminder that the TV is powered on and that time is being added to the lamp s elapsed hours set the computer s screen saver to a ...

Страница 92: ...rd 4 X 3 Standard Zoom VGA 640 X 480 WVGA 848 X 480 SVGA 800 X 600 WSVGA 1064 X 600 XGA 1024 X 768 PC 720p 1280 X 720 WXGA 1365 X 768 SXGA 1280 X 1024 DVI D signals only Format Reduced Standard PC 1080p 1920 X 1080 DVI D signals only Computer Display Formats Repeatedly press the FORMAT key to cycle through the TV displays available for your computer s video signal ...

Страница 93: ...Appendices Appendix A Bypassing the Parental Lock 95 Appendix B Specifications 97 Appendix C Programming the Remote Control 99 Appendix D Troubleshooting 109 ...

Страница 94: ......

Страница 95: ...can either enter a new pass code to open the Parental Lock menu and make changes or press EXIT to close the menu If any of the locks are turned on and you exit the menus when prompted for a new code the old code and all lock settings are retained If all locks are turned off and you exit the menus when prompted for a new code then the previous code is erased Lock Bypass Instructions Have Been Filed...

Страница 96: ...96 Appendices 96 Appendices This page intentionally left blank ...

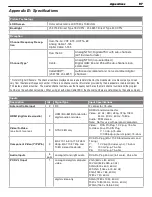
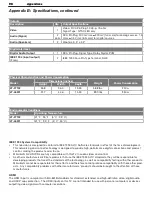
Страница 97: ... channel number When using an authorized CableCARD the channel numbers are determined by the cable company Inputs Description Qty Signal Type Input Specifications Antenna Cable input 2 RF F connector 75 ohm HDMI digital video audio 2 HDMI EIA 861B standard for digital audio and video HDMI standard connector Video 60 Hz 480i 480p 720p 1080i 24 Hz 30 Hz 60 Hz 1080p Audio PCM stereo Note Not for use w...

Страница 98: ...to the attention of those manufacturers HDMI The HDMI input is compliant with EIA 861B standards for standard extended and high definition video digital audio and HDCP copy protection The HDMI inputs on this TV are not intended for use with personal computers or devices outputting video signals with computer resolutions Outputs Description Qty Output Specifications Video 1 Video RCA Pin Plug 1 0 Vp...

Страница 99: ...sted on this page IMPORTANT Some manufacturers may change their products or they may use more than one remote control system The TV s remote control may be unable to operate your A V equipment in these cases Set the remote control s slide switch to the type of device you wish to program or control VCRs and DVRs CH POWER SLEEP FAST FORWARD PAUSE PLAY RECORD REVERSE STOP GUIDE DVR only MENU DVR only...

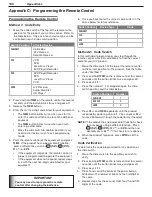
Страница 100: ...our equipment 6 Once you have found the correct code write it in the space below for future reference Switch Position Device Type Code CABLE SAT VCR DVD AUDIO Method 2 Code Search In this method of programming you step through the remote control s internal code library to find the correct code for your A V product 1 Move the slide switch at the top of the remote control to the correct position for...

Страница 101: ...ates the volume and mute functions of the A V receiver in all positions of the slide switch Activate Audio Lock if you normally use an A V receiver with your TV and other A V equipment 1 Program the AUDIO position for your A V receiver as described earlier in this section 2 Move the slide switch to the AUDIO position 3 Press and hold POWER on the remote control for several seconds until the button...

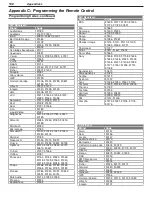
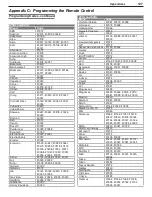
Страница 102: ...283 31269 31268 31266 31189 30189 Pioneer 31384 31343 31023 30630 30531 30150 30014 Polk Audio 31414 31289 30189 Proscan 31254 RadioShack 31263 A V Receivers Brand Code RCA 31609 31511 31390 31254 31074 31023 30531 Rio 31869 Samsung 31500 31295 Sansui 31189 30189 Sanyo 31801 Sharp 31386 31361 Sharper Image 31416 31411 31410 31409 31385 31263 30797 Sherwood 31077 Sirius 31811 31627 31602 Sonic Blue...

Страница 103: ...rs Brand Code JVC 31294 30072 Kenwood 30826 30681 30626 30190 30037 30028 KLH 31711 31373 31372 31318 Koss 31317 Krell 30157 LG 31208 Linn 30157 LXI 30305 Magnavox 30305 30157 30038 Marantz 30626 30435 30180 30157 30038 30029 Mark Levinson 31484 McIntosh 30660 30290 30256 MCS 30029 MGA 30083 Miro 30000 Mission 30157 Mitsubishi 30098 30083 MTC 30625 30420 NAD 30299 30019 Nikko 30625 30174 30170 NSM...

Страница 104: ...021 Pace 11877 10237 10008 Panasonic 10107 10021 10000 Panther 10637 Paragon 10000 Philips 11305 10317 10153 10031 10027 10025 Pioneer 11877 10877 10533 10144 10023 Popular Mechanics 10400 Pulsar 10000 Quasar 10000 RadioShack 10883 10797 10315 10015 RCA 11256 10021 Realistic 10207 Recoton 10400 Regal 10279 10273 10259 10020 Regency 10002 Rembrandt 10011 Runco 10000 Samsung 10144 10040 Scientific A...

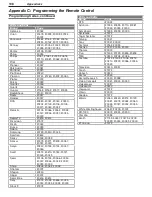
Страница 105: ...75 Symphonic 21268 20675 TAG McLaren 20894 Teac 20809 20790 Technics 20703 20490 Technosonic 20730 DVD Players Recorders Brand Code Curtis Mathes 21087 CyberHome 21129 21117 21024 21023 20874 20816 Daewoo 21242 21234 21172 21169 20869 20833 20784 20705 Daytek 20872 Denon 20634 20490 Desay 21407 Disney 21270 20675 Dual 21085 21068 Durabrand 21127 DVD2000 20521 Emerson 21268 20675 20591 Enterprise 2...

Страница 106: ...6 10819 10749 10724 10639 10566 10392 10247 10099 Dish Network System 11775 11505 11170 11005 10775 Dishpro 11775 11505 11005 10775 Echostar 11775 11505 11170 11005 10775 Expressvu 11775 10775 GE 10566 10392 General Instrument 10869 GOI 11775 10775 Goodmans 11246 Hisense 11535 Hitachi 11250 10819 HTS 11775 10775 Hughes Network Systems 11749 11444 11443 11442 11142 10749 iLo 11535 Jerrold 10869 JVC...

Страница 107: ... Northgate 21972 Olympus 20035 Onkyo 20222 Optimus 21262 21162 21062 21048 20593 20432 20162 20104 20048 20037 VCRs and DVRs Brand Code ABS 21972 Admiral 20479 20209 20048 Adventura 20000 Aiko 20278 Aiwa 20307 20124 20037 20000 Akai 20242 20175 20106 20061 20041 Alienware 21972 America Action 20278 American High 20035 Asha 20240 Audiovox 20278 20037 Beaumark 20240 Bell Howell 20104 Broksonic 20479...

Страница 108: ...184 20121 20045 20043 Sears 20105 20104 20066 20054 20047 20046 20042 20037 20035 20000 Sharp 20848 20062 20048 Shintom 20072 Shogun 20240 Singer 20072 Sonic Blue 20616 20614 Sony 21972 21032 20636 20035 20034 20033 20032 20000 Stack 9 21972 VCRs and DVRs Brand Code STS 20042 Sylvania 21593 20593 20110 20081 20043 20035 20000 Symphonic 21593 20593 20000 Systemax 21972 Tagar Systems 21972 Tatung 20...

Страница 109: ...MENU to display the TV Main menu 2 Use to highlight the Audio Video icon and press ENTER 3 When the Audio Video menu is displayed with the AV Memory Reset text box high lighted press ENTER to reset 4 Press EXIT to exit the menu All Audio and Video settings for the individual input are reset except for the Listen To Language audio Balance and Closed Caption settings A V Reset for all inputs To rese...

Страница 110: ...this reset only if all other resets have been unsuccessful To reset all consumer accessible settings and all memories to the original factory defaults CAUTION All owner performed setups and adjustments will be erased 1 While viewing the TV press MENU to display the TV Main menu 2 With the Main menu displayed press number keys 1 2 3 to display the Reset Menu 3 READ THE ON SCREEN WARNING AND INSTRUC...

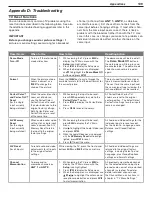
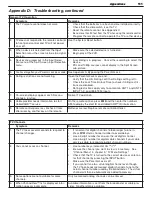
Страница 111: ...d are installed correctly Check that the slide switch is set to TV Reset the remote control See Appendix C Be no more than 20 feet from the TV when using the remote control Program the remote control to operate the TV or other device 2 TV does not respond to the remote control or to front panel control and TV will not power on or off Use the System Reset button 3 When a device is selected from the...

Страница 112: ...inition graphics 7 When viewing a stopped VCR white lines are rolling on the screen Turn off video mute for the VCR Begin playing the tape Change the VCR input to the antenna input Appendix D Troubleshooting continued TV Power On Off Symptom Remarks 1 TV takes an excessively long time to power on When switched on the TV needs time to boot up just as a computer does TV Energy Mode is set to Low Pow...

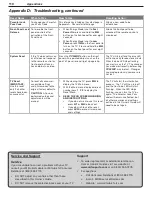
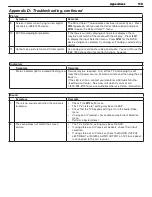
Страница 113: ...lor color balance has been incorrectly set Press VIDEO repeatedly until you see the PerfectColor option and press ENTER to open the PerfectColor menu 10 DVCR analog digital problems If the tape is currently playing but no picture displays there may be a mismatch of the media with the display Press INPUT to display the Input Selection menu Press ENTER for the DVCR device If digital is selected try ...

Страница 114: ... program has already been recorded once and the copy protection only allows one recording Unapproved source device for copy protected material The recording device can not decode the copyright signal included in the signal source try another device if available The playing device for dubbing does not support copy righted material Source for recording is copyrighted Too many IEEE 1394 devices in ne...

Страница 115: ...ke sure a device is connected at the end Disconnect all the cables and devices from the TV Replace them one by one to locate the problem device or cable Use System Reset front control panel 8 An IEEE 1394 device has been plugged in but does not appear in the Input Selection menu not discovered The IEEE 1394 connection to the TV or another device is not secure or is loose The IEEE 1394 device is no...

Страница 116: ...ose 6 inches or less to the TV during Learning If learning a Mitsubishi remote control make sure slide switch is not set to TV position Some but not all device key functions can be learned by NetCommand For example POWER and PLAY may be learned but other functions may not The signal from the remote control may not be strong enough Insert fresh batteries and try Learning again 3 The A V Receiver is...

Страница 117: ...the United States TV GUIDE and other related marks are registered marks of Gemstar TV Guide International Inc and or one of its affiliates The TV Guide On Screen system is manufactured under license from Gemstar TV Guide International Inc and or one of its affiliates The TV Guide On Screen system is protected by one or more of the following United States patents 4 908 713 6 498 895 6 850 693 6 396...

Страница 118: ...ty laws and treaties This License Agreement grants you no rights to use such content except that you own the media on which the Software is recorded but MDEA and its licensors retain ownership of the Software itself All rights not expressly granted are reserved by MDEA 5 EXPORT RESTRICTIONS MDEA is licensing the Software for use within the United States You agree that you will not export or re exp...

Страница 119: ...rritory customarily covered by an authorized MITSUBISHI service center If not you must either deliver your television to an authorized service location at your own expense or pay for any travel and or transportation costs the service center may charge to and from you home Actual service labor will be provided without charge c Proof of purchase date from an authorized MITSUBISHI dealer is required ...

Страница 120: ...E 1394 31 DTVLink 18 DV 32 115 DVDs and the Remote Control 50 99 and V Chip Ratings 71 DVD Player with Component Video Connecting 29 DVI Device Connecting 28 DVI Jack for Personal Computer 18 E Energy Mode 40 F F1 F4 Keys 44 50 Fast Power On Energy Mode 40 FAV 65 Film Mode 72 FireWire See IEEE 1394 Freeze Picture 50 Front Panel 14 Front Panel Lock 68 Full Specturm Color 12 G GUIDE Key button 50 H ...

Страница 121: ...100 Programming vs NetCommand Learning 99 Reset 51 Reset A V all settings 14 A V Memory for individual de vices 72 DVCR Counter 84 Pass Code 95 PerfectColor 74 Remote Control 51 System Reset Button 109 Reset Functions TV 109 Review Screen TV Connections 45 S S Video Connecting 24 Connector Illustration 22 Safeguards 8 SAP Second Audio Program 73 Satellite Receiver and the Remote Control 99 Connect...

Страница 122: ...ress MENU 2 When the Main menu appears with Setup high lighted press ENTER 3 When the Setup menu opens press to high light the on screen Demo Mode Off button 4 Press ENTER System Reset If the TV does not respond to the remote control front panel controls or will not power on off press the SYSTEM RESET button on the front panel with a pointed object such as the point of a pencil or end tip of a pap...

Отзывы: