background image

43

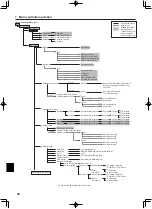
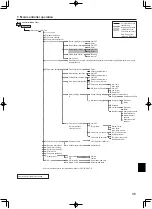
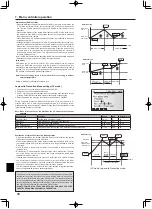
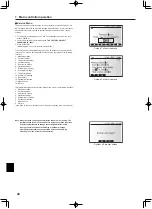
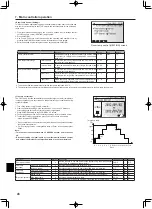
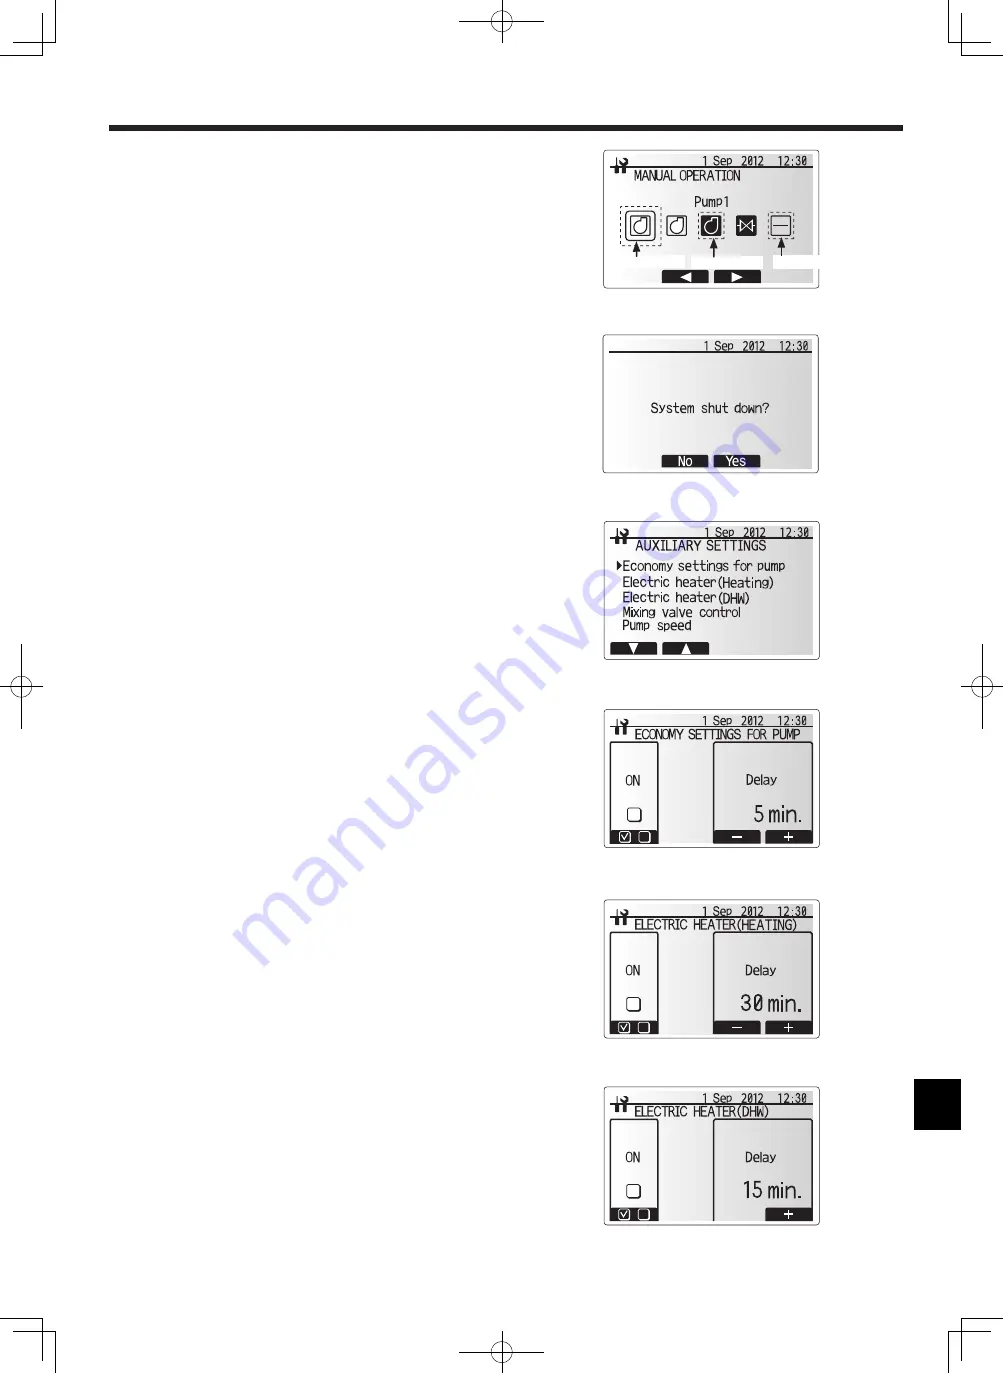
Manual operation menu screen

.  Main controller operation

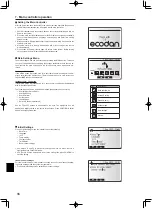
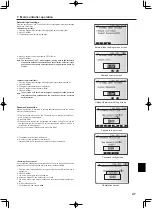
Auxiliary settings

This function is used to set the parameters for any auxiliary parts used in the 
system.

From the service menu use F1 and F2 buttons to highlight Auxiliary settings then 
press CONFIRM.

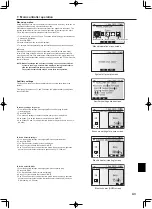
Auxiliary settings menu screen

Electric heater (Heating) screen

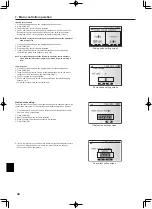
Economy settings for pump screen

Electric heater (DHW) screen

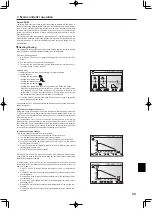
<Electric heater (Heating)>

From the Auxiliary settings menu highlight Electric heater (heating).
Press CONFIRM.
The Electric heater (heating) screen is displayed.
Press F1 button to switch the function ON/OFF.
 Use F3 and F4 buttons to adjust the time period of heat pump only operation 
before the booster heater will assist in space heating. (5 -180mins)

1.
2.
3.
4.
5.

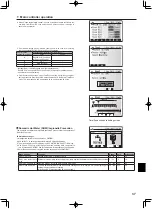
<Economy settings for pump>

 From the Auxiliary settings menu highlight Economy Settings for water 
circulation pump.
Press CONFIRM.
The economy settings for water circulation pump screen is displayed.
Use button F1 to switch the water circulation pump ON/OFF.
 Use buttons F3 and F4 to adjust the time the water circulation pump will run. (3 - 
60 mins)

1.

2.
3.
4.
5.

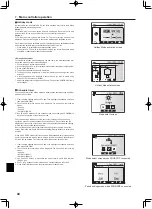
Manual operation

During the filling of the system the water circulation pump  and 3-way valve can be 

manually overridden using manual operation mode.
When manual operation is selected a small timer icon appears in the screen. The 
function selected will only remain in manual operation for a maximum of 2 hours.  
This is to prevent accidental permanent override of the FTC4. 

 From the service menu use F1 and F2 buttons to scroll through list until Manual 
Operation is highlighted.
Press CONFIRM.
Manual operation menu screen is displayed.
 To activate manual operation press the function button under the desired part.

►Example

Pressing F3 button will switch manual operation mode ON for the main 3-way 

valve. When filling of the DHW tank is complete the installer should access this 

menu again and press F3 to deactivate manual operation of the part. Alternatively 
after 2 hours manual operation mode will no longer be active and FTC4 will resume 
control of the part.  

NOTE:  Manual operation and heat source setting can not be selected if the 

system is running. A screen will be displayed asking the installer to 
stop the system before these modes can be activated. 
The system automatically stops 2 hours after last operation.

1.

2.
3.
4.

System off prompt screen

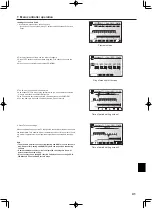
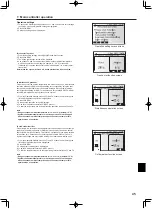
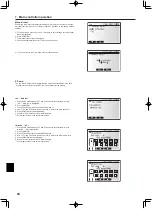
<Electric heater (DHW)>

From the Auxiliary settings menu highlight Electric heater (DHW).
Press CONFIRM.
The Electric heater (DHW) screen is displayed.
Press F1 button to switch the function ON/OFF.
 Use F3 and F4 buttons to adjust the time period of heat pump only operation 
before the booster heater and the immersion heater (if present) will assist in 
DHW heating. (15 -30mins)

1.
2.
3.
4.
5.

Being selected Being running

Error indication

Содержание Ecodan FTC4

Страница 1: ...ONTROLLER SLAVE Cased PAC SIF051B E OPERATION MANUAL For safe and correct use please read this operation manual thoroughly before operating the FTC4 unit FOR USER INSTALLATION MANUAL For safe and correct use read this manual thoroughly before installing the FTC4 unit FOR INSTALLER ...

Страница 2: ... from splashing on the FTC4 unit When installing sensors and parts do not expose the terminals 1 1 Before installation Environment Caution Do not install the FTC4 unit in outdoor location as it is designed for indoor installation only Otherwise electric shock or breakdown may be caused by water wind or dust Do not use the unit in an unusual environment If the FTC4 unit is installed or exposed to s...

Страница 3: ...mode Domestic hot water heating mode for showers sinks etc Flow rate Speed at which water circulates around the primary circuit Flow temperature Temperature at which water is delivered to the primary circuit FTC4 Master Flow temperature controller the circuit board in charge of controlling the system master board for multiple outdoor units control FTC4 Slave Slave board for multiple outdoor units ...

Страница 4: ...t waterproof Avoid locations where the unit is exposed to direct sunlight or other sources of heat Select a location where easy wiring access to the power source is available Avoid locations where combustible gases may leak be produced flow or accu mulate Select a level location that can bear the weight and vibration of the unit Avoid locations where the unit is exposed to oil steam or sulfuric ga...

Страница 5: ...d via outdoor unit 4 1 4 2 FTC4 Master powered by independent source 4 1 4 2 3 2 Second step Outdoor unit type Outdoor unit type System diagram Thermistor Reference section Split TH2 Liquid refrigerant temp 4 4 5 2 Packaged 4 4 5 2 PAC IF052B E is not available for Split type system FTC4 Master Main controller Wireless Remote controller Option Wireless receiver Option Outdoor unit Main controller ...

Страница 6: ...ing defrost Present Present Present For heating only THW1 Flow water temp THW2 Return water temp THW5 Tank water temp 4 4 4 5 5 3 Present Present Absent THW1 Flow water temp THW2 Return water temp THW5 Tank water temp 4 4 4 5 5 3 Absent Absent Present THW1 Flow water temp THW2 Return water temp 4 4 4 5 5 3 Absent Absent Absent THW1 Flow water temp THW2 Return water temp 4 4 4 5 5 3 1 Please make s...

Страница 7: ...lowing 1 Use a relay s 2 When power is supplied from outdoor unit TOTAL current including the other parts requirement MUST be 3A otherwise the fuse on the outdoor unit PCB will blow 3 When independent power supplies i e from the FTC4 unit itself total current for the pump s is 3A otherwise the fuse on the FTC4 PCB will blow Connect earth cable if there is one Adjust the pump speed setting so that ...

Страница 8: ...4 PUHZ HRP200 4 PUHZ SW175 190 4 PUHZ SHW230 4 PUHZ HRP100 125 3 PUHZ SHW112 140 3 Available range Available range Available range Available range 2 Split type units Heating 1 When the connected plate heat exchanger is ACH 30 30 made by ALFA LAVAL 2 When the connected plate heat exchanger is ACH 70 30 made by ALFA LAVAL 3 When the connected plate heat exchanger is ACH 70 40 made by ALFA LAVAL 4 Wh...

Страница 9: ...reaker wiring recommended Description Power supply Capacity Breaker Wiring Immersion heater DHW tank N 230V 50Hz 3 kW 16 A 2 5 mm When installing an immersion heater with the capacity of bigger than shown above select an appropriate size breaker and cable diameter based on the maximum possible electric current Safety device 1 Install the enclosed thermistor THW5 on the DHW tank Microcomputer detec...

Страница 10: ...7 THW8 THW9 Mixing tank Motorized mixing valve Water circulation pump 2 Zone1 Flow switch 2 Zone1 Water circulation pump 3 Zone2 Flow switch 3 Zone2 Heat emitters Zone1 Heat emitters Zone2 1 zone temperature control 2 zone temperature control 1 zone temperature control with boiler 2 zone temperature control with boiler 1 Zone1 heat emitters e g radiator fan coil unit field supply 2 Mixing tank fie...

Страница 11: ...ve phase conductors of the supply 2 Max 45 m If 2 5 mm used Max 50 m If 2 5 mm used and S3 separated Max 80 m 3 The values given in the table above are not always measured against the ground value Notes 1 Wiring size must comply with the applicable local and national codes 2 FTC4 Master outdoor unit connecting cords shall not be lighter than polychloroprene sheathed flexible cord Design 60245 IEC ...

Страница 12: ...nit earth Circuit rating FTC4 Master L N 3 AC230V FTC4 Master Outdoor unit S1 S2 3 FTC4 Master Outdoor unit S2 S3 3 DC24V Note In accordance with IEE regulations the circuit breaker isolating switch located on the outdoor unit should be installed with lockable devices health and safety 1 A breaker with at least 3 0 mm contact separation in each pole shall be provided Use earth leakage breaker NV T...

Страница 13: ...in controller can be installed either in the switch box or directly on the wall Perform the installation properly according to the method 1 Secure clearances shown in Fig 4 2 2 regardless of whether installing the main controller either directly on the wall or in the switch box 2 Prepare the following items in the field Double switch box Thin metal conduit Locknut and bushing Cable cover Wall plug...

Страница 14: ...n or cracks to the main controller do not overtighten the screws and make an additional installation hole s 6 Cut out the cable access hole Direct wall installation Cut out the knockout hole indicated with grey in Fig 4 2 7 in the cosmetic cover by knife or nipper Thread the main controller cable from the slot behind the back cover through this access hole 7 Plug the lead wire cable into the front...

Страница 15: ...in controller cable along the wall surface Thread the main controller cable through the cable access hole at the top of the main controller Seal the gap between the cable and the access hole with putty Use a cable cover Disassembling the front cover and the cosmetic cover 1 Remove the cosmetic cover Insert a flat head screwdriver into either of two open slots at the bottom of the main controller a...

Страница 16: ...s remote controller to transmit and receive data referring to the wireless remote controller installation manual Control option B This option features the main controller and the Mitsubishi Electric thermistor wired to FTC4 Master The thermistor is used to monitor room temperature but can not make any changes in control operation Any changes to DHW 1 must be made using the main controller mounted ...

Страница 17: ...allocated to Zone1 and the thermistor to Zone2 A thermistor built into the main controller can be used for monitoring the room tempera ture for Auto Adaptation function whilst keeping all its features of the main controller available The main controller and FTC4 Master are connected by a 2 core 0 3 mm non polar cable field supply with a maximum length of 500 m To use the sensor in the main control...

Страница 18: ...re too long bundle the excess cables outside the FTC4 Master unit Do not bind the wires in the FTC4 Master unit Thermistor position Place THW1 on water piping water outlet side after booster heater and THW2 on the water inlet side It is recommended to protect the thermistor with heat insulating materials so as not to be affected by ambient temperature Note Be sure to attach THW1 where it correctly...

Страница 19: ...igerant water HEX DHW tank temperature Water OUTLET side after booster heater Water piping Water INLET side THW1 TH2 THW5 THW2 1 FTC4 Master FTC4 Master FTC4 Master FTC4 Master FTC4 Master FTC4 Master FTC4 Master FTC4 Master Outdoor unit SPLIT type outdoor unit with DHW tank THW1 TH2 THW5 THW2 1 Refrigerant Refrigerant LIQUID side piping SPLIT type without a refrigerant water HEX inside 1 Refriger...

Страница 20: ...age a contact signals Remote switch minimum applicable load 12V DC 1mA Wiring specification and field supply parts 4 5 2 Thermistor inputs Name Terminal block Connector Item Optional part model TH1 CN20 Thermistor Room temp Option 1 PAC SE41TS E TH2 CN21 Thermistor Ref liquid temp 2 THW1 CNW12 1 2 Thermistor Flow water temp THW2 CNW12 3 4 Thermistor Return water temp THW5 CNW5 Thermistor DHW tank ...

Страница 21: ...TBO 1 9 11 3 way valve 2 way valve 1 output Heating DHW 230V AC 0 1 A Max 3 0 A b OUT5 TBO 1 12 13 Mixing valve output Stop Close 230V AC 0 1 A Max TBO 1 13 14 Stop Open OUT6 TBO 3 1 2 Booster heater 1 output OFF ON 230V AC 0 5 A Max Relay OUT7 TBO 3 3 4 Booster heater 2 output OFF ON 230V AC 0 5 A Max Relay OUT8 TBO 2 11 12 Booster heater 2 output OFF ON 230V AC 0 5 A Max Relay OUT9 TBO 2 9 10 CN...

Страница 22: ...ermostat Wiring for immersion heater with a built in direct cut off thermostat Fig 4 6 1 Fig 4 6 2 Fig 4 6 3 4 6 Wiring for heater Care to be taken when connecting a booster heater s The initial setting assumes that the connected booster heater s has a built in direct cut off thermostat Fig 4 6 1 When the connected booster heater s has a built in indirect cut off thermostat perform wiring accordin...

Страница 23: ...Connect the thermistor to monitor the Zone2 flow temp to the THW8 TBI 2 1 and 2 2 terminals Connect the thermistor to monitor the Zone2 return temp to the THW9 TBI 2 11 and 2 12 terminals The maximum length of the thermistor wiring is 5 m Do not splice the wiring to extend or shorten it or this could affect correct monitoring of each hot water temperature through zones If the wiring is too long bu...

Страница 24: ...a 3 way valve please read the follow ing Specification of 2 way valve field supply Power supply 230V AC Current 0 1A Max If over 0 1A you must use a relay Type Normally closed Installation position Electrical connection terminal block Output signal Heating DHW System OFF 2 way valve1 DHW TBO 1 9 10 OFF closed ON open OFF closed 2 way valve2 Heating TBO 2 7 8 ON open OFF closed OFF closed Note Shou...

Страница 25: ... off Before insertion or ejection wait until the LED lamps on the FTC4 control board are all off 6 The read and write operations have been verified using the following SD memo ry cards however these operations are not always guaranteed as the specifica tions of these SD memory cards could change Manufacturer Model Tested in Verbatim 44015 0912 61 Mar 2012 SanDisk SDSDB 002G B35 Oct 2011 Panasonic ...

Страница 26: ...2 5 Automatic switch to backup heat source operation When outdoor unit stops by error Inactive Active 2 OFF SW2 6 Mixing tank WITHOUT Mixing tank WITH Mixing tank OFF SW2 7 2 zone temperature control Inactive Active OFF SW2 8 OFF SW3 SW3 1 Room thermostat 2 input IN6 logic change Zone2 operation stop at thermostat short Zone2 operation stop at thermostat open OFF SW3 2 Flow switch 2 input IN3 logi...

Страница 27: ...mmersion heater Set Dip SW 1 5 to set whether the system has a booster heater Dip SW 1 5 Setting OFF WITHOUT booster heater ON WITH booster heater Set Dip SW 1 6 to set the booster heater function Dip SW 1 6 Setting OFF For heating only ON For heating and DHW Set Dip SW 1 1 to set whether the system has a boiler Dip SW 1 1 Setting OFF WITHOUT boiler ON WITH boiler When Dip SW 1 1 is OFF back up op...

Страница 28: ...ion heater OFF WITHOUT booster heater OFF WITHOUT DHW tank OFF WITHOUT immersion heater ON WITH booster heater OFF OFF WITHOUT DHW tank OFF WITHOUT immersion heater OFF WITHOUT booster heater The use of two 2 way valves can perform same function as a 3 way valve Booster heater Heat emitter DHW tank THW5 THW1 THW2 3 way valve Booster heater Heat emitter DHW tank THW5 THW1 THW2 Immersion heater 3 wa...

Страница 29: ...ng three steps Booster heater 1 OUT6 Booster heater 2 OUT7 Booster heater 2 OUT8 OFF OFF OFF OFF ON STEP 1 ON OFF OFF STEP 2 OFF ON ON STEP 3 ON ON ON Set Dip SW 2 4 to set activate or deactivate cooling mode Dip SW 2 4 Setting OFF Inactive ON Active When Dip SW 2 4 is OFF cooling mode is not available Set Dip SW 2 5 to set the automatic switch to backup heater only operation When outdoor unit sto...

Страница 30: ... no longer required please turn off both outdoor and indoor unit power supply before returning Dip SW4 5 to OFF position 5 Dip Switch setting 5 6 Emergency mode Boiler operation The emergency mode is available when a failure on the outdoor unit of the heat pump or a communication error occurs This mode uses boiler as a heat source and automatically controls the heating mode When the system is not ...

Страница 31: ...ced Check for water leakage strainer blockage water circulation pump function LL Setting errors of Dip switches on FTC4 control board For boiler operation check that Dip SW1 1 is set to ON With Boiler and Dip SW2 6 is set to ON With Mixing Tank For 2 zone temperature control check Dip SW2 7 is set to ON 2 zone and Dip SW2 6 is set to ON With Mixing Tank For multiple outdoor units control system ch...

Страница 32: ...r over the unit and do not touch the unit with wet hands An electric shock may result Do not spray combustible gas close to the unit Fire may result Do not place a gas heater or any other open flame appliance where it will be exposed to the air discharged from the unit Incomplete combustion may result Do not remove the front panel or the fan guard from the outdoor unit when it is running When you ...

Страница 33: ...en this icon is displayed Legionella prevention mode is active 2 Heat pump Heat pump is running Defrosting Emergency heating 3 Electric heater When this icon is displayed the Electric heaters booster or immersion heater are in use 4 Target temperature Target flow temperature Target room temperature Compensation curve 5 OPTION Pressing the function button below this icon will dis play the quick vie...

Страница 34: ...setting DHW Schedule timer preview Day select Time setting Time setting DHW 2 1 Period Schedule timer preview Day select Time setting Time setting Holiday mode DHW active non active Heating Cooling active non active Holiday menu Zone1 Heating room temp Heating flow temp Cooling flow temp Zone2 Heating room temp Heating flow temp Initial settings Date Time yyyy mm dd hh mm Language ENG FR GER SW SP...

Страница 35: ...Min temp Max temp H P thermo diff adjust ON OFF Lower limit Upper limit Boiler settings Hybrid settings Outdoor ambient temp 2 Priority Ambient Cost CO2 Intelligent settings Energy price Electricity Boiler Schedule CO2 emission Electricity Boiler Heat source Heat pump capacity Boiler efficiency Booster heater 1 capacity Booster heater 2 capacity Floor dry up function ON OFF For more details refer ...

Страница 36: ...n the title is highlighted press CONFIRM to edit 2 Use function buttons appropriate to edit each setting then press CONFIRM to save the setting Main Settings Menu The main settings menu can be accessed by pressing the MENU button To reduce the risk of untrained end users altering the settings accidentally there are two ac cess levels to the main settings and the service section menu is password pr...

Страница 37: ...DHW mode 30 120 min 60 DHW mode restriction The time period after DHW mode when space heating has priority over DHW mode temporarily pre venting further stored water heating Only when DHW max operation time has passed 30 120 min 30 2 When 2 zone temperature control is active or wireless remote controllers are available from Room RC zone select screen select zone no to assign to each remote control...

Страница 38: ... takes a little longer to heat the water in the DHW tank but the energy used is reduced This is because heat pump operation is restricted using signals from the FTC4 based on measured DHW tank temperature Note The actual energy saved in Eco mode will vary according to outdoor ambient temperature Return to the DHW legionella prevention menu Legionella Prevention Mode settings LP mode 1 Use button F...

Страница 39: ...en Explanation of compensation curve During late spring and summer usually the demand for space heating is reduced To prevent the heat pump from producing excessive flow temperatures for the pri mary circuit the compensation curve mode can be used to maximise efficiency and reduce running costs The compensation curve is used to restrict the flow temperature of the primary space heating circuit dep...

Страница 40: ... F2 and F3 buttons to move between mode icons to select the Hot Water DHW 2 icon Use F1 to F4 buttons to select start and end months that apply to Period 2 Press CONFIRM to be shown the preview screen for each mode 2 3 4 5 Holiday mode Holiday mode can be activated in 2 ways Both methods will result in the Holiday Mode activation screen being shown Option 1 From the main menu screen button E shoul...

Страница 41: ...ive press CONFIRM to start 7 Use F3 button to set the required time of inactivity then press CONFIRM 8 You can add up to 4 periods of inactivity within a 24 hour interval 9 Press F4 to save settings When scheduling heating button F1 changes the scheduled variable between time and temperature This enables a lower temperature to be set for a number of hours e g a lower temperature may be required at...

Страница 42: ...ce setting Operation settings External input settings Running information Thermistor reading Summary of settings Error history Password protection Manual reset SD card In this Installation Manual instructions will be given only for the following functions Manual operation Auxiliary settings Heat source setting Operation settings External input settings Password protection Manual reset SD card Info...

Страница 43: ...all timer icon appears in the screen The function selected will only remain in manual operation for a maximum of 2 hours This is to prevent accidental permanent override of the FTC4 From the service menu use F1 and F2 buttons to scroll through list until Manual Operation is highlighted Press CONFIRM Manual operation menu screen is displayed To activate manual operation press the function button un...

Страница 44: ...to warm up a room 1 2 3 4 1 2 3 4 Mixing valve setting screen Pump speed setting screen Pump speed From the Auxiliary settings menu highlight water circulation pump speed Press CONFIRM Press F3 and F4 buttons to select a refrigerant address of which you wish to configure or check the settings and press CONFIRM 1 The Pump speed screen is displayed Use F2 and F3 buttons to set the pump speed of the ...

Страница 45: ...ough the list until Simultaneous operation is highlighted Press CONFIRM Simultaneous operation screen is displayed To switch simultaneous operation ON OFF press F1 To alter the temperature at which simultaneous operation starts use F3 and F4 Note Range of outdoor ambient temperature is 15 C to 10 C default 15 C System shall automatically return to routine operation This will happen when the outdoo...

Страница 46: ...ater temperature in stages to gradually dry concrete when this particular type of underfloor heating system is installed 1 Turn off the system using the main controller 2 From the Operation settings in the service menu use F1 and F2 buttons to scroll through the list until Floor dry up function is highlighted 3 Press CONFIRM to display the FLOOR DRY UP screen 4 To change settings press F4 For deta...

Страница 47: ...ration 1 2 3 4 5 Password protection Password protection is available to prevent unauthorised access to the service menu by untrained persons From the service menu use F1 and F2 buttons to scroll through list until Pass word protection is highlighted Press CONFIRM When password input screen is displayed use buttons F1 and F2 to move left and right between the four digits F3 to lower the selected d...

Страница 48: ... PC tool is necessary for the setting SD Main RC From the SD card setting use F1 and F2 buttons to scroll through list until SD Main RC is highlighted Press CONFIRM Press F3 and F4 buttons to set the Ref address 1 Use F1 F2 and F3 buttons to select a menu to write to the main controller Press CONFIRM to start downloading Wait for a few minutes until Complete appears 1 For multiple outdoor units co...

Страница 49: ... 15 C 35 C 35 C Zone1 flow temp 25 C 60 C 25 C Zone2 outdoor ambient temp 1 15 C 35 C 35 C Zone2 flow temp 1 25 C 60 C 25 C Adjust Zone1 outdoor ambient temp 14 C 34 C Zone1 flow temp 25 C 60 C Zone2 outdoor ambient temp 1 14 C 34 C Zone2 flow temp 1 25 C 60 C Holiday DHW 3 Active Non active Non active Heating Cooling 2 Active Non active Active Zone1 heating room temp 10 C 30 C 15 C Zone2 heating ...

Страница 50: ...h 0 5 kWh Boiler 0 001 999 kWh 0 5 kWh CO2 emission Electricity 0 001 999 kg CO2 kWh 0 5 kg CO2 kWh Boiler 0 001 999 kg CO2 kWh 0 5 kg CO2 kWh Heat source Heat pump capacity 1 40 kW 11 2 kW Boiler efficiency 25 150 80 Booster heater 1 capacity 1 20 kW 2 kW Booster heater 2 capacity 1 20 kW 4 kW Floor dry up function On Off 6 Off Target temp Start Finish 25 60 C 30 C Max temp 25 60 C 45 C Max temp ...

Страница 51: ...t 3 The main screen appears with a press of the ON button but disappears in a second The main controller operations do not work for a whilst after the settings are changed in the service menu This is because the system takes time to apply the changes Normal operation The indoor unit is applying updated settings made in the service menu Normal operation will start shortly 4 LED2 on FTC4 Master is o...

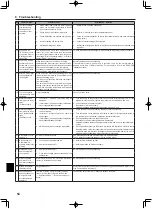
Страница 52: ...re 4 5 1 1 SD memory card is NOT inserted into the memory card slot with correct orientation 1 Correctly insert SD memory card in place until a click is heard 2 Not an SD standards compliant memory card 2 Use an SD standards compliant memory card Refer to section 4 9 LED4 on FTC4 Master is blinking See Figure 4 5 1 1 Full of data 1 Move or delete data or replace SD memory card with a new one 2 Wri...

Страница 53: ... function go to iii below iii Replace 3 way valve Refer to the service manual 11 Hot or warm water from cold tap Heat of hot water pipe is transferred to cold water pipe Insulate re route pipework 12 Water leakage 1 Poorly sealed connections of water circuit components 1 Tighten connections as required 2 Water circuit components reaching the end of life 2 Refer to PARTS CATALOG in the service manu...

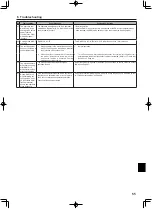
Страница 54: ... handle on the pressure relief valve to check for foreign objects in it If the problem is not still solved replace the pressure relief valve with a new one 2 If intermittent expansion vessel charge may have reduced bladder perished 2 Check pressure in expansion vessel Recharge to 1 bar if necessary If bladder perished replace expansion vessel with a new one 20 Water discharges from pressure relief...

Страница 55: ...re is lower than the preset temperature below which the freeze stat function is activated Cooling mode does not start running 2 To run Cooling mode overriding the freeze stat function adjust the preset tem perature below which the freeze stat function is activated Refer to Freeze stat function on Page 49 30 The electric heaters are activated shortly after DHW or LP mode starts running after Coolin...

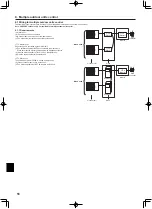
Страница 56: ... electric heater to the master unit FTC Slave unit The hydrobox or PAC SIF051B E is used as a slave unit a Connect each outdoor unit to a slave unit b The main controller must NOT be wired to a slave unit 9 Multiple outdoor units control 9 1 Wiring for multiple outdoor units control To establish a larger system up to 6 outdoor units of the same model can be connected in one system Note PUHZ FRP ou...

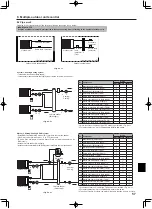
Страница 57: ...outdoor unit is split type TH2 needs to be installed Fig 9 2 1 2 For safety protection it is recommended to install a flow switch No Component Wiring Master Slave 1 Slave 2 1 Booster heater field supply 2 Circulation pump1 field supply 3 Flow switch1 field supply 2 4 Immersion heater field supply 5 Flow temp thermistor THW1 6 Return temp thermistor THW2 7 Tank water temp THW5 8 Slave1 circulation ...

Страница 58: ...stor THW7 option No Component Wiring Master Slave 1 Slave 2 13 Zone2 flow temp thermistor THW8 option 14 Zone2 return temp thermistor THW9 option 15 Slave1 circulation pump1 field supply 16 Slave1 flow switch field supply 2 17 Slave1 flow temp thermistor THW1 18 Slave1 return temp thermistor THW2 19 Slave1 ref liquid temp thermistor TH2 1 20 Slave2 circulation pump1 field supply 21 Slave2 flow swi...

Страница 59: ... thermistor THW2 16 Slave1 ref liquid temp thermistor TH2 1 17 Slave2 circulation pump1 field supply 18 Slave2 flow switch field supply 2 19 Slave2 flow temp thermistor THW1 20 Slave2 return temp thermistor THW2 21 Slave2 ref liquid temp thermistor TH2 1 2 For safety protection it is recommended to instal a flow switch No Component Wiring Master Slave 1 Hydrobox Slave 2 Hydrobox 1 Booster heater f...

Страница 60: ... FTC4 Master TB1 TB2 S1 S2 S3 Power supply N 230V 50Hz Earth leakage breaker Wiring circuit breaker or or Isolating switch Earth leakage breaker circuit L N Fig 9 3 1 S1 S2 S3 L N L N BLACK BLACK YELLOW YELLOW YELLOW YELLOW BLACK BLACK CNO1 CNO1 CNO1 Black CNO1 Black FTC4 Master FTC4 Master S1 S2 S3 Initial settings Power supplied by outdoor unit Modified settings Separate power supply to FTC4 Mas...

Страница 61: ...ided Use earth leakage breaker NV The breaker shall be provided to ensure disconnection of all active phase conductors of the supply 2 Max 45 m If 2 5 mm used Max 50 m If 2 5 mm used and S3 separated Max 80 m 3 The values given in the table above are not always measured against the ground value Notes 1 Wiring size must comply with the applicable local and national codes 2 FTC4 Slave outdoor unit c...

Страница 62: ...Remove the short circuited connector CNS2 on FTC4 Slave see Fig 9 3 5 Turn the outdoor unit DIP switch SW8 3 to ON Turn on the outdoor unit BEFORE the FTC4 Slave Fig 9 3 5 Fig 9 3 6 FTC4 Slave power supply N 230 V 50 Hz FTC4 Slave input capacity Main switch Breaker 1 16 A Wiring Wiring No size mm FTC4 Slave power supply 2 Min 1 5 FTC4 Slave power supply earth 1 Min 1 5 FTC4 Slave Outdoor unit 2 2 ...

Страница 63: ... is recommended to protect the thermistor with heat insulating materials so as not to be affected by ambient temperature Note Be sure to attach THW1 where it correctly detects Flow temp water oulet side Fore more details see Page 6 Caution Do not route the thermistor cables together with power cables The sensor part of the thermistor should be installed where user can not access It should be separ...

Страница 64: ...e Split type Packaged type SW1 8 Wireless remote controller WITHOUT Wireless remote controller WITH Wireless remote controller SW2 SW2 1 Room thermostat1 input IN1 logic change Zone1 operation stop at short Zone1 operation stop at open SW2 2 Flow switch1 input IN2 logic change Failure detection at short Failure detection at open SW2 3 Booster heater capacity restriction Inactive Active SW2 4 Cooli...

Страница 65: ...l part model TH2 CN21 Thermistor Ref liquid temp THW1 CNW12 1 2 Thermistor Flow water temp THW2 CNW12 3 4 Thermistor Return water temp Note Do not splice the wiring to extend or shorten it or this could affect correct monitoring of each temperature If the wiring is too long bundle it with a strap to adjust the length Outputs Name Terminal block Connector Item OFF ON Signal Max current OUT1 TBO 1 3...

Страница 66: ...itch minimum applicable load 12V DC 1mA Thermistor inputs Name Terminal block Connector Item Optional part model TH2 CN21 Thermistor Ref liquid temp THW1 CNW12 1 2 Thermistor Flow water temp THW2 CNW12 3 4 Thermistor Return water temp Note Do not splice the wiring to extend or shorten it or this could affect correct monitoring of each temperature If the wiring is too long bundle it with a strap to...

Страница 67: ...OFF ON Signal Max current OUT1 TBO 1 3 4 CNP1 Water circulation pump 1 output OFF ON 230V AC 1 0 A Max OUT4 TBO 1 9 11 CNV1 3 way valve 2 way valve 1 output Heating DHW 230V AC 0 1 A Max OUT13 TBO 2 7 8 2 way valve 2 output DHW Heating 230V AC 0 1 A Max TBO 1 12 13 14 9 10 11 6 7 8 3 4 5 1 2 12 13 14 9 10 11 6 7 8 3 4 5 1 2 TBO 2 OUT1 OUT4 N L N L N L OUT13 Fig 9 7 2 Wiring specification and field...

Страница 68: ...ontroller is off See Figure 5 2 1 When LED1 on master controller is also off See Figure 5 2 1 1 Master controller is not supplied with 220 to 240V AC 1 Check the voltage across the L and N terminals on the indoor power supply terminal block See section 4 5 When the voltage is not 220 to 240V AC check for faulty wiring to power supply When the voltage is 220 to 240V AC go to 2 below 2 There are pro...

Страница 69: ...cuit 3 Connect the output wire OUT10 Boiler operation to the signal input room thermostat input on the boiler 2 4 Install one of the following room temp thermostats 3 Wireless remote controller option Room temp thermostat field supply Main controller remote position 1 The boiler temp thermistor is an optional part 2 OUT10 has no voltage across it 3 Boiler heating is controlled on off by the room t...

Страница 70: ... to RINSE not to leave flux Do not use chlorine detergent when washing 2 Be sure that the amount of contamination per unit cubic content of heat transfer pipe is less than the following amount Example In case of 9 52 mm Residual water 0 6 mg m Residual oil 0 5 mg m Solid foreign object 1 8 mg m Thermistor position Refer to 4 4 Notes Install the hydraulic filter at the water inlet pipework Inlet wa...

Страница 71: ...og som er beregnet for bruk i bolig forretnings og lettindustrimiljøer vakuuttaa täten asiasta yksin vastuussa että alla kuvatut lämmitys jäähdytysjärjestelmän osat jotka on tarkoitettu käytettäviksi asuin toimisto ja kevyen teollisuuden ympäristöissä MITSUBISHI ELECTRIC PAC IF051B E PAC IF052B E PAC SIF051B E Note Its serial number is on the nameplate of the product Hinweis Die Seriennummer befin...

Страница 72: ...TSUBISHI ELECTRIC EUROPE B V HARMAN HOUSE 1 GEORGE STREET UXBRIDGE MIDDLESEX UB8 1QQ U K This product is made by Mitsubishi Electric Air Conditioning Systems Europe Ltd NETTLEHILL Rd HOUSTOUN IND ESTATE LIVINGSTON EH54 5EQ UK Installers Please be sure to put your contact address telephone number on this manual before handing it to the customer ...

Отзывы: