background image

OTHERS

PRECAUTIONS

FEA
TURES

PREP

ARA

TION

TROUBLE-

SHOOTING

CONTENTS

CAUTION:

Changes or modifications not expressly approved by the party responsible for compliance could void 

the user’s authority to operate the equipment.

NOTE:

This equipment has been tested and found to comply with the limits for a Class A digital device, 

pursuant to Part 15 of the FCC Rules.  These limits are designed to provide reasonable protection 

against harmful interference when the equipment is operated in a commercial environment.  This 

equipment generates, uses, and can radiate radio frequency energy and, if not installed and used in 

accordance with the instruction manual, may cause harmful interference to radio communications.  

Operation of this equipment in a residential area is likely to cause harmful interference in which case 

the user will be required to correct the interference at his or her own expense.

This device complies with Industry Canada licence-exempt RSS standard(s). Operation is subject to the 

following two conditions:

(1)  this device may not cause interference, and 

(2)  this device must accept any interference, including interference that may cause undesired 

operation of the device.

WARNING:

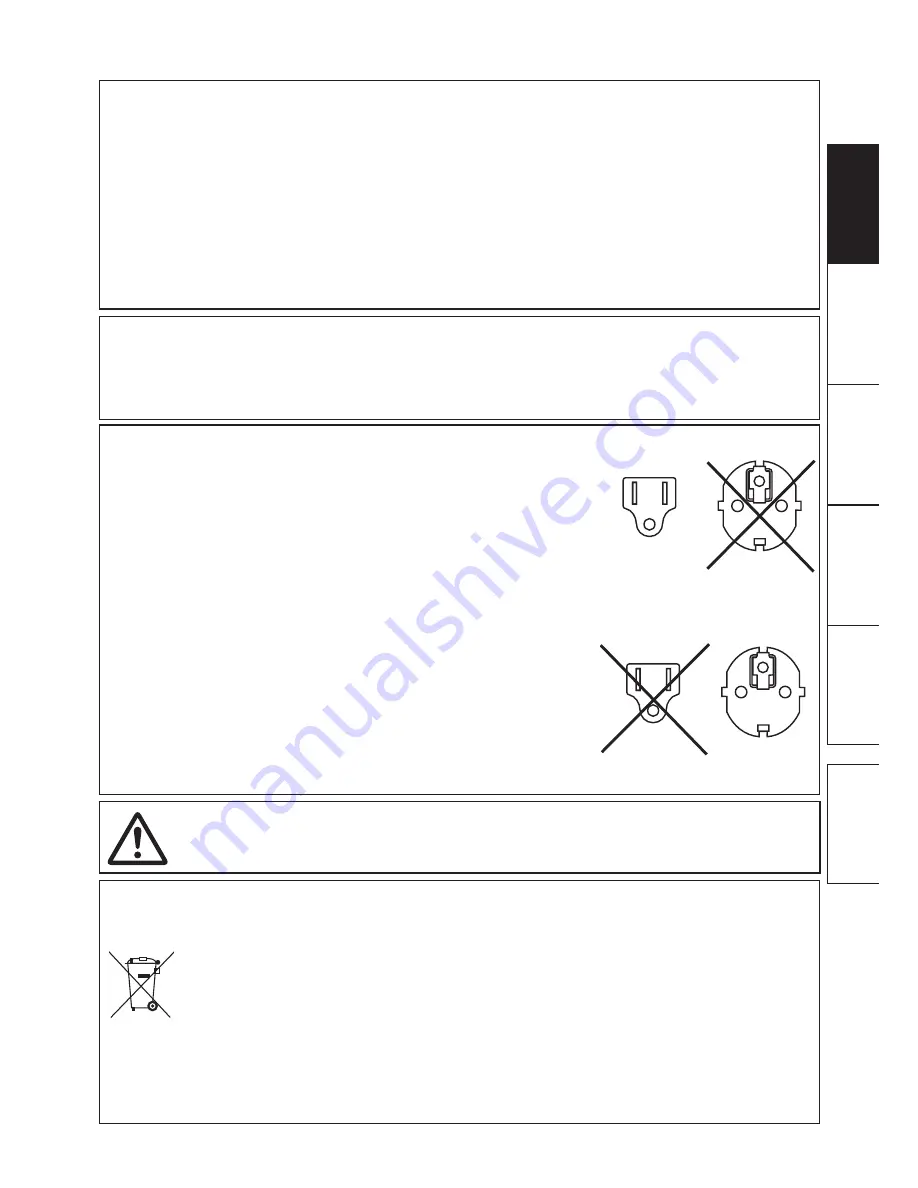
In the USA or Canada, use the AC power cord according to the recommendations as 

below, in order to comply with UL60950-1 and CAN/CSA C22.2 No. 60950-1-03.

Connect to the 120 V receptacle of the room or the host equipment.

The AC power cord should be UL or CSA approved and consist of type SVT, size 

16 or 18AWG, length 2 m or shorter cord with IEC60320-1/C13 type, 125 V 10 A or 

higher rating connector and NEMA 5-15 type, 125 V 10 A or higher rating plug.

Use the AC power cord as specified above, so as not to interfere with radio and 

television reception.  

If you use other cables, it may cause interference with radio and television reception.

WARNING:

In Europe, use the AC power cord according to the recommendations as below, in 

order to comply with EN60950-1.

Connect to the 230 V receptacle of the room or the host equipment.

The AC power cord should be VDE approved and consist of core size 0.75 mm

2

 or 

bigger, length 2 m or shorter cord with IEC60320-1/C13 type, 250 V 10 A or higher 

rating connector and CEE(7)VII type, 250 V 10 A or higher rating plug.

Use the AC power cord as specified above, so as not to interfere with radio and 

television reception.  

If you use other cables, it may cause interference with radio and television reception.

WARNING:

The socket outlet shall be installed near the equipment and shall be easily accessible.

Note: This symbol mark is for EU countries only.

This symbol mark is according to the directive 2002/96/EC Article 10 Information for users and Annex IV, and/or 

to the directive 2006/66/EC Article 20 Information for end-users and Annex II.

Your MITSUBISHI ELECTRIC product is designed and manufactured with high quality materials and 

components which can be recycled and/or reused.

This symbol means that electrical and electronic equipment, batteries and accumulators, at their end-of-life, 

should be disposed of separately from your household waste.

If a chemical symbol is printed beneath the symbol shown above, this chemical symbol means that the battery 

or accumulator contains a heavy metal at a certain concentration. This will be indicated as follows: 

Hg: mercury (0,0005%),  Cd: cadmium (0,002%),  Pb: lead (0,004%) 

In the European Union there are separate collection systems for used electrical and electronic products, 

batteries and accumulators.

Please, dispose of this equipment, batteries and accumulators correctly at your local community waste 

collection/recycling centre.

Please, help us to conserve the environment we live in! 

Содержание CP-D80DW

Страница 1: ...ION MANUAL IS IMPORTANT TO YOU PLEASE READ IT BEFORE USING YOUR DIGITAL COLOR PRINTER Hereby Mitsubishi Electric Corporation declares that this digital color printer is in compliance with the essential requirements and other relevant provisions of Directive 1999 5 EC ...

Страница 2: ...of electric shock The exclamation point within an equilateral triangle is intended to alert the user to the presence of important operating and maintenance servicing instructions in the literature accompanying the appliance The Caution hot surface symbol indicates that the marked item may be hot and should not be touched The Electro Static Discharge ESD warning symbol indicates that trouble includ...

Страница 3: ...elevision reception If you use other cables it may cause interference with radio and television reception WARNING In Europe use the AC power cord according to the recommendations as below in order to comply with EN60950 1 Connect to the 230 V receptacle of the room or the host equipment The AC power cord should be VDE approved and consist of core size 0 75 mm2 or bigger length 2 m or shorter cord ...

Страница 4: ...f adjustable paper guide 10 Print paper installation 11 12 Ink ribbon installation 13 14 Handling of paper ink ribbon set 15 Connection with USB data signal equipment 16 Printer driver installation 16 Error messages and countermeasures 17 20 Indications on the front panel and countermeasures 17 Overcoming paper jams 18 Repairing a torn ink ribbon 19 Before calling for service 20 Instructions for t...

Страница 5: ...s the unit may be damaged In the interest of safety avoid handling of liquids near the unit DO NOT REMOVE THE CABINET Touching internal parts is dangerous besides it may lead to malfunction Contact the sales dealer to carry out internal checks and adjustments Before opening the cover for eliminating a jammed paper etc be sure to disconnect the power cord plug UNPLUG THE POWER CORD DURING A LONG AB...

Страница 6: ...me a prime cause of damage PLACES THE UNIT ON A HORIZONTAL LEVEL The unit is likely to be affected if it is placed in slanted conditions or in an unstable places PROTECT AGAINST DEW FORMATION In extremely cold regions if the unit is moved quickly from an extremely cold place to warmer one dew is likely to be formed If dew is formed printing is not possible OPERATING AMBIENT TEMPERATURE RANGE The o...

Страница 7: ...e strips at the print outlet The paper tray is used for storing the cut print paper 10x15 4x6 or smaller size temporarily The print paper may fall from the tray or may not be stored in the printed order Do not use the printer in a place where a strong wind blows Otherwise the print paper may not be fed properly resulting in the paper jam NOTE YOUR UNDERSTANDING IS REQUESTED FOR THE LOSS OF IMAGES ...

Страница 8: ...80DW has a high resolution of 300 dpi for precise illustrations and sharp photographic images LARGE CAPACITY PRINTING Maximum of 430 prints per roll for 10x15 4x6 is offered Large economical print capacity per roll reduces frequency of exchanging paper and ink ribbon HIGH QUALITY PRINTS CP D80DW is a dye sublimation thermal transfer color printer which produces superior high quality images It also...

Страница 9: ...pull the printer up and out of the box Pull the printer straight up as shown in the figure NOTE Printer weighs about 12 kg Handle it with care Unwrap the packing Remove the protective materials for transportation such as protective sheet Remove the paper strip bin before carrying the printer Hold the printer by the front and rear handle as illustrated in the drawing CAUTION Do not carry the printe...

Страница 10: ...r jam occurs or the door is open See page 17 PAPER RIBBON INDICATOR When an error concerning the ink ribbon or print paper occurs this indicator illuminates or blinks See page 17 1 5 3 4 2 6 7 8 POWER INDICATOR When the power is turned on the indicator illuminates It normally illuminates green however blinks or illuminates orange depending on the printer status See page 17 PRINT OUTLET The printed...

Страница 11: ...le by using the cable ties supplied 4 2 1 3 5 SECURING THE POWER CORD AND USB CABLE 1 Wrap a cable tie supplied around the power cord or the USB cable 2 Draw the tie through the securing hole on the rear panel and secure it Example PAPER STRIP BIN Hook and pull up the paper strip bin to attach it firmly Hold and pull the handle on the lower part of paper strip bin to remove PAPER TRAY Engage the u...

Страница 12: ...low the printer setup listed below Position the adjustable paper guides See page 10 Install the print paper to this printer See pages 11 to 12 Install the ink ribbon to this printer See pages 13 to 14 Connect the printer to a personal computer See page 16 Make sure to close the printing unit when the setup procedure is completed ...

Страница 13: ...r width When they are not positioned properly a malfunction such as paper jam and misaligned printing position may occur NOTE When you use 10x15 4x6 15x15 6x6 or 15x20 6x8 size paper having width of 152 mm after using 13x13 5x5 or 13x18 5x7 size paper having width of 127 mm for a long time or printing such paper in large quantities thermal head cleaning may be required For cleaning of the thermal ...

Страница 14: ...the flanges to the print paper with the stoppers retracted Make sure that the flanges are attached to the print paper securely and release the latches NOTE Take care not to pinch your fingers Do not remove the sticker on the print paper roll yet Do not loosen the paper roll Any slack in the print paper may degrade the print quality CAUTION When placing the print paper keep the print paper upright ...

Страница 15: ... print quality NOTE When taking the print paper out pull it up toward you by holding the paper flanges Make sure to turn on the power before replacing the print paper Make sure to eliminate any slack from the print paper If you carry out the following steps without eliminating the slack the print paper may be damaged NOTE If you continue to feed the print paper inward after the buzzer sounds it ma...

Страница 16: ...k cassette Handle Ditch Make sure to set the ink ribbon roller to the ditches firmly Turn the shaft to eliminate any slack Place the ink cassette containing the ink ribbon in the position as shown in the illustration To insert the ink cassette align the protrusions on both sides of the cassette with the right and left guides inside the printing unit and slide it in a slanting direction Mount the i...

Страница 17: ...nting unit is closed the print paper may have not been installed correctly In this case open the printing unit to make sure that the print paper has been installed correctly Then close the printing unit again When the paper roll is reinstalled more than three times the print paper may be used up earlier than the ink ribbon Installation of the print paper and the ink ribbon is completed NOTE Make s...

Страница 18: ... of prints may not be made In addition if you replace the print paper before it is used up the indicated number of prints may not be made AFTER PRINTING If the paper absorbs nonvolatile organic solvents alcohol ester ketone etc the print may be discolored Discoloration of prints is accelerated if the print paper comes into contact with soft vinyl chloride such as transparent tape Avoid storing pri...

Страница 19: ...site to check the latest version of the printer driver and the printer information http www mitsubishielectric co jp vcp support driver_en html BEFORE OPERATION CONNECTION WITH USB DATA SIGNAL EQUIPMENT To USB port Personal computer Digital color printer To USB port NOTE A USB cable is not supplied with this unit Use the USB 2 0 certified cable of 2 m or less in length CONNECTING TO PERSONAL COMPU...

Страница 20: ...occurs Refer to Overcoming paper jams 18 Green The temperature of the thermal head is too high or too low Wait until the indication goes off When the indicator stops blinking the printer resumes printing automatically 7 Green The ink ribbon which is not available to this printer is installed Replace the ink ribbon with a new one The actual combination of ink ribbon and print paper is inconsistent ...

Страница 21: ...f an arrow Cut off the defective part of the print paper with scissors NOTE Make sure to cut off the printed part of the print paper Failure to do this may result in the ink ribbon sticking to the print paper and being torn Make sure to clean the thermal head and the platen roller Refer to CLEANING on pages 21 and 22 Remove the print paper Install the print paper and the ink cassette with the ink ...

Страница 22: ...k ribbon on a flat clean surface Place a piece of transparent adhesive cellophane tape on the center of the ink ribbon ERROR MESSAGES AND COUNTERMEASURES Wind the shaft of the ink ribbon in the direction of the arrow so that the cellophane tape is not seen Install the ink cassette in the printer Cellophane tape Direction to turn the shaft ...

Страница 23: ...r service Symptom Check Remedy The power is not turned on Is the power cord plug disconnected from the outlet Connect the power cord plug to the outlet firmly The protective circuit may be working Turn off the power and wait for about two minutes Then turn on the power again The printing unit doesn t open Are you turning off the power during printing procedure Turn on the power and then open the p...

Страница 24: ...d make sure not to apply excessive force to the peeling roller on the bottom of the thermal head When the excessive force is applied to the roller the roller may be deformed resulting in deterioration of the printing quality WHEN USING THE CLEANING RIBBON CR D70 When you use print paper of 152 mm 6 width after using that of 127 mm 5 thermal head cleaning with a cleaning ribbon may be required If o...

Страница 25: ...ean cloth Clean the black part of the roller Wipe the black part carefully with cloth dampened with a small amount of alcohol Wipe the whole roller by turning it Cleaning part PAPER FLANGE CLEANING Clean the parts that contact the print paper sides as shown right Wipe the parts carefully with cloth dampened with a small amount of alcohol Platen roller ...

Страница 26: ... without frame 152 x 203 mm without frame Gradations 256 8 bits for each color Supply method Automatic Interface Hi Speed USB Ver 2 0 Power supply 220 240 V AC 50 60 Hz 120 V AC 50 60 Hz Power consumption 2 4 A 220 240 V AC 50 60 Hz 4 6 A 120 V AC 50 60 Hz Operating conditions Temperature 5 C 40 C Humidity 30 80 RH no dewing Installation conditions Operating attitude Horizontal 5 Outside dimension...

Страница 27: ...5 German Branch Gothaer Strasse 8 40880 Ratingen Postfach 1548 40835 Ratingen Germany Phone 49 2102 486 9250 FAX 49 2102 486 7320 French Branch 25 Boulevard des Bouvets 92741 NANTERRE cedex France Phone 33 1 55 68 55 00 FAX 33 1 55 68 57 31 Benelux Branch Nijverheidsweg 23a 3641 RP Mijdrecht The Netherlands Phone 31 0 297 282461 FAX 31 0 297 283936 Spanish Branch Barcelona Ctra de Rubí 76 80 Apdo ...

Отзывы: