13
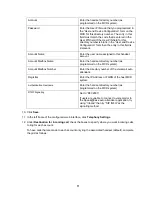
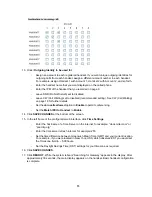
13. Under
Outgoing Identity to be used for
,
-
Assign an account to each registered handset. If you want unique outgoing identities for
outgoing calls from each handset, assign a different account number to each handset.
For example, assign Handset 1 with Account 1, Handset 2 with Account 2, and so forth.
-
Enter the handset name that you want displayed on the called phone.
-
Enter the IPEI of the handset that you recorded on page 9.
-
Leave DND (Do Not Disturb) set to disabled.
-
Leave CW (Call Waiting) set to disabled (recommended setting). See CW (Call Waiting)
on page 18 for further details.
-
Set the
Join calls allowed
option to
Enable
to permit conferencing.
-
Set the
Match IPEI to Handset
to
Enable
.
14. Click
SAVE CHANGES
at the bottom of the screen.
15. In the left frame of the configurator web interface, click
Time Settings
.
-
Enter the hostname of a Time Server on the internet, for example:
“clock.mitel.com” or
“pool.ntp.org”
-
Enter the time server refresh interval, for example: 255
-
Set the time difference between Greenwich Mean Time (GMT) and your current location.
For example, if you were located in New York, USA, which observes EST you would set
the Timezone field to
– 5:00 hours.
-
Set the Daylight Savings Time (DST) settings for your timezone as required.
16. Click
SAVE CHANGES
.
17. Click
REBOOT
.
While the system reboots “Searching for Gateway” appears in the display. After
approximately 30 seconds, the main display appears on the handset. Basic handset configuration
is complete.
Содержание 5610
Страница 1: ...MITEL COMMUNICATIONS DIRECTOR PLATFORM AND 5000 COMMUNICATIONS PLATFORM ...
Страница 6: ......
Страница 58: ...Configuration and Administration Guide 52 ...
Страница 59: ......


