2
PL / EN
MIR0406
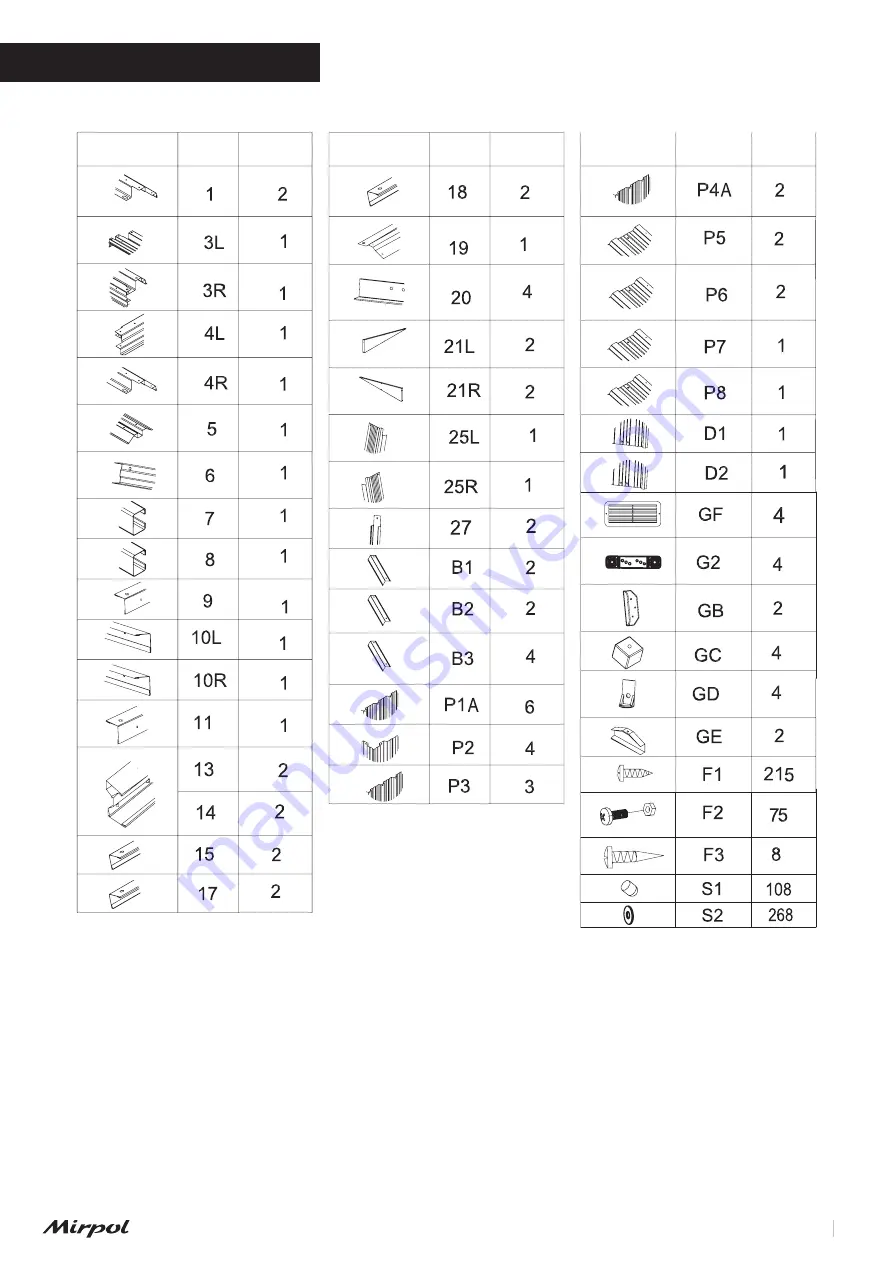
LISTA CZĘŚCI / PARTS LIST
Część/Part
Symbol
Ilość/Qty.
Страница 1: ...y domek narz dziowy Instrukcja monta u i obs ugi Metal Tool Shed Assembly and use instructions MIR0406 EN PL Importer Mirpol sp z o o ul Ciasna 3 35 232 Rzesz w biuro mirpol rzeszow pl www mirpol rzes...
Страница 2: ...tions location and other requirements Study and understand this assembly manual Important information and helpful tips will make your work easier and more enjoyable Assembly instructions The instructi...
Страница 3: ...2 PL EN MIR0406 LISTA CZ CI PARTS LIST Cz Part Symbol Ilo Qty Cz Part Symbol Ilo Qty Cz Part Symbol Ilo Qty...
Страница 4: ...3 PL EN MIR0406...
Страница 5: ...ne na rysunkach poni ej Upewnij sie ze zestaw monta u pr t w bazowych jest w kszta cie kwadratu Assemble the base bars 1 to 4L with the screws F1 Then place the reducing channel input 5 at the top of...
Страница 6: ...cianach domku wyr wnaj z pr tem bazowym Zabezpiecz rubami F1 z podk adkami od wewn trz Cz Symbol Ilo Place the wall panels P1 P2 P3 and P4A on the base bars as shown in drawing Align the holes in the...
Страница 7: ...atecznie mi kkie aby ruba je utworzy a przy wkr caniu Cz Symbol Ilo Place the 2 pieces G2 of the upper slide into the sliding channel 7 and 8 See enlargement Install the door bar 6 between the front w...
Страница 8: ...P3 P5 i P6 mi dzy listwami bazowymi i k townikami g rnymi Przymocuj je za pomoc rub F1 i podk adek Place the upper angles 9 10L 10R and 11 on the top of the wall panel P1 Align the holes in the wall...
Страница 9: ...ciennego Nast pnie przymocuj kolumn drzwi 25L za pomoc rub F1 Powt rz to samo dla prawej kolumny drzwi 25R Place the Left Door Column 25L on top of the Base Bar 3L and insert into the wall panel Then...
Страница 10: ...nele szczytowe 21L i 21R razem ze z czem B3 Zabezpiecz je za pomoc ruby F2 i nakr tki patrz rysunki poni ej Place the 4 pieces of the top panels 21L and 21R on top of the slide channels 7 8 and rear r...
Страница 11: ...r tki Cz Symbol Ilo Warning make sure that the strip side of the two middle ceiling elements is the same as shown on the left Connect the two roof supports 13 and 14 then attach 4 sets of roof structu...
Страница 12: ...orzy i zabezpiecz je rubami F1 i nakr tkami z podk adkami Place the roof panels P5 P6 and P7 on top of the top panel 21L and 21R Align the holes and secure them with bolts F1 and nuts with washers War...
Страница 13: ...g rze panel w szczytowych i wspornik w Wyr wnaj otwory i zabezpiecz je rubami F1 i nakr tkami z podk adkami Place the rest of the roof panels P5 P6 and P7 on top of the top panel Align the holes and...
Страница 14: ...ie umie 4 cz ci g rnego naro nika GC na po czeniach ko nierzowych dachu i zabezpiecz je rubami F1 z podk adkami Cz Symbol Ilo Connect the roof slats 15 17 and 18 with the roof panels secure them with...
Страница 15: ...w ko cow GE do przedniej i tylnej cz ci dachu i zabezpiecz j rubami F1 za pomoc podk adek jak pokazano na rysunku Cz Symbol Ilo Place the two central roof trim pieces 19 on top of the roof panels Alig...
Страница 16: ...uwak GD na listwie drzwiowej 20 przy obu dolnych kraw dziach Zabezpiecz je za pomoc ruby F2 i nakr tki z podk adk Connect the door trim 20 to the door panels D1 and D2 and fasten with the rod 27 Next...
Страница 17: ...IR0406 KROK STEP 13 Przymocuj 2 klamki GB do paneli drzwiowych D2 od wewn trz za pomoc ruby F2 i nakr tki Fix the 2 handles GB to the door panels D2 from the inside with the bolt F2 and the nut Cz Sym...
Страница 18: ...drzwi do g rnego suwaka G2 za pomoc rub F3 Zobacz rysunki poni ej Cz Symbol Ilo Warning ensure the alignment of the door will realign the holes with door panel Slide the door panel into the base stri...
Страница 19: ...na panelach myd em i wod Uszczelnienia silikonowe mog by stosowane do uszczelnie wodoszczelnych w ca ym domku Nie przechowuj chemikali w basenowych w swoim domku narz dziowym Materia y palne i r ce mu...