5
3
3
1
1
2
2
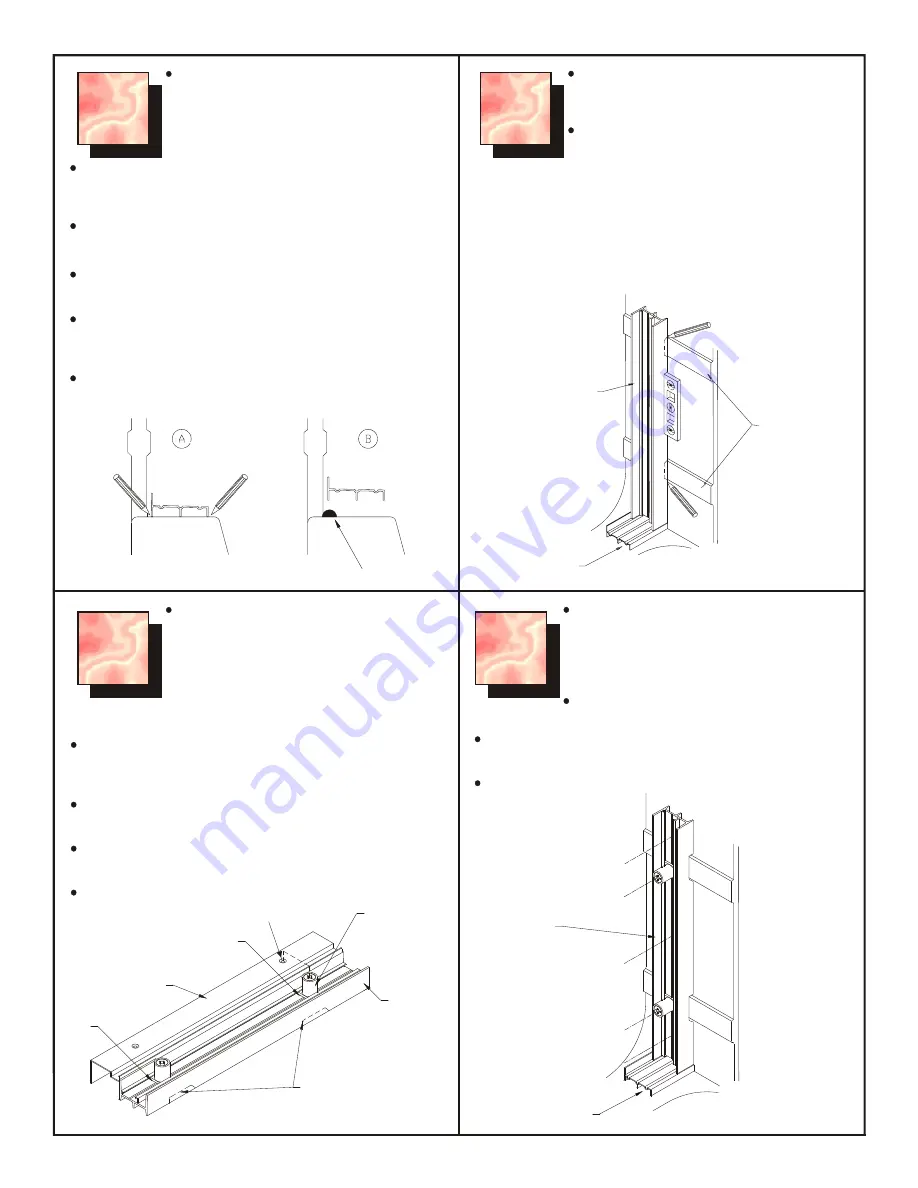
Position the plastic jambs against the wall
according to the position as shown ensuring
that the flexible fins are against the tub wall.
Plumb with level and pencil mark as shown.
4
4
(Note: Not applicable for M36, M37, M41 & 360 installation.
Reposition the plastic jamb and drill three 1/8”
(3 mm) holes through the plastic wall jamb and
shower wall. The holes should be spaced
along the jamb and drilled as perpendicular to
the wall as possible.
Check that the adjusting blocks are in the
marked position.
Carve out, with a knife the three fins on the
rear side of each plastic jamb in order that it
may fit the contour of the raised bands of the
acrylic tub/shower or shower stall.
(Not applicable to fiberglass products,
model #s: 314836AC, 374835A, 326032A,
376032B, M41 & 360 Series door
installation).
Slide the adjustment blocks (T-12) into each end of the plastic
jambs (T-7). Be sure that the adjustment screws are all the way
into the adjustment blocks.
Lay one plastic jamb (T-7) and an aluminum wall jamb (T-2)
side by side on a flat surface.
Align the adjusting blocks (T-12) with the prepunched holes in
the aluminum jamb. Mark the location of the adjusting blocks.
Repeat with the other plastic jamb and aluminum wall jamb.
Depending on the location of the shower head,
determine which way to position the
interchangeable panels (T-4, T-5, T-6), wall
jambs (T-2) and plastic jambs (T-7). See
Figures 1, 2, 3 or 4.
NOTE:
Only for the M160/M360 and 360 Series door
installation: measure the wall opening at the tub rim and cut the
sill (T-3) to suit the full width of the tub.
Place the sill (T-3) on the rim of the tub/shower or shower stall,
in line and closer to the inner edge of the rim.
Draw a pencil line (A) along the outside and inside of the sill,
then remove the sill.
Apply a bead of silicone caulking(B) along the outside pencil
line. Press the sill onto the base in the original position using
the inside pencil line as a guide.
Remove excess silicone.
Drill a 1/8” (3 mm) hole through each adjusting block, the
plastic jamb and the shower wall.
Drill the holes as perpendicular as possible.
PENCIL
PENCIL
SILICONE
T-3
SILL
T-7
PLASTIC
JAMB
OUTSIDE
RAISED
BANDS
INSIDE TUB
PENCIL MARK
T-2
WALL JAMB
PENCIL MARK
T-12
ADJUSTMENT
BLOCK
T-7 PLASTIC
JAMB
CARVE OUT
DRILL
DRILL
DRILL
DRILL
DRILL
T-3
SILL
OUTSIDE
INSIDE TUB
T-7
PLASTIC
JAMB
LEVEL
PREPUNCHED HOLE


