Miro Displays FP158 Скачать руководство пользователя страница 10

P

OWER 

M

ANAGEMENT

The power management feature of this monitor is comprised of two 
stages: On or Out Of Range (Green), OFF (Amber blinking).
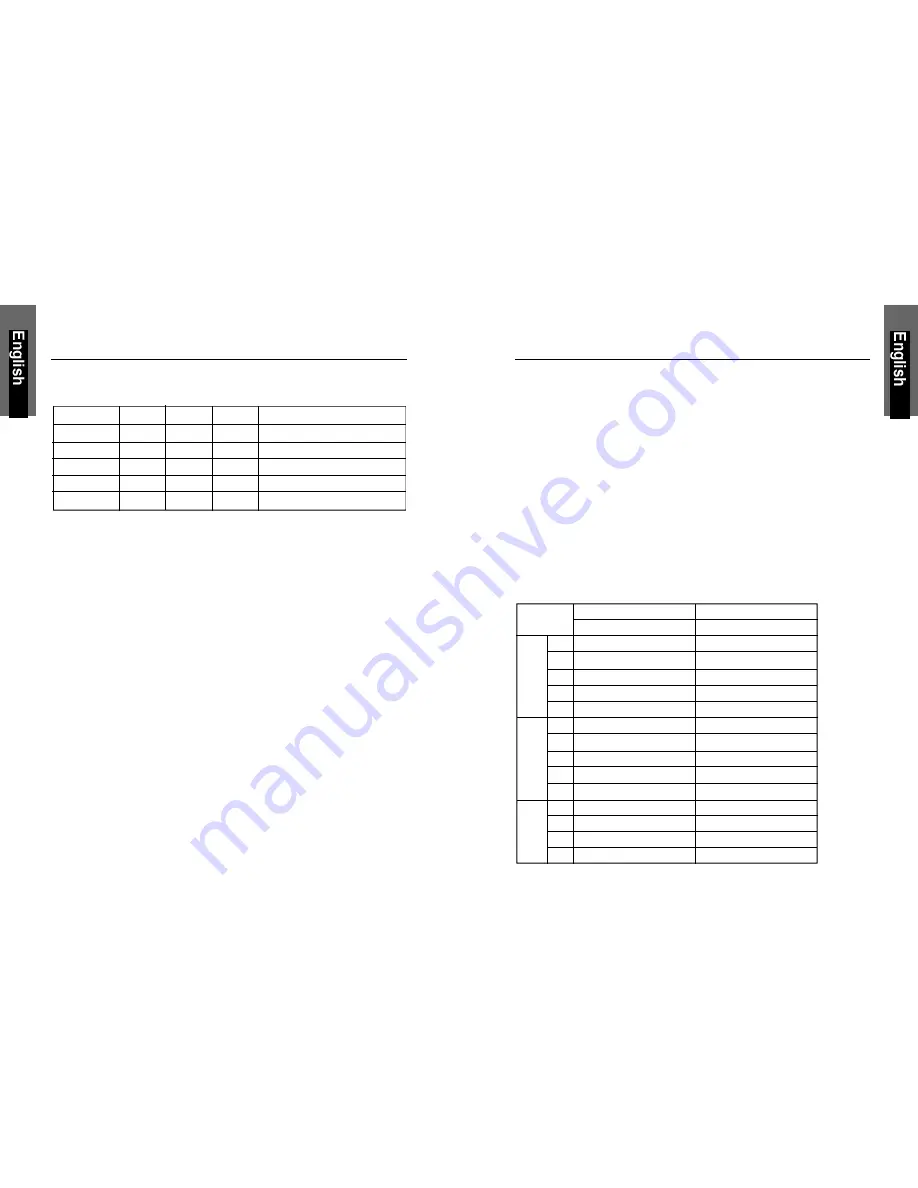
Power Mode H-Sync

V-Sync

Video

LED Color

Normal

Pulse

Pulse

Active

Green

Out Of Range

Pulse

Pulse

Active

Green

Off

Pulse

No pulse

Blanked

Amber blinked per 1 sec.

Off

No pulse

Pulse

Blanked

Amber blinked per 1 sec.

Off

No pulse

No pulse

Blanked

Amber blinked per 1 sec.

This monitor meets the Green Monitor standards as set by the Video
Electronics Standards Association (VESA). This feature is designed to 
conserve electrical energy by reducing power consumption when there is
no video input signal present. When there is no video input signal this
monitor, following a time-out period, will automatically switch to an OFF
mode. This reduces the monitor's internal power supply consumption.
After the video input signal is restored, full power is restored and the 
display is automatically redrawn. The appearance is similar to a 
"Screen Saver" feature  except the display is completely off. The display
is restored by pressing a key on the keyboard, or clicking the mouse.

P

LUG & 

P

LAY

This monitor is equipped with VESA DDC1/2B capabilities according to
the VESA DDC STANDARD. It allows the monitor to inform the host
system of its identity and, depending on the level of DDC used, 
communicate additional information about its display capabilities. The
communication channel is defined in two levels, DDC1 and DDC2B.
The DDC1 is a unidirectional data channel from the display to the host
that continuously transmits EDID information. The DDC2B is a 
bidirectional data channel based on the I²C protocol. The host can request
EDID information over the DDC2B channel.

T

IMING 

G

UIDE

The LCD is a multi-frequency display. It operates at horizontal frequencies between
30KHz - 60KHz and vertical frequencies between 55Hz - 75Hz. Because of its
microprocessor-based design, it offers auto-synchronization and auto-sizing 
capabilities. This monitor offers 14 pre-programmed settings that are listed in the
timing table on page 11.

These preset modes cover most of the common video modes supported by popular
graphics adapters. However, each adapter’s implementation of these video modes
may very slightly. If you find it necessary to make minor display adjustments (for
example, horizontal and vertical position). Please refer to the On Screen Display
section of this manual for instructions.

If you would like to use one of the preset timing modes, please refer to your video
card manufacturer’s installation guide for instructions on how to make these 
changes. The video card controls the refresh rate. Most video cards provide a soft-
ware utility or hardware DIP switches that allows you to change the frequency used
for each resolution.

Timing Table

Resolution

Frequency

Preset      Horizontal    Vertical        Horizontal      Vertical

M1

720

400

31.47kHz

70.0Hz

M2

640

480

31.47kHz

60.0Hz

VGA

M3

640

480

35.00kHz

66.6Hz

M4

640

480

37.50kHz

75.0Hz

M5

640

480

37.86kHz

72.8Hz

M6

800

600

35.16kHz

56.3Hz

M7

800

600

37.88kHz

60.0Hz

SVGA M8

800

600

48.08kHz

72.2Hz

M9

800

600

46.87kHz

75.0Hz

M10

832

624

49.73kHz

75.0Hz

M11

1024

768

48.36kHz

60.0Hz

XGA

M12

1024

768

56.48kHz

70.1Hz

M13

1024

768

60.24kHz

74.9Hz

M14

1024

768

60.02kHz

75.0Hz

Note: 

In case of using Macintosh

TM

, you may need a Mac adapter.

10

11

Содержание FP158

Страница 1: ...miro FP158 Manual miro Displays GmbH TRIFORUM Haus A1 Frankfurter Str 233 D 63263 Neu Isenburg Tel 0180 5 22 35 26 0 24 DM Min Fax 06102 3667 77 e mail kontakt miro de...

Страница 2: ...on 1 Equipment Checklist 2 Monitor Features 3 GETTING STARTED Installation 4 Control Buttons 5 On Screen Display 6 ON SCREEN CONTROLS Menu Descriptions 7 REFERENCE How to optimize the DOS Mode 9 Power...

Страница 3: ...ff and on the user is encouraged to try to correct the interference by one or more of the following measures Reorient or relocate the receiving antenna Increase the separation between the equipment an...

Страница 4: ...Keep food particles and fingerprints away from the display area at all times STORAGE Store the monitor in a dark place away from sunlight and ultraviolet UV radiation as air bubbles may develop within...

Страница 5: ...user serviceable parts are inside 2 In an emergency disconnect the AC power plug 3 To avoid electrical shock disconnect the power cord from the AC adapter before connecting the signal cable to the co...

Страница 6: ...d Crystal Display LCD that uses amorphous silicon TFTs as a switching device Resolution up to 1024 x 768 Color up to 16 7M Color support Dot pitch 0 297mm H x 0 297mm W Scanning frequency 30kHz 60kHz...

Страница 7: ...activates the items you highlight 2 Brightness Select button To adjust brightness or to choose which function you need in OSD Menu you may click 3 Contrast Select button To adjust contrast or to choo...

Страница 8: ...ttings easier When highlighted the icons illustrate the control function to assist you in identifying which control needs adjustment Before activating the OSD menu the Auto button 4 can be used to aut...

Страница 9: ...Generally most of the DOS Mode are set by VGA CARD in resolution 720 x 400 70Hz but some are set in 640 x 400 70Hz our monitor only supports 720 x 400 70Hz MENU DESCRIPTIONS LANGUAGE Select this contr...

Страница 10: ...ormation The DDC2B is a bidirectional data channel based on the I C protocol The host can request EDID information over the DDC2B channel TIMING GUIDE The LCD is a multi frequency display It operates...

Страница 11: ...ssary may cause some lines to appear thicker than others SPECIFICATIONS LCD Type 15 38 1cm diagonal viewable screen TFT Thin Film Transistor Active Matrix Panel 0 297mm pixel pitch Color Filter R G B...

Страница 12: ...th this monitor is tightly secured to the video output port on the back of the computer Adjust the brightness and contrast Image is unstable unfocused Use AUTO TUNE to adjust automatically If the imag...

Страница 13: ...iv Allgemeine Informationen 1 Pr fliste Zubeh r 2 Ger temerkmale 3 INSTALLATION Installation des Monitors 4 Bedienung 6 OSD Bildschirm Men 7 OSD BILDSCHIRM Men Erl uterungen 8 SONSTIGES Optimieren de...

Страница 14: ...Innere des Monitors gelangen k nnen zu Besch digungen f hren Zudem setzen Sie sich dabei der Gefahr eines elektrischen Stromschlages aus Falls der Monitor besch digt ist vermeiden Sie unbedingt den K...

Страница 15: ...erabdr cke darauf SICHERHEITSRICHTLINIEN Gehen Sie sorgsam mit dem Netzkabel um Speziell beim unachtsamen Gebrauch des Netzkabels besteht die Gefahr eines elektrischen Stromschlages Stellen Sie keine...

Страница 16: ...euchtigkeit ber 90 aus Vermeiden Sie in jedem Fall Kondensation wird das Ger t aus einer kalten Umgebung in ein w rmeres eventuell feuchtes Umfeld gebracht kondensiert Feuchtigkeit im Inneren Ihres Mo...

Страница 17: ...eine problemlose und einfache Installation des Monitors Folgende Einstellm glichkeiten sind gegeben Auto Adjust Helligkeit Kontrast H V Position Takt Fokus Farbtemperatur R G B Warm K hl Sprache Rese...

Страница 18: ...er Graphikkarte an Ihrem Computer anschlie en 3 Die Schrauben des Signalkabels festziehen damit sich der Anschluss nicht l sen kann und der Monitor optimal funktioniert siehe Abb 2 Abb 2 4 Anschlie en...

Страница 19: ...rden die aktuellen Einstellungen angezeigt Sie haben die M glichkeit die Einstellungen Ihres Monitors manuell vorzunehmen oder diese durch l ngeres Dr cken der Auto Taste 4 des LCD Displays automatisi...

Страница 20: ...ITION VERTIKALE POSITION Einstellung der Vertikalposition des Bildes 8 9 MEN ERL UTERUNGEN SPRACHE Eine der angebotenen Sprachen f r die Bildschirm Men s w hlen R GAIN ROT Einstellung des Rotanteils a...

Страница 21: ...x 400 70Hz gestellt werden Unser Monitor unterst tzt nur 720 x 400 70Hz 10 11 STROMSPARSYSTEM LED INDICATOR POWER MANAGEMENT ACITVE Dieser Monitor entspricht dem VESA DPMSTM Standard Diese Funktion ka...

Страница 22: ...rozessor Design verf gt er ber die M glichkeiten einer automatischen Synchronisation und Gr eneinstellung Dieser Flachbildschirm bietet 14 vorprogrammierte Einstellungen die in der nachfolgenden Tabel...

Страница 23: ...60 Kontrastverh ltnis Typ 400 1 Leuchtdichte Typ 250cd m LC Reaktionszeit Max 40ms Kompatibilit t PC IBM XT AT 386 486 Pentium oder PS 2 und kompatibles vom VGA bis zu 1024 x 768 75 Hz NI Aufl sung M...

Страница 24: ...ten Sie den Monitor etwa einen Tag lang nicht verwenden und den Strom nicht einschalten Beachten Sie bitte die folgenden Punkte 16 17 IM ST RUNGSFALLE Falls sich die St rungen auch nach Durchf hrung...

Страница 25: ...kabel richtig anschliessen berpr fen Sie die Video Aus gangsbetriebsart vom Computer und w hlen Sie eine Betriebsart innerhalb des Monitor Betriebs bereichs Einzelheiten entnehmen Sie bitte der Bedien...

Страница 26: ...ieses Handbuch ist urheberrechtlich gesch tzt Alle Rechte sind vorbehalten Kein Teil dieses Handbuchs darf ohne vorherige schriftliche Zustimmung des Herstellers vervielf ltigt bertragen transkribiert...

Отзывы: