background image

WARRANTY

Limited Warranty  Policy 
in the United States and Canada

MIRAGE LOUDSPEAKERS

warrants this product to the

retail purchaser against any failure resulting from original 
manufacturing defects in workmanship or materials. The 
warranty is in effect for a period of: Speaker Section-five (5)
years, Amplifier Section-one (1) year from date of purchase from
an authorized 

MIRAGE 

dealer and is valid only if the original

dated bill of sale is presented when service is required.

The warranty does not cover damage caused during shipment,
by accident, misuse, abuse, neglect, unauthorized product 
modification, failure to follow the instructions outlined in 
the owner’s manual, failure to perform routine maintenance,
damage resulting from unauthorized repairs or claims based
upon misrepresentations of the warranty by the seller.

Warranty Service

If you require service for your 

MIRAGE

loudspeaker(s) at any

time during the warranty period, please contact:

1) the dealer from whom you purchased the product(s),

2) 

MIRAGE NATIONAL SERVICE

, 203 Eggert Road,

Buffalo, N.Y. 14215 Tel: 716-896-9801or

3) 

MIRAGE LOUDSPEAKERS

, a division of Audio Products

International Corp., 3641 McNicoll Avenue, Scarborough,
Ontario, Canada, M1X 1G5,Tel: 416-321-1800.

You will be responsible for transporting the speakers in adequate
packaging to protect them from damage in transit and for the 
shipping costs to an authorized 

MIRAGE

service center or to

MIRAGE LOUDSPEAKERS

. If the product is returned for

repair to 

MIRAGE LOUDSPEAKERS

in Scarborough or 

Buffalo, the costs of the return shipment to you will be paid by

MIRAGE

, provided the repairs concerned fall within the

Limited Warranty. The 

MIRAGE

Warranty is limited to repair 

or replacement of 

MIRAGE

products. It does not cover any

incidental or consequential damage of any kind. If the provisions
in any advertisement, packing cartons or literature differ from
those specified in this warranty, the terms of the Limited
Warranty prevail.

GARANTIE

Garantie aux 
États-Unis et au Canada

La société 

MIRAGE

garantit cet appareil contre toute 

défectuosité attribuable aux pièces d’origine et à la main-
d’oeuvre. Cette garantie est valide pendant une période de cinq
(5) ans (enceinte) et de un (1) an (amplificateur) à partir de la
date d’achat auprès d’un revendeur 

MIRAGE

agréé ; la garantie

ne sera honorée que sur présentation d’une pièce justificative de
la date d’achat.

La garantie ne couvre aucun dommage subi pendant le transport
ou imputable à un accident, à une utilisation impropre ou 
abusive, à la négligence, à une modification non autorisée, à la
non-observance des instructions décrites dans le manuel de 
l’utilisateur ou des directives d’entretien, ni aucun dommage subi
par suite de réparations non autorisées ou de réclamations
fondées sur une mauvaise interprétation des conditions de la
présente garantie par le revendeur.

Service sous garantie

Dans l’éventualité où une réparation deviendrait nécessaire 
pendant la période de couverture de la garantie, communiquez
avec :

1) le revendeur auprès de qui l’appareil a été acheté,

2)

MIRAGE NATIONAL SERVICE

, 203, Eggert Road,

Buffalo, N.Y. 14215, tél. : 1-716-896-9801 ou 

3) 

MIRAGE LOUDSPEAKERS

, 3641, avenue McNicoll,

Scarborough (Ontario), Canada, M1X 1G5, tél. : 1-416-321-1800.

Le propriétaire de l’appareil est responsable de son emballage et
de tous frais d’expédition à un centre de service 

MIRAGE

agréé ou à 

MIRAGE LOUDSPEAKERS

. Si l’appareil est

expédié à 

MIRAGE LOUDSPEAKERS

à Scarborough ou à

Buffalo aux fins de réparation, les frais de réexpédition seront
assumés par 

MIRAGE

à la condition que les réparations 

effectuées soient couvertes par la garantie. La garantie est 
limitée à la réparation ou au remplacement des appareils 
fabriqués et distribués par 

MIRAGE

. Elle ne couvre aucun

dommage indirect ou consécutif de quelque nature que ce soit.
Si les conditions accompagnant toute publicité, emballage ou
documentation divergent de celles de la présente garantie, les
conditions de la présente garantie prévaudront.

Содержание OM - C2

Страница 1: ...O M S e r i e s o w n e r s m a n u a l PRINTED IN CANADA 7AI MOMNI 2 The Sound of the 21st Century O M 6 O M 8 O M 1 0 O M 1 2 O M 1 4 O M C 2 O M C 3 O M R 2 ...

Страница 2: ...e If you are unable to insert the plug fully into the outlet try reversing the plug If the plug should still fail to fit contact your electrician to replace your obsolete outlet DO NOT defeat the safety purpose of the polarized plug IMPORTANT SAFETY INSTRUCTIONS Power Cord Protection Power supply cords should be routed so that they are not likely to b e walked on or pinched by the items placed upo...

Страница 3: ...your Subwoofer Connection Methods for Model OM 6 1 For ease of hook up use the Speaker Level Connection as you would a non powered speaker Be sure to set the Input Selector Switch to the center Speaker Level position See Figure 5 for connection and Figures 6 or 7 for placement 2 If your system has Left Right Pre amp Outputs and Left Right Main Amplifier Inputs we recommend the Low Level Connection...

Страница 4: ... Elektriker kommen zu lassen um die alte Steckdose auszutauschen AUF KEINEN FALL die Sicherheitsbestimmung des Verpolschutzes umgehen Verbindungsschnurschutz Die elektrischen Verbindungsschnüre sollten so verlegt werden daß nicht über sie gelaufen wird oder daß sie nicht von auf ihnen liegenden Gegenständen eingeklemmt werden Dabei sollte besondere Aufmerksamkeit den Stellen zukommen wo die Schnür...

Страница 5: ...s 1 Eine einfache Methode bei der die Lautsprecher gewissermaßen ohne Leistungsverstärker benutzt werden ist die High Level Anschlussmethode Eingangswahlschalter auf die Center Position 90º High Level setzen Siehe Abbildung 5 für das Anschließen und Abbildungen 6 oder 7 für das Aufstellen 2 Wenn das System über linke rechte Vorverstärkerausgänge und linke rechte Hauptverstärkereingänge verfügt sch...

Страница 6: ...a può essere infilato nella presa elettrica in un solo modo costituendo quindi un elemento di sicurezza Se non è possibile inserire completamente la spina nella presa provare a capovolgerla E se la spina continua a non inserirsi contattare un elettricista che provveda a sostituire la presa ormai inadeguata È importante NON rendere inoperante l elemento di sicurezza presente nella spina polarizzata...

Страница 7: ...te la Connessione a Livello dell Altoparlante come fareste nel caso di un altoparlante non amplificato Assicuratevi di mettere il Selettore d Entrata nella posizione centrale livello dell altoparlante Consultate l illustrazione 5 per la connessione e le illustrazioni 6 e 7 per la collocazione 2 Se il vostro sistema è provvisto di Uscite Sinistra Destra del Preamplificatore ed Entrate Sinistra Dest...

Страница 8: ...seguridad por el cual encaja en la toma de la pared solamente en una posición En caso de no poder introducir el enchufe completamente en la toma de la pared intentar la posición inversa Si no consigue meter el enchufe póngase en contacto con un electricista para reemplazar la toma de la pared por otra más moderna NO anule el dispositivo de seguridad del enchufe polarizado Protección del cable de a...

Страница 9: ...l altavoz Véase la figura 5 para la conexión y 6 y 7 para la colocación 2 Si su sistema viene con salidas de preamplificador izquierda y derecha y con entradas de amplificador principal izquierda y derecha le aconsejamos la conexión por nivel bajo para un mejor rendimiento sonoro Emplee cables de conexión de RCA con un conector en Y Véase la figura 5 para la conexión y 6 y 7 para la colocación Ase...

Страница 10: ...g Hvis stikket ikke kan sættes helt ind i kontakten kan De vende stikket Hvis stikket stadigvæk ikke passer kan De tilkalde en elektriker der kan udskifte den forældede kontakt Omgå IKKE sikkerheden i et polariseret stik Beskyt netledningen Ledninger bør trækkes så man ikke træder på dem og så de ikke bliver klemt af ting der anbringes på eller op mod dem Man skal især være opmærksom på ledninger ...

Страница 11: ...6 MODELLEN 1 For at lette tilslutningen anvendes samme højttaler niveau tilslutning som for en højttaler uden forstærker Kontroller at indgangsomskifteren står i midten højttalerniveau Se tegning 5 for tilslutning og tegningerne 6 og 7 for anbringelse 2 Hvis Deres system har højre venstre for forstærker udgange og højre venstre hovedforstærker indgange anbefaler vi lav niveau tilslutning for at op...

Страница 12: ...s agit là d une importante caractéristique de sécurité Si la fiche ne peut être insérée à fond dans la prise l inverser et essayer à nouveau Si cela ne règle pas le problème communiquer avec un électricien pour faire remplacer la prise Ne PAS faire échec aux fins de protection de la fiche polarisée Protection du cordon d alimentation Les cordons d alimentation devraient être placés de manière à pr...

Страница 13: ...u normal Speaker Level comme dans le cas d une enceinte sans amplificateur Prendre soin de régler le sélecteur de niveau d entrée à sa position centrale Speaker Level Se reporter à la figure 5 pour le raccordement et à la figure 6 ou 7 pour le positionnement 2 Si votre récepteur ou amplificateur est doté de sorties préampli gauche droit et d entrées d amplificateur gauche droit il est recommandé d...

Страница 14: ...t maar op één manier in het stopkontact Dit is een veiligheidsmaatregel Als u niet in staat bent om de stekker goed in het stopkontakt te krijgen probeer het andersom Mocht het dan steeds niet lukken neem dan kontakt op met uw elektricien om de verouderde stekker te ver vangen Probeer NIET de veiligheidsmaatregel van de gepolariseerde stekker te ontkennen Bescherming van de elektrische snoer De el...

Страница 15: ...idspreker zonder versterker Let op dat u de Input Selector Switch ingangselectieknop op de middenpositie hebt geplaatst Luidsprekerniveau Zie illustratie 5 voor de aansluiting en illustraties 6 of 7 voor de plaatsing 2 Als uw systeem links rechts uitgangen heeft van een voorversterker en links rechts ingangen van de hoofdluidspreker dan raden wij u voor het beste geluid een lage niveau installatie...

Страница 16: ... corrente alternada Como medida de segurança neste tipo de tomada uma lâmina é mais larga do que a outra de modo que a tomada só pode ser encaixada na parede em uma posição Se não for possível encaixar a tomada na parede em uma posição inverta a tomada e tente novamente Se mesmo assim a tomada não se encaixa peça a um eletricista para trocar a tomada na parede por uma mais moderna Para sua própria...

Страница 17: ...posição central nível do alto falante Veja a figura 5 para a conexão e a figura 6 ou 7 para a colocação 2 Se o seu sistema possui saídas de pré amplificação esquerda direita e entradas de amplificador principal esquerda e direita aconselhamos que faça a conexão de nível baixo para um melhor rendimento sonoro Utilize cabos de conexão RCA com um conector em Y Veja a figura 5 para a conexão e a figur...

Страница 18: ...t vj tn snm j jheljdfyj gjkzhbpjdfyyjq ctntd jq dbkrjq 5c rjynfrnysvb gkfcnbyfvb hfpkbxyjq ibhbys87 Gjkzhbpjdfyyfz ctntdfz dbkrf ghtlyfpyfxtyf lkz j tcgtxty bz tpjgfcyjcnb7 Nfrfz dbkrf eltn dcnfdkznmcz d hjptnre ktrnhjctnb njkmrj d jlyjv gjkj tybb7 Tckb dbkrf yt dcnfdkztncz d hjptnre gjkyjcnm 9 gjgsnfqntcm gthtdthyenm dbkre7 Tckb dbkrf gj ght ytve yt dcnfdkztncz d hjptnre9 j hfnbntcm r rdfkbabwbhj...

Страница 19: ...r Level Gjlcjtlbytybt gjrfpfyj yf hbc7 9 hfpvtotybt gjrfpfyj yf hbc7 bkb 7 7 Tckb d Dfitq cbcntvt bvt ncz ds jls c ghtlecbkbntktq ktdjuj3ghfdjuj rfyfkjd b d jls jcyjdyjuj ecbkbntkz ktdjuj3ghfdjuj rfyfkjd9 lkz gjkextybz yfbkexib fhfrnthbcnbr pdexfybz htrjvtyletncz bcgjkmpjdfnm hfp tvs Low Level 5ybprjuj ehjdyz87 Bcgjkmpeqnt RCA cjtlbybntkmyst rf tkb c Y hfp tvfvb7 Gjlcjtlbytybt gjrfpfyj yf hbc7 9 h...

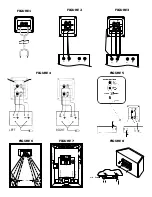
Страница 20: ... RIGHT REAR LEFT REAR LEFT MAIN RIGHT MAIN SUBWOOFER CENTER CHANNEL 2 3m 5 1m 4 1m FIGURE 1 FIGURE 2 FIGURE 3 FIGURE 4 FIGURE 6 FIGURE 7 min 9mm FIGURE 8 FIGURE 5 RIGHT LEFT ...

Страница 21: ...rent MOSFET with Isolated Power Supply Module 150 watts 600 watts Instantaneous Peak 2 6 1 2 16 5cm Long Throw Polypropylene N A 100Hz 1 9KHz 91dB 6 ohms Nominal 4 ohms Minimum 30 200 watts RMS Channel Cont Variable 3dB 20Hz to 3dB 45Hz Bi Amp Bi Wire High Level Gold Plated 44 1 4 x 9 3 4 x 16 5 8 112 4 x 24 8 x 42 2 High Gloss Black Trim with Acoustically Transparent Grille Cloth 60 27 2 110 120v...

Страница 22: ...cified in this warranty the terms of the Limited Warranty prevail GARANTIE Garantie aux États Unis et au Canada La société MIRAGE garantit cet appareil contre toute défectuosité attribuable aux pièces d origine et à la main d oeuvre Cette garantie est valide pendant une période de cinq 5 ans enceinte et de un 1 an amplificateur à partir de la date d achat auprès d un revendeur MIRAGE agréé la gara...

Отзывы: